ゼロから作るDeep Learning (2)
――自然言語処理編をkerasで再現してみた。
書籍で使用しているソースコードはこちらで公開されています。
numpyでごりごり実装しているので、比較してみると面白いかも。
中身の詳細な説明は本を見てください。
なお、ここでは、google colabで実装していく。
2章 自然言語と単語の分散表現
LSIによる分散表現の実装でニューラルネットワークは登場せず、ここではKerasの出番なしのため省略。
3章 word2vec
CBoWを自前で実装する章。
自分のKerasに対する知識が不足しており、強くてニューゲームどころかハードモードだった
自分がハマったところをメモ書き
- np_utils.to_categoricalを使用してone-hot表現に変換すると、次元が1つ増える
- この関数は、値が表すインデックスの要素に1を立てるような変換をする
- 1なら[0, 1, 0, ...]、3なら[0, 0, 0, 1, 0, ...]みたいな
- 対象データのIDが1から始まるため、必ず最初の要素に0が入るような処理になる
- ID0は、空文字として使用する
- この仕様に気付かずにネットワークの次元を増やさないと、エラー内容が良くわからずにハマる
- 入力コンテキストの重みの平均は、lambda層を用いて自前で実装する必要がある
- 存在を知らなかったので、公式サンプルを見つけるまで路頭に迷う
なお、以下のコードでは、本書で使用しているデータだと、流石にデータが少ないので、もうちょっと量を多くして検証を行った。
後、計算時間が結構かかるので、100エポックで終了した。
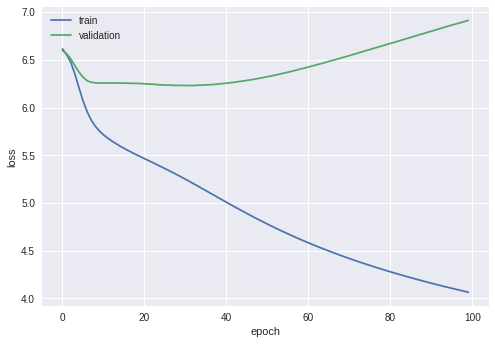
結果を見れば分かるが大分過学習気味なので十分でしょう。
# colab上に必要な物を入れる
!pip install -q keras umap-learn

import numpy as np
np.random.seed(529)

import matplotlib.pyplot as plt
from itertools import compress
from matplotlib import cm
from sklearn.cluster import KMeans
import keras.backend as K
from keras.models import Sequential
from keras.layers import Embedding, Lambda, Dense
from keras.optimizers import Adam
from keras.preprocessing import sequence
from keras.preprocessing.text import Tokenizer
from keras.utils.data_utils import get_file
from keras.utils import np_utils
from umap import UMAP

# ハイパーパラメータ
window_size = 1
hidden_size = 5
batch_size = 20
max_epoch = 100

# alice in wonderlandのテキストを取得
path = get_file('alice.txt', origin='http://www.gutenberg.org/files/11/11-0.txt')
text = open(path).readlines()[:300]
text = [sentence for sentence in text if sentence.count(' ') >= 2]

# 次元数 = 語彙数
# (後続処理で、空文字分の0が増えるため+1する)
vocab_size = len(tokenizer.word_index) + 1

# 学習データを作成
contexts = list()
targets = list()

for sentence in text_id:
  L = len(sentence)
  # 各word(target)ごとにcontextを求める
  for idx, word in enumerate(sentence):
    contexts.append([sentence[i] for i in range(idx-window_size, idx+window_size+1) if i != idx and 0 <= i < L])
    targets.append(word)

# 端のcontextは0で穴埋め
x_train = sequence.pad_sequences(contexts, maxlen=window_size*2)
# one-hot表現に変換
y_train = np_utils.to_categorical(targets, vocab_size)

# モデルの定義
model = Sequential()
model.add(Embedding(input_dim=vocab_size, output_dim=hidden_size, input_length=window_size*2))
model.add(Lambda(lambda x: K.mean(x, axis=1), output_shape=(hidden_size,)))
model.add(Dense(vocab_size, activation='softmax'))
model.compile(loss='categorical_crossentropy', optimizer='adam', metrics=['accuracy'])

# 学習
hist = model.fit(x_train, y_train, batch_size=batch_size, epochs=max_epoch, validation_split=0.1)

# 損失のプロット
train_loss = hist.history['loss']
val_loss = hist.history['val_loss']
plt.plot(np.arange(len(train_loss)), train_loss, label='train')
plt.plot(np.arange(len(val_loss)), val_loss, label='validation')
plt.xlabel('epoch')
plt.ylabel('loss')
plt.legend()
plt.show()

# 正解率のプロット
train_acc = hist.history['acc']
val_acc = hist.history['val_acc']
plt.plot(np.arange(len(train_acc)), train_acc, label='train')
plt.plot(np.arange(len(val_acc)), val_acc, label='validation')
plt.xlabel('epoch')
plt.ylabel('accuracy')
plt.legend()
plt.show()

# 分散表現の取得
w2v = model.get_weights()[0]

# クラスタリング
kmeans = KMeans(n_clusters=10, random_state=529).fit(w2v)

# 次元圧縮
w2v_umap = UMAP().fit_transform(w2v)

# クラスタ内で頻度上位の語を取得
for c in set(kmeans.labels_):
  print('cluster %s' % c)
  for w, i in list(compress(sorted(tokenizer.word_index.items(), key=lambda x: x[1]), kmeans.labels_[1:] == c))[:10]:
    print(w, end=' ')
  print()

# クラスタごとに色分けプロット
for c in set(kmeans.labels_):
  # クラスタ内で頻度上位の語を注釈
  for w, i in list(compress(sorted(tokenizer.word_index.items(), key=lambda x: x[1]), kmeans.labels_[1:] == c))[:5]:
    plt.annotate(w, (w2v_umap[i, 0], w2v_umap[i, 1]))

  v = w2v_umap[kmeans.labels_ == c]
  plt.scatter(v[:, 0], v[:, 1], label=c, cmap=cm.hsv, alpha=0.8)

plt.legend()
plt.show()
結果
損失の推移
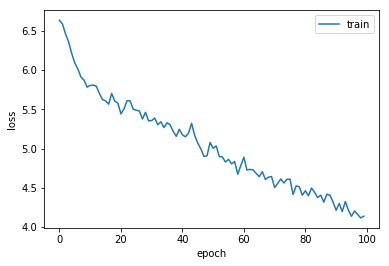
参考までに書籍内の実装による結果
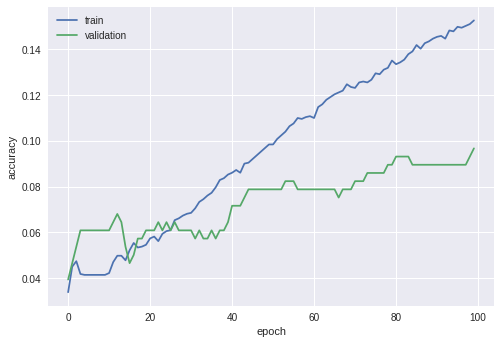
正解率の推移
各クラスタの主要単語
cluster 0
way when if thought could went said door found moment
cluster 1
she it in alice little not or up there nothing
cluster 2
and ’ i down but be so herself like see
cluster 3
the this out one me alice’s ‘i any ‘oh tears
cluster 4
again i’m gutenberg i’ve it’ll inches will carroll date they’ll
cluster 5
was a her very on with about were is white
cluster 6
time feet use then going go poor once look things
cluster 7
to that you for had as by would they came
cluster 8
of at no rabbit all into what off through my
cluster 9
how much quite eyes such rather low trying than he
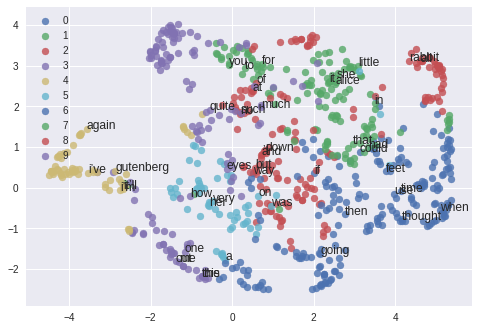
単語の分布
簡単に考察(?)
40エポック程から過学習の傾向がある。
ここでの趣旨からは若干逸れるので結果は割愛するが、
ウィンドウサイズや次元数といったハイパーパラメータを大きくして、コーパス量を増やしても、あまり大きな変化はなかった。
ここでは、negative samplingを実装してないから汎化性能が上がらないのだと思う。
後、Kerasで学習を行った場合は、損失の減り具合が大分滑らか。
多分、Adamの実装によるもの。
kerasのソースを読もうとして断念した
分散表現を見てみると、やはり精度がいまいちな気がするが、
「she」と「alice」が近しかったりしているので、それなりには上手くいっているのだろう。


