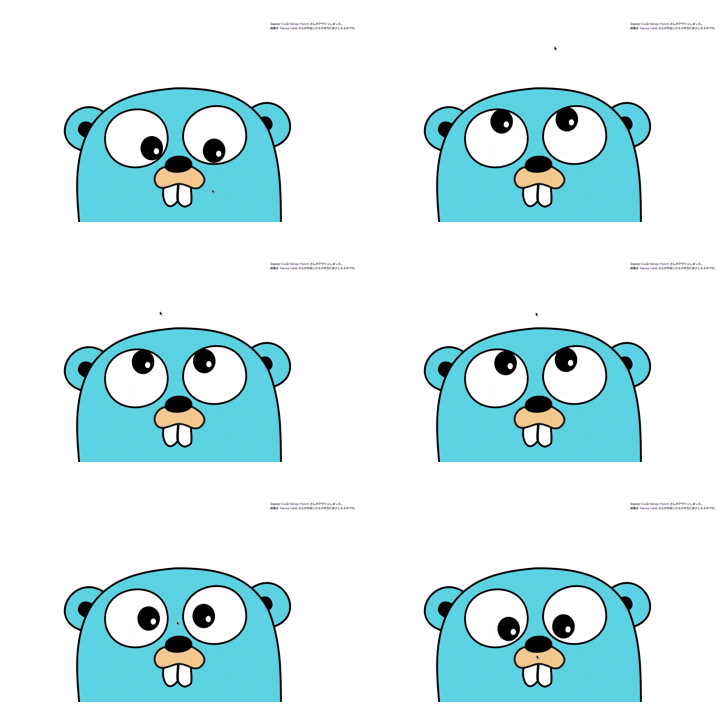
完成品

https://cajonito.github.io/gopher/
大変可愛らしい。
ソースコードはGitHubで公開されています。
https://github.com/cajonito/gopher
この記事
フロントの練習のために上記サイトを作成する過程を紹介します。
Webフロントエンドのプログラミングの練習のために作りましたが記事の内容は環境構築の話がメインです。
登場するものは以下の通りです。
- GitHub Pagesでサイトを公開
- Dockerで開発環境を構築
- クリエイティブ・コモンズ・ライセンス
- HTML + CSS + Javascript + jQuery でGopherくんを作成
動機と構想
HTMLとCSSの練習がしたい。何かサイトを作ろう。
Gopherくんがマウスカーソルを目で追いかける様を見たいから作ってみよう。
どこかで公開したいけどお金はかけたくない。
出来るだけストレス無く開発したい。
絵描けないけどGopherくんの画像をどうやって用意しよう?
GitHub Pagesで公開
静的なサイトなら無料で公開できる環境は多くありますが、個人的にはGitHub Pagesが一番楽だと思います。
Hosted directly from your GitHub repository. Just edit, push, and your changes are live.
ということで、GitHubのリポジトリを作っただけでページが公開されて、pushするだけでデプロイされます。すごく楽です。
一応細かい制限はあるみたいです。
https://help.github.com/ja/articles/what-is-github-pages
無料プランの場合、GitHub Pagesはパブリックリポジトリのみで利用出来るようです。
Hello Wolrd
今回は任意のリポジトリ名でdocsディレクトリ以下を公開するという設定にします。
(他の公開形式もありますが今回は割愛します。)
今回はgopherというパブリックリポジトリを作成しました。
$ git clone https://github.com/(ユーザー名)/(リポジトリ名).git
$ cd (リポジトリ名)
$ mkdir docs
$ echo 'hello world' > docs/index.html
ツリー構造はこんな感じ
$ tree
.
├── README.md
└── docs
    └── index.html

1 directory, 2 files
作成したファイルをmasterブランチにpushしておきます。
次にGitHubのリポジトリの設定からmasterブランチのdocsディレクトリ以下を公開するよう設定します。
docsディレクトリが存在しないとこの選択肢は選べないので注意です。

これで以下のURLにアクセスするとdocs以下に配置したindex.htmlが表示されるはずです。
https://(ユーザー名).github.io/(リポジトリ名)/
 あとはdocs/以下を編集してmasterブランチにpushするだけで上記ページは更新されていきます。
Dockerで開発環境を構築
何か編集するたびにpushして確認するのも大変なのでローカルで開発環境を作ります。
Dockerを使うとさくっとサーバーを建てて、必要なくなったらさくっと消せるので便利です。
DockerとDockerComposeをインストール
公式サイトより入手してください。
https://www.docker.com/
設定ファイルを作成
今回はNginxコンテナをローカルで建てて利用します。
docker-compose.ymlとnginx.confを以下の位置に作成します。
$ tree
.
├── README.md
├── docker-compose.yml
├── docs
│   └── index.html
└── nginx.conf

1 directory, 4 files
まずnginx.confを作ります。
僕は詳しくないのですが、ローカルで自分で使うだけなので最低限必要そうなものを設定します。
server {
    listen 80;
    server_name _;

    root /var/www/html;
    index index.html;

    charset utf-8;
}
次にdocker-compose.ymlを作成します。
DockerComposeは本来複数のコンテナを管理するためのものだった気がしますが、使うコンテナが1つでも簡単に構築、削除が出来るので今回みたいにサーバーを建てる用途の時はよく利用します。
version: '3'

services:
  nginx:
    image: nginx:latest
    ports:
      - 8080:80
    volumes:
      - ./nginx.conf:/etc/nginx/conf.d/default.conf
      - ./docs:/var/www/html
- image
- nginxコンテナの最新バージョンを使います。
- バージョンを指定することもできます。
- ports
- ホストのポート8080をコンテナの80に関連付けます。
- ホストで使いたいポートとnginx.confで指定したポートに応じて変更してください。
- volumes:
- ホストのnginx.confをコンテナ内の所定の位置にマウントします
- ホストのdocs/以下をnginx.confで指定したrootディレクトリにマウントします
ポイントはGitHubPagesで公開されるdocs/以下をNginxのルートディレクトリにマウントしていることです。
こうすることでローカルではNginxコンテナで表示を確認し、そのままGitHubにpushして公開する事が出来ます。
これらの設定ファイルも同じリポジトリでバージョン管理すれば楽ちんです。
Dockerコンテナを起動
docker-compose.ymlが配置されたディレクトリで以下のコマンドを実行して起動。
$ docker-compose up -d
以下にアクセスするとGitHub Pagesと同じ表示がされるはずです。
http://localhost:8080
終了する時は同じくdocker-compose.ymlが配置されたディレクトリで以下のコマンドです。
$ docker-compose down
あとはdocs/以下を編集して、上記URLを開いて確認を繰り返して開発していきます。
公開したくなったらmasterブランチにpushしましょう。
マウスカーソルを目で追うGopherくんを作る
お待ちかねです。
画面に大きくGopherくんを表示して、マウスカーソルを目で追いかける感じにしたいです。
画像の用意
https://github.com/golang-samples/gopher-vector
こちらにCC BY 3.0ライセンスで公開されたGopherくんの画像がありました。
クリエイティブ・コモンズ・ライセンスは以下のサイトが非常にわかりやすかったです。
https://creativecommons.jp/licenses/
クリエイティブ・コモンズは、クリエイティブ・コモンズ・ライセンス(CCライセンス)を提供している国際的非営利組織とそのプロジェクトの総称です。
CCライセンスとはインターネット時代のための新しい著作権ルールで、作品を公開する作者が「この条件を守れば私の作品を自由に使って構いません。」という意思表示をするためのツールです。
「CC BY」は
原作者のクレジット(氏名、作品タイトルなど)を表示することを主な条件とし、改変はもちろん、営利目的での二次利用も許可される最も自由度の高いCCライセンス。
とのことなので、サイト上にクレジットを表示して利用させて頂く事にしました。
目を動かすために改変をしますがそれもOKのようです。
画像の加工
元の画像のSVGをテキストファイルで編集して目とそれ以外で2ファイル用意しました。
要素を削除したりサイズをいじるだけなのでフィーリングでなんとかなりました。
ページの作成
最終的な構成は以下のようになりました。
$ tree
.
├── README.md
├── docker-compose.yml
├── docs
│   ├── css
│   │   └── style.css
│   ├── image
│   │   ├── gopher.svg
│   │   └── gopher_eye.svg
│   ├── index.html
│   └── javascript
│       └── main.js
└── nginx.conf

4 directories, 8 files
ソースコードは悪戦苦闘した結果以下のようになりました。
色々セオリーを外してるかもしれませんがとりあえず動きました。
マウスカーソルのx, y座標を入力したら目の位置を計算するコードを書いてjQueryで制御するのが簡単かなと思いました。
index.html
<!DOCTYPE html>
<html>
  <head>
    <meta charset="utf-8" />
    <link rel="stylesheet" href="./css/style.css" />
    <title>Gopher Eye Tracking</title>
  </head>

  <body>
    <div id="page">
      <header>
        <div id="header_inner">
          <p>
            Gopherくんは <a href="http://reneefrench.blogspot.com/" target="_blank">Renee French</a> さんがデザインしました。
          </p>
          <p>
            画像は <a href="https://twitter.com/tenntenn" target="_blank">Takuya Ueda</a> さんが作成したものを元に加工したものです。
          </p>
        </div>
      </header>
      <main>
        <div id="gopher_image">
          <div id="gopher">
            <img src="./image/gopher.svg" alt="gohperくん" />
            <div id="gopher_right_eye">
              <img src="./image/gopher_eye.svg" alt="gohperくんの右目" />
            </div>
            <div id="gopher_left_eye">
              <img src="./image/gopher_eye.svg" alt="gohperくんの左目" />
            </div>
          </div>
        </div>
      </main>
      <footer></footer>
    </div>
    <script
      src="https://code.jquery.com/jquery-3.4.1.slim.min.js"
      integrity="sha256-pasqAKBDmFT4eHoN2ndd6lN370kFiGUFyTiUHWhU7k8="
      crossorigin="anonymous"
    ></script>
    <script src="./javascript/main.js"></script>
    <script>
      var gopher = new Gopher(
        "#gopher",
        "#gopher_right_eye",
        "#gopher_left_eye"
      );

      $(window).on("load mousemove", function(e) {
        var cX = e.clientX;
        var cY = e.clientY;

        if (!cX) {
          cX = $(window).width() / 2;
          cY = $(window).height() / 2;
        }

        gopher.update(cX, cY).render();
      });
    </script>
  </body>
</html>
css/style.css
html,
body,
div,
span,
iframe,
h1,
h2,
h3,
h4,
h5,
h6,
p,
a,
img,
ul,
li,
table,
tr,
th,
td,
tbody,
footer,
header,
main,
nav,
section,
article {
  margin: 0;
  padding: 0;
  border: 0;
  font-weight: normal;
  list-style: none;
  text-decoration: none;
}

body {
  font-family: "ヒラギノ角ゴ Pro W3", "Hiragino Kaku Gothic Pro", "メイリオ",
    Meiryo, Osaka, "MS Pゴシック", "MS PGothic", sans-serif;
  width: 100%;
}

# header_inner {
	padding: 10px;
	font-size: 10px;
	position: fixed;
	top: 0%;
	right: 0%;
	z-index: 100;
}

# gopher_image {
  overflow: hidden;
  position: fixed;
  bottom: 0%;
  width: 100%;
  height: 70%;
}

# gopher {
  position: absolute;
  left: 50%;
  transform: translateX(-50%);
  width: 1000px;
  z-index: 1;
}

# gopher_right_eye {
  position: absolute;
  text-align: center;
	left: calc(50% - 17%);
	top: 120px;
	width: 120px;
	z-index: 2;
}

# gopher_left_eye {
  position: absolute;
  text-align: center;
	left: calc(50% + 14%);
	top: 120px;
	width: 120px;
	z-index: 2;
}

img {
  width: 100%;
}
javascript/main.js
class Gopher {
  constructor(gopherSel, rightPupilSel, leftPupilSel) {
    this._dom = $(gopherSel);
    var width = this._dom.width();
    var height = this._dom.height();
    this.x = width / 2;
    this.y = height / 2;

    var range = width * 0.07;

    this.rightEye = new Eye(
      rightPupilSel,
      this.x - width * 0.17,
      this.y - height * 0.33,
      range
    );

    this.leftEye = new Eye(
      leftPupilSel,
      this.x + width * 0.14,
      this.y - height * 0.34,
      range
    );
  }

  update(x, y) {

    var offset = this._dom.offset();
    var baseX = offset.left;
    var baseY = offset.top;

    this.rightEye.update(x - baseX, y - baseY);
    this.leftEye.update(x - baseX, y - baseY);

    return this;
  }

  render() {
    this.rightEye.render();
    this.leftEye.render();

    return this;
  }
}

class Eye {
  constructor(selector, x, y, range) {
    this._pupil = new Pupil(selector, x, y);
    this.x = x;
    this.y = y;
    this.range = range;
  }

  get pupil() {
    return this._pupil;
  }

  update(x, y) {
    const distanceRatio = 0.3;

    var distanceX = x - this.x;
    var distanceY = y - this.y;
    var distance = Math.min(
      Math.sqrt(distanceX ** 2 + distanceY ** 2) * distanceRatio,
      this.range
    );

    var rad = Math.atan2(distanceY, distanceX);

    var newX = this.x + Math.cos(rad) * distance;
    var newY = this.y + Math.sin(rad) * distance;

    this.pupil.update(newX, newY);
    return this;
  }

  render() {
    this.pupil.render();

    return this;
  }
}

class Pupil {
  constructor(selection, x, y) {
    this._dom = $(selection);
    this.update(x, y);
  }

  update(x, y) {
    this.x = x - this._dom.width() / 2;
    this.y = y - this._dom.height() / 2;

    return this;
  }

  render() {
    this._dom.css({
      top: this.y + "px",
      left: this.x + "px"
    });

    return this;
  }
}
感想
フロントエンドの練習をして公開するならDockerとGitHubPagesは手軽で強力だと思いました。
やっぱり手を動かすと得られるものは多いと思うので、手を気持ちよく動かせる環境は大事です。