はじめに
前回の記事ではセキュリティの設定をした。
今回は同じサーバーにドメインをあて、Let's Encryptを使用してSSL接続する。
環境
- CentOS Linux release 7.6.1810 (Core)
- Apache/2.4.6 (CentOS)
前提条件
- すでにドメインを取得していること
ドメインのDNS設定
お名前ドットコムでドメインを取得したので、
DNS設定の作業はお名前ドットコムにログインして行う。
- 「ドメイン設定 > DNS関連機能の設定 > DNSレコード設定を利用する」の画面を開く
- 「ホスト名」にサブドメインを入力して、「VALUE」にVPSのIPを入力
- 「追加」ボタンを押す。
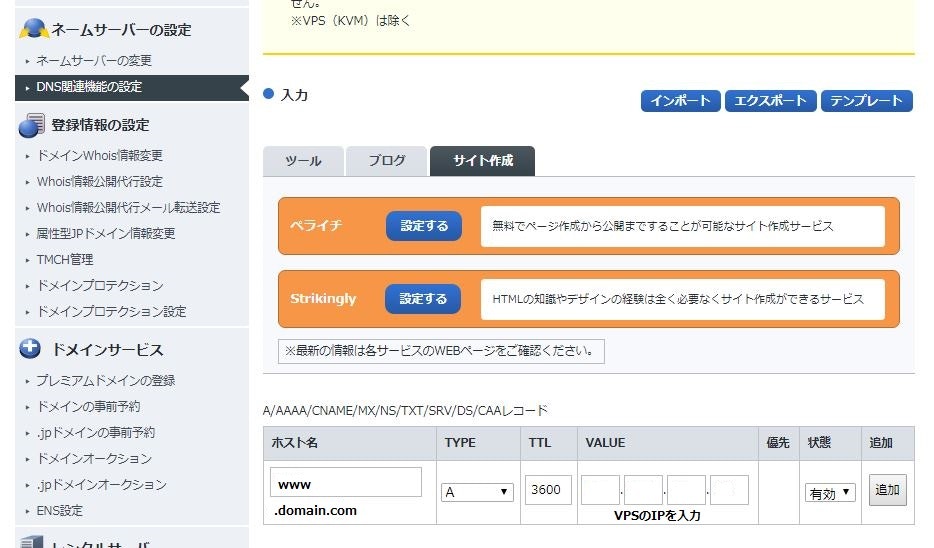
レコードを設定してドメインがVPSに向くようにする。
指定したドメインにwebブラウザでアクセスして、以下の画面が出れば設定完了
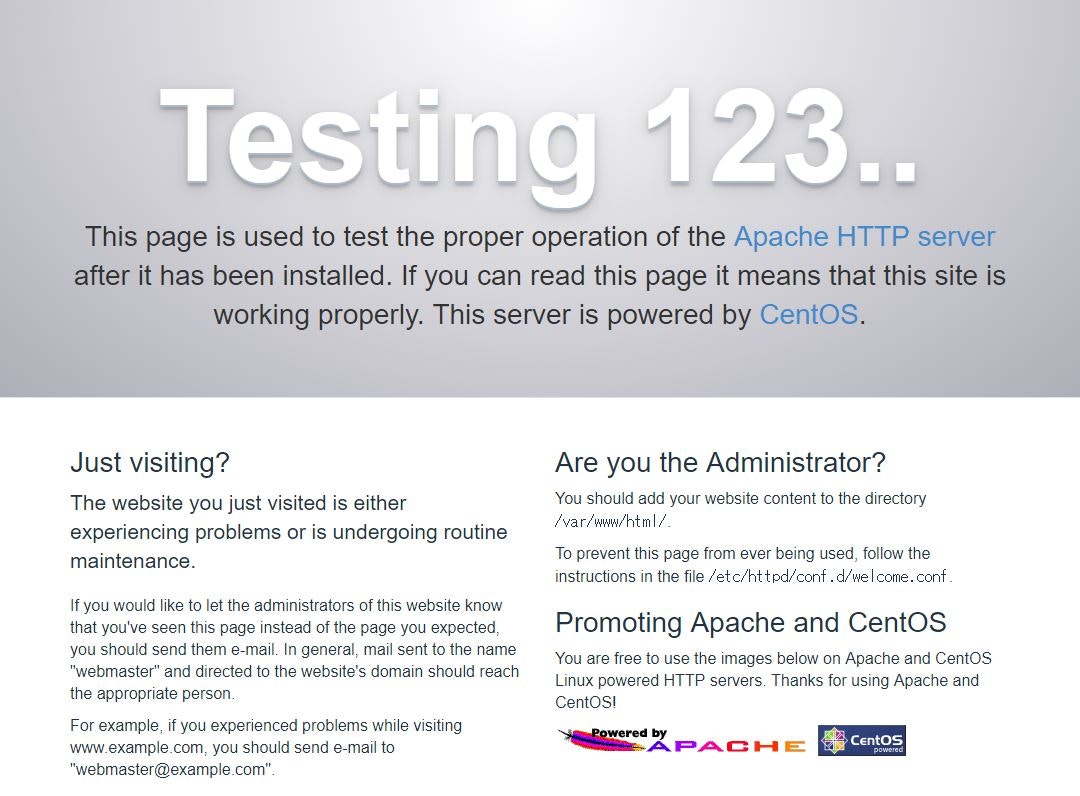
設定が反映されるまで、少し時間がかかるかも
Let's Encript
公式:https://letsencrypt.org/
日本語ポータル:https://letsencrypt.jp/
無料でSSL証明書を発行してもらえる。
ただし、証明書の有効期間は90日間
インストール
ここを参照
https://letsencrypt.jp/usage/install-certbot.html#CentOS7
まずSSH接続
別の作業のためrootでログインしていたので、sudoを付けずに実行した。
# yum install epel-release
Loaded plugins: fastestmirror, langpacks
Loading mirror speeds from cached hostfile
 :
省略
 :
Package epel-release-7-11.noarch already installed and latest version
Nothing to do
EPELのインストールはすでにされていたらしい。
続いてpython-certbot-apachをインストール
# yum install certbot python-certbot-apache
Loaded plugins: fastestmirror, langpacks
Loading mirror speeds from cached hostfile
 :
省略
 :
Complete!
証明書の取得
ここを参照
https://letsencrypt.jp/usage/#GetCertificate
コマンドの実行
# certbot certonly --webroot -w /var/www/html -d www.domain.com
コマンドを実行すると色々聞かれる
まずはメールアドレスを聞かれる
 :
省略
 :
Enter email address (used for urgent renewal and security notices) (Enter 'c' to
cancel):
メールアドレスを入力する。
次にLet's Encryptの利用規約への同意
 :
省略
 :
- - - - - - - - - - - - - - - - - - - - - - - - - - - - - - - - - - - - - - - -
Please read the Terms of Service at
https://letsencrypt.org/documents/LE-SA-v1.2-November-15-2017.pdf. You must
agree in order to register with the ACME server at
https://acme-v02.api.letsencrypt.org/directory
- - - - - - - - - - - - - - - - - - - - - - - - - - - - - - - - - - - - - - - -
(A)gree/(C)ancel:
問題なければaを入力する。
Electronic Frontierとメールアドレスを共有してもいいか?と聞かれる。
yesにするとニュースメールとかが届くらしい。
- - - - - - - - - - - - - - - - - - - - - - - - - - - - - - - - - - - - - - - -
Would you be willing to share your email address with the Electronic Frontier
Foundation, a founding partner of the Let's Encrypt project and the non-profit
organization that develops Certbot? We'd like to send you email about our work
encrypting the web, EFF news, campaigns, and ways to support digital freedom.
- - - - - - - - - - - - - - - - - - - - - - - - - - - - - - - - - - - - - - - -
(Y)es/(N)o:
問題なければyを入力する。メールアドレスの利用拒否ならnと入力
Starting new HTTPS connection (1): supporters.eff.org
 :
省略
 :
IMPORTANT NOTES:
 - Congratulations! Your certificate and chain have been saved at:
 :
省略(1)
 :
 - Your account credentials have been saved in your Certbot
   configuration directory at /etc/letsencrypt. You should make a
   secure backup of this folder now. This configuration directory will
   also contain certificates and private keys obtained by Certbot so
   making regular backups of this folder is ideal.
 - If you like Certbot, please consider supporting our work by:

   Donating to ISRG / Let's Encrypt:   https://letsencrypt.org/donate
   Donating to EFF:                    https://eff.org/donate-le
これで証明書の取得は完了
上記の「省略(1)」の部分に作成された証明書の場所が書いてあるはず
ここまで来て、certonlyオプションは付けなくて良かったのではないかと気付く。
certonlyオプションは、証明書取得だけを行い、Webサーバ設定は自身で行うオプション。
おかげでまだWebサーバ設定ができていない。
もう一度certbotコマンドを入力する。
またドメイン名を聞かれてしまった。
# certbot
Saving debug log to /var/log/letsencrypt/letsencrypt.log
 :
省略
 :
No names were found in your configuration files. Please enter in your domain
name(s) (comma and/or space separated)  (Enter 'c' to cancel):
ドメイン名を入力する。
すでに存在する証明書でもう一度インストールするかい?と聞かれる(多分)
Cert not yet due for renewal
 :
省略
 :
What would you like to do?
- - - - - - - - - - - - - - - - - - - - - - - - - - - - - - - - - - - - - - - -
1: Attempt to reinstall this existing certificate
2: Renew & replace the cert (limit ~5 per 7 days)
- - - - - - - - - - - - - - - - - - - - - - - - - - - - - - - - - - - - - - - -
Select the appropriate number [1-2] then [enter] (press 'c' to cancel):
さっき作った証明書でいいので1を入力する。
仮想ホストの設定
 :
省略
 :
Which virtual host would you like to choose?
- - - - - - - - - - - - - - - - - - - - - - - - - - - - - - - - - - - - - - - -
1: ssl.conf                       |                       | HTTPS | Enabled
- - - - - - - - - - - - - - - - - - - - - - - - - - - - - - - - - - - - - - - -
Press 1 [enter] to confirm the selection (press 'c' to cancel):
1を入力する。
HTTPで接続されたら、HTTPSで接続するようにリダイレクトしますか?(多分)
 :
省略
 :
Please choose whether or not to redirect HTTP traffic to HTTPS, removing HTTP access.
- - - - - - - - - - - - - - - - - - - - - - - - - - - - - - - - - - - - - - - -
1: No redirect - Make no further changes to the webserver configuration.
2: Redirect - Make all requests redirect to secure HTTPS access. Choose this for
new sites, or if you're confident your site works on HTTPS. You can undo this
change by editing your web server's configuration.
- - - - - - - - - - - - - - - - - - - - - - - - - - - - - - - - - - - - - - - -
Select the appropriate number [1-2] then [enter] (press 'c' to cancel):
リダイレクトさせたいので2を入力する。
 :
省略
 :
IMPORTANT NOTES:
 - Congratulations! Your certificate and chain have been saved at:
 :
省略
 :
 - If you like Certbot, please consider supporting our work by:

   Donating to ISRG / Let's Encrypt:   https://letsencrypt.org/donate
   Donating to EFF:                    https://eff.org/donate-le
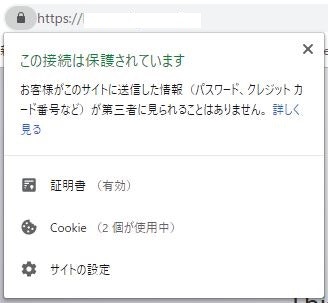
これで完了!
指定したドメインにHTTPSでアクセスしてみる。
CRONによる自動更新
90日ごとに更新するのは面倒なので、CRONで自動更新する。
まずCRONが動いているかをチェックする。
# systemctl status crond
* crond.service - Command Scheduler
   Loaded: loaded (/usr/lib/systemd/system/crond.service; enabled; vendor preset: enabled)
   Active: active (running) since Sun 2018-12-16 16:36:44 JST; 8min ago
 :
省略
 :
active(running)になっていることを確認
# crontab -u root -e
certbot renewコマンドは、有効期間の残りが30日未満の証明書が更新されるとのこと
毎月1日の4時にcertbot renewを実行する
00 04 01 * * certbot renew && systemctl restart httpd
設定完了
まとめ
次回はwebminをインストールして設定したいと思います。