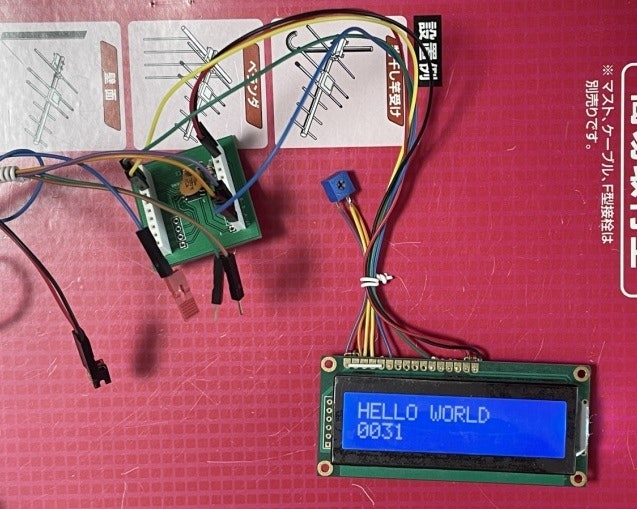
x 原因は、わからないが液晶がちらつく場合は、ウェートを調整してね!!
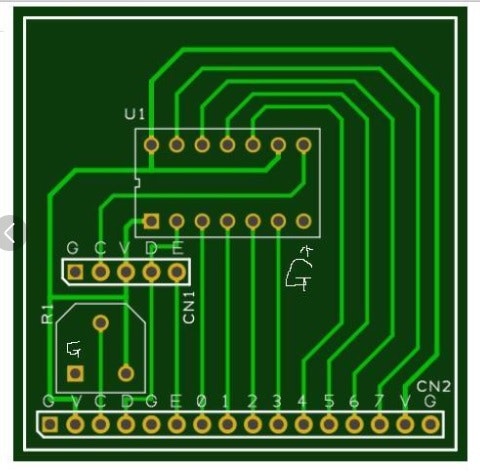
x 74hc164を使用
目的
液晶のテスト
メインプログラム
//LCD_NS_031_1

#include <Arduino.h>

#include "LCD_031_1.h"

//初期化
void setup()
{

    lcd.begin(16, 2);

    lcd.clear();

} //setup


//カウンター
unsigned char LL=0;


//メインループ
void loop()
{

    //lcd.clear();

    //文字列の表示
    lcd.setCursor(0, 0);
    lcd.print("HELLO WORLD");

     //4桁の値の表示
     lcd.setCursor(0, 1);
     lcd.print(  (int)(LL++)  );

     //1秒の待ち
     delay(1000);

} //loop
LCD_031_1.hのプログラム
#define DW   digitalWrite

///#define swdclk   PA14 // 8pin
///#define swdio    PA13 // 7pin
#define swdclk   PA11 // 5pin
#define swdio    PA12 // 6pin
//#define swdclk   PA12 // 6pin
//#define swdio    PA11 // 5pin
//#define t_led1   PA12 // 6pin
//#define t_led2   PA11 // 5pin
//#define en       PA0  // 4pin
//#define in7      PB7  // 1pin
#define en      PB7  // 1pin

//シフトパターン
//              12345678   12345678   12345678   12345678
char b8[8] = {0b10000000,0b01000000,0b00100000,0b00010000,
              0b00001000,0b00000100,0b00000010,0b00000001 };

void seg1(int v, int rs)
{
  for (int jj = 0; jj < 8; jj++) {
    if ( (v & b8[jj]) == 0 ) {
      DW(swdio, 0); //ビットが0
    } else {
      DW(swdio, 1); //ビットが1
    }//endif
    DW(swdclk, 1);
    DW(swdclk, 0);
  }//for

  DW(swdio, rs);
  DW(en, 1); delay(30);
  DW(en, 0); delay(30);
}//seg1


//液晶の初期化コード
int lcd_int[]={
  0x30,0x30,0x30,0x38,0x08,0x01,0x06,0x08+0x04
};//lcd_init


//LCD初期化関数
void lcd_int1()
{
    delay(3000); //not Delete

    //GPIO初期化
    pinMode(swdclk, OUTPUT);
    pinMode(swdio, OUTPUT);
    pinMode(en, OUTPUT);
    DW(en, 0);

    //液晶の初期化
    for(int ii=0;ii<8;ii++){
        seg1( lcd_int[ii] , 0);delay(2);
    }//for

    seg1( 0x80+0x00 , 0  ); //1ライン目にカーソルを移動

    //debug
    char *str1 = "ON LCD ";
    while( *str1 != 0 ) {seg1( *str1 , 1  ); str1++;}
    delay(500);

    //画面クリア
    //seg1(   0x01  , 0  );
    //delay(5);
}//lcd_int1


//10の割り算 0から1028までは、正しい。主に0から999
#define DIV10(n) ((n*205)>>11)

char ch_hex_a_b[16];
char *ch_hex_a(int x)
{
    ch_hex_a_b[4] = 0;

    if       ( x >= 9000 ) {x = x - 9000; ch_hex_a_b[0] = '9';
    } else if( x >= 8000 ) {x = x - 8000; ch_hex_a_b[0] = '8';
    } else if( x >= 7000 ) {x = x - 7000; ch_hex_a_b[0] = '7';
    } else if( x >= 6000 ) {x = x - 6000; ch_hex_a_b[0] = '6';
    } else if( x >= 5000 ) {x = x - 5000; ch_hex_a_b[0] = '5';
    } else if( x >= 4000 ) {x = x - 4000; ch_hex_a_b[0] = '4';
    } else if( x >= 3000 ) {x = x - 3000; ch_hex_a_b[0] = '3';
    } else if( x >= 2000 ) {x = x - 2000; ch_hex_a_b[0] = '2';
    } else if( x >= 1000 ) {x = x - 1000; ch_hex_a_b[0] = '1';
    } else                 {              ch_hex_a_b[0] = '0';
    }//if

    ch_hex_a_b[3] = '0' + (  x - (DIV10(x) * 10)  );  // 3  <- 120 - 123
    x = DIV10(x);                                     // 12 <= 123 / 10
    ch_hex_a_b[2] = '0' + (  x - (DIV10(x) * 10)  );  // 2  <- 12 - 10
    ch_hex_a_b[1] = '0' +  DIV10(x);                  // 1  <- 12 / 10

    return(ch_hex_a_b);
} //ch_hex_a


//クラスの定義
struct _lcd {
    void begin(int col, int rows);     //メソッドの宣言
    void clear();                      //メソッドの宣言
    void setCursor(int col, int rows); //メソッドの宣言
    int  write(char ch);               //メソッドの宣言
    int  print(char *str1);            //メソッドの宣言
    int  print(int num);               //メソッドの宣言 オーバーロード
};

//ポートをhiにする 初期化
//メソッドの定義
void _lcd::begin(int col, int rows)
{
    lcd_int1();
    //delay(3000);
}//begin


//ポートをhiにする 初期化
//メソッドの定義
void _lcd::clear()
{
    //画面クリア
    seg1(   0x01  , 0  );
    delay(500);
}//begin

//ポートをhiにする 初期化
//メソッドの定義
void _lcd::setCursor(int col, int rows)
{
    int vram=(rows * 0x40)+col;

    seg1( 0x80+vram , 0  ); //1ライン目にカーソルを移動
    delay(1);
}//begin


//液晶への一文字出力
//メソッドの定義
int _lcd::write(char ch)
{
    seg1(ch,1);

    return(0);
}//write


//文字列の表示
//メソッドの定義
int _lcd::print(char *str1)
{
    //文字の中身がゼロか
    while(*str1) {

        //一文字出力
        write(*str1 ++);

    } //while

    //戻り値
    return(0);
}//print


//文字列の表示 オーバーロード 4桁
//メソッドの定義
int _lcd::print(int num)
{
    if(num < 0) {
        write('-');
        num = 0 - num;
    }

    char *str1 = ch_hex_a(num);

    //文字の中身がゼロか
    while(*str1) {

        //一文字出力
        write(*str1 ++);

    } //while

    //戻り値
    return(0);
}//print


//実体の作成
_lcd lcd;