PowerSystems の VIOS (Virtual I/O Server) 環境下のLPAR に RHEL8.3 をインストールしたログです。
実行環境
・PowerSystems S824
・VIOS 2.2.6 : ホスト名 vios_2
・導入対象 VIOC (RHEL 8.3): LPAR/ホスト名 RHEL83_lpar
-> LPAR ID は 45
-> vios_2 上では、SCSI ID 37、vhost2 で設定されている
-> LPARのブートディスクは外部ストレージに存在(SAN boot)
・HMC(V9R1.910) S824を管理するHardware Management Console
インストール・メディアの準備
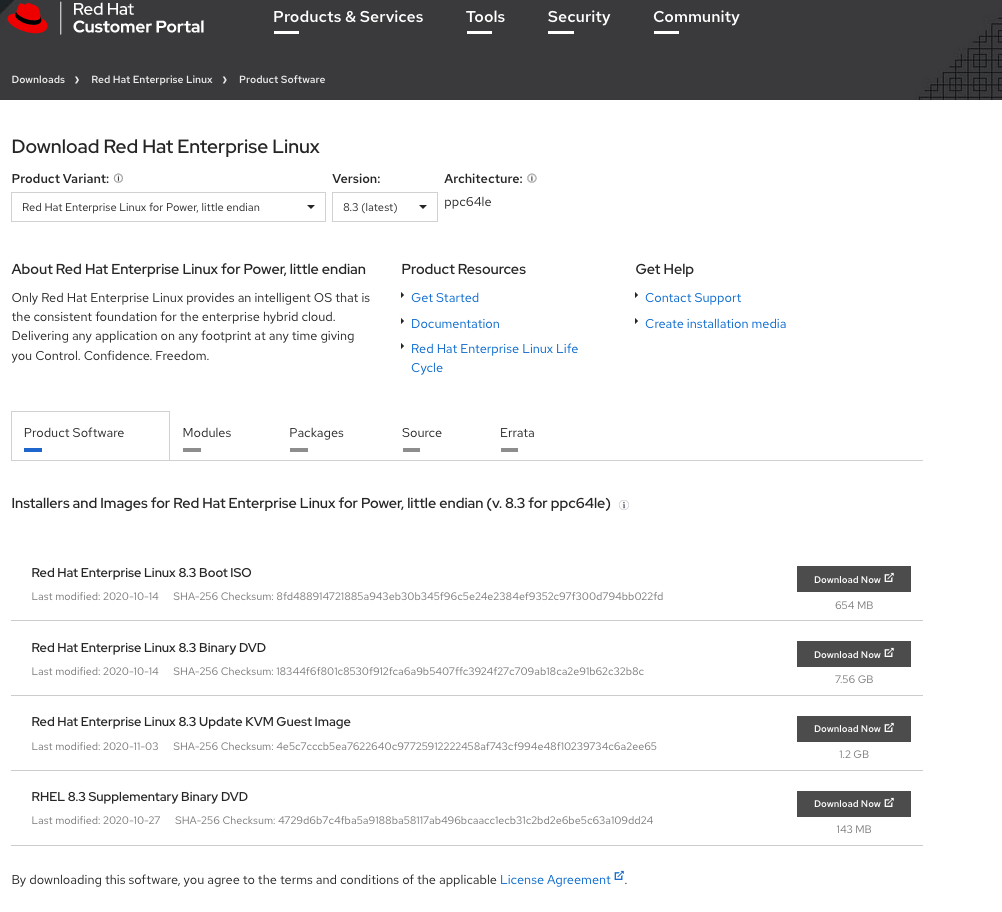
RedHat のサイトから対象のイメージをダウンロード(要RedHat Subscription)

-> RedHat Enterprise linux 8.3 Binary DVD を選択
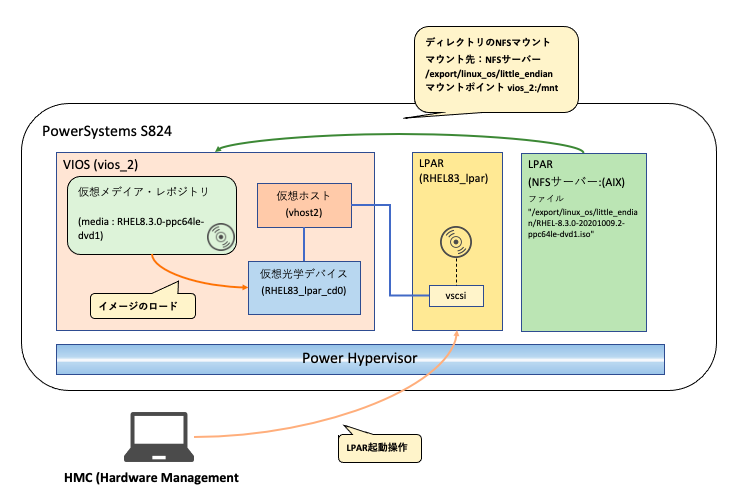
NFS サーバー(AIX) にダウンロードした iso ファイルをアップロードしておきます。
$ ls -l /export/linux_os/little_endian| grep 8.3
-rw-r-----    1 root     system   8117753856 Dec 08 23:17 RHEL-8.3.0-20201009.2-ppc64le-dvd1.iso
$
VIOS仮想光学デバイスの作成とイメージのロード
$ hostname
vios_2
仮想アダプターの設定についての記載は省略しますが、vios_2 の SCSI id 37 に RHEL8.3導入対象LPAR(RHEL83_lpar)のSCSIアダプターを割り当てています。
気になる方は、次の資料などをご参考ください。[Virtual I/O Server(VIOS) はじめての構築] (https://ibm.ent.box.com/s/j2wriuiwqkljshau6jgrnzja6svj4ewh) p37 STEP4. VIOSの構成(ストレージ)
この環境では、以下の設定です。
・RHEL8.3導入対象LPAR(RHEL83_lpar) の LPAR ID は 45です。
・vios_2 上で SCSI ID 37 、LPAR ID 45 (16進数で 2d) にマッピングしている vhost を探します。
$ lsmap -all | grep 37
vhost2          U8286.42A.XXXXXXX-V2-C37                     0x0000002d
$ lsmap -vadapter vhost2
SVSA            Physloc                                      Client Partition ID
--------------- -------------------------------------------- ------------------
vhost2          U8286.42A.XXXXXXX-V2-C37                     0x0000002d
-> vhost2 が RHEL8.3導入対象LPAR(RHEL83_lpar)に紐づいていることがわかりました。
* そういえば、lsmap コマンドで表示されるLPAR IDが16進数であることは、明記されているところを見かけた覚えがありませんね。私は先輩に教えていただきましたが... 口伝??
参考:lsmap コマンド 物理デバイス、論理デバイス、および仮想デバイス間のマッピングを表示
- 別サーバーに配置したiso ファイルを VIOS 上で参照できるように NFS マウントを実施
$ mount XX.XX.XX.XX:/export/linux_os/little_endian /mnt
$ mount | grep mnt
XX.XX.XX.XX /export/linux_os/little_endian /mnt             nfs3   Dec 09 09:38


$ ls -l /mnt | grep 8.3
-rw-r-----    1 root     system   8117753856 Dec 08 23:17 RHEL-8.3.0-20201009.2-ppc64le-dvd1.iso
$
- VIOS 仮想メディア・レポジトリの設定
この環境ではすでにレポジトリーは作成されています。
$ lsrep
Size(mb) Free(mb) Parent Pool         Parent Size      Parent Free
   16322     1696 rootvg                    51072            14464
作成する場合は次のマニュアルを参照 -> Virtual I/O Serverでの仮想メディア・リポジトリーの作成
- 仮想メディア・レポジトリのサイズを増加
$ chrep -size 7G
$ echo $?
0
$ lsrep | head
Size(mb) Free(mb) Parent Pool         Parent Size      Parent Free
   23461     8835 rootvg                    51072             7296
$ mkvopt -name RHEL8.3.0-ppc64le-dvd1 -file /mnt/RHEL-8.3.0-20201009.2-ppc64le-dvd1.iso
$ echo $?
0

$ lsrep | grep RHEL8.3
RHEL8.3.0-ppc64le-dvd1                                     7742 None            rw
- 仮想光学デバイスの作成
先ほど確認した、vios_2 の vhost に 仮想メディアをロードするための仮想光学デバイスを作成します。
$ lsmap -vadapter vhost2
SVSA            Physloc                                      Client Partition ID
--------------- -------------------------------------------- ------------------
vhost2          U8286.42A.XXXXXX-V2-C37                     0x0000002d


VTD                   NO VIRTUAL TARGET DEVICE FOUND
$
$  mkvdev -fbo -vadapter vhost2 -dev RHEL83_lpar_cd0
p8185l_cd0 Available
$ lsmap -vadapter vhost2
SVSA            Physloc                                      Client Partition ID
--------------- -------------------------------------------- ------------------
vhost2          U8286.42A.XXXXXX-V2-C37                     0x0000002d


VTD                   RHEL83_lpar_cd0
Status                Available
LUN                   0x8100000000000000
Backing device
Physloc
Mirrored              N/A
-> 仮想光学デバイス "RHEL83_lpar_cd0" が vhost2 (RHEL83_lparの仮想ホスト) に作成されました。
まだこの状態では、CDデバイスがLPARに割り当てられただけの状態のため、
仮想メディア・リポジトリにある iso ファイルを仮想光学デバイスにロードします。(DVDをDVDデバイスに配置するイメージ)
$ loadopt -disk RHEL8.3.0-ppc64le-dvd1 -vtd RHEL83_lpar_cd0
$ echo $?
0
$ lsvopt
VTD             Media                                                 Size(mb)
RHEL83_lpar_cd0      RHEL8.3.0-ppc64le-dvd1                                    7742
-> これで対象LPAR(RHEL83_lpar) に仮想メディアが割り当てられ、iso ファイルがCDメディアとして割り当てられた状態になりました。
参考:
・[How to configure a VIOS Media Repository/Virtual Media Library (ex. AIX Install/Restore)]
(https://www.ibm.com/support/pages/how-configure-vios-media-repositoryvirtual-media-library-ex-aix-installrestore)
・[VIOS virtual media repo command]
(https://www.ibm.com/support/knowledgecenter/POWER8/p8hcg/p8hcg_virtualmediarepos_commands.htm)
・ファイル・バッキングされた仮想光ディスク・デバイスにマップする仮想ターゲット・デバイスの Virtual I/O Serverでの作成
HMC GUIでの仮想メディア・リポジトリの割り当て方法は以下をご参考ください。
LPARの活動化
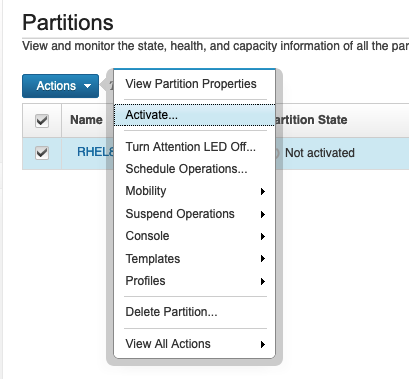
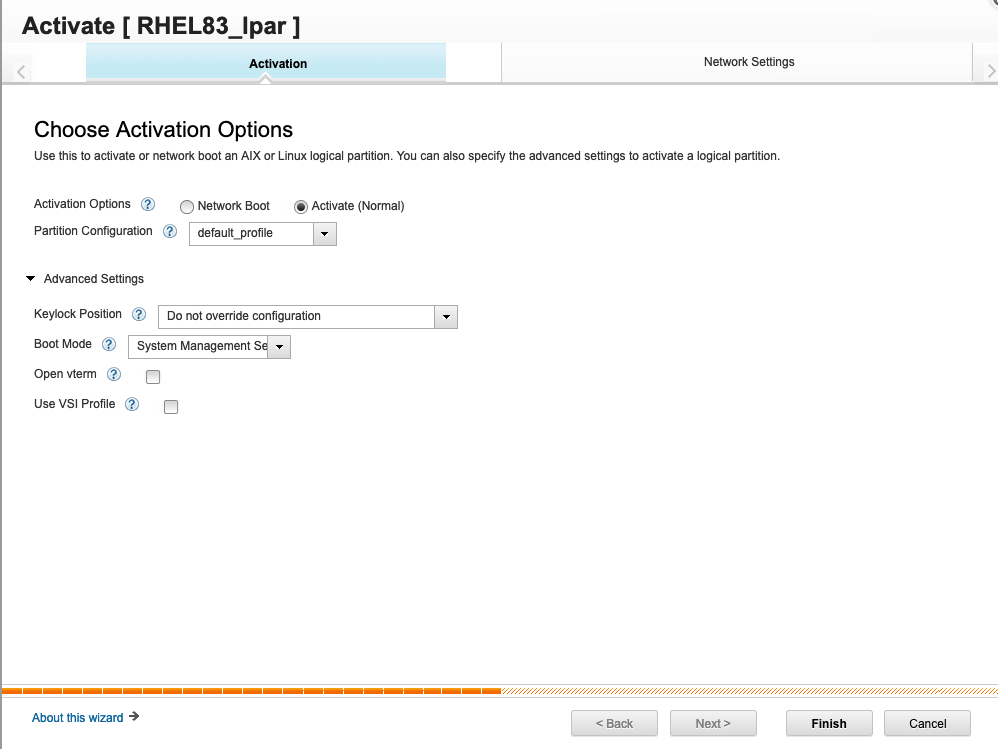
- HMC から 対象LPARを SMS(System Management Service)モードで Activate
インストール
・HMC(Hardware Management Console) の 仮想端末から対象LPARにログイン、SMSの設定を進めます
PowerPC Firmware
 Version FW860.70 (SV860_205)
 SMS (c) Copyright IBM Corp. 2000,2016 All rights reserved.
-------------------------------------------------------------------------------
 Main Menu
 1.   Select Language
 2.   Setup Remote IPL (Initial Program Load)
 3.   I/O Device Information
 4.   Select Console
 5.   Select Boot Options
 -------------------------------------------------------------------------------
 Navigation Keys:
                                             X = eXit System Management Services
 -------------------------------------------------------------------------------
 Type menu item number and press Enter or select Navigation key:5
PowerPC Firmware
 Version FW860.70 (SV860_205)
 SMS (c) Copyright IBM Corp. 2000,2016 All rights reserved.
-------------------------------------------------------------------------------
 Select Device Type
 1.   Tape
 2.   CD/DVD
 3.   Hard Drive
 4.   Network
 5.   List all Devices
 -------------------------------------------------------------------------------
 Navigation keys:
 M = return to Main Menu
 ESC key = return to previous screen         X = eXit System Management Services
 -------------------------------------------------------------------------------
 Type menu item number and press Enter or select Navigation key:5
PowerPC Firmware
 Version FW860.70 (SV860_205)
 SMS (c) Copyright IBM Corp. 2000,2016 All rights reserved.
-------------------------------------------------------------------------------
 Select Device
 Device  Current  Device
 Number  Position  Name
 1.        4      Interpartition Logical LAN
        ( loc=U8286.42A.XXXXXXX-V45-C32-T1 )
 2.        -      Interpartition Logical LAN
        ( loc=U8286.42A.XXXXXXX-V45-C33-T1 )
 3.        2      SCSI CD-ROM
        ( loc=U8286.42A.XXXXXXX-V45-C2-T1-Lxxxxxxxxxxxx00000 )
 4.        1      53 GB   FC Harddisk, part=1 ()
        ( loc=U8286.42A.XXXXXXX-V45-C3-T1-Wxxxxxxxxxxxxcb-L00xxxxxxxxxxxx000 )
 5.        -      53 GB   FC Harddisk, part=1 ()
        ( loc=U8286.42A.XXXXXXX-V45-C3-T1-Wxxxxxxxxxxxx1ca-L00xxxxxxxxxxxx00 )
 6.        -      53 GB   FC Harddisk, part=1 ()
        ( loc=U8286.42A.XXXXXXX-V45-C4-T1-Wxxxxxxxxxxxxcb-Lxxxxxxxxxxxx00000 )
 -------------------------------------------------------------------------------
 Navigation keys:
 M = return to Main Menu      N = Next page of list
 ESC key = return to previous screen         X = eXit System Management Services
 -------------------------------------------------------------------------------
 Type menu item number and press Enter or select Navigation key: 3
-> 3. SCSI CD-ROM を指定します。
PowerPC Firmware
 Version FW860.70 (SV860_205)
 SMS (c) Copyright IBM Corp. 2000,2016 All rights reserved.
-------------------------------------------------------------------------------
 Select Task

SCSI CD-ROM
    ( loc=U8286.42A.XXXXXXX-V45-C2-T1-L8100000000000000 )


 1.   Information
 2.   Normal Mode Boot
 3.   Service Mode Boot
 -------------------------------------------------------------------------------
 Navigation keys:
 M = return to Main Menu
 ESC key = return to previous screen         X = eXit System Management Services
 -------------------------------------------------------------------------------
 Type menu item number and press Enter or select Navigation key: 1
-> 1 で確認
 Version FW860.70 (SV860_205)
 SMS (c) Copyright IBM Corp. 2000,2016 All rights reserved.
-------------------------------------------------------------------------------
 Device Information
    /vdevice/v-scsi@30000002/disk@81xxxxxxxxxxxx000
                   :  (Bootable)
DEVICE             : SCSI CD-ROM
    ( loc=U8286.42A.XXXXXXX-V45-C2-T1-L8xxxxxxxxxxxx000 )
NAME               : disk
DEVICE-TYPE        : block

 Parent Information
IBM,FW-ADAPTER-NAME: Virtual SCSI
NAME               : v-scsi
DEVICE-TYPE        : vscsi
 Version FW860.70 (SV860_205)
 SMS (c) Copyright IBM Corp. 2000,2016 All rights reserved.
-------------------------------------------------------------------------------
 Select Task
SCSI CD-ROM
    ( loc=U8286.42A.XXXXXXX-V45-C2-T1-L8xxxxxxxxxxxx00 )


 1.   Information
 2.   Normal Mode Boot
 3.   Service Mode Boot

 -------------------------------------------------------------------------------
 Navigation keys:
 M = return to Main Menu
 ESC key = return to previous screen         X = eXit System Management Services
 -------------------------------------------------------------------------------
 Type menu item number and press Enter or select Navigation key:2
ブートを待つ
vncを立ち上げて GUI でインストール設定しようと思っていたのですが、対象環境のネットワーク(Firewall)制限でvnc を立ち上げられなかったので、そのままプロンプトで実行。
Welcome to the Red Hat Enterprise Linux 8.3 installer!


      Install Red Hat Enterprise Linux 8.3 (64-bit kernel)
      Test this media & install Red Hat Enterprise Linux 8.3  (64-bit kernel)
      Rescue a Red Hat Enterprise Linux system (64-bit kernel)
      Other options...


5) Asturian                31) Croatian               57) Odia
6) Belarusian              32) Hungarian              58) Punjabi
7) Bulgarian               33) Interlingua            59) Polish
8) Bangla                  34) Indonesian             60) Portuguese
9) Tibetan                 35) Icelandic              61) Romanian
10) Bosnian                36) Italian                62) Russian
11) Catalan                37) Japanese               63) Sinhala
12) Czech                  38) Georgian               64) Slovak
13) Welsh                  39) Kazakh                 65) Slovenian
14) Danish                 40) Khmer                  66) Albanian
15) German                 41) Kannada                67) Serbian
16) Greek                  42) Korean                 68) Swedish
17) English                43) Lithuanian             69) Tamil
18) Spanish                44) Latvian                70) Telugu
19) Estonian               45) Maithili               71) Tajik
20) Basque                 46) Macedonian             72) Thai
21) Persian                47) Malayalam              73) Turkish
22) Finnish                48) Marathi                74) Ukrainian
23) Filipino               49) Malay                  75) Urdu
24) French                 50) Burmese                76) Vietnamese
25) Friulian               51) Norwegian Bokmål       77) Mandarin Chinese


Press ENTER to continue: 37
-> 日本語(37.Japanese) を選択
Please select language support to install ['b' to return to language list, 'c'
to continue, 'q' to quit, 'r' to refresh]: c
================================================================================
================================================================================
Installation


1) [x] Language settings                 2) [x] Time settings
       (English (United States))                (America/New_York timezone)
3) [x] Installation source               4) [x] Software selection
       (Local media)                            (Server with GUI)
5) [!] Installation Destination          6) [x] Kdump
       (Automatic partitioning                  (Kdump is enabled)
       selected)
7) [ ] Network configuration             8) [!] Root password
       (Not connected)                          (Root account is disabled.)
9) [!] User creation
       (No user will be created)


Please make a selection from the above ['b' to begin installation, 'q' to quit,
'r' to refresh]:
[anaconda]1:main* 2
================================================================================
その他必要項目を設定
-> 7. Network configuration
================================================================================
Device configuration


1) IPv4 address or "dhcp" for DHCP
   xx.xx.xx.xx
2) IPv4 netmask
   255.255.0.0
3) IPv4 gateway
4) IPv6 address[/prefix] or "auto" for automatic, "dhcp" for DHCP, "ignore" to
   turn off
   auto
5) IPv6 default gateway
6) Nameservers (comma separated)
7) [x] Connect automatically after reboot
8) [x] Apply configuration in installer


Configuring device envXX.


Please make a selection from the above ['c' to continue, 'q' to quit, 'r' to
refresh]:
-> 4. Software selection
Software selection
Base environment


1) [ ] Server with GUI                  4) [ ] Workstation
2) [x] Server                           5) [ ] Custom Operating System
3) [ ] Minimal Install


Please make a selection from the above ['c' to continue, 'q' to quit, 'r' to
refresh]:
Software selection


Additional software for selected environment


1) [ ] Hardware Monitoring Utilities    14) [ ] Virtualization Hypervisor
2) [ ] Windows File Server              15) [ ] Basic Web Server
3) [ ] Debugging Tools                  16) [ ] Legacy UNIX Compatibility
4) [ ] File and Storage Server          17) [ ] Container Management
5) [x] FTP Server                       18) [ ] Development Tools
6) [ ] GNOME                            19) [ ] Graphical Administration Tools
7) [ ] Guest Agents                     20) [ ] Headless Management
8) [ ] Infiniband Support               21) [ ] RPM Development Tools
9) [ ] Mail Server                      22) [ ] Scientific Support
10) [x] Network File System Client      23) [ ] Security Tools
11) [ ] Network Servers                 24) [ ] Smart Card Support
12) [ ] Performance Tools               25) [x] System Tools
13) [ ] Remote Management for Linux


Please make a selection from the above ['c' to continue, 'q' to quit, 'r' to
refresh]:
とりあえず NFS と FTP ができるように選択。System Tools は必要になるかもということで選択。
-> 5. Installation Destination
Please make a selection from the above ['b' to begin installation, 'q' to quit,
'r' to refresh]: 5
Probing storage...
================================================================================
================================================================================
Installation Destination


1) [x] 2145: 50 GiB (mpatha), xxxxxxxxxxxxxxxxxxxxxxxxxxxxxxdxxxxxxx


1 disk selected; 50 GiB capacity; 992.5 KiB free


Please make a selection from the above ['c' to continue, 'q' to quit, 'r' to
refresh]:
================================================================================

================================================================================
Partitioning Options


1) [ ] Replace Existing Linux system(s)
2) [x] Use All Space
3) [ ] Use Free Space
4) [ ] Manually assign mount points


Installation requires partitioning of your hard drive. Select what space to use
for the install target or manually assign mount points.


Please make a selection from the above ['c' to continue, 'q' to quit, 'r' to
refresh]:


================================================================================
================================================================================
Partition Scheme Options


1) [ ] Standard Partition
2) [x] LVM
3) [ ] LVM Thin Provisioning


Select a partition scheme configuration.


Please make a selection from the above ['c' to continue, 'q' to quit, 'r' to
refresh]:


================================================================================
その他の設定も終わり (ログ省略)
================================================================================
Installation


1) [x] Language settings                 2) [x] Time settings
       (English (United States))                (America/New_York timezone)
3) [x] Installation source               4) [x] Software selection
       (Local media)                            (Server)
5) [x] Installation Destination          6) [x] Kdump
       (Automatic partitioning                  (Kdump is enabled)
       selected)
7) [x] Network configuration             8) [x] Root password
       (Wired (envXX) connected)                (Password is set.)
9) [ ] User creation
       (No user will be created)


Please make a selection from the above ['b' to begin installation, 'q' to quit,
'r' to refresh]: b
インストール開始
所要15分くらいでログイン可能に。
Red Hat Enterprise Linux 8.3 (Ootpa)
Kernel 4.18.0-240.el8.ppc64le on an ppc64le


Activate the web console with: systemctl enable --now cockpit.socket


RHEL83_lpar login: root
Password:

[root@pRHEL83_lpar ~]# cat /etc/os-release
NAME="Red Hat Enterprise Linux"
VERSION="8.3 (Ootpa)"
ID="rhel"
ID_LIKE="fedora"
VERSION_ID="8.3"
PLATFORM_ID="platform:el8"
PRETTY_NAME="Red Hat Enterprise Linux 8.3 (Ootpa)"
ANSI_COLOR="0;31"
CPE_NAME="cpe:/o:redhat:enterprise_linux:8.3:GA"
HOME_URL="https://www.redhat.com/"
BUG_REPORT_URL="https://bugzilla.redhat.com/"


REDHAT_BUGZILLA_PRODUCT="Red Hat Enterprise Linux 8"
REDHAT_BUGZILLA_PRODUCT_VERSION=8.3
REDHAT_SUPPORT_PRODUCT="Red Hat Enterprise Linux"
REDHAT_SUPPORT_PRODUCT_VERSION="8.3"RHEL83_lpar
無事導入できました!
/dev/sr0に導入に使用したイメージがあるので、/media/rhel8dvd にマウントしておきます。(yum設定のため)
root@p8185l /]# mkdir /media/rhel8dvd
[root@p8185l /]# mount /dev/sr0  /media/rhel8dvd
mount: /media/rhel8dvd: WARNING: device write-protected, mounted read-only.
[root@p8185l /]# ls -l /media/rhel8dvd
total 48
dr-xr-xr-x. 4 root root  2048 Oct  9 06:40 AppStream
dr-xr-xr-x. 4 root root  2048 Oct  9 06:40 BaseOS
dr-xr-xr-x. 3 root root  2048 Oct  9 06:40 boot
-r--r--r--. 1 root root  8266 Oct  9 06:37 EULA
-r--r--r--. 1 root root  1455 Oct  9 06:37 extra_files.json
-r--r--r--. 1 root root 18092 Oct  9 06:37 GPL
dr-xr-xr-x. 2 root root  2048 Oct  9 06:40 images
-r--r--r--. 1 root root   103 Oct  9 06:37 media.repo
dr-xr-xr-x. 3 root root  2048 Oct  9 06:40 ppc
-r--r--r--. 1 root root  1669 Oct  9 06:37 RPM-GPG-KEY-redhat-beta
-r--r--r--. 1 root root  5134 Oct  9 06:37 RPM-GPG-KEY-redhat-release
-r--r--r--. 1 root root  1796 Oct  9 06:40 TRANS.TBL
/etc/yum.repos.d/にrhel83_base-media.repoファイルを作成し、導入イメージのyum レポジトリを設定しておく
# cat /etc/yum.repos.d/rhel83_base-media.repo
[dvd-BaseOS]
name=RHEL8_BaseOS
baseurl=file:///media/rhel8dvd/BaseOS/
enabled=1
gpgcheck=1
gpgkey=file:///media/rhel8dvd/RPM-GPG-KEY-redhat-release

[dvd-AppStream]
name=RHEL8_AppStream
baseurl=file:///media/rhel8dvd/AppStream/
enabled=1
gpgcheck=1
gpgkey=file:///media/rhel8dvd/RPM-GPG-KEY-redhat-release
そういえば、RHEL 8 だと パッケージ・マネージャーはdnf というものを使うのかな。dnf に慣れておらず、先に進みたいのでひとまずyumの設定をしておきます。
追加でインストール時にゲートウェイと DNS の設定ができていなかったので、OS上で設定しました。
# nmcli connection modify envXX ipv4.gateway "XX.XX.XX.XX"
# nmcli connection modify envXX ipv4.dns XX.XX.XX.XX,XX.XX.XX.XX"
# nmcli con up envXX
終わりに
若干説明省略しているところはありますが、流れとしてご参考になればと思います。
以上です。


