はじめに
【2020.9.21】 Oscillators and the Physics of Sound に書き漏れがあったので追記しました。
サウンドファイルの再生じゃなくて、音そのものを発信(発振?)させるのってどうすればいいんだろうとググっていて、AudioKitというライブラリを見つけました。
で、AudioKit Tutorial: Getting Startedというチュートリアルが、順を追って丁寧に解説されてるので動かしてみました。
ただページそのものがかなり古い(2016/バージョンは3.6)ので、公式ページにある最新版のAudioKit Playgrounds (zip)(バージョンは4.9.5)で動かしてみたときの変更点を備忘録としてまとめておきます。DLはこちらから。
実行環境
- Xcode 11.6
- macOS Catalina(10.15.6)
- 公式ページのAudioKit Playgrounds (zip)(バージョンは4.9.5)
Getting Started
まず AudioKit Playgrounds (zip)は最新版を使うので、チュートリアルページのリンクではなく、公式サイトのDLページから入手します。ファイル名は「AudioKitPlaygrounds-4.9.5.zip」になります。
これを解凍してXcodeで開いた後に・・・
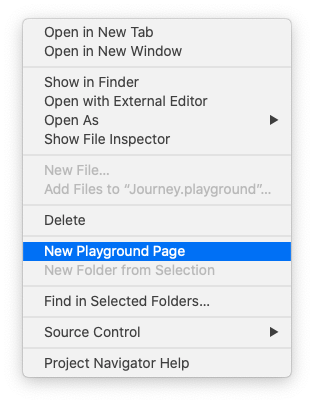
Click the + button in the bottom left-hand corner of the Navigator view. Select the New Playground… option, name it Journey, and save it in the Playgrounds folder the other playground files are stored in.
ナビゲータービューの左下隅にある+ボタンをクリックします。 [新しいプレイグラウンド…]オプションを選択し、「ジャーニー」という名前を付けて、他のプレイグラウンドファイルが格納されているプレイグラウンドフォルダに保存します。
と書いてありますが、ナビゲータービューの左下隅にある+ボタンでは「New Playground…」なんて出てこないので、ナビゲータービュー上で右クリックすると「New Playground Page」が出てきますのでここから追加できます。
Xcodeのバージョンの問題かしらん?Playgroundってあんまり使ってないんで。。。
さらに以下のような注釈がありますが・・・
This project will fail unless you build the project at least once using Product / Build, or ⌘-B. Once built, run the playground again and you’ll hear your playground emit 10 seconds of a beeping sound. You can use the Play/Stop button at the bottom left of the playground window within the Debug Area to stop or repeat the playground.
このプロジェクトは、Product / Buildまたは⌘-Bを使用してプロジェクトを少なくとも1回ビルドしない限り失敗します。 作成したら、遊び場をもう一度実行すると、遊び場から10秒間のビープ音が聞こえます。 デバッグ領域内のプレイグラウンドウィンドウの左下にある[再生/停止]ボタンを使用して、プレイグラウンドを停止または繰り返します。
Note: If the playground fails to execute, and you see errors in the Debug Area, try restarting Xcode. Unfortunately, using playgrounds in combination with frameworks can be a little error-prone and unpredictable. :[
注:プレイグラウンドの実行に失敗し、デバッグ領域にエラーが表示された場合は、Xcodeを再起動してみてください。 残念ながら、フレームワークと組み合わせてプレイグラウンドを使用すると、エラーが発生しやすくなり、予測できなくなります。 :[
私の環境でも結構出たので、新規のPlaygoundファイルを作ったら「⌘-B」を押し、実行してエラーが出たときは、Xcodeを再起動したり、AudioKitPlaygrounds.xcodeprojに既に作成済みのPlaygroudファイルを実行してから、再度自分で書いたPlaygroundを実行したりしてました。
Oscillators and the Physics of Sound
このコードをそのまま実行すると、以下のエラーが出ます。
error: 02Oscillators.xcplaygroundpage:21:1: error: use of unresolved identifier 'AKPlaygroundLoop'
AKPlaygroundLoop(every: 0.5) {
^~~~~~~~~~~~~~~~
最新バージョンでは、AudioKitとAudioKitUI(おそらくUI系)と二つのフレームワークに分割されていて、'AKPlaygroundLoop'は AudioKitUI にあるので、
import AudioKitUI
を追加すればOKです。以降、'AKPlaygroundLoop'が出てくる箇所ではimportを忘れずに。
【参考】AudioKit/AudioKit/iOS/AudioKit/User Interface/AKPlaygroundLoop.swift
【2020.9.21追記】
rampTimeもエラーになります。
error: 02Oscillators.xcplaygroundpage:18:12: error: value of type 'AKOscillator' has no member 'rampTime'
oscillator.rampTime = 0.2
~~~~~~~~~~ ^~~~~~~~
これは rampDuration に変更されていうようなので、以下のように変更します。
//---rampTimeは、rampDurationに変更
oscillator.rampDuration = 0.2
【参考】AudioKit Reference AKOscillator Class Reference
Sound Envelopes
import AudioKitUI
を追加すればOKです。
Additive Sound Synthesis
1.まず以下を追加。
import AudioKitUI
2.Live ViewにUIを表示するので、Live Viewを表示する必要があります。「Alt+Cmd+Return」で表示/非表示を切り替えます。
【参考】How to create live playgrounds in Xcode
- AKPlaygroundView クラスを使ってUIを作成していますが、これがエラーになって動かない。
AudioKitPlaygrounds.xcodeprojに既存の他のファイルを見てみると、AKLiveViewController を使っているようなので、こちらで書き換えました。クラス名を含めた変更点は3つ。
・AKPlaygroundView >> AKLiveViewController
・override func setup() >> override func viewDidLoad()
・addSubview() >> addView()
GitHubで、AudioKit/AudioKit/iOS/AudioKit/User Interface/を見ると、どちらのクラスも存在しているので AKPlaygroundView で何故ダメなのかは不明。
4.Live View にUIが表示されるようになるが、音が鳴らない。
オシレーターを生成するための「createAndStartOscillator()」という関数があって、サンプルコードでは生成時に「oscillator.start()」を実行しているけど、「AudioKit.start()」の後に実行しないと音が鳴らないようです。
なので、createAndStartOscillator()にある「oscillator.start()」をコメントにして、「AudioKit.start()」のあとに以下のコードを追加すればOK。
//AKOscillator.start()は、AudioKit.start()の後でないと音が鳴らない
oscillators.forEach {
    $0.start()
}
Polyphony
1.まず以下を追加。
import AudioKitUI
2.AKPlaygroundView を AKLiveViewController に変更。Additive Sound Synthesis の項を参照。
Sampling
コードの変更点は、特になし。ただサンプルコードで使っている.wavファイルは、自分でDL(リンクあり)して該当Playground配下の「Resources」フォルダに入れておく必要があります。
まとめ
AudoKit、面白そうだけど、入門的な記事は古いものしか見当たらなかったので、まとめてみました。参考になれば幸いです。自分で書いたコードではないので、あえてコード全文は載せていません。
他にいい参考記事あったら教えてください。
シンセサイザーの音声合成的な知識が必要なので使いこなすにはハードル高そうですが、画面のキャラクタタップしたら「どう森」みたいにインチキ言語を喋るとかさせたら面白いかも(笑)。