はじめに
みなさん、こんばんは。しいくまです。
HashiCorp 社が出している Terraform、とっても便利ですよねー。
わたしの大好きなプロダクトのひとつです。
Infrastructure as Code を実現するためには欠かせない
Terraform について書きたいと思います。
ただひとつの記事で Terraform のすべてを伝えることは不可能なので
少しずつ記事にしていけたらと思います。
Azure で Terraform を使うためには、まず Azure AD で認証が必要です。
本日は、Azure AD 認証の方法について書きます。
Azure AD 認証の方法
Terraform における Azure AD 認証の方法は以下の 4 つがあります。
- Azure CLI
- マネージド ID
- サービスプリンシパル (クライアント証明書)
- サービスプリンシパル (シークレット)
HashiCorp の推奨としては、以下のとおりです。
・ CI ツールなどから非対話式で呼び出して使いたい場合は、マネージド ID もしくはサービスプリンシパルを使ってね。
・ ローカル PC から呼び出して使いたい場合は、Azure CLI を使ってね。
Azure CLI の認証方法は、ローカル環境に Azure CLI が必要、
かつ対話式に認証が必要ですので、ご注意ください。
最新の情報は下記 URL を参照ください。
あくまでも推奨ですので、
ローカル環境であっても、他の認証方法が使えないというわけではないです。
あえて対話式の認証方式を使うより、他の非対話式の認証方法を使った方が楽ですよね。
非対話式であるマネージド ID とサービスプリンシパルを使う認証方法を選択する際にひとつポイントとなるのが、どこから Terraform を実行するのか?ということです。
両者の特徴ですが、
[ マネージド ID ]
- Azure AD 認証時にパスワード情報を必要としない (パスワード不要)
- Terraform は、Azure 上のリソース (Virtual Machine (以下、VM) など) から実行する必要がある (Azure 外の環境 (オンプレや AWS) からは使えない)
[サービスプリンシパル]
- Azure AD 認証時にパスワードなどの情報が必要
- Terraform は、どこからでも実行可能 (Azure 外の環境 (オンプレや AWS) からでも使える)
Azure 内でから実行するのであれば、パスワード情報不要の 2. マネージド ID を使うが個人的にはオススメなのです。
シークレット情報が書かれたファイルを GitHub 上にアップロードしてしまうというリスクを抑えることができます。
ただし、Azure 外の環境からアクセスするためには、サービスプリンシパル一択となってしまいます。
その際は、シークレット情報の管理はしっかり行ってください。
マネージド ID については以下 URL が参考になるかと思います。
実装方法
今回は、マネージド ID を使った実装方法を書きます。
イメージとしては以下のような感じです。
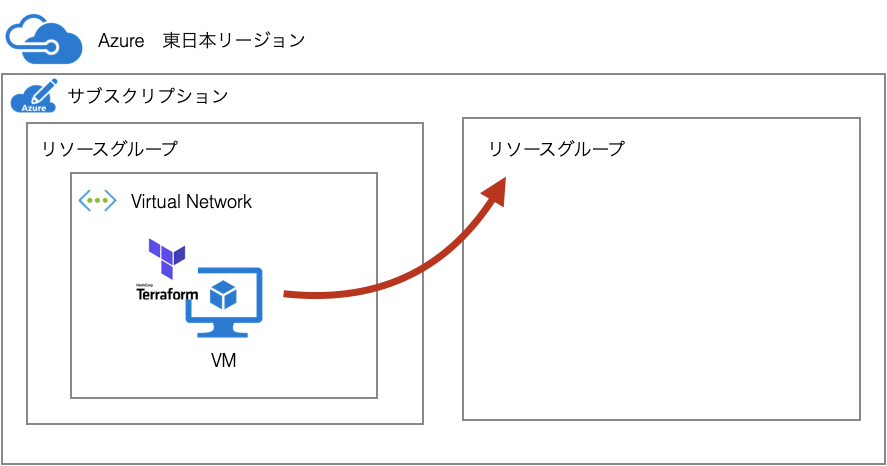
マネージド ID が有効になっている VM から、Azure AD 認証を実施して、同じテナントで同じサブスクリプション内にリソースグループを作ってみたいと思います。
流れば以下のとおりです。
[前提条件]
- Azure 上に基本的なリソース (Virtual Network (以下、VNET)、VM (CentOS) ) が作成されていること
[ 手順 ]
- VM のマネージ ID の有効化
- サブスクリプション ID および テナント ID の取得
- Terraform のインストール
- テンプレートの作成
- terraform plan & apply
それでは試してみましょう。
1. VM のマネージ ID の有効化
Azure Portal にログインします。
[Virtual Machines] に移動し、対象の対象仮想マシンを選択します。
[ID] を選択し、状態を [オン] にして、[保存] を選択します。
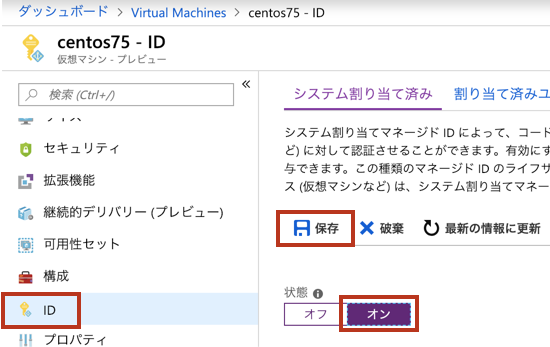
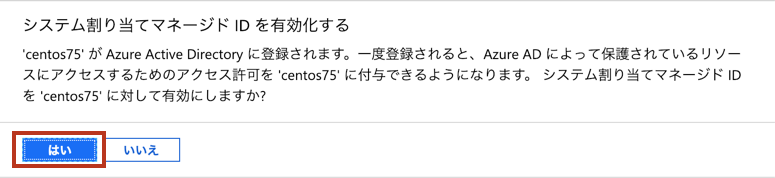
[はい] を選択します。
次に権限を付与します。
[サブスクリプション] に移動し、対象のサブスクリプションを選択します。

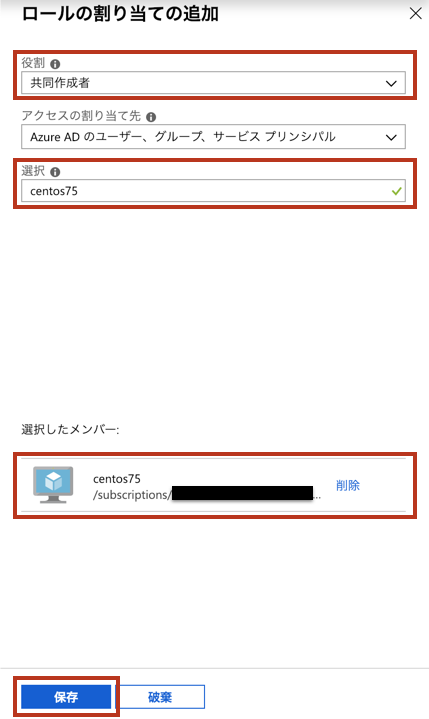
[アクセス制御(IAM)] → [ロールの割り当ての追加] の順に選択します。
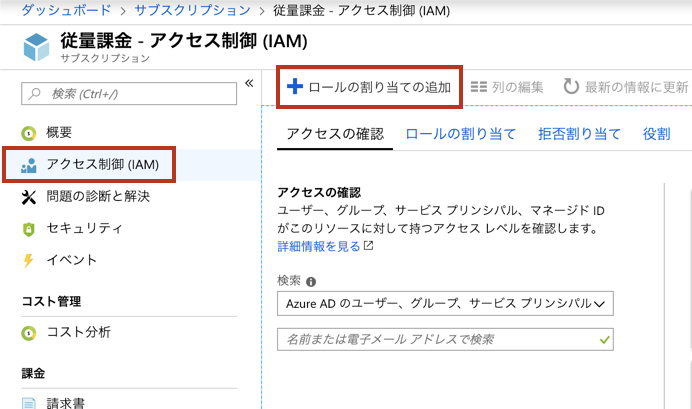
役割は [共同作成者] を選択し、選択という項目から対象の仮想マシンを選択します。
最後に [保存] を選択します。
2. サブスクリプション ID および テナント ID の取得
いろいろやり方はあります。
Azure Portal から取得するやり方、Azure CLI で取得するやり方、Azure PowerShell で取得するやり方、などなど。
今回は、Azure CLI で取得するやり方をご紹介します。
[az login] コマンドを実行します。
するとブラウザが起動し、認証をします。
以下のような結果が返ってきたら、認証は成功です。
$ az login
Note, we have launched a browser for you to login. For old experience with device code, use "az login --use-device-code"
You have logged in. Now let us find all the subscriptions to which you have access...
[
  {
    "cloudName": "AzureCloud",
    "id": "<サブスクリプション ID>",
    "isDefault": true,
    "name": "従量課金",
    "state": "Enabled",
    "tenantId": "<テナント ID>",
    "user": {
      "name": "hogehoge@example.com",
      "type": "user"
    }
  }
]
実行結果にサブスクリプション ID と テナント ID が含まれているのでコピーしておきます。
id が、サブスクリプション ID で、
tenantId が、テナント ID となります。
3. Terraform のインストール
Terraform はバイナリで配布されているのでダウンロードして配置するだけです。
今回 OS は CentOS 7.5 を使用します。
まずはダウンロードします。
[root@centos75 ~]# curl -OL https://releases.hashicorp.com/terraform/0.11.11/terraform_0.11.11_linux_amd64.zip
  % Total    % Received % Xferd  Average Speed   Time    Time     Time  Current
                                 Dload  Upload   Total   Spent    Left  Speed
100 20.0M  100 20.0M    0     0  32.8M      0 --:--:-- --:--:-- --:--:-- 32.8M
$PATH がとおっているディレクトリへ解凍します。
[root@centos75 ~]# cd /usr/local/bin
[root@centos75 bin]# unzip ~/terraform_0.11.11_linux_amd64.zip
Archive:  /root/terraform_0.11.11_linux_amd64.zip
  inflating: terraform
[root@centos75 bin]# ls -l
total 87388
-rwxrwxr-x. 1 root root 89483552 Dec 14 21:20 terraform
インストール確認をします。
[root@centos75 bin]# terraform version
Terraform v0.11.11
4. テンプレートの作成
Terraform のテンプレートを用意します。
こちらから git clone もしくはコピーして持ってきてください。
[root@centos75 ~]# git clone https://github.com/c9mau1/terraform-azure-azureadauth.git
Cloning into 'terraform-azure-azureadauth'...
remote: Enumerating objects: 10, done.
remote: Counting objects: 100% (10/10), done.
remote: Compressing objects: 100% (8/8), done.
remote: Total 10 (delta 0), reused 10 (delta 0), pack-reused 0
Unpacking objects: 100% (10/10), done.
terraform.tfvars を作成し、サブスクリプション ID およびテナント ID を記載します。
[root@centos75 ~]# cd terraform-azure-azureadauth
[root@centos75 terraform-azure-azureadauth]# vim terraform.tfvars
以下内容を入力し、保存します。
subscription_id = "<サブスクリプション ID>"
tenant_id = "<テナント ID>"
これで準備は完了です。
provider.tf こちらに Azure AD 認証をするための情報が書かれています。
[2019/01/13 00:03:17 terraform-azure-azureadauth]$ cat provider.tf
variable "subscription_id" {}
variable "tenant_id" {}

provider "azurerm" {
  subscription_id = "${var.subscription_id}"
  tenant_id       = "${var.tenant_id}"
  use_msi     = true
}
Azure AD 認証をする際は、"azurerm" を使います。
プロパティとしては、subscription_id および tenant_id を指定し、use_msi でマネージド ID での認証を有効化しています。
値は外部変数として先ほど作成した terraform.tfvars を参照するように定義しています。
resource_group.tf はリソースグループを作成するための情報が書かれています。
[2019/01/13 00:06:03 terraform-azure-azureadauth]$ cat resource_group.tf
### Resource Group
resource "azurerm_resource_group" "rg" {
  name     = "${local.res_group}"
  location = "${local.region}"
}
リソースグループを作成する際は、azurerm_resource_group を使います。
プロパティは、リソースグループ名と場所を指定しています。
この他にタグなどの情報も指定することが可能です。
値は外部変数として variables.tf に書いています。
[root@centos75 terraform-azure-azureadauth]# cat variables.tf
locals {
  region            = "japaneast"
  res_group         = "test-rg"
}
5. terraform 実行
まずは、init をします。
[root@centos75 terraform-azure-azureadauth]# terraform init

Initializing provider plugins...
- Checking for available provider plugins on https://releases.hashicorp.com...
- Downloading plugin for provider "azurerm" (1.21.0)...

The following providers do not have any version constraints in configuration,
so the latest version was installed.

To prevent automatic upgrades to new major versions that may contain breaking
changes, it is recommended to add version = "..." constraints to the
corresponding provider blocks in configuration, with the constraint strings
suggested below.

* provider.azurerm: version = "~> 1.21"

Terraform has been successfully initialized!

You may now begin working with Terraform. Try running "terraform plan" to see
any changes that are required for your infrastructure. All Terraform commands
should now work.

If you ever set or change modules or backend configuration for Terraform,
rerun this command to reinitialize your working directory. If you forget, other
commands will detect it and remind you to do so if necessary.
success したら、次に plan をします。
[root@centos75 terraform-azure-azureadauth]# terraform plan
Refreshing Terraform state in-memory prior to plan...
The refreshed state will be used to calculate this plan, but will not be
persisted to local or remote state storage.


------------------------------------------------------------------------

An execution plan has been generated and is shown below.
Resource actions are indicated with the following symbols:
  + create

Terraform will perform the following actions:

  + azurerm_resource_group.rg
      id:       <computed>
      location: "japaneast"
      name:     "test-east-rg"
      tags.%:   <computed>


Plan: 1 to add, 0 to change, 0 to destroy.

------------------------------------------------------------------------

Note: You didn't specify an "-out" parameter to save this plan, so Terraform
can't guarantee that exactly these actions will be performed if
"terraform apply" is subsequently run.
次に apply をします。
[Enter a value: ] で止まるので、[yes] を入力します。
[root@centos75 terraform-azure-azureadauth]# terraform apply

An execution plan has been generated and is shown below.
Resource actions are indicated with the following symbols:
  + create

Terraform will perform the following actions:

  + azurerm_resource_group.rg
      id:       <computed>
      location: "japaneast"
      name:     "test-east-rg"
      tags.%:   <computed>


Plan: 1 to add, 0 to change, 0 to destroy.

Do you want to perform these actions?
  Terraform will perform the actions described above.
  Only 'yes' will be accepted to approve.

  Enter a value: yes

azurerm_resource_group.rg: Creating...
  location: "" => "japaneast"
  name:     "" => "test-east-rg"
  tags.%:   "" => "<computed>"
azurerm_resource_group.rg: Creation complete after 1s (ID: /subscriptions/xxxxx/resourceGroups/test-east-rg)

Apply complete! Resources: 1 added, 0 changed, 0 destroyed.
これで完成です!
さいごに
これで認証できるようになりましたので
次回以降は仮想マシンの作成や Web Apps などの PaaS にも挑戦していきたいと思います。