この記事では、CloudBuildとGitHubを用いて以下のCI/CD戦略を実現します。
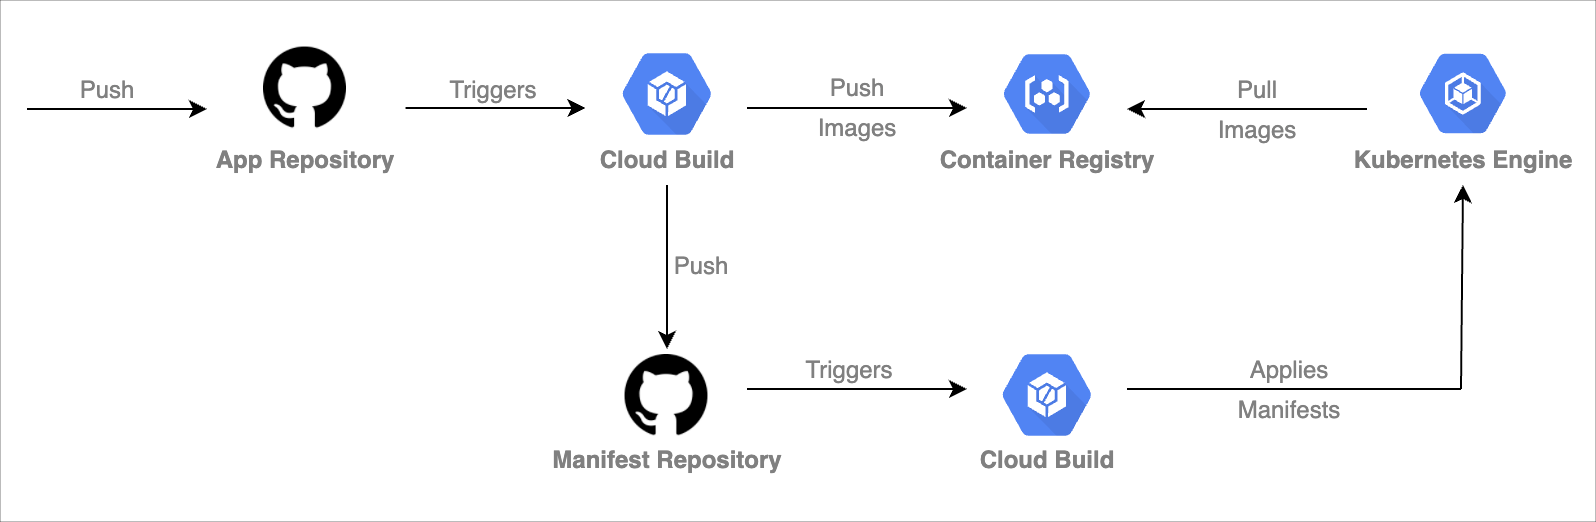
- アプリケーションの変更を
Appリポジトリにプッシュ - 1のプッシュをトリガーに、CloudBuildを実行
・ContainerRegistryにイメージをプッシュ
・マニフェストファイルを自動更新して、Manifestリポジトリにプッシュ - 2のプッシュをトリガーに、CloudBuildを実行
・GKEに最新のマニフェストファイルを適用
・適用された旨を、Manifestリポジトリの特定のブランチにコミット
前提条件
・マニフェストファイルの適用に十分なリソースのKubernetesクラスターが構築されている
・アプリケーションとマニフェストのリポジトリが分割されている
環境構築
GitOps-style continuous delivery with Cloud Buildを参考にしています。(タイトルもパクり参考にしました)
AppとManifestのリポジトリは、それぞれ以下を使用しています。
| 名前 | リポジトリ |
|---|---|
| App | go-grpc-health-probe-sample |
| Manifest | go-grpc-health-probe-sample-manifests |
※ 記事中に「App」や「Manifest」という名前が出てきた場合は、上記のリポジトリやそれに関連するファイルのことを表しています。
必要なAPIを有効にする
$ gcloud services enable \
      container.googleapis.com \
      cloudbuild.googleapis.com \
      containeranalysis.googleapis.com
CloudBuildに、GKEへのアクセス権を付与する
- Google Cloud Consoleで、Cloud Buildの
設定ページを開きます。 - Kubernetes Engine Developerのステータスを
有効にします。

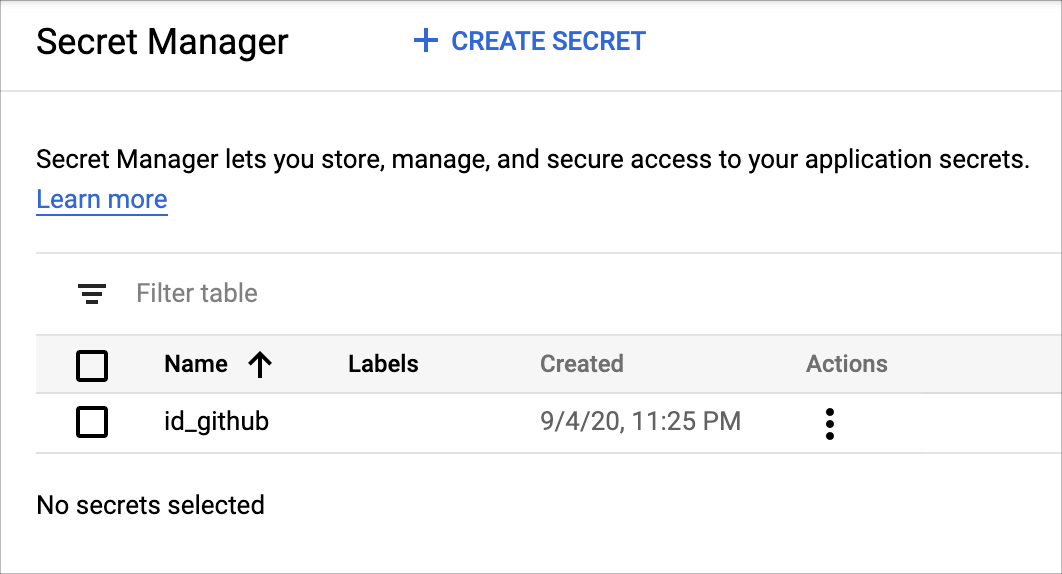
GitHubのSSH認証鍵をSecretManagerに保存する
詳しくはここを参考にしてください。
-
workingdirディレクトリを作成し、そこに新しいGitHub SSH認証鍵を作成します。
(ディレクトリ名は任意) - キーの保存先ファイルの入力を求められたら、
id_githubと入力します。
※ パスフレーズは空のままにしてください。 - Google Cloud Consoleで、
セキュリティ > シークレット マネージャーページを開きます。 -
+CREATE SECRETをクリック
・名前はid_github
・先ほど作成したSSH認証鍵を選択
・シークレットを作成をクリックします。
$ mkdir -p ~/workingdir
$ cd ~/workingdir
$ ssh-keygen -t rsa -b 4096 -C ${GITHUB_EMAIL}
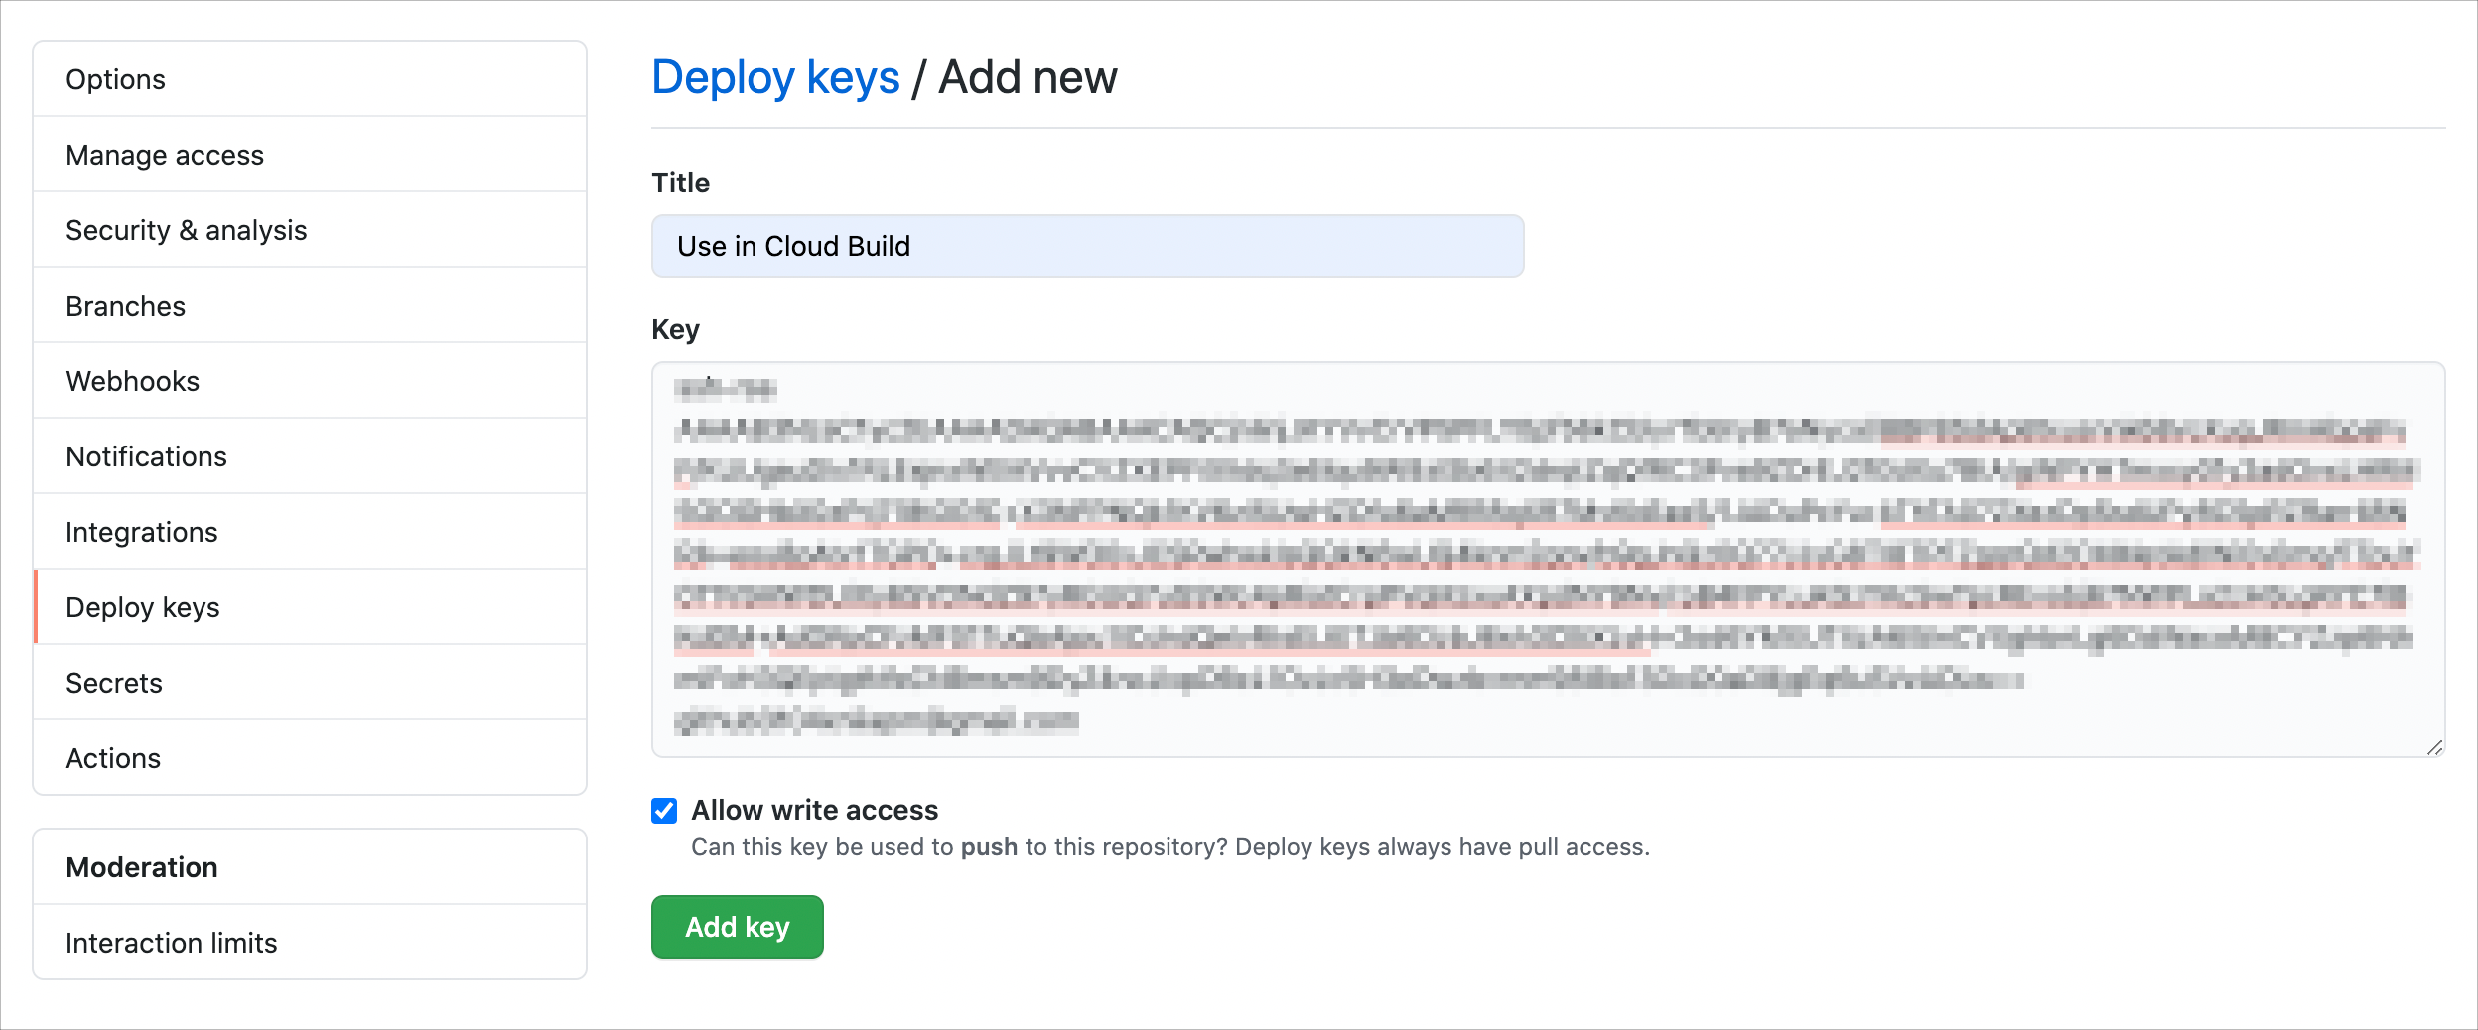
GitHubに公開SSH認証鍵を追加する
-
ManifestリポジトリのSettings > Deploy KeysのAdd deploy keyをクリックする。 - タイトルを入力し、先ほど作成した公開SSH認証鍵を貼り付ける。
-
Allow write accessにチェックをいれて、キーの追加をクリックする。
※ この認証鍵を使用して、Manifestリポジトリにプッシュするので、必ずチェックを入れる。 - ローカルのSSH認証鍵は不要なので、削除する。
CloudBuildサービスアカウントに、SecretManagerへのアクセス権を付与する
- Cloud Consoleで
IAMと管理 > IAMページを開きます。 - 表から、末尾が
@cloudbuild.gserviceaccount.comのメールアドレスを見つけて、鉛筆アイコンをクリックします。 -
Secret Manager のシークレット アクセサーのロールを追加し、保存をクリックします。
各リポジトリでの準備
ブランチ名は、可能な限りデブロイ先の環境名に近づけてください。
| デプロイ先 | Appリポジトリのブランチ名 | Manifestリポジトリのブランチ名 |
|---|---|---|
| dev | develop | candidate-dev |
| staging | staging | candidate-staging |
| production | production | candidate-production |
ここではdev環境向けの設定について説明します。
Appリポジトリの準備
cloudbuild.yaml
※見やすくする為に、リポジトリの内容から一部変更しています。
cloudbuild.yaml
timeout: 780s
steps:
  - id: build and push grpc-gateway image
    name: gcr.io/kaniko-project/executor:latest
    args:
      - --destination=gcr.io/$PROJECT_ID/grpc-gateway:${SHORT_SHA}
      - --cache=true
      - --cache-ttl=6h
      - --dockerfile=Dockerfile.proxy
      - --build-arg=PROJECT_ID=${PROJECT_ID}

  - id: build and push grpc-server image
    name: gcr.io/kaniko-project/executor:latest
    args:
      - --destination=gcr.io/$PROJECT_ID/grpc-server:${SHORT_SHA}
      - --cache=true
      - --cache-ttl=6h
      - --dockerfile=Dockerfile.server
      - --build-arg=PROJECT_ID=${PROJECT_ID}

  - id: access the id_github file from secret manager
    name: gcr.io/cloud-builders/gcloud
    entrypoint: 'bash'
    args:
      - '-c'
      - |
        gcloud secrets versions access latest --secret=id_github > /root/.ssh/id_github
    volumes:
      - name: 'ssh'
        path: /root/.ssh

  - id: set up git with key and domain
    name: 'gcr.io/cloud-builders/git'
    entrypoint: 'bash'
    args:
      - '-c'
      - |
        chmod 600 /root/.ssh/id_github
        cat <<EOF >/root/.ssh/config
        Hostname github.com
        IdentityFile /root/.ssh/id_github
        EOF
        ssh-keyscan -t rsa github.com > /root/.ssh/known_hosts
    volumes:
      - name: 'ssh'
        path: /root/.ssh

  - id: connect to the repository
    name: 'gcr.io/cloud-builders/git'
    args:
      - clone
      - --recurse-submodules
      - git@github.com:istsh/go-grpc-health-probe-sample-manifests.git
    volumes:
      - name: 'ssh'
        path: /root/.ssh

  - id: switch to candidate-dev branch
    name: 'gcr.io/cloud-builders/gcloud'
    dir: go-grpc-health-probe-sample-manifests
    entrypoint: /bin/sh
    args:
      - '-c'
      - |
        set -x && \
        git config --global user.email $(git log --format='%an <%ae>' -n 1 HEAD | sed 's/.*\<\([^>]*\)\>.*/\1/g') && \
        git fetch origin candidate-dev && git switch candidate-dev && \
        git fetch origin master && git merge origin/master
    volumes:
      - name: 'ssh'
        path: /root/.ssh

  - id: generate manifest for grpc-gateway
    name: 'gcr.io/cloud-builders/gcloud'
    dir: go-grpc-health-probe-sample-manifests/k8s/base/grpc-gateway
    entrypoint: /bin/sh
    args:
      - '-c'
      - |
        set -x && \
        sed "s/GOOGLE_CLOUD_PROJECT/${PROJECT_ID}/g" deployment.yaml.tpl | \
        sed "s/COMMIT_SHA/${SHORT_SHA}/g" > deployment.yaml

  - id: generate manifest for grpc-server
    name: 'gcr.io/cloud-builders/gcloud'
    dir: go-grpc-health-probe-sample-manifests/k8s/base/grpc-server
    entrypoint: /bin/sh
    args:
      - '-c'
      - |
        set -x && \
        sed "s/GOOGLE_CLOUD_PROJECT/${PROJECT_ID}/g" deployment.yaml.tpl | \
        sed "s/COMMIT_SHA/${SHORT_SHA}/g" > deployment.yaml

  - id: push generated manifests to candidate-dev branch
    name: 'gcr.io/cloud-builders/gcloud'
    dir: go-grpc-health-probe-sample-manifests
    entrypoint: /bin/sh
    args:
      - '-c'
      - |
        set -x && \
        git add k8s/base/grpc-gateway/deployment.yaml k8s/base/grpc-server/deployment.yaml && \
        git commit \
        --author="Cloud Build Service Account <$(gcloud auth list --filter=status:ACTIVE --format='value(account)')>" \
        -m "Deploying images
        - gcr.io/istsh-sample/grpc-gateway:${SHORT_SHA}
        - gcr.io/istsh-sample/grpc-server:${SHORT_SHA}
        Built from commit ${COMMIT_SHA} of repository go-grpc-health-probe-sample-manifest" && \
        git push origin candidate-dev
    volumes:
      - name: 'ssh'
        path: /root/.ssh
ステップは以下の順序・内容で実行されます
- grpc-gatewayのイメージを作成し、ContainerRegistryにプッシュ。タグは
:${SHORT_SHA}。 - grpc-serverのイメージを作成し、ContainerRegistryにプッシュ。タグは
:${SHORT_SHA}。 - SecretManagerからGitHub SSH認証鍵を取得し、
/root/.ssh/に配置。 - GitHubに接続する為の設定。
-
Manifestリポジトリをクローン。 -
candidate-devブランチにスイッチし、masterブランチをマージ。
マニフェストファイルの変更をmasterにマージしておけば、このステップでcandidate-devブランチに取り込まれます。 - grpc-gatewayの
deployment.yaml.tplの内容を一部変更し、deployment.yamlを作成または変更。
・GOOGLE_CLOUD_PROJECT->${PROJECT_ID}
・COMMIT_SHA->${SHORT_SHA} - grpc-serverの
deployment.yaml.tplの内容を一部変更し、deployment.yamlを作成または変更。
・GOOGLE_CLOUD_PROJECT->${PROJECT_ID}
・COMMIT_SHA->${SHORT_SHA} -
deployment.yamlをコミットし、Manifestリポジトリにプッシュ
Manifestリポジトリの準備
対応するブランチを作成する
| ブランチ名 | 役割 |
|---|---|
| candidate-dev | 最新のマニフェストファイルをコミットするブランチ。 デプロイのトリガーとなる。 |
| dev | マニフェストファイルが適用された旨をコミットするブランチ |
マニフェストファイルのテンプレートを用意する
Appリポジトリのプッシュにより実行されるビルドでは、yamlのテンプレートを用いて、自動的にマニフェストファイルを生成します。
そこで自動で生成または変更する必要のあるマニフェストファイルのテンプレートを用意します。
今回は、deployment.yamlを自動で生成または変更する必要があるので、deployment.yaml.tplファイルを作成します。
ここでは1ファイルだけ紹介します。
deployment.yaml.tpl
apiVersion: apps/v1
kind: Deployment
metadata:
  name: grpc-server
spec:
  replicas: 2
  revisionHistoryLimit: 3
  selector:
    matchLabels:
      app: grpc-server
  template:
    metadata:
      labels:
        app: grpc-server
    spec:
      volumes:
        - name: envoy
          configMap:
            name: envoy-grpc-server-config
      containers:
        - name: grpc-server
          image: gcr.io/istsh-sample/grpc-server:COMMIT_SHA
          imagePullPolicy: Always
          ports:
            - containerPort: 8080
          command: ["/server"]
          readinessProbe:
            exec:
              command: [ "/bin/grpc_health_probe", "-addr=:8080" ]
            initialDelaySeconds: 1
          livenessProbe:
            exec:
              command: [ "/bin/grpc_health_probe", "-addr=:8080" ]
            initialDelaySeconds: 1
        - name: envoy-proxy
          image: envoyproxy/envoy:v1.14-latest
          imagePullPolicy: Always
          command:
            - "/usr/local/bin/envoy"
          args:
            - "--config-path /etc/envoy/envoy.yaml"
          ports:
            - name: app
              containerPort: 10000
            - name: envoy-admin
              containerPort: 8001
          volumeMounts:
            - name: envoy
              mountPath: /etc/envoy
注目すべきは、:COMMIT_SHAの部分です。
CloudBuildのビルドにより、毎回ContainerRegistryにイメージがプッシュされるのですが、トリガーとなったコミットのIDで、この:COMMIT_SHAを置換します。
cloudbuild.yaml
※見やすくする為に、リポジトリの内容から一部変更しています。
cloudbuild.yaml
steps:
  - id: deploy
    name: 'gcr.io/cloud-builders/kubectl'
    args:
    - 'apply'
    - '-k'
    - 'k8s/overlays/dev/'
    env:
    - 'CLOUDSDK_COMPUTE_ZONE=${_CLOUDSDK_COMPUTE_ZONE}'
    - 'CLOUDSDK_CONTAINER_CLUSTER=${_CLOUDSDK_CONTAINER_CLUSTER}'

  - name: gcr.io/cloud-builders/gcloud
    entrypoint: 'bash'
    args: [ '-c', 'gcloud secrets versions access latest --secret=id_github > /root/.ssh/id_github' ]
    volumes:
      - name: 'ssh'
        path: /root/.ssh

  - name: 'gcr.io/cloud-builders/git'
    entrypoint: 'bash'
    args:
      - '-c'
      - |
        chmod 600 /root/.ssh/id_github
        cat <<EOF >/root/.ssh/config
        Hostname github.com
        IdentityFile /root/.ssh/id_github
        EOF
        ssh-keyscan -t rsa github.com > /root/.ssh/known_hosts
    volumes:
      - name: 'ssh'
        path: /root/.ssh

  - name: 'gcr.io/cloud-builders/git'
    args:
      - clone
      - --recurse-submodules
      - git@github.com:istsh/go-grpc-health-probe-sample-manifests.git
    volumes:
      - name: 'ssh'
        path: /root/.ssh

  - name: 'gcr.io/cloud-builders/gcloud'
    id: Copy to dev branch
    dir: go-grpc-health-probe-sample-manifests
    entrypoint: /bin/sh
    args:
      - '-c'
      - |
        set -x && \
        git config --global user.email $(git log --format='%an <%ae>' -n 1 HEAD | sed 's/.*\<\([^>]*\)\>.*/\1/g') && \
        git fetch origin dev && git switch dev && \
        git checkout $COMMIT_SHA k8s/base/grpc-gateway/deployment.yaml && \
        git checkout $COMMIT_SHA k8s/base/grpc-server/deployment.yaml && \
        git commit \
        --author="Cloud Build Service Account <$(gcloud auth list --filter=status:ACTIVE --format='value(account)')>" \
        -m "Manifest from commit $COMMIT_SHA

        $(git log --format=%B -n 1 $COMMIT_SHA)" && \
        git push origin dev
    volumes:
      - name: 'ssh'
        path: /root/.ssh

substitutions:
  _CLOUDSDK_COMPUTE_ZONE: us-central1-b
  _CLOUDSDK_CONTAINER_CLUSTER: go-grpc-health-probe-sample
ステップは以下の内容・順序で実行されます
- GKEに最新のマニフェストファイルを適用。
- SecretManagerからGitHub SSH認証鍵を取得し、
/root/.ssh/に配置。 - GitHubに接続する為の設定。
-
Manifestリポジトリをクローン。 -
devブランチにスイッチ。
candidate-devブランチにコミットされたdeployment.yamlを反映し、コミット&プッシュ。
CloudBuildのトリガーを追加する
トリガーはApp用とManifest用の2つ追加する必要があります。
Appリポジトリ用のトリガー
-
リポジトリを接続から、GitHubを選択し、続行をクリック - 対象の
Appリポジトリを選択し、リポジトリを接続をクリック -
pushトリガーを作成をクリック - イベント >
ブランチにpushするを選択 - ソース > ブランチに
^develop$と入力 - ビルド構成 >
Cloud Build 構成ファイルを選択し、cloudbuild.yamlのパスを入力 -
保存をクリック
Manifestリポジトリ用のトリガー
-
リポジトリを接続から、GitHubを選択し、続行をクリック - 対象の
Manifestリポジトリを選択し、リポジトリを接続をクリック -
pushトリガーを作成をクリック - イベント >
ブランチにpushするを選択 - ソース > ブランチに
^candidate-dev$と入力 - ビルド構成 >
Cloud Build 構成ファイルを選択し、cloudbuild.yamlのパスを入力 -
保存をクリック
コミットの内容
AppリポジトリのCloudBuildが成功すると、以下の様なコミットコメントでManifestリポジトリにプッシュされます。
Author: Cloud Build Service Account <xxx@cloudbuild.gserviceaccount.com>
Date:   Sun Sep 6 14:25:37 2020 +0000

    Deploying images
    - gcr.io/istsh-sample/grpc-gateway:12792a4
    - gcr.io/istsh-sample/grpc-server:12792a4

    Built from commit 12792a48c682312075ff4988367eb0b7393d28cd of repository go-grpc-health-probe-sample-manifest
さらに、このプッシュをトリガーにしたManifestリポジトリのCloudBuildが成功すると、以下の様なコミットコメントでManifestリポジトリにプッシュされます。
Author: Cloud Build Service Account <xxx@cloudbuild.gserviceaccount.com>
Date:   Sat Sep 5 16:16:40 2020 +0000

    Manifest from commit beaa97bc46cfb624f1f325da1702d99fec0c9af0

    Deploying images
    - gcr.io/istsh-sample/grpc-gateway:12792a4
    - gcr.io/istsh-sample/grpc-server:12792a4

    Built from commit 12792a48c682312075ff4988367eb0b7393d28cd of repository go-grpc-health-probe-sample-manifest
まとめ
Appリポジトリにプッシュするだけで、CloudBuildで2つのビルドが連鎖的に実行され、特定の環境にデプロイされるようになりました。
今後はArgoCDやSpinnakerを使用したCI/CDにも挑戦してみようと思います。