概要
OpenCV v3.3.1のリリースにYOLOが入ってOpenCVから扱えるようになったのですが、
個人的にいつも自分がopenFrameworksを書いている環境からを扱えると嬉しい気持ちがあったので、
OpenCVのYOLOサンプルコードをopenFrameworksで動かすところまでの手順をメモします。
ちなみにofxDarknetというものがあるので、そちらを使えばもっと簡単にYOLOを試せると思います。
やったこと
やったことは以下の3つです。出来る人がやればすぐ終わる内容なのでこのメモは初心者向けです。
- OpenCV3.3.1のインストール。
- Xcodeの環境設定
- OpenCvのYOLOサンプルコードをoFに移植
環境
- MacOS X 10.11.6
- openFrameworks 0.9.8
- OpenCV3.3.1
- Xcode 8.2.1
(1) OpenCVのインストール
まず最新のOpenCV(3.3.1)をインストールします。
最新のOpenCV(3.3.1)がインストール出来れば方法は何でも大丈夫です。
インストールの手順は世の中の方が既に詳しく解説をたくさん出してくださっているので、
そちらを参照して下さい。
自分の場合はこちらの記事を参考に下記のようにしてインストールしました。
$ brew tap homebrew/science
$ brew install opencv3
(2) Xcodeの環境設定
ProjectGenerator等でoFのプロジェクトを作ったら、
BuildSettingsのHeader Search PathsにOpenCVのインクルードパスを追加します。
自分はProject.xcconfigにOPENCV_PATHを追加して、以下のようにしました。

ちなみに自分はHomebrewでインストールしたのでOpenCVのincludeまでのパスは下記のようになりました。
/usr/local/Cellar/opencv/3.3.1_1
次にOpenCVのdylibをBuild SettingsのOther Linker Flagsに追加していきます。
OpenCVの使いたい機能のものを追加すればOKなのですが、
今回は以下の3つがあれば大丈夫です。
- libopencv_core.dylib
- libopencv_dnn.dylib
- libopencv_imgproc.dylib

ちなみにここまで書いた所で[こちらの記事](https://qiita.com/TatsuyaOGth/items/d4493446ba3e5e292753)を発見しましたので、より詳しい部分についてはこちらの記事が参考になります。oFとCv::Matの変換などについても記載があるので大変参考になりました。
(3) OpenCvのYOLOサンプルコードをoFに移植
諸々の設定が終わったらOpenCVのYOLOサンプルコードをoFに移植します。
と言ってもほとんど直す箇所はありません。
以下にソース記載します。
# pragma once

# include "ofMain.h"

// YOLO
# include <opencv2/dnn.hpp>
# include <opencv2/dnn/shape_utils.hpp>
# include <opencv2/imgproc.hpp>
# include <opencv2/highgui.hpp>
# include <fstream>
# include <iostream>
# include <algorithm>
# include <cstdlib>

using namespace std;
using namespace cv;
using namespace cv::dnn;

class ofApp : public ofBaseApp{

	public:
		void setup();
		void update();
		void draw();

    dnn::Net net;

    int network_width = 416;
    int network_height = 416;

    ofVideoGrabber video;
    ofImage detectImg;  // 静止画認識
    ofImage cameraImg; // webCam認識

    vector<string> classNamesVec;

    cv::Mat toCV(ofPixels &pix);
    void getDetectedImageFromYOLO(ofPixels &op);

};
# include "ofApp.h"

//--------------------------------------------------------------
void ofApp::setup(){

    String modelConfiguration = "yolo.cfg"; // YOLOの.cfgファイルへのパスを記載

    String modelBinary = "yolo.weights"; // YOLOの.weightsファイルへのパスを記載

    //! [Initialize network]
    net = readNetFromDarknet(modelConfiguration, modelBinary);
    //! [Initialize network]
    if (net.empty())
    {
        cout << "Can't load network by using the following files: " << endl;
        cout << "cfg-file:     " << modelConfiguration << endl;
        cout << "weights-file: " << modelBinary << endl;
        cout << "Models can be downloaded here:" << endl;
        cout << "https://pjreddie.com/darknet/yolo/" << endl;
    }

    // cam
    video.setDeviceID( 0 );
    video.setDesiredFrameRate( 30 );
    video.initGrabber( 640, 480 );

    // img
    detectImg.load("my.jpg"); // 認識したい静止画
    getDetectedImageFromYOLO(detectImg.getPixels());
    detectImg.update();

    // objectClassName
    ifstream classNamesFile("coco.names"); // YOLOの.ClassNameファイルへのパスを記載
    if (classNamesFile.is_open())
    {
        string className = "";
        while (std::getline(classNamesFile, className))
            classNamesVec.push_back(className);

        for( auto itr : classNamesVec )
        {
            string cName = itr;
            cout << "classNames :" << cName << endl;
        }
    }
}

//--------------------------------------------------------------
void ofApp::update(){
    video.update();
    getDetectedImageFromYOLO(video.getPixels());
    cameraImg = video.getPixels();
}

//--------------------------------------------------------------
void ofApp::draw(){
    ofSetColor(255);
    video.draw(0, 0);
    cameraImg.draw(640,0);

    detectImg.draw(0,480);

    ofDrawBitmapString(ofToString(ofGetFrameRate(), 0),20, 20);
}


cv::Mat ofApp::toCV(ofPixels &pix)
{
    return cv::Mat(pix.getHeight(), pix.getWidth(), CV_MAKETYPE(CV_8U, pix.getNumChannels()), pix.getData(), 0);
}

//--------------------------------------------------------------
void ofApp::getDetectedImageFromYOLO(ofPixels &op){
    cv::Mat frame = toCV(op);

    if (frame.channels() == 4)
        cvtColor(frame, frame, COLOR_BGRA2BGR);

    //! [Resizing without keeping aspect ratio]
    Mat resized;
    resize(frame, resized, cvSize(network_width, network_height));
    //! [Resizing without keeping aspect ratio]

    //! [Prepare blob]
    Mat inputBlob = blobFromImage(resized, 1 / 255.F); //Convert Mat to batch of images
    //! [Prepare blob]

    //! [Set input blob]
    net.setInput(inputBlob, "data");                   //set the network input
    //! [Set input blob]

    //! [Make forward pass]
    Mat detectionMat = net.forward("detection_out");   //compute output
    //! [Make forward pass]

    vector<double> layersTimings;
    double freq = getTickFrequency() / 1000;
    double time = net.getPerfProfile(layersTimings) / freq;
    ostringstream ss;
    ss << "FPS: " << 1000/time << " ; time: " << time << " ms";
    putText(frame, ss.str(), cvPoint(20,20), 0, 0.5, Scalar(0,0,255));

    float confidenceThreshold = 0.24;

    for (int i = 0; i < detectionMat.rows; i++)
    {
        const int probability_index = 5;
        const int probability_size = detectionMat.cols - probability_index;
        float *prob_array_ptr = &detectionMat.at<float>(i, probability_index);

        size_t objectClass = max_element(prob_array_ptr, prob_array_ptr + probability_size) - prob_array_ptr;
        float confidence = detectionMat.at<float>(i, (int)objectClass + probability_index);

        if (confidence > confidenceThreshold)
        {
            float x = detectionMat.at<float>(i, 0);
            float y = detectionMat.at<float>(i, 1);
            float width = detectionMat.at<float>(i, 2);
            float height = detectionMat.at<float>(i, 3);
            int xLeftBottom = static_cast<int>((x - width / 2) * frame.cols);
            int yLeftBottom = static_cast<int>((y - height / 2) * frame.rows);
            int xRightTop = static_cast<int>((x + width / 2) * frame.cols);
            int yRightTop = static_cast<int>((y + height / 2) * frame.rows);

            rectangle(frame, cvRect(xLeftBottom, yLeftBottom,xRightTop - xLeftBottom,yRightTop - yLeftBottom), Scalar(0, 255, 0));

            if (objectClass < classNamesVec.size())
            {
                ss.str("");
                ss << confidence;
                String conf(ss.str());
                String label = String(classNamesVec[objectClass]) + ": " + conf;
                int baseLine = 0;
                CvSize labelSize = getTextSize(label, FONT_HERSHEY_SIMPLEX, 0.5, 1, &baseLine);
                rectangle(frame, cvRect(xLeftBottom, yLeftBottom ,labelSize.width, labelSize.height + baseLine),Scalar(255, 255, 255), CV_FILLED);
                putText(frame, label, cvPoint(xLeftBottom, yLeftBottom + labelSize.height),
                        FONT_HERSHEY_SIMPLEX, 0.5, Scalar(0,0,0));
            }
            else
            {
                cout << "Class: " << objectClass << endl;
                cout << "Confidence: " << confidence << endl;
                cout << " " << xLeftBottom
                << " " << yLeftBottom
                << " " << xRightTop
                << " " << yRightTop << endl;
            }
        }
    }
}
そして、後はYOLOの学習済みのモデルファイル等をDLしてきて適当なフォルダへ配置して、
コード内のパスを書き換えて実行するだけです。
学習済みのモデル等は下記のページからDLできます。
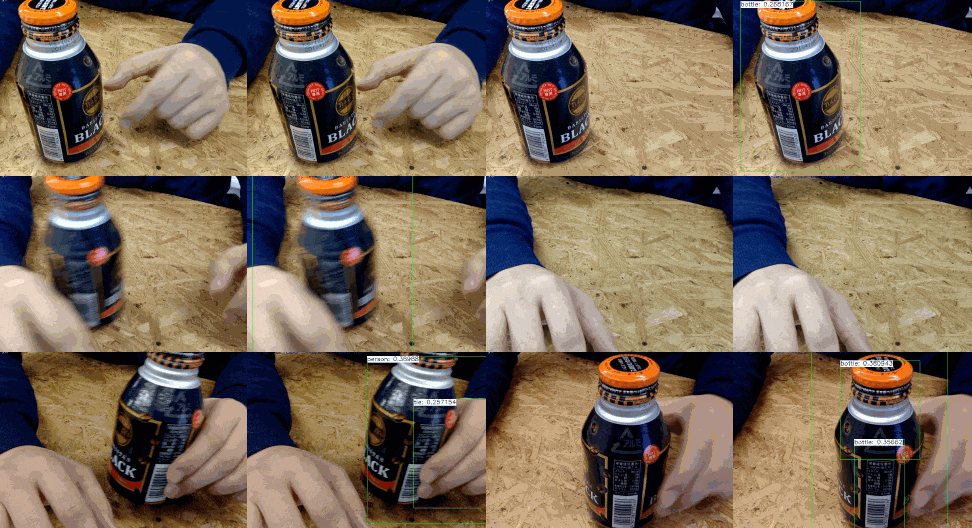
実行結果
下記のgifはtiny-yoloを実行したものです。
精度は少し下がりますが通常のYOLOより速く、fpsは15前後出ていました。
以上です。
一応、今回のコードをこちらに置いておきます。
https://github.com/AkihiroChaya/oF_OpenCV_YOLO
