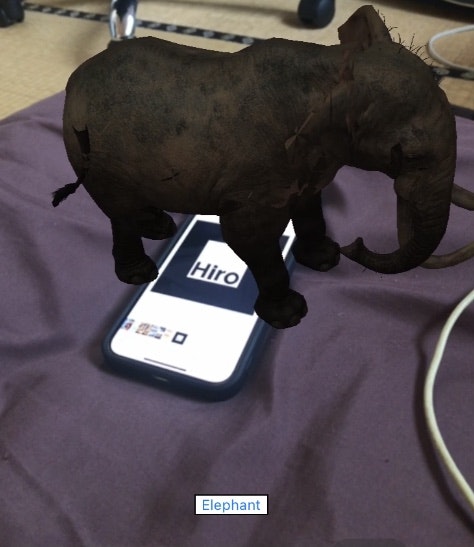
AR(Augmented Reality、拡張現実)とは、現実世界に仮想的な視覚情報を追加して、現実の環境を拡張する技術です。ARには「マーカー型」「GPS型」「空間認識型」「物体認識型」の種類がありますが、本稿では「マーカー型」ARを利用したアプリの開発について説明します。AR機能はAR.jsライブラリで実現されています。
マーカー型のAR
マーカー型のARとは、ビジョンベースのARで、画像をトリガーとして使用します。ある画像を認識し、その画像の特徴点を一致させることで、ARコンテンツを自動的に表示することができます[1]。よく使われるものは以下のHiroの画像です。このアプリでも、この「Hiro」画像を認識してARコンテンツを表示するようになっています。
AR.jsでマーカー型のAR機能を開発
今回は、JavascriptのライブラリであるAR.jsを使用して、ARを実現しました。AR.jsは、Web ARの開発に使用されるライブラリです。。このライブラリは@dsudoさんが「AR.js の世界へようこそ! 3歩でわかる お手軽 拡張現実」で紹介されています。
ディレクトリ構成
.
├── index.html
├── routes.js
├── server.js
├── public
│   ├── sound
│   ├── littlest_tokyo (AR model folder)
│   ├── shiba (AR model folder)
│   ├── horse (AR model folder)
│   └── elephant (AR model folder)
└── scripts
    ├── gesture-detector.js
    ├── gesture-handler.js
    └── soundhandler.js
index.htmlに以下のスクリプトを貼り付けます
以下のスクリプトをindex.htmlのheadに埋め込むと、AR.jsライブラリを使うことができます。
<!--> index.html <--->
<!doctype HTML>
<html>
    <head>
        <meta charset="utf-8">
        <meta http-equiv="X-UA-Compatible" content="IE=edge">
        <meta name="viewport" content="width=device-width, user-scalable=no, minimum-scale=1.0, maximum-scale=1.0">
        <script src="https://kit.fontawesome.com/14b20d6d18.js" crossorigin="anonymous"></script>
        <script src="https://aframe.io/releases/1.4.0/aframe.min.js"></script>
        <script src="https://raw.githack.com/AR-js-org/AR.js/master/aframe/build/aframe-ar.js"></script>
        <script src="https://rawgit.com/donmccurdy/aframe-extras/master/dist/aframe-extras.loaders.min.js"></script>
        <script src="https://supereggbert.github.io/aframe-htmlembed-component/dist/build.js"></script>
        ...
        ...
ARのコンテンツ
次に、index.htmlのbodyに以下のコードを入れます。
<!--> index.html <--->
  ....
    <body>
      <a-scene
        arjs
        embedded
        renderer="logarithmicDepthBuffer: true;"
        vr-mode-ui="enabled: false"
        id="scene"
      >
            <a-assets>
                <a-asset-item id="model" src="public/elephant/scene.gltf" ></a-asset-item>
            </a-assets>
            <a-marker preset="hiro"
                raycaster="objects: .clickable"
                emitevents="true"
                cursor="fuse: false; rayOrigin: mouse;"
                id="markerA"
              >
                <a-entity
                    position="0 0 0"
                    scale="1 1 1"
                    class="clickable"
                    gltf-model="#model"
                    animation-mixer
                    htmlembed
                    ></a-entity>
            </a-marker>

            <a-entity camera></a-entity>
        </a-scene>
    </body>
-
a-scene:a-scene要素でシーン(ARのコンテンツ)が表示されます。グローバールなルートオブジェクトであり、すべてのエンティティはa-sceneの内に含まれます。
- キャンバス、レンダラー、レンダーループの設定
- デフォルトのカメラとライト
- webvr-polyfill、VREffectの設定
- WebVR APIを呼び出すEnter VRのUIの追加
- WebXRシステムを介してWebXRデバイスを構成する
-
a-assets
- パフォーマンス向上のためのアセット管理システム
- アセットを一か所に配置する
- アセットをプリロードおよびキャッシュできる
-
a-marker
- マーカーを認識し、ARのコンテンツを発動
- マーカーの種類は「hiro」、「pattern」、「barcode」があります。preset="hiro"で、hiroのマーカーを認識することになります。
ここまででは、ARの映像を表示することができました。もし表示されない場合は、scaleの値が大きすぎる可能性があります。私自身はこの像を表示するために、scale="0.02 0.02 0.02"を使用しました。gltfファイルはSketchfabでダウンロードできます。
他のARのコンテンツを追加
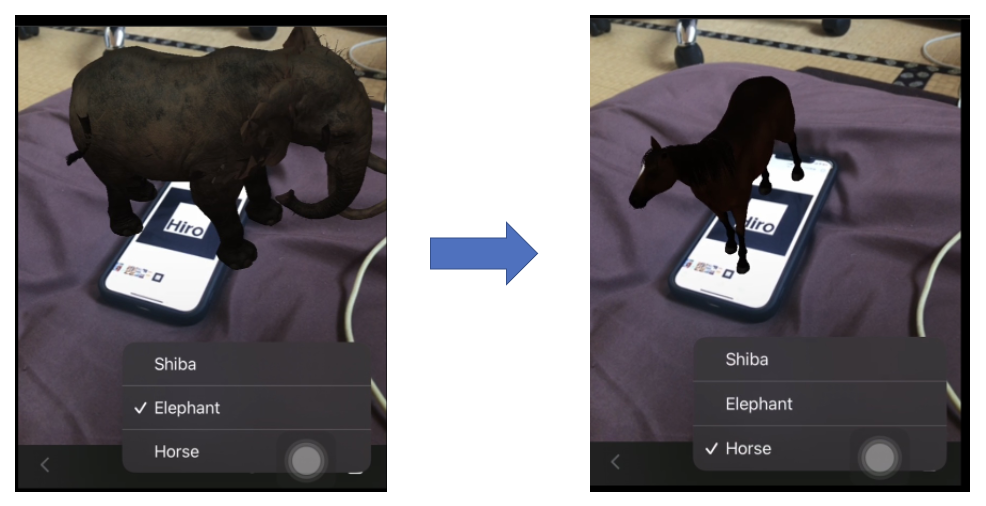
1つのコンテンツだけ表示できるのはちょっとつまらないので、複数のコンテンツを加えました。そのため、index.htmlを修正し、コンテンツを選択する機能を追加しました。
document.querySelector("a-entity").setAttribute()メソッドを使えば、 エンティティの属性値を変えることができます。ここでは、a-sceneコードの修正は必要ありません。
<!--> index.html <--->

<head>
...
   <script>
    function changeModel(modelParam) {
        let modelName = modelParam.value.toLowerCase();
        console.log(modelName);
        console.log(document.querySelector("a-entity").getAttribute("gltf-model"))
        if (modelName==="elephant") {
            console.log("debug")
            document.querySelector("a-entity").setAttribute("gltf-model", "public/elephant/scene.gltf");
            document.querySelector("a-entity").setAttribute("scale", "0.02 0.02 0.02");
        }

        if (modelName==="shiba") {
            document.querySelector("a-entity").setAttribute("gltf-model", "public/shiba/scene.gltf");
            document.querySelector("a-entity").setAttribute("scale", "1 1 1");
        }

        if (modelName==="horse") {
            document.querySelector("a-entity").setAttribute("gltf-model", "public/horse/scene.gltf");
            document.querySelector("a-entity").setAttribute("scale", "1 1 1");

        }

        if (modelName==="tokyo") {
            document.querySelector("a-entity").setAttribute("gltf-model", "public/littlest_tokyo/scene.gltf");
            document.querySelector("a-entity").setAttribute("scale", "0.005 0.005 0.005");

        }
    };
   </script>

</head>
<body>
    <div class="option-list">
         <select onchange="changeModel(this);" class="model" id="rgb">
            <option id="shiba" value="shiba">Shiba</option>
            <option id="elephant" value="elephant">Elephant</option>
            <option id="horse" value="horse">Horse</option>
            <option id="tokyo" value="tokyo">Littlest Tokyo</option>
        </select>
    </div>
    <!--> <a-scene>コード <--->
    ....
</body>
以上のコードを入れると、表示するコンテンツを選択できます。
コンテンツをズームや回転
AR.jsの最近バージョンで、コンテンツをズームや回転するためのタッチジェスチャーを実現することができるようになりました。スマホで簡単にコンテンツを回転し、拡大・縮小できます。この機能を作るために、以下の2つのファイルを使用します。
- gesture-detector.js
// gesture-detector.js
// Component that detects and emits events for touch gestures

AFRAME.registerComponent("gesture-detector", {
    schema: {
      element: { default: "" }
    },

    init: function() {
      this.targetElement =
        this.data.element && document.querySelector(this.data.element);

      if (!this.targetElement) {
        this.targetElement = this.el;
      }

      this.internalState = {
        previousState: null
      };

      this.emitGestureEvent = this.emitGestureEvent.bind(this);

      this.targetElement.addEventListener("touchstart", this.emitGestureEvent);

      this.targetElement.addEventListener("touchend", this.emitGestureEvent);

      this.targetElement.addEventListener("touchmove", this.emitGestureEvent);
    },

    remove: function() {
      this.targetElement.removeEventListener("touchstart", this.emitGestureEvent);

      this.targetElement.removeEventListener("touchend", this.emitGestureEvent);

      this.targetElement.removeEventListener("touchmove", this.emitGestureEvent);
    },

    emitGestureEvent(event) {
      const currentState = this.getTouchState(event);

      const previousState = this.internalState.previousState;

      const gestureContinues =
        previousState &&
        currentState &&
        currentState.touchCount == previousState.touchCount;

      const gestureEnded = previousState && !gestureContinues;

      const gestureStarted = currentState && !gestureContinues;

      if (gestureEnded) {
        const eventName =
          this.getEventPrefix(previousState.touchCount) + "fingerend";

        this.el.emit(eventName, previousState);

        this.internalState.previousState = null;
      }

      if (gestureStarted) {
        currentState.startTime = performance.now();

        currentState.startPosition = currentState.position;

        currentState.startSpread = currentState.spread;

        const eventName =
          this.getEventPrefix(currentState.touchCount) + "fingerstart";

        this.el.emit(eventName, currentState);

        this.internalState.previousState = currentState;
      }

      if (gestureContinues) {
        const eventDetail = {
          positionChange: {
            x: currentState.position.x - previousState.position.x,

            y: currentState.position.y - previousState.position.y
          }
        };

        if (currentState.spread) {
          eventDetail.spreadChange = currentState.spread - previousState.spread;
        }

        // Update state with new data

        Object.assign(previousState, currentState);

        // Add state data to event detail

        Object.assign(eventDetail, previousState);

        const eventName =
          this.getEventPrefix(currentState.touchCount) + "fingermove";

        this.el.emit(eventName, eventDetail);
      }
    },

    getTouchState: function(event) {
      if (event.touches.length === 0) {
        return null;
      }

      // Convert event.touches to an array so we can use reduce

      const touchList = [];

      for (let i = 0; i < event.touches.length; i++) {
        touchList.push(event.touches[i]);
      }

      const touchState = {
        touchCount: touchList.length
      };

      // Calculate center of all current touches

      const centerPositionRawX =
        touchList.reduce((sum, touch) => sum + touch.clientX, 0) /
        touchList.length;

      const centerPositionRawY =
        touchList.reduce((sum, touch) => sum + touch.clientY, 0) /
        touchList.length;

      touchState.positionRaw = { x: centerPositionRawX, y: centerPositionRawY };

      // Scale touch position and spread by average of window dimensions

      const screenScale = 2 / (window.innerWidth + window.innerHeight);

      touchState.position = {
        x: centerPositionRawX * screenScale,
        y: centerPositionRawY * screenScale
      };

      // Calculate average spread of touches from the center point

      if (touchList.length >= 2) {
        const spread =
          touchList.reduce((sum, touch) => {
            return (
              sum +
              Math.sqrt(
                Math.pow(centerPositionRawX - touch.clientX, 2) +
                  Math.pow(centerPositionRawY - touch.clientY, 2)
              )
            );
          }, 0) / touchList.length;

        touchState.spread = spread * screenScale;
      }

      return touchState;
    },

    getEventPrefix(touchCount) {
      const numberNames = ["one", "two", "three", "many"];

      return numberNames[Math.min(touchCount, 4) - 1];
    }
  });
- gesture-handler.js
// gesture-handler.js
AFRAME.registerComponent("gesture-handler", {
    schema: {
      enabled: { default: true },
      rotationFactor: { default: 5 },
      minScale: { default: 0.3 },
      maxScale: { default: 8 },
    },

    init: function () {
      this.handleScale = this.handleScale.bind(this);
      this.handleRotation = this.handleRotation.bind(this);

      this.isVisible = false;
      this.initialScale = this.el.object3D.scale.clone();
      this.scaleFactor = 1;

      this.el.sceneEl.addEventListener("markerFound", (e) => {
        this.isVisible = true;
      });

      this.el.sceneEl.addEventListener("markerLost", (e) => {
        this.isVisible = false;
      });
    },

    update: function () {
      if (this.data.enabled) {
        this.el.sceneEl.addEventListener("onefingermove", this.handleRotation);
        this.el.sceneEl.addEventListener("twofingermove", this.handleScale);
      } else {
        this.el.sceneEl.removeEventListener("onefingermove", this.handleRotation);
        this.el.sceneEl.removeEventListener("twofingermove", this.handleScale);
      }
    },

    remove: function () {
      this.el.sceneEl.removeEventListener("onefingermove", this.handleRotation);
      this.el.sceneEl.removeEventListener("twofingermove", this.handleScale);
    },

    handleRotation: function (event) {
      if (this.isVisible) {
        this.el.object3D.rotation.y +=
          event.detail.positionChange.x * this.data.rotationFactor;
        this.el.object3D.rotation.x +=
          event.detail.positionChange.y * this.data.rotationFactor;
      }
    },

    handleScale: function (event) {
      if (this.isVisible) {
        this.scaleFactor *=
          1 + event.detail.spreadChange / event.detail.startSpread;

        this.scaleFactor = Math.min(
          Math.max(this.scaleFactor, this.data.minScale),
          this.data.maxScale
        );

        this.el.object3D.scale.x = this.scaleFactor * this.initialScale.x;
        this.el.object3D.scale.y = this.scaleFactor * this.initialScale.y;
        this.el.object3D.scale.z = this.scaleFactor * this.initialScale.z;
      }
    },
  });
以上の2つのファイルを作れたら、gesture-detectorをa-sceneに、gesture-handlerをa-entityに埋め込みます。
<!--> index.html <--->
<head>
...
<script src="scripts/gesture-detector.js"></script>
<script src="scripts/gesture-handler.js"></script>
</head>
<body>
...
<a-scene
    arjs
    embedded
    renderer="logarithmicDepthBuffer: true;"
    vr-mode-ui="enabled: false"
    gesture-detector
    id="scene"
>
...
<a-entity
    position="0 0 0"
    scale="1 1 1"
    class="clickable"
    gesture-handler
    gltf-model="#model"
    animation-mixer
    htmlembed
></a-entity>
...
</a-scene>
</body>
Soundを加える
像や馬や犬が出現するとき、吠える音を聴きたいですね。私は音を出す機能を追加します。以下のsoundhandler.jsを使います。
// soundhandler.js

AFRAME.registerComponent('soundhandler', {
    tick: function () {
        var entity = document.querySelector('[sound]');
        if (document.querySelector('a-marker').object3D.visible === true) {
            console.log()
            if(document.getElementById('voice').style.display !== 'none'){
                entity.components.sound.playSound();
            }
        } else {
            entity.components.sound.pauseSound();
        }

    }
});
次に、index.htmlを以下のように修正します。
<!--> index.html <--->

<head>
...
<script src="scripts/soundhandler.js"></script>
<script>
function changeModel(modelParam) {
    let modelName = modelParam.value.toLowerCase();
    console.log(modelName);
    console.log(document.querySelector("a-entity").getAttribute("gltf-model"))
    if (modelName==="elephant") {
        console.log("debug")
        document.querySelector("a-entity").setAttribute("gltf-model", "public/elephant/scene.gltf");
        document.querySelector("a-entity").setAttribute("scale", "0.02 0.02 0.02");
        document.querySelector("a-entity").setAttribute("sound", "src: public/sound/elephant.mp3");
    }

    if (modelName==="shiba") {
        document.querySelector("a-entity").setAttribute("gltf-model", "public/shiba/scene.gltf");
        document.querySelector("a-entity").setAttribute("scale", "1 1 1");
        document.querySelector("a-entity").setAttribute("sound", "src: public/sound/dog.wav");
    }

    if (modelName==="horse") {
        document.querySelector("a-entity").setAttribute("gltf-model", "public/horse/scene.gltf");
        document.querySelector("a-entity").setAttribute("scale", "1 1 1");
        document.querySelector("a-entity").setAttribute("sound", "src: public/sound/horse.wav");

    }

    if (modelName==="tokyo") {
        document.querySelector("a-entity").setAttribute("gltf-model", "public/littlest_tokyo/scene.gltf");
        document.querySelector("a-entity").setAttribute("scale", "0.005 0.005 0.005");
        document.querySelector("a-entity").setAttribute("sound", "src: public/sound/tokyo-metro.mp3");

    }
};

function muteSound() {
    var soundBtn = document.getElementById('voice');
    soundBtn.style.display = 'none';

    var muteBtn = document.getElementById('mute');
    muteBtn.style.display = 'block';

}

function turnSoundOn () {
    var soundBtn = document.getElementById('voice');
    soundBtn.style.display = 'block';

    var muteBtn = document.getElementById('mute');
    muteBtn.style.display = 'none';
}

</script>

</head>
<body>
    <div class="option-list">
        <div class="btn">
            <button id="voice" class="voice" onclick="muteSound()"><i class="fa-solid fa-volume-high" style="color: #c0c0c0;"></i></button>
            <button id="mute" class="mute-voice" onclick="turnSoundOn()"  style="display:none"><i class="fa-solid fa-volume-xmark" style="color: #ff2600;"></i></button>
         </div>
         <select onchange="changeModel(this);" class="model" id="rgb">
            <option id="shiba" value="shiba">Shiba</option>
            <option id="elephant" value="elephant">Elephant</option>
            <option id="horse" value="horse">Horse</option>
            <option id="tokyo" value="tokyo">Littlest Tokyo</option>
        </select>
    </div>
    <!--> <a-scene>コード <--->
    ....
     <a-entity
        position="0 0 0"
        scale="1 1 1"
        class="clickable"
        gesture-handler
        gltf-model="#model"
        animation-mixer
        htmlembed
        sound="src: public/sound/dog.wav;"
        soundhandler
        ></a-entity>
    ....

</body>
成果
最後の成果はこのようになります! 試したい方はvr-dog.onrender.comで使ってください。
ソースコード
参考文献
[1] https://www.japancv.co.jp/column/4190/
[2]AR.js の世界へようこそ! 3歩でわかる お手軽 拡張現実
[3] https://ar-js-org.github.io/AR.js-Docs/


