Create an Immersal Map using 3D Scanner App
はじめに
前回の記事で、REST APIを叩いて、マップ作成はできました。全てのステップはImmersal SDKを使います。今回は他のアプリからの撮影した画像をマップ作成する。
Summary
On the Previous Article, I compiled on how to use the Sample and REST API by using the Immersal SDK. In this article, I compiled on how to use another application to get object images and create a map using the Immersal REST API.
準備
Preparation
- Immersalアカウント / Immersal Account
- iPhone 12 Pro + 3D Scanner App
3D Scanner Appのページ / 3D Scanner App download page
手順
3D Scanner Appで画像撮影
Taking Picture with 3D Scanner App
3D Scanner Appのデモでモデルをスキャンして、「All Data」を保存します。
By watching the Scanner App Demo, scan a model and export 「All Data」 from the result.
Pythonで画像変化
Convert images using Python
撮影した画像はiTunesか他のアプリかでパソコンに移動します。
Copy the exported all data to your computer using iTunes or any other app.

まず、ImmersalはJPEG画像を受け付けません。なので画像変は必要です。Pythonで画像変化をするならPillowが必要です
The Immersal Service doesn't process JPEG images (or maybe any other type of images). So we have to convert the image first using Pillow. We have to install Pillow first if we have never install it.
pip install Pillow
その後、画像をJPGからPNGに変化します。
After that, with the code below we convert the JPEG images produced by 3D Scanner App into PNG images.
from PIL import Image
import os

for subdirs, dirs, files in os.walk('フォルダ名/Your Folder Name'):
    for file in files:
        if file.endswith((".jpg")):
            img_path = os.path.join(subdirs, file.split('.')[0] + ".jpg")
            save_path = os.path.join(subdirs, file.split('.')[0] + ".png")
            im1 = Image.open(r'{0}'.format(img_path))
            im1.save(r'{0}'.format(save_path))
変化された画像から、JSONデータを作成します。
After the images have been converted, we create a JSON data with scheme of Immersal image submission.
import json
import os
import base64
import quaternion
import numpy as np

index = 0


data = {}

data['token'] = "自分のToken/Input your token"
data['bank'] = 0
data['run'] = 0
data['index'] = 0
data['anchor'] =  False

def ConvertToBase64(src_filepath):
    with open(src_filepath, 'rb') as imageFileAsBinary:
        fileContent = imageFileAsBinary.read()
        b64_encoded_img = base64.b64encode(fileContent)

        return b64_encoded_img


for subdirs, dirs, files in os.walk('フォルダ名/Your Folder Name'):
    for file in files:
        if file.endswith((".json")):
            f = open(os.path.join(subdirs, file))
            json_Data = json.load(f)

            #回転のマトリックス
            #This is camera rotation in the 4x4 Matrix
            data['r00'] = json_Data['cameraPoseARFrame'][0]
            data['r01'] = json_Data['cameraPoseARFrame'][1]
            data['r02'] = json_Data['cameraPoseARFrame'][2]

            data['r10'] = json_Data['cameraPoseARFrame'][4]
            data['r11'] = json_Data['cameraPoseARFrame'][5]
            data['r12'] = json_Data['cameraPoseARFrame'][6]

            data['r20'] = json_Data['cameraPoseARFrame'][8]
            data['r21'] = json_Data['cameraPoseARFrame'][9]
            data['r22'] = json_Data['cameraPoseARFrame'][10]

            #カメラの位置
            #This is Camera Position in the 4x4 Matrix
            data['px'] = json_Data['cameraPoseARFrame'][3]
            data['py'] = json_Data['cameraPoseARFrame'][7]
            data['pz'] = json_Data['cameraPoseARFrame'][11]

            #カメラのIntrinsics
            #This is Camera Intrinsics
            data['fx'] = json_Data['intrinsics'][0]
            data['fy'] = json_Data['intrinsics'][4]
            data['ox'] = json_Data['intrinsics'][2]
            data['oy'] = json_Data['intrinsics'][5]
            imageData = ConvertToBase64(os.path.join(subdirs, file.split('.')[0] + ".png"))
            data['b64'] = str(imageData, 'utf-8')
            data['index'] = index

            #画像一枚にアンカーにする
            #We set the first image to be Anchor
            data['anchor'] = True if index==1 else False
            f.close()

            #Create A savepath for your folder
            savepath = 'フォルダ名/frame_{index}.json'.format(index = index)
            with open(savepath, 'w') as fs:
                json.dump(data, fs)

            index = index + 1
完了したら、アップロード可能なデータを作成されます。
After the process is completed, we have created a set of JSON files which are ready to be submitted using REST API.
マップ作成
Map Creation
マップ作成は前回の記事で説明した、まずワークスペースリセットして。画像アップロードして、マップ作成します。
I have compiled on how to use REST API to create a map. First we reset/clear the workspace. Then we submit the JSON data and finally we create the map.
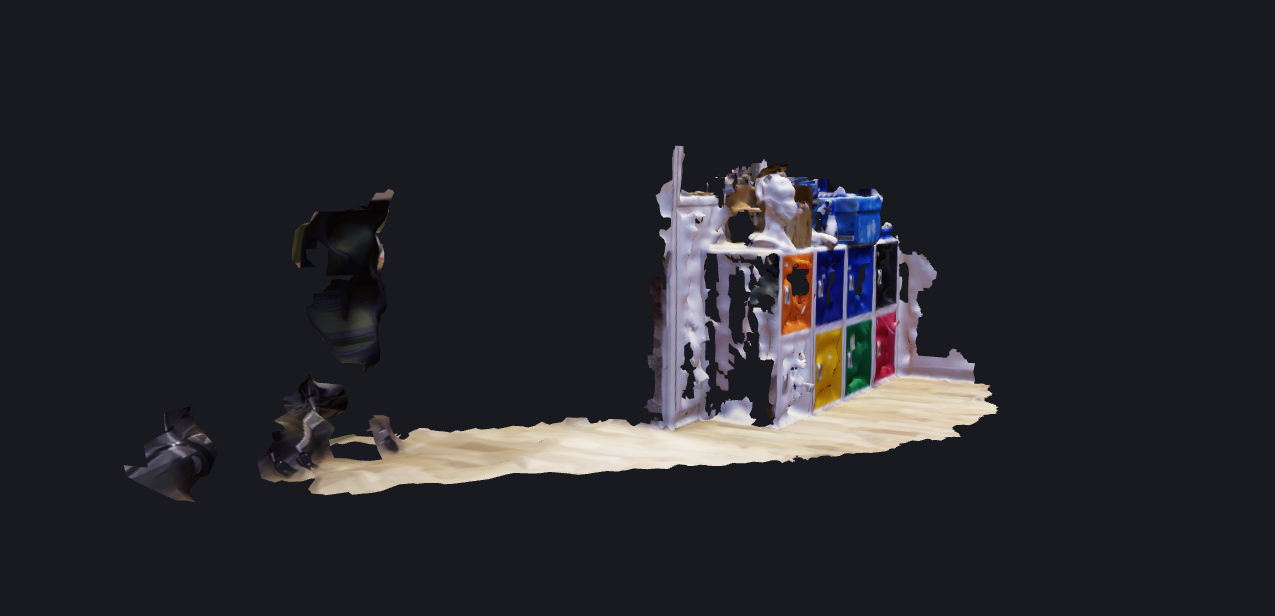
こちらは3DScanner AppとImmersalの結果を比べます。
3D Scanner Appの結果はオリエンテーションがちょっと変。
Below is the comparison result of Mapping between 3D Scanner App and Immersal.
The 3D Scanner App orientation result is a bit strange.

変なオリエンテーションをしても、ポイントクラウドはまだ認識されます。
Even though the orientation is strange, its still able to detect point cloud.

Immersalでオリエンテーションの修理
Fixing the Orientation
前を書いた通り、3D Scanner Appを付けば、角度がちょっと変です。なので、そのモデル角度を修理します。修理するためには、JSONを作成する時、Z-axisで90度回転します。回転のマトリックスコードはこちらになります。
As I wrote earlier, the result from the 3D Scanner is a bit strange so I want to fix it. To fix the orientation, before we submit we have to rotate the image on Z-axis for 90 degrees. Below is the code for rotation code.
...
                Matrix_base = [[json_Data['cameraPoseARFrame'][0], json_Data['cameraPoseARFrame'][1], json_Data['cameraPoseARFrame'][2]],
                                [json_Data['cameraPoseARFrame'][4],json_Data['cameraPoseARFrame'][5],json_Data['cameraPoseARFrame'][6]],
                                [json_Data['cameraPoseARFrame'][8],json_Data['cameraPoseARFrame'][9],json_Data['cameraPoseARFrame'][10]]]

                #90度で回転する
                #Rotate the images 90 Degrees
                Matrix_Rz = [[math.cos(math.radians(90)), -math.sin(math.radians(90)), 0],
                            [math.sin(math.radians(90)), math.cos(math.radians(90)), 0],
                            [0, 0, 1]]

                Matrix_Rotation_new = np.matmul(Matrix_base, Matrix_Rz)

                data['r00'] = Matrix_Rotation_new[0][0]
                data['r01'] = Matrix_Rotation_new[0][1]
                data['r02'] = Matrix_Rotation_new[0][2]

                data['r10'] = Matrix_Rotation_new[1][0]
                data['r11'] = Matrix_Rotation_new[1][1]
                data['r12'] = Matrix_Rotation_new[1][2]

                data['r20'] = Matrix_Rotation_new[2][0]
                data['r21'] = Matrix_Rotation_new[2][1]
                data['r22'] = Matrix_Rotation_new[2][2]
...
Spatial回転の参考
A theoretical reference for spatial transformation.
https://www.brainvoyager.com/bv/doc/UsersGuide/CoordsAndTransforms/SpatialTransformationMatrices.html
回転させた結果はこちらになります。
Below is the result of the rotated images.