NameSpaceを使ってネットワーク作成を行い、FRRoutingでOSPFでルーティングしていこうと思います。
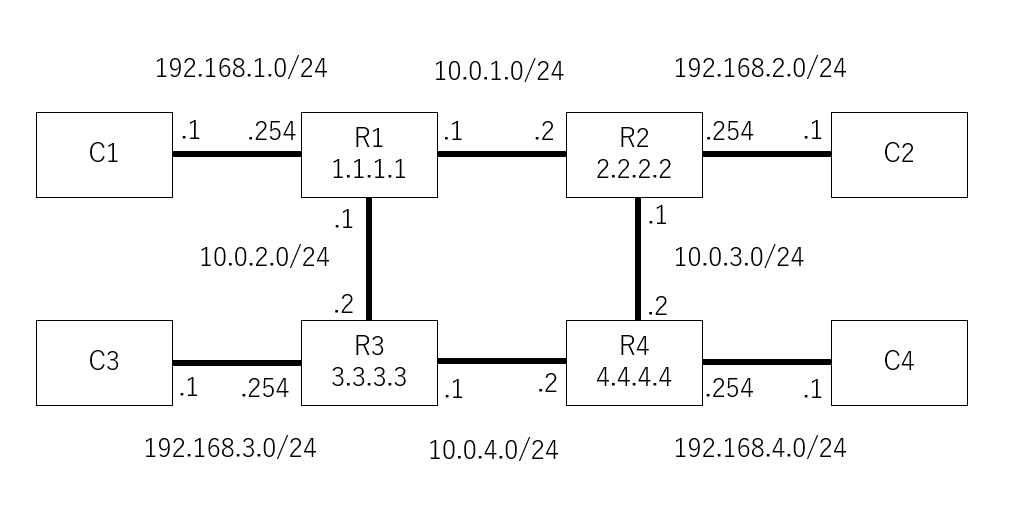
作成するネットワーク
環境
- ubuntu20.04 LTS
NameSpaceの追加
ip netns add C1
ip netns add C2
ip netns add C3
ip netns add C4
ip netns add R1
ip netns add R2
ip netns add R3
ip netns add R4
vethインターフェースの作成
ip link add C1-R1 type veth peer name R1-C1
ip link add C2-R2 type veth peer name R2-C2
ip link add C3-R3 type veth peer name R3-C3
ip link add C4-R4 type veth peer name R4-C4
ip link add R1-R2 type veth peer name R2-R1
ip link add R1-R3 type veth peer name R3-R1
ip link add R2-R4 type veth peer name R4-R2
ip link add R3-R4 type veth peer name R4-R3
各NameSpaceにinterfaceの割り当て
ip link set C1-R1 netns C1 up
ip link set C2-R2 netns C2 up
ip link set C3-R3 netns C3 up
ip link set C4-R4 netns C4 up
ip link set R1-C1 netns R1 up
ip link set R1-R2 netns R1 up
ip link set R1-R3 netns R1 up
ip link set R2-C2 netns R2 up
ip link set R2-R1 netns R2 up
ip link set R2-R4 netns R2 up
ip link set R3-C3 netns R3 up
ip link set R3-R1 netns R3 up
ip link set R3-R4 netns R3 up
ip link set R4-C4 netns R4 up
ip link set R4-R2 netns R4 up
ip link set R4-R3 netns R4 up
loopbackの有効化
ip netns exec R1 ip l set up lo
ip netns exec R2 ip l set up lo
ip netns exec R3 ip l set up lo
ip netns exec R4 ip l set up lo
Routingの有効化
ip netns exec R1 sysctl -w net.ipv4.ip_forward=1
ip netns exec R2 sysctl -w net.ipv4.ip_forward=1
ip netns exec R3 sysctl -w net.ipv4.ip_forward=1
ip netns exec R4 sysctl -w net.ipv4.ip_forward=1
各interfaceにIPアドレスの設定
ip netns exec C1 ip addr add 192.168.1.1/24 dev C1-R1
ip netns exec C2 ip addr add 192.168.2.1/24 dev C2-R2
ip netns exec C3 ip addr add 192.168.3.1/24 dev C3-R3
ip netns exec C4 ip addr add 192.168.4.1/24 dev C4-R4
ip netns exec R1 ip addr add 192.168.1.254/24 dev R1-C1
ip netns exec R1 ip addr add 10.0.1.1/24 dev R1-R2
ip netns exec R1 ip addr add 10.0.2.1/24 dev R1-R3
ip netns exec R2 ip addr add 192.168.2.254/24 dev R2-C2
ip netns exec R2 ip addr add 10.0.1.2/24 dev R2-R1
ip netns exec R2 ip addr add 10.0.3.1/24 dev R2-R4
ip netns exec R3 ip addr add 192.168.3.254/24 dev R3-C3
ip netns exec R3 ip addr add 10.0.2.2/24 dev R3-R1
ip netns exec R3 ip addr add 10.0.4.1/24 dev R3-R4
ip netns exec R4 ip addr add 192.168.4.254/24 dev R4-C4
ip netns exec R4 ip addr add 10.0.3.2/24 dev R4-R2
ip netns exec R4 ip addr add 10.0.4.2/24 dev R4-R3
ip netns exec R1 ip addr add 1.1.1.1/32 dev lo
ip netns exec R2 ip addr add 2.2.2.2/32 dev lo
ip netns exec R3 ip addr add 3.3.3.3/32 dev lo
ip netns exec R4 ip addr add 4.4.4.4/32 dev lo
デフォルトルートの設定
ip netns exec C1 ip route add 0.0.0.0/0 via 192.168.1.254
ip netns exec C2 ip route add 0.0.0.0/0 via 192.168.2.254
ip netns exec C3 ip route add 0.0.0.0/0 via 192.168.3.254
ip netns exec C4 ip route add 0.0.0.0/0 via 192.168.4.254
FRRoutingのインストール
最新バージョンは8.2(2022/5/24)
curl -s https://deb.frrouting.org/frr/keys.asc | sudo apt-key add -
FRRVER="frr-stable"
echo deb https://deb.frrouting.org/frr $(lsb_release -s -c) $FRRVER | sudo tee -a /etc/apt/sources.list.d/frr.list
sudo apt update && sudo apt install frr frr-pythontools
ospfdデーモンの有効化
/etc/frr/daemonsファイルを書き換える。
- ospfd=no
+ ospfd=yes
FRRoutinの起動
systemctl start frr
systemctl enable frr
NameSpaceごとにデーモンを配置するディレクトリの作成とコピー
mkdir /etc/frr/R1
mkdir /etc/frr/R2
mkdir /etc/frr/R3
mkdir /etc/frr/R4
cp /etc/frr/daemons /etc/frr/*.conf /etc/frr/R1
cp /etc/frr/daemons /etc/frr/*.conf /etc/frr/R2
cp /etc/frr/daemons /etc/frr/*.conf /etc/frr/R3
cp /etc/frr/daemons /etc/frr/*.conf /etc/frr/R4
NameSpaceごとのデーモンを設定する
/etc/frr/R1/daemonsに追記
+ watchfrr_options="--netns=R1"
/etc/frr/R2/daemonsに追記
+ watchfrr_options="--netns=R2"
/etc/frr/R3/daemonsに追記
+ watchfrr_options="--netns=R3"
/etc/frr/R4/daemonsに追記
+ watchfrr_options="--netns=R4"
FRRoutingの各デーモンを起動する
/usr/lib/frr/frrinit.sh start R1
/usr/lib/frr/frrinit.sh start R2
/usr/lib/frr/frrinit.sh start R3
/usr/lib/frr/frrinit.sh start R4
各ルータにOSPFの設定を投入する
R1
vtysh -N R1
ubuntu# configure
ubuntu(config)# hostname R1
R1(config)# router ospf
R1(config-router)# ospf router-id 1.1.1.1
R1(config-router)# network 192.168.1.0/24 area 0.0.0.0
R1(config-router)# network 10.0.1.0/24 area 0.0.0.0
R1(config-router)# network 10.0.2.0/24 area 0.0.0.0
R1(config-router)# network 1.1.1.1/32 area 0.0.0.0
R1(config-router)# end
R1# copy run sta
R2
vtysh -N R2
ubuntu# configure
ubuntu(config)# hostname R2
R2(config)# router ospf
R2(config-router)# ospf router-id 2.2.2.2
R2(config-router)# network 192.168.2.0/24 area 0.0.0.0
R2(config-router)# network 10.0.1.0/24 area 0.0.0.0
R2(config-router)# network 10.0.3.0/24 area 0.0.0.0
R2(config-router)# network 2.2.2.2/32 area 0.0.0.0
R2(config-router)# end
R2# copy run sta
R3
vtysh -N R3
ubuntu# configure
ubuntu(config)# hostname R3
R3(config)# router ospf
R3(config-router)# ospf router-id 3.3.3.3
R3(config-router)# network 192.168.3.0/24 area 0.0.0.0
R3(config-router)# network 10.0.2.0/24 area 0.0.0.0
R3(config-router)# network 10.0.4.0/24 area 0.0.0.0
R3(config-router)# network 3.3.3.3/32 area 0.0.0.0
R3(config-router)# end
R3# copy run sta
R4
vtysh -N R4
ubuntu# configure
ubuntu(config)# hostname R4
R4(config)# router ospf
R4(config-router)# ospf router-id 4.4.4.4
R4(config-router)# network 192.168.4.0/24 area 0.0.0.0
R4(config-router)# network 10.0.3.0/24 area 0.0.0.0
R4(config-router)# network 10.0.4.0/24 area 0.0.0.0
R4(config-router)# network 4.4.4.4/32 area 0.0.0.0
R4(config-router)# end
R4# copy run sta
結果
R1のルーティングテーブルを確認する
R1# sh ip route
Codes: K - kernel route, C - connected, S - static, R - RIP,
       O - OSPF, I - IS-IS, B - BGP, E - EIGRP, N - NHRP,
       T - Table, v - VNC, V - VNC-Direct, A - Babel, F - PBR,
       f - OpenFabric,
       > - selected route, * - FIB route, q - queued, r - rejected, b - backup
       t - trapped, o - offload failure

O   1.1.1.1/32 [110/0] is directly connected, lo, weight 1, 00:04:24
C>* 1.1.1.1/32 is directly connected, lo, 00:05:29
O>* 2.2.2.2/32 [110/10] via 10.0.1.2, R1-R2, weight 1, 00:03:20
O>* 3.3.3.3/32 [110/10] via 10.0.2.2, R1-R3, weight 1, 00:02:51
O>* 4.4.4.4/32 [110/20] via 10.0.1.2, R1-R2, weight 1, 00:02:06
  *                     via 10.0.2.2, R1-R3, weight 1, 00:02:06
O   10.0.1.0/24 [110/10] is directly connected, R1-R2, weight 1, 00:04:30
C>* 10.0.1.0/24 is directly connected, R1-R2, 00:05:29
O   10.0.2.0/24 [110/10] is directly connected, R1-R3, weight 1, 00:04:34
C>* 10.0.2.0/24 is directly connected, R1-R3, 00:05:29
O>* 10.0.3.0/24 [110/20] via 10.0.1.2, R1-R2, weight 1, 00:03:20
O>* 10.0.4.0/24 [110/20] via 10.0.2.2, R1-R3, weight 1, 00:02:51
O   192.168.1.0/24 [110/10] is directly connected, R1-C1, weight 1, 00:00:36
C>* 192.168.1.0/24 is directly connected, R1-C1, 00:00:36
O>* 192.168.2.0/24 [110/20] via 10.0.1.2, R1-R2, weight 1, 00:00:30
O>* 192.168.3.0/24 [110/20] via 10.0.2.2, R1-R3, weight 1, 00:00:26
O>* 192.168.4.0/24 [110/30] via 10.0.1.2, R1-R2, weight 1, 00:00:20
  *                         via 10.0.2.2, R1-R3, weight 1, 00:00:20
C1からC4へpingを打ってみる
root# ip netns exec C1 ping 192.168.4.1
PING 192.168.4.1 (192.168.4.1) 56(84) bytes of data.
64 bytes from 192.168.4.1: icmp_seq=1 ttl=62 time=0.073 ms
64 bytes from 192.168.4.1: icmp_seq=2 ttl=62 time=0.047 ms
64 bytes from 192.168.4.1: icmp_seq=3 ttl=62 time=0.041 ms
64 bytes from 192.168.4.1: icmp_seq=4 ttl=62 time=0.061 ms