折角覚えたChefを忘れてはいけないため、そろそろ再始動。
これまでChef-solo環境でテストしていたが、久々にChef13 Server/Client環境を構築することとします。
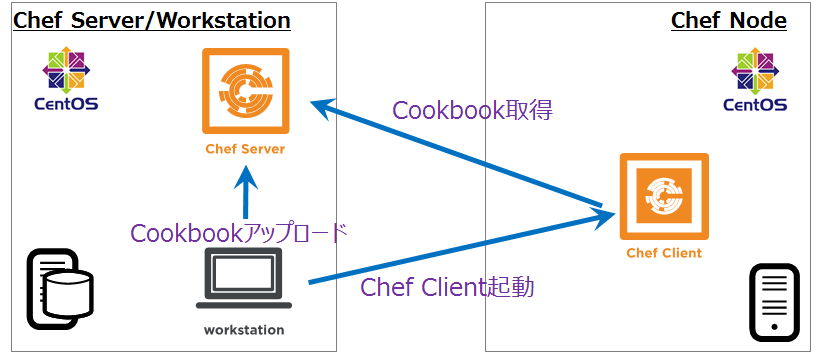
1. 構成図
テスト環境は、最近私の中ではおなじみのConoHaクラウド環境に作成します。
OSはCent OS 7.3
想定する普段の私の業務は、Chef Server/Workstationは同一環境であるため、今回構築するChef ServerとWorkstationも同一サーバーとします。
| 用途 | ホスト名 | OS |
|---|---|---|
| Chef Server/client | brighton001 | CentOS 7.4 |
| Chef Client | brighton002 | CentOS 7.4 |
2.事前作業
1. /etc/hostsファイルの編集
Chef ServerとChef Nodeの/etc/hostsファイルに Chef ServerとChef Nodeの名前解決ができるよう編集します。
2.ユーザー/グループの作成
Chef Serverで作業を行うためのユーザー/グループを以下のように作成します。
| グループ名 | GID |
|---|---|
| chef | 9000 |
| ユーザー名 | UID |
|---|---|
| chef | 9000 |
- 実行結果
# groupadd -g 9000 chef
# useradd -c "chef uesr" -g chef -G 9000 -u 9000 chef
# passwd chef
Changing password for user chef.
New password:
Retype new password:
passwd: all authentication tokens updated successfully.
このユーザー/グループは、Chef Nodeにも作成しておきます。
3.sudo設定
chefユーザーにroot権限を付与するため、/etc/sudoersファイルを編集します。
いろいろめんどくさいのでALLで設定し、パスワードなしで実行するためNOPASSWORDも設定しておきます。
- 設定内容
# grep chef /etc/sudoers
chef    ALL=(ALL)       ALL
chef    ALL=(ALL)       NOPASSWD: ALL
本来は必要最低の権限のみ与えるべき。
この設定は、Chef Nodeにも行います。
4. ssh鍵交換の設定
Chef Server/WorkstationからChef Nodeにchefユーザーにsshで実行するために、SSH鍵交換を行います。
- Chef Server/Workstation上のchefユーザーで公開鍵を作成
$ ssh-keygen -t rsa -N "" -f ~/.ssh/id_rsa
Generating public/private rsa key pair.
Created directory '/home/chef/.ssh'.
Your identification has been saved in /home/chef/.ssh/id_rsa.
Your public key has been saved in /home/chef/.ssh/id_rsa.pub.
The key fingerprint is:
~(省略)~
- Chef Node上のchefユーザーで公開鍵を作成
$ ssh-keygen -t rsa -N "" -f ~/.ssh/id_rsa
Generating public/private rsa key pair.
Created directory '/home/chef/.ssh'.
Your identification has been saved in /home/chef/.ssh/id_rsa.
Your public key has been saved in /home/chef/.ssh/id_rsa.pub.
The key fingerprint is:
~(省略)~
- Chef Server/Workstation上のchefユーザーの公開鍵をChef Node上のchefユーザーに送付
$ cd .ssh
$ ls
id_rsa  id_rsa.pub
$ scp id_rsa chef@brighton002:/home/chef/.ssh/id_rsa.pub_brighton001
The authenticity of host 'brighton002 (XX.XX.XX.XX)' can't be established.
~(省略)~
chef@brighton002's password:
id_rsa    100% 1675     2.9MB/s   00:00
- 送付した公開鍵をauthorized_keyファイルに記述
$ ssh -l chef brighton002 "cat /home/chef/.ssh/id_rsa.pub_brighton001 >> /home/chef/.ssh/authorized_keys"
chef@brighton002's password:
5. Firewallの設定
Chef WorkstationからChef Serverに接続するために443portを使用します。
そのため、firewall-cmdコマンドを使用し、443portを接続許可します。
- 実行結果
# firewall-cmd --list-all
public (active)
  target: default
  icmp-block-inversion: no
  interfaces: eth0
  sources:
  services: ssh dhcpv6-client
  ports:
  protocols:
  masquerade: no
  forward-ports:
  source-ports:
  icmp-blocks:
  rich rules:

# firewall-cmd --permanent --add-port=443/tcp
success
# firewall-cmd --list-all
public (active)
  target: default
  icmp-block-inversion: no
  interfaces: eth0
  sources:
  services: ssh dhcpv6-client
  ports:
  protocols:
  masquerade: no
  forward-ports:
  source-ports:
  icmp-blocks:
  rich rules:
# systemctl restart firewalld
3. Chef Server導入
Chef Serverの環境構築は、Chef DocのInstalled Standaloneを参考に行います。
1. Chef Serverのインストール
インターネット環境と接続ができるため、 chefユーザーにsuし、インターネットからChef Serverをダウンロードしてインストールします。
$ sudo rpm -Uvh https://packages.chef.io/files/stable/chef-server/12.17.15/el/7/chef-server-core-12.17.15-1.el7.x86_64.rpm
※2018/2/9時点の最新
- 実行結果
$ sudo rpm -Uvh https://packages.chef.io/files/stable/chef-s                                     erver/12.17.15/el/7/chef-server-core-12.17.15-1.el7.x86_64.rpm
Retrieving https://packages.chef.io/files/stable/chef-server/12.17.15/el/7/chef-                                     server-core-12.17.15-1.el7.x86_64.rpm
warning: /var/tmp/rpm-tmp.f3UpTF: Header V4 DSA/SHA1 Signature, key ID 83ef826a:                                      NOKEY
Preparing...                          ################################# [100%]
Updating / installing...
   1:chef-server-core-12.17.15-1.el7  ################################# [100%]
インストールが完了しました。rpmコマンドでChef Serverのモジュールが導入されたことを、あらためて確認します。
$ rpm -q chef-server-core-12.17.15-1.el7
chef-server-core-12.17.15-1.el7.x86_64
2. Chef Serverの初期構成
Chef Server後、初期構成が必要です。chef-server-ctl reconfigureを実行します。
$ sudo chef-server-ctl reconfigure
Starting Chef Client, version 12.19.36
resolving cookbooks for run list: ["private-chef::default"]
Synchronizing Cookbooks:
  - enterprise (0.11.0)
  - openssl (8.0.0)
  - packagecloud (0.3.0)
  - yum-epel (2.1.2)
  - private-chef (0.1.1)
  - runit (4.0.3)
  - compat_resource (12.19.0)
Installing Cookbook Gems:
Compiling Cookbooks...
Recipe: private-chef::default
  * directory[/etc/opscode] action create (up to date)
  * directory[/etc/opscode/logrotate.d] action create
    - create new directory /etc/opscode/logrotate.d
    - change mode from '' to '0755'
    - change owner from '' to 'root'
    - change group from '' to 'root'
  Converging 297 resources
  * link[/usr/bin/private-chef-ctl] action create (up to date)
  * link[/usr/bin/chef-server-ctl] action create (up to date)
  * directory[/etc/opscode] action nothing (skipped due to action :nothing)
  * directory[/etc/opscode/logrotate.d] action nothing (skipped due to action :nothing)
  * log[opscode_webui deprecation notice] action write (skipped due to only_if)
Recipe: private-chef::users
  * linux_user[opscode] action create
    - create user opscode
  * group[opscode] action create
    - alter group opscode
    - replace group members with new list of members
~(省略)~
Chef Client finished, 482/1084 resources updated in 05 minutes 12 seconds
Chef Server Reconfigured!
3.ユーザー/組織の作成
ユーザーと組織を作成します。
ユーザー名は、Web GUIのログインに必要
組織は、Chef Server内を論理分割するのに必要。今回は1つしか作成しない
| ユーザー名 | 組織名 | pemファイルのパス |
|---|---|---|
| brighton | koba | /etc/opscode/koba/ |
pemファイルのディレクトリを作成します。
$ sudo mkdir -p /etc/opscode/koba
ユーザーを作成します。
$ sudo chef-server-ctl user-create brighton adm adm ****@gmail.com '*******' --filename /etc/opscode/koba/brighton.pem
組織を作成します。
$ sudo chef-server-ctl org-create koba 'koba test' --association_user brighton --filename /etc/opscode/koba/koba-validator.pem
作成されているかどうか chef-server-ctl user-list コマンドおよび chef-server-ctl org-list コマンドで確認します。
$ sudo chef-server-ctl user-list
brighton
pivotal
$ sudo chef-server-ctl org-list
koba
[chef@brighton001 ~]$
- コマンドオプション
ユーザーの作成
$ chef-server-ctl user-create USER_NAME FIRST_NAME LAST_NAME EMAIL 'PASSWORD' --filename FILE_NAME
組織の作成
$ user-create stevedanno Steve Danno steved@chef.io 'abc123' --filename /path/to/stevedanno.pem
このあと、Chef Manageを導入すると、Webでいろいろできるようになるのですが、GUIを使うことを想定していないため、それらの手順は省きます。
4. Chef Workstation導入
Chef Workstationの環境構築は、Chef DocのInstalled the Chef DK および、Workstationsを参考に行います。
1. Chef Development Kitの導入
インターネット環境と接続ができるため、 Chef Server同様にインターネットからChef Development Kitをダウンロードしてインストールします。
※Chef DOWNLOADS/Chef Development Kit
sudo rpm -Uvh https://packages.chef.io/files/stable/chefdk/2.4.17/el/7/chefdk-2.4.17-1.el7.x86_64.rpm
※2018/2/9時点の最新
- 実行結果
$ sudo rpm -Uvh https://packages.chef.io/files/stable/chefdk/2.4.17/el/7/chefdk-2.4.17-1.el7.x86_64.rpm
Retrieving https://packages.chef.io/files/stable/chefdk/2.4.17/el/7/chefdk-2.4.17-1.el7.x86_64.rpm
warning: /var/tmp/rpm-tmp.WIqtag: Header V4 DSA/SHA1 Signature, key ID 83ef826a: NOKEY
Preparing...                          ################################# [100%]
Updating / installing...
   1:chefdk-2.4.17-1.el7              ################################# [100%]
Thank you for installing Chef Development Kit!
インストールが完了しました。rpmコマンドでChef Development Kitモジュールが導入されたことを、あらためて確認します。
$ sudo rpm -q chefdk-2.4.17-1.el7
chefdk-2.4.17-1.el7.x86_64
2.Verifyの実施
chef verify コマンドにて、正しく導入されていることを確認します。
- 実行結果
$ sudo chef verify
[WARN] This is an internal command used by the ChefDK development team. If you are a ChefDK user, please do not run it.
~(省略)~
---------------------------------------------
Verification of component 'fauxhai' succeeded.
Verification of component 'kitchen-vagrant' succeeded.
Verification of component 'openssl' succeeded.
Verification of component 'delivery-cli' succeeded.
Verification of component 'git' succeeded.
Verification of component 'test-kitchen' succeeded.
Verification of component 'inspec' succeeded.
Verification of component 'berkshelf' succeeded.
Verification of component 'chefspec' succeeded.
Verification of component 'opscode-pushy-client' succeeded.
Verification of component 'tk-policyfile-provisioner' succeeded.
Verification of component 'knife-spork' succeeded.
Verification of component 'chef-dk' succeeded.
Verification of component 'chef-sugar' succeeded.
Verification of component 'chef-client' succeeded.
Verification of component 'generated-cookbooks-pass-chefspec' succeeded.
Verification of component 'chef-provisioning' succeeded.
Verification of component 'package installation' succeeded.
全てのVerification of componentの結果がsucceededであることを確認します。
3. 環境変数の設定
chefユーザーがrubyコマンドが使用できるようにパスの設定を行います。
このrubyはChef DKの中に同梱されているものです。
$ echo 'eval "$(chef shell-init bash)"' >> ~/.bash_profile
- 実行結果
$ which ruby
/usr/bin/which: no ruby in (/usr/local/bin:/bin:/usr/bin:/usr/local/sbin:/usr/sbin:/home/chef/.local/bin:/home/chef/bin)
$ echo 'eval "$(chef shell-init bash)"' >> ~/.bash_profile
$ source .bash_profile
$ which ruby
/opt/chefdk/embedded/bin/ruby
4. chef-repoの作成
Chef Workstationで使用するリポジトリ chef-repo を作成します。
今回chef-repoは、chefユーザーのホームディレクトリ内に作成します。
/home/chef
        └─ chef-repo              # リポジトリディレクトリ
以前はknife コマンドでchef-repoの作成を行っていましたが、chefコマンドを使用してリポジトリを作成します。
- 実行結果
$ pwd
/home/chef
$ chef generate app chef-repo
Recipe: code_generator::app
  * directory[/home/chef/chef-repo] action create
    - create new directory /home/chef/chef-repo
  * template[/home/chef/chef-repo/.kitchen.yml] action create
    - create new file /home/chef/chef-repo/.kitchen.yml
    - update content in file /home/chef/chef-repo/.kitchen.yml from none to f88995
~(省略)~
    - update content in file /home/chef/chef-repo/cookbooks/chef-repo/spec/unit/recipes/default_spec.rb from none to 02fa96
    (diff output suppressed by config)
  * execute[initialize-git] action run
    - execute git init .
  * cookbook_file[/home/chef/chef-repo/.gitignore] action create
    - create new file /home/chef/chef-repo/.gitignore
    - update content in file /home/chef/chef-repo/.gitignore from none to edcd62
    (diff output suppressed by config)
- リポジトリ作成後のディレクトリ構成
/home/chef
        └─ chef-repo             # リポジトリディレクトリ
                 ├─ cookbooks    # 作成されたディレクトリ
                 ├─ README.md    # 作成されたファイル
                 └─ test         # 作成されたディレクトリ
5. chef-repoの設定
chef-repoとChef Serverを紐付けるために以下のファイルが必要となります。
- knife.rb
- ORGANIZATION-validator.pem
- USER.pem
このファイルは、.chefディレクトリに配置します。
/home/chef
        └─ chef-repo            # リポジトリディレクトリ
                 ├─ cookbooks
                 ├─ README.md
                 ├─ test
                 └─ .chef       # knife.rbファイルなどを配置するためのディレクトリ
ファイルを配置するためのディレクトリ .chefディレクトリを作成し、手順3.3の作成したpemファイルをコピーしてきます。
コピーしたファイルのパーミッションは 600に変更します。
$ mkdir -p ~/chef-repo/.chef
$ cd chef-repo/.chef/
$ pwd
/home/chef/chef-repo/.chef
$ sudo cp /etc/opscode/koba/*.pem .
$ ls -l
total 8
-rw-r--r-- 1 root root 1678 Feb  9 17:42 brighton.pem
-rw-r--r-- 1 root root 1678 Feb  9 17:42 koba-validator.pem
$ sudo chown chef.chef *pem
$ ls -l
total 8
-rw-r--r-- 1 chef chef 1678 Feb  9 17:42 brighton.pem
-rw-r--r-- 1 chef chef 1678 Feb  9 17:42 koba-validator.pem
$ sudo chmod 600 *pem
$ ls -l
total 8
-rw------- 1 chef chef 1678 Feb  9 17:42 brighton.pem
-rw------- 1 chef chef 1678 Feb  9 17:42 koba-validator.pem
次に、knife.rbファイルを作成します。
CHEF DOCSのWorkstationsによると、必要な記述内容か以下の通りです。
current_dir = File.dirname(__FILE__)
log_level                :info
log_location             STDOUT
node_name                'node_name'
client_key               "#{current_dir}/USER.pem"
validation_client_name   'ORG_NAME-validator'
validation_key           "#{current_dir}/ORGANIZATION-validator.pem"
chef_server_url          'https://api.chef.io/organizations/ORG_NAME'
cache_type               'BasicFile'
cache_options( :path => "#{ENV['HOME']}/.chef/checksums" )
cookbook_path            ["#{current_dir}/../cookbooks"]
マニュアルからこの内容をコピーし、環境に応じて編集します。
current_dir = File.dirname(__FILE__)
log_level                :info
log_location             STDOUT
node_name                'brighton'                               #ユーザー名
client_key               "#{current_dir}/brighton.pem"            # ユーザーの鍵ファイル
validation_client_name   'koba-validator'                        # 組織+ -validator
validation_key           "#{current_dir}/koba-validator.pem"       # 組織名
chef_server_url          'https://brighton001/organizations/koba'  # サーバーのホスト名と、最後は組織名に変更
cache_type               'BasicFile'
cache_options( :path => "#{ENV['HOME']}/.chef/checksums" )
cookbook_path            ["#{current_dir}/../cookbooks"]
6. SSL設定
knife.rb で設定した Chef Server の自己証明書を信頼する設定コマンド knife ssl fetch を実行します。
設定は knife.rb が参照できるように chef-repo 配下でコマンドを実行します。
- 実行結果
$ pwd
/home/chef/chef-repo/.chef
$ knife ssl fetch
WARNING: Certificates from brighton001 will be fetched and placed in your trusted_cert
directory (/home/chef/chef-repo/.chef/trusted_certs).

Knife has no means to verify these are the correct certificates. You should
verify the authenticity of these certificates after downloading.

Adding certificate for brighton001 in /home/chef/chef-repo/.chef/trusted_certs/brighton001.crt
接続設定が完了すれば、knife ssl check コマンドを実行し、接続確認を行います。
$ knife ssl check
Connecting to host brighton001:443
Successfully verified certificates from `brighton001'
knife client list コマンドで、組織名を確認します。
$ knife client list
koba-validator
5. Chef Nodeの設定
Chef Nodeの設定は、Chef DocのBootstrap a Nodeを参考に行います。
1. Bootstarpの実行
knife bootstrapコマンドを実行し、Chef ServerにChef Nodeを登録します。
実際に実行するコマンドは以下の通りです。
knife bootstrap Node名 -x username --sudo
- 実行結果
$ knife bootstrap brighton002 -x chef --sudo
Doing old-style registration with the validation key at /home/chef/chef-repo/.chef/koba-validator.pem...
Delete your validation key in order to use your user credentials instead

Connecting to brighton002
chef@brighton002's password:
brighton002 -----> Installing Chef Omnibus (-v 13)
brighton002 downloading https://omnitruck-direct.chef.io/chef/install.sh
brighton002   to file /tmp/install.sh.3180/install.sh
brighton002 trying wget...
brighton002 el 7 x86_64
brighton002 Getting information for chef stable 13 for el...
brighton002 downloading https://omnitruck-direct.chef.io/stable/chef/metadata?v=13&p=el&pv=7&m=x86_64
brighton002   to file /tmp/install.sh.3185/metadata.txt
brighton002 trying wget...
brighton002 sha1        0d8b0f9b3ce0a2721f7e8ff7ea46330fd712df46
brighton002 sha256      89c96addb749370044964b63d16382149f0756d54e833602dd91cf039a92a9f7
brighton002 url https://packages.chef.io/files/stable/chef/13.7.16/el/7/chef-13.7.16-1.el7.x86_64.rpm
brighton002 version     13.7.16
brighton002 downloaded metadata file looks valid...
brighton002 downloading https://packages.chef.io/files/stable/chef/13.7.16/el/7/chef-13.7.16-1.el7.x86_64.rpm
brighton002   to file /tmp/install.sh.3185/chef-13.7.16-1.el7.x86_64.rpm
brighton002 trying wget...
brighton002 Comparing checksum with sha256sum...
brighton002 Installing chef 13
brighton002 installing with rpm...
brighton002 warning: /tmp/install.sh.3185/chef-13.7.16-1.el7.x86_64.rpm: Header V4 DSA/SHA1 Signature, key ID 83ef826a: NOKEY
brighton002 Preparing...                          ################################# [100%]
brighton002 Updating / installing...
brighton002    1:chef-13.7.16-1.el7               ################################# [100%]
brighton002 Thank you for installing Chef!
brighton002 Starting the first Chef Client run...
brighton002 Starting Chef Client, version 13.7.16
brighton002 Creating a new client identity for brighton002 using the validator key.
brighton002 resolving cookbooks for run list: []
brighton002 Synchronizing Cookbooks:
brighton002 Installing Cookbook Gems:
brighton002 Compiling Cookbooks...
brighton002 [2018-02-09T18:57:13+09:00] WARN: Node brighton002 has an empty run list.
brighton002 Converging 0 resources
brighton002
brighton002 Running handlers:
brighton002 Running handlers complete
brighton002 Chef Client finished, 0/0 resources updated in 03 seconds
これによりChef NodeにChef Clientのモジュールがインストールされ、さらにChef Server上に登録されました。
# rpm -qa chef*
chef-13.7.16-1.el7.x86_64
2. 確認
knife clientコマンドや、knife nodeコマンドで、Chef Server上にChef Nodeがとうろくされたことを確認します。
- 実行結果
$ knife client list
brighton002
koba-validator
$ knife node list
brighton002
$ knife node show brighton002
Node Name:   brighton002
Environment: _default
FQDN:        brighton002
IP:          XX.XX.XX.XX
Run List:
Roles:
Recipes:
Platform:    centos 7.4.1708
Tags:
3. validator.pemファイルの削除
Chef Client12.1から組織ファイルが不要となったため、削除します。
$ rm -f ./.chef/koba-validator.pem
これでChef Server/Client環境の構築が完了しました。
6. 感想
ひさびさすぎて疲れました。個人的にはAnsibleよりもChefのほうが手がかかる気がしますが、なんでしょう、Chefのほうが好きですね(笑)