使用環境
- OS:Win11
- Eclipse:Eclipse 2021
- Java:Java17
- SpringBoot:3.1.2
openaiのAPI_KEY取得およびRequest/Responseの紹介
- https://qiita.com/brgd/items/d7bb6deb6492d2ad9b22 で詳しく説明しているので参照を...
EclipseでSpringBootプロジェクト作成
- 当記事の内容範囲外ので割愛させてください、Googleしたら沢山ある。
プロジェクト設定
ApplicationConfig設定
ApplicationConfig.java
package com.chatgpt.config;

import org.springframework.boot.web.client.RestTemplateBuilder;
import org.springframework.context.annotation.Bean;
import org.springframework.context.annotation.Configuration;
import org.springframework.web.client.RestTemplate;

@Configuration
public class ApplicationConfig {

	@Bean
    public RestTemplate restTemplate(RestTemplateBuilder builder) {
        return builder.build();
    }

}
propertiesファイル作成
application.properties
openai.api.key=API_KEY
openai.api.url=https://api.openai.com/v1/chat/completions
DTO作成
RequestDTO作成
Message.java
package com.chatgpt.domain.dto;

import lombok.AllArgsConstructor;
import lombok.Data;
import lombok.NoArgsConstructor;

@Data
@AllArgsConstructor
@NoArgsConstructor
public class Message {
	public String role;
	public String content;
}
ChatGptRequest.java
package com.chatgpt.domain.dto;

import java.util.List;

import lombok.Data;

@Data
public class ChatGptRequest {
	private String model;
	private List<Message> messages;
	private Integer max_tokens;

}
ResponseDTO作成
Choice.java
package com.chatgpt.domain.dto;

import lombok.Data;

@Data
public class Choice {
	public int index;
	public Message message;
	public String finish_reason;

}
Usage.java
package com.chatgpt.domain.dto;

import lombok.Data;

@Data
public class Usage {
	public int prompt_tokens;
	public int completion_tokens;
	public int total_tokens;

}
ChatGptResponse.java
package com.chatgpt.domain.dto;

import java.util.List;

import lombok.Data;

@Data
public class ChatGptResponse {
	public String id;
	public String object;
	public int created;
	public List<Choice> choices;
	public Usage usage;

}
Service作成
ChatGptService.java
package com.chatgpt.domain.seivice;

import java.util.List;

import org.springframework.beans.factory.annotation.Autowired;
import org.springframework.beans.factory.annotation.Value;
import org.springframework.http.HttpEntity;
import org.springframework.http.HttpHeaders;
import org.springframework.http.MediaType;
import org.springframework.stereotype.Service;
import org.springframework.web.client.RestTemplate;

import com.chatgpt.domain.dto.ChatGptRequest;
import com.chatgpt.domain.dto.ChatGptResponse;
import com.chatgpt.domain.dto.Message;

@Service
public class ChatGptService {

	@Value("${openai.api.key}")
	private String apiKey;

	@Value("${openai.api.url}")
	private String apiUrl;

	@Autowired
	private RestTemplate restTemplate;

	public ChatGptResponse getChatCptResponse(String prompt) {

		HttpHeaders headers = new HttpHeaders();
		headers.setContentType(MediaType.APPLICATION_JSON);
		headers.set("Authorization", "Bearer " + apiKey);

		ChatGptRequest chatGptRequest = new ChatGptRequest();
		chatGptRequest.setModel("gpt-3.5-turbo"); //モデル名
		chatGptRequest.setMessages(List.of(new Message("system", prompt), new Message("user", prompt))); //メッセージ指定
		chatGptRequest.setMax_tokens(20); //一回で返す最大Token数

		HttpEntity<ChatGptRequest> request = new HttpEntity<>(chatGptRequest, headers);

		return restTemplate.postForObject(apiUrl, request, ChatGptResponse.class);
	}

}
ControllerとView作成
ChatGptWebController.java
package com.chatgpt.app.controller;

import org.springframework.beans.factory.annotation.Autowired;
import org.springframework.stereotype.Controller;
import org.springframework.ui.Model;
import org.springframework.web.bind.annotation.GetMapping;
import org.springframework.web.bind.annotation.PostMapping;
import org.springframework.web.bind.annotation.RequestParam;

import com.chatgpt.app.form.ChatGptWebForm;
import com.chatgpt.domain.dto.ChatGptResponse;
import com.chatgpt.domain.seivice.ChatGptService;

@Controller
public class ChatGptWebController {

	@Autowired
	private ChatGptService chatGptService;

	@GetMapping("/")
	String index(Model model) {
		model.addAttribute("chatGptWebForm", new ChatGptWebForm("", ""));
		return "index";
	}

	@PostMapping(value = "/chatweb", params = "submit")
	public String searchAccount(Model model, @RequestParam("userInput") String userInput) {
		ChatGptResponse chatCPTResponse = chatGptService.getChatCptResponse(userInput);
		ChatGptWebForm chatGptWebForm = new ChatGptWebForm();
		chatGptWebForm.setUserInput(userInput);
		chatGptWebForm.setMessage(chatCPTResponse.getChoices().get(0).getMessage().getContent());
		model.addAttribute("chatGptWebForm", chatGptWebForm);
		return "index";
	}

}
ChatGptWebForm.java
index.html
<!doctype html>
<html xmlns:th="http://www.thymeleaf.org">
<head>
<title>Title</title>
<!-- Required meta tags -->
<meta charset="utf-8">
<meta name="viewport"
	content="width=device-width, initial-scale=1, shrink-to-fit=no">

<!-- Bootstrap CSS -->
<link rel="stylesheet"
	href="https://stackpath.bootstrapcdn.com/bootstrap/4.3.1/css/bootstrap.min.css"
	integrity="sha384-ggOyR0iXCbMQv3Xipma34MD+dH/1fQ784/j6cY/iJTQUOhcWr7x9JvoRxT2MZw1T"
	crossorigin="anonymous">
</head>
<body>
	<form action="/chatweb" th:action="@{/chatweb}" method="post"
		th:object="${chatGptWebForm}" class= "ml-3">
		<div class="form-group row mt-3">
			<label for="userInput" class="col-sm-2 col-form-label">質問</label>
			<div class="col-sm-9">
				<input type="text" class="form-control" th:field="*{userInput}">
			</div>
		</div>
		<div class="form-group row">
			<div class="col-sm-10">
				<button type="submit" name="submit" class="btn btn-primary">送信</button>
			</div>
		</div>


		<div class="col-sm-11">
			<h3>回答:</h3>
		<!-- <p class="bg-secondary" th:text="*{userInput}"></p> -->
			<p class="bg-info" th:text="*{message}"></p>
		</div>
	</form>

	<!-- Optional JavaScript -->
	<!-- jQuery first, then Popper.js, then Bootstrap JS -->
	<script src="https://code.jquery.com/jquery-3.3.1.slim.min.js"
		integrity="sha384-q8i/X+965DzO0rT7abK41JStQIAqVgRVzpbzo5smXKp4YfRvH+8abtTE1Pi6jizo"
		crossorigin="anonymous"></script>
	<script
		src="https://cdnjs.cloudflare.com/ajax/libs/popper.js/1.14.7/umd/popper.min.js"
		integrity="sha384-UO2eT0CpHqdSJQ6hJty5KVphtPhzWj9WO1clHTMGa3JDZwrnQq4sF86dIHNDz0W1"
		crossorigin="anonymous"></script>
	<script
		src="https://stackpath.bootstrapcdn.com/bootstrap/4.3.1/js/bootstrap.min.js"
		integrity="sha384-JjSmVgyd0p3pXB1rRibZUAYoIIy6OrQ6VrjIEaFf/nJGzIxFDsf4x0xIM+B07jRM"
		crossorigin="anonymous"></script>
</body>
</html>
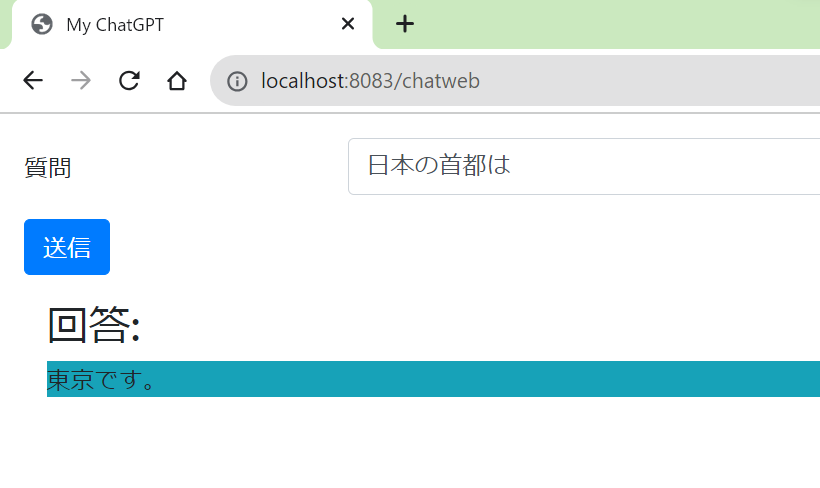
結果を確認
- 初期画面

- 質問してみる
その他
- 上記まではChatGPTのWEBAPP作ったんですがもちろん個人APIとして作成することも可能です。
個人APIとして作成
- webのControllerをRestApiのControllerとして作成する
- ApiのResponseをResponseEntityにして返す。
ChatGptApiController.java
package com.chatgpt.app.controller;

import org.springframework.beans.factory.annotation.Autowired;
import org.springframework.http.HttpStatus;
import org.springframework.http.ResponseEntity;
import org.springframework.web.bind.annotation.PostMapping;
import org.springframework.web.bind.annotation.RequestBody;
import org.springframework.web.bind.annotation.RestController;

import com.chatgpt.domain.dto.ChatGptResponse;
import com.chatgpt.domain.seivice.ChatGptService;

@RestController
public class ChatGptApiController {

	@Autowired
	private ChatGptService chatGptService;

	@PostMapping("/chatapi")
	public ResponseEntity<ChatGptResponse> processInputRequest(@RequestBody("message") String userInput) {
		ChatGptResponse chatCPTResponse = chatGptService.getChatCptResponse(userInput);
		return new ResponseEntity<>(chatCPTResponse, HttpStatus.OK);
	}

}
Apiを呼んでみる
