基本的な概念については繰り返し説明しません。疑問がある方は、以下のリンクをご参照ください:https://yo1000.gitbooks.io/self-study-spring/content/chapter7.html
1.AOP思想、動的プロキシ、Spring AOPの三者の関係

Spring AOP の実装は、主に動的プロキシを使用してアスペクト指向プログラミングを実現します。インターフェースに基づく場合、Spring AOP は JDK の動的プロキシを使用してプロキシオブジェクトを作成します。一方、クラスに基づく場合には、CGLIB 動的プロキシ(コード生成ライブラリ)を使用してプロキシオブジェクトを作成します。
具体的には:
JDK 動的プロキシ:対象オブジェクトが1つ以上のインターフェースを実装している場合、Spring AOP は JDK の Proxy クラスを使用してプロキシを生成します。このプロキシクラスはこれらのインターフェースを実装し、メソッド呼び出しをアスペクトで定義されたアドバイス(Advice)に転送します。
CGLIB 動的プロキシ:対象オブジェクトがインターフェースを実装していない場合、Spring AOP は CGLIB を使用してサブクラスプロキシを生成します。このプロキシクラスは対象オブジェクトのサブクラスであり、対象オブジェクトのメソッドをオーバーライドして、メソッド呼び出しの前後にアスペクトのアドバイスを実行します。
したがって、Spring AOP は対象オブジェクトを直接変更することなく、これらの2つのプロキシ方式を利用してアスペクト指向プログラミングを実現できます。
2.Springで利用可能なAdvice


3.アドバイスの詳細情報を取得する
1.JointPointインターフェース
メソッドのシグネチャや渡される引数などの情報を取得する必要がある場合、通知メソッドの引数に JoinPoint 型を宣言することができます。
// @Beforeアノテーションで前置通知メソッドをマークします
// value属性: 切入点式を指定し、現在の通知メソッドがどのターゲットメソッドに適用されるかをSpringに指示します
// 前置通知メソッドの引数としてJoinPoint型のパラメータを宣言すると、Springがこのオブジェクトを渡します
// JoinPointオブジェクトを使用して、ターゲットメソッドの名前や実際の引数リストを取得できます
@Before(value = "execution(public int com.atguigu.aop.api.Calculator.add(int,int))")
public void printLogBeforeCore(JoinPoint joinPoint) {

    // 1. JoinPointオブジェクトを通じてターゲットメソッドのシグネチャオブジェクトを取得します
    // メソッドのシグネチャ: メソッドの全ての宣言情報
    Signature signature = joinPoint.getSignature();

    // 2. メソッドのシグネチャオブジェクトを使ってターゲットメソッドの詳細情報を取得します
    String methodName = signature.getName();
    System.out.println("methodName = " + methodName);

    int modifiers = signature.getModifiers();
    System.out.println("modifiers = " + modifiers);

    String declaringTypeName = signature.getDeclaringTypeName();
    System.out.println("declaringTypeName = " + declaringTypeName);

    // 3. JoinPointオブジェクトを使って外部から渡されたターゲットメソッドの引数リストを取得します
    Object[] args = joinPoint.getArgs();

    // 4. 配列を直接印刷しても具体的なデータが見えないため、Listコレクションに変換します
    List<Object> argList = Arrays.asList(args);

    System.out.println("[実行前に処理したいアドバイス] " + methodName + "メソッドが開始されました。引数リスト: " + argList);
}
2.方法の返却値
方法の返却値を取得するには、@AfterReturning通知のreturning属性を使用します。
// @AfterReturningアノテーションで正常終了後の通知メソッドをマークします
// value属性: 切入点式を指定し、どのターゲットメソッドに適用されるかを指示します
// returning属性: メソッドの返却値を受け取るための引数名を指定します
@AfterReturning(
    value = "execution(public int com.atguigu.aop.api.Calculator.add(int,int))",
    returning = "result"
)
public void logReturnValue(JoinPoint joinPoint, int result) {

    // 1. JoinPointオブジェクトを使ってターゲットメソッドのシグネチャオブジェクトを取得します
    Signature signature = joinPoint.getSignature();

    // 2. メソッドのシグネチャオブジェクトを使ってターゲットメソッドの詳細情報を取得します
    String methodName = signature.getName();
    System.out.println("methodName = " + methodName);

    // 3. メソッドの返却値を取得します
    System.out.println("[AOP後置通知] " + methodName + "メソッドが正常に終了しました。返却値: " + result);
}
3.例外オブジェクトのキャッチ
メソッドが例外をスローした場合にその例外をキャッチして処理するには、@AfterThrowing通知のthrowing属性を使用します。
// @AfterThrowingアノテーションで例外発生後の通知メソッドをマークします
// value属性: 切入点式を指定し、どのターゲットメソッドに適用されるかを指示します
// throwing属性: メソッドでスローされた例外を受け取るための引数名を指定します
@AfterThrowing(
    value = "execution(public int com.atguigu.aop.api.Calculator.divide(int,int))",
    throwing = "ex"
)
public void logException(JoinPoint joinPoint, Throwable ex) {

    // 1. JoinPointオブジェクトを使ってターゲットメソッドのシグネチャオブジェクトを取得します
    Signature signature = joinPoint.getSignature();

    // 2. メソッドのシグネチャオブジェクトを使ってターゲットメソッドの詳細情報を取得します
    String methodName = signature.getName();
    System.out.println("methodName = " + methodName);

    // 3. スローされた例外オブジェクトを取得します
    System.out.println("[AOP例外通知] " + methodName + "メソッドで例外が発生しました。例外: " + ex.getMessage());

    // 4. 例外のスタックトレースを表示する場合
    ex.printStackTrace();
}
4.ポイントカット基本構文
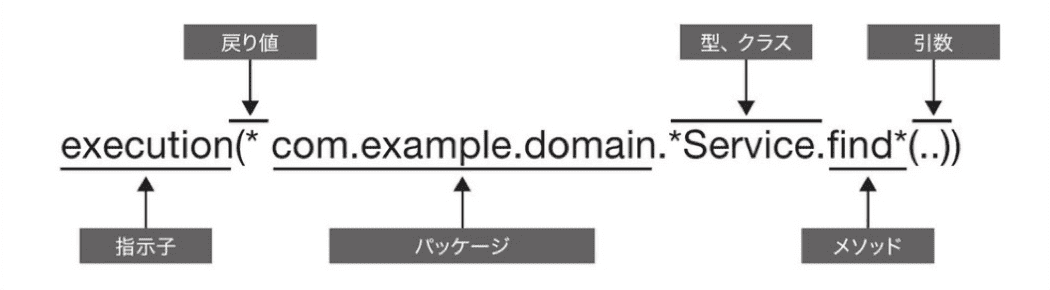
以下はPointcut式のサンプルです。
-
execution(String com.example.user.UserSerice.*(..))
UserServiceクラスのStringが返り値のメソッドを対象とします -
execution(* com.example.user.UserService.*(String, ..))
UserServiceクラスの1つ目の引数がStringのメソッドを対象とします
5.切点表达式を再利用(または抽出)
切点表达式を再利用(または抽出)することで、コードの重複を避け、AOPの設定をより保守しやすくすることができます。Spring AOPでは、切点表現式を抽出して共通の切点として定義し、それを複数のアドバイスタイプで使い回すことができます。
切点表現式の再利用方法
@Pointcutアノテーションの使用
@Pointcutアノテーションを使用して、切点表現式をメソッドとして定義し、それをアドバイスタイプで参照することができます。これにより、同じ切点表現式を複数のアドバイスで再利用できます。
@Aspect
public class LoggingAspect {

    // 切点表現式をメソッドとして定義する
    @Pointcut("execution(* com.example.service..*(..))")
    public void serviceLayer() {}

    // 前置通知
    @Before("serviceLayer()")
    public void logBefore(JoinPoint joinPoint) {
        // 前置通知の処理
        System.out.println("Before method: " + joinPoint.getSignature());
    }

    // 後置通知
    @After("serviceLayer()")
    public void logAfter(JoinPoint joinPoint) {
        // 後置通知の処理
        System.out.println("After method: " + joinPoint.getSignature());
    }

    // 例外通知
    @AfterThrowing(pointcut = "serviceLayer()", throwing = "ex")
    public void logException(JoinPoint joinPoint, Throwable ex) {
        // 例外通知の処理
        System.out.println("Exception in method: " + joinPoint.getSignature());
        System.out.println("Exception: " + ex.getMessage());
    }
}
説明:
- @Pointcutアノテーションを使って、serviceLayerという名前の切点を定義しています
- @Before, @After, @AfterThrowingアノテーションで、serviceLayer()という名前の切点を参照しています
- これにより、serviceLayer切点を再利用することで、切点表現式の重複を避けることができます
切点(Pointcut)を統一的に管理する
切点表現式を専用のクラスにまとめて、再利用可能なメソッドとして管理します。これにより、切点の変更が容易になり、複数のアドバイスタイプで同じ切点を使用できます。
@Component
public class Pointcuts {

    @Pointcut("execution(* com.example.service..*(..))")
    public void serviceLayer() {}

    @Pointcut("execution(* com.example.repository..*(..))")
    public void repositoryLayer() {}

    @Pointcut("serviceLayer() || repositoryLayer()")
    public void dataAccessLayer() {}
}
異なるアスペクトクラスで切点を参照する
他のアスペクトクラスで、定義された切点を完全修飾名とメソッド名を使って参照します。
@Aspect
@Component
public class LoggingAspect {

    @Before("com.example.aspect.PointcutDefinitions.serviceLayer()")
    public void logBeforeServiceLayer(JoinPoint joinPoint) {
        System.out.println("Before method in service layer: " + joinPoint.getSignature());
    }

    @Before("com.example.aspect.PointcutDefinitions.repositoryLayer()")
    public void logBeforeRepositoryLayer(JoinPoint joinPoint) {
        System.out.println("Before method in repository layer: " + joinPoint.getSignature());
    }

    @After("com.example.aspect.PointcutDefinitions.dataAccessLayer()")
    public void logAfterDataAccessLayer(JoinPoint joinPoint) {
        System.out.println("After method in data access layer: " + joinPoint.getSignature());
    }
}
6.環绕通知(Around Advice)
環绕通知(Around Advice)は、AOP(アスペクト指向プログラミング)における非常に強力な通知の一つです。他の通知タイプと異なり、環绕通知はメソッドの実行前後にカスタムロジックを挿入するだけでなく、ターゲットメソッドの実行を制御することもできます。ターゲットメソッドの実行を完全に制御し、メソッドの戻り値を変更したり、例外をスローしてメソッドの実行を中止することも可能です。
環绕通知の基本概念
1.環绕通知の定義:
- 環绕通知は、@Aroundアノテーションを使用して定義します。環绕通知メソッドは、ProceedingJoinPoint型の引数を受け取る必要があります。この引数を使って、通知メソッド内でターゲットメソッドの実行を制御します
2.環绕通知の制御:
-
環绕通知内で、ProceedingJoinPoint.proceed()メソッドを呼び出してターゲットメソッドを実行するか、呼び出さないことでターゲットメソッドの実行を中止することができます
-
メソッド実行前と実行後にカスタムロジックを挿入することができ、またメソッドが例外をスローした際の処理も可能です
import org.aspectj.lang.ProceedingJoinPoint;
import org.aspectj.lang.annotation.Around;
import org.aspectj.lang.annotation.Aspect;
import org.springframework.stereotype.Component;

@Aspect
@Component
public class LoggingAspect {

    @Around("execution(* com.example.service..*(..))")
    public Object aroundAdvice(ProceedingJoinPoint joinPoint) throws Throwable {
        // メソッド呼び出し前のログを記録
        System.out.println("メソッド開始: " + joinPoint.getSignature().toShortString());

        Object result = null;
        try {
            // ターゲットメソッドを実行
            result = joinPoint.proceed();
            // メソッド正常終了後のログを記録
            System.out.println("メソッド終了: " + joinPoint.getSignature().toShortString());
        } catch (Throwable ex) {
            // メソッドが例外をスローした後のログを記録
            System.out.println("メソッド例外: " + joinPoint.getSignature().toShortString());
            throw ex; // 例外を再スロー
        }

        // ターゲットメソッドの結果を返す
        return result;
    }
}
説明
-
@Aroundアノテーション:
- @Aroundアノテーションで環绕通知メソッドを指定します
- execution(* com.example.service..*(..))は切点表現式で、com.example.serviceパッケージおよびそのサブパッケージ内の全てのメソッドに適用されます
- ProceedingJoinPoint:
- ProceedingJoinPointは、proceed()メソッドを呼び出すことでターゲットメソッドの実行を制御します
- proceed()メソッドを呼ぶ前後でカスタムロジックを挿入できます
- ログ記録:
- ターゲットメソッドの実行前後、および例外発生時にログを記録します
環绕通知は、AOPの中で最も強力な通知タイプであり、ターゲットメソッドの実行を完全に制御する能力を提供します。Spring AOPで環绕通知を使用することで、メソッドの実行前後に複雑なロジックを挿入したり、例外処理を行うことができます。これは、トランザクション管理や性能監視などの横断的関心事を実装するための強力なツールです。
7.切面の優先順位設定
Spring AOPでは、複数の切面(アスペクト)を適用する場合、切面の適用順序が重要です。Spring AOPでは、@Orderアノテーションを使用して切面の優先順位を設定できます。これにより、どの切面が他の切面よりも先に適用されるかを制御できます。

コード例
//高い優先順位の切面(外層)
import org.aspectj.lang.ProceedingJoinPoint;
import org.aspectj.lang.annotation.Around;
import org.aspectj.lang.annotation.Aspect;
import org.springframework.core.annotation.Order;
import org.springframework.stereotype.Component;

@Aspect
@Component
@Order(1) // 高い優先度
public class OuterAspect {

    @Around("execution(* com.example.service..*(..))")
    public Object aroundAdvice(ProceedingJoinPoint joinPoint) throws Throwable {
        System.out.println("Outer Aspect - Before method");

        // ターゲットメソッドの実行
        Object result = joinPoint.proceed();

        System.out.println("Outer Aspect - After method");

        return result;
    }
}
//低い優先順位の切面(内層)
import org.aspectj.lang.ProceedingJoinPoint;
import org.aspectj.lang.annotation.Around;
import org.aspectj.lang.annotation.Aspect;
import org.springframework.core.annotation.Order;
import org.springframework.stereotype.Component;

@Aspect
@Component
@Order(2) // 低い優先度
public class InnerAspect {

    @Around("execution(* com.example.service..*(..))")
    public Object aroundAdvice(ProceedingJoinPoint joinPoint) throws Throwable {
        System.out.println("Inner Aspect - Before method");

        // ターゲットメソッドの実行
        Object result = joinPoint.proceed();

        System.out.println("Inner Aspect - After method");

        return result;
    }
}
//ターゲットメソッド
import org.springframework.stereotype.Service;

@Service
public class ExampleService {

    public void exampleMethod() {
        System.out.println("Target Method - Execution");
    }
}
//実行結果
//ターゲットメソッド exampleMethod を呼び出すと、以下のようにログが出力されます。
Outer Aspect - Before method
Inner Aspect - Before method
Target Method - Execution
Inner Aspect - After method
Outer Aspect - After method
この例から、切面の優先順位が高い(@Order(1))切面がターゲットメソッドの前後で最初に処理され、優先順位が低い(@Order(2))切面がその後に処理されることがわかります。切面の優先順位設定を使用することで、複数の切面が同じメソッドに適用される場合に、処理の順序を制御することができます。
長い記事に最後までお付き合いいただきありがとうございました。ご質問や異論があれば、コメントをお願いします。