ALH Advent Calender
ALH Advent Calenderです!
ノリで参加しました。こっそり紹介
今回はAzureでのアーキテクチャをハンズオン形式で紹介します。
Azureでの初歩的な知識を前提としているので、初見さんおいてけぼりな感じですがごめんなさい![]()
Azure上での非同期アーキテクチャ
メッセージングのマネージド・サービスであるAzure Service Busを使ってみたいと思います。
なぜ非同期?について、
- 重たい処理を切り離す
- スケーラビリティ向上
- 負荷平準化
- バッファリング
などのメリットがあります。
オンラインディレードのアーキテクチャの選択肢として、Azure Queue Storageを利用するパターンや、DBポーリングなどがありますが、実装が簡単そうなのでServiceBusを選択しました。(というか使ってみたい)
MQなどメッセージングってニッチな領域ですが、クラウドネイティブアプリケーションでは不可欠なアーキテクチャだと思ってます。
英語ですが、以下見てみることをおすすめします。
Enterprise Integration Patterns
※右側が目次です。
前段のインプット
アーキテクチャのベストプラクティスがAzure公式ドキュメントにて詳しく解説されています。
個人的に読んでるだけでも勉強になるので他の章もおすすめです!
【Azure】Azure Web アプリケーションのスケーラビリティの向上
【Azure】キュー ベースの負荷平準化パターン
執筆のきっかけ
AzureのJava系ドキュメントやサンプルがしんどい
ハンズオン資料は結構充実しているのですが、ちょっと突っ込んだ内容で実装しようとするとC#やNode.jsのドキュメントが多く、Java実装がしんどいです。
環境に合わせた言語選定は必要ですね。
ただ、今現在(2019/12/07時点)で、Pivotalさんも力入れてくれているみたいです。
さらにAzureのStorageを対象とするSDKでは以下の問題があり、v12はpreview![]()
GA神話がありますが、実案件で使う場合にはさすがにpreviewは怖いですよね、、、
Microsoft Azure Storage SDK for Java
v10,11は使わないでね
本投稿がどなたかの参考になれば幸いです!
構成図
以下の構成とします。
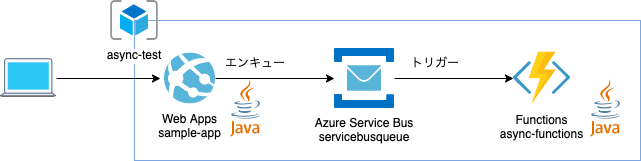
ServiceBusでは大別してキューとトピック、またJMSやMQを使用できますが、今回はキューで作成します。
https://www.draw.io/
図の作成にはこちらを使いました。便利!
ServiceBusリソースの用意
ポータル上で作成してもよいのですが、今回はCLIで作成してみます。
実行環境
- macOS Mojave
- Azure CLI 2.0.68
- JDK Zulu 1.8.0_232
- Azure Functions Core Tools 2.7.1948
# Azureログイン
az login

# リソースグループ作成
az group create --name async-test --location japaneast

# ServiceBus名前空間の作成(リソース割当) 1分ぐらい
az servicebus namespace create --resource-group async-test --name serbicebusqueue --location japaneast --sku Basic

# キューの作成
az servicebus queue create --resource-group async-test --namespace-name serbicebusqueue --name funcqueue
create時の
--nameについて、Azure上で一意である必要があるので以下のエラーが発生した場合は別の名前に変更してください。
# 設定したnameが使えない場合
BadRequest - The specified name is not available. CorrelationId: XXXXXXXXXXXXXXXXXXXXXXX
ポータルでは
$RANDOMを設定しています。
https://docs.microsoft.com/ja-jp/azure/service-bus-messaging/service-bus-quickstart-cli
以下のコマンドを実行し、接続文字列が正常に表示されれば作成完了です。
az servicebus namespace authorization-rule keys list --resource-group async-test --namespace-name serbicebusqueue --name RootManageSharedAccessKey --query primaryConnectionString --output tsv

Endpoint=sb://serbicebusqueue.servicebus.windows.net/;SharedAccessKeyName=RootManageSharedAccessKey;SharedAccessKey=[ランダムな文字列]
クラウドの基本ですが、アクセスキーの取り扱いは十分に注意してください。
WebAppsの作成
早速実装サンプルを。
はじめにServiceBusへの送信側の実装です。
Spring Boot Initializrでブランクプロジェクト作成
- WebとAzureSupportにチェックを入れます
dependencyの追加
		<!-- for Azure Service Bus -->
		<dependency>
			<groupId>com.microsoft.azure</groupId>
			<artifactId>azure-servicebus-spring-boot-starter</artifactId>
		</dependency>
application.propertiesの設定
ServiceBusへの接続設定はstarter内のConfigurationクラスが設定してくれますので、先程作成したServiceBusの接続文字列、キューを設定します。
# Service Busの設定
azure.servicebus.connection-string=Endpoint=sb://serbicebusqueue.servicebus.windows.net/;SharedAccessKeyName=RootManageSharedAccessKey;SharedAccessKey=[ランダムな文字列]
azure.servicebus.queue-name=funcqueue
azure.servicebus.queue-receive-mode=peeklock
Serviceクラスの作成
MVCモデルに倣い、Controllerから呼び出されるServiceクラスとして実装します。
package com.example.async.domain;

import com.microsoft.azure.servicebus.Message;
import com.microsoft.azure.servicebus.QueueClient;
import com.microsoft.azure.servicebus.primitives.ServiceBusException;
import org.slf4j.Logger;
import org.slf4j.LoggerFactory;
import org.springframework.beans.factory.annotation.Autowired;
import org.springframework.stereotype.Service;

import java.nio.charset.StandardCharsets;

@Service
public class EnqueueService {

    private static final Logger logger = LoggerFactory.getLogger(EnqueueService.class);

    /**
     * AutoConfigureによってServiceBusへの接続設定が隠蔽されます。
     */
    @Autowired
    QueueClient queueClient;

    public boolean sendQueueMessage() {
        String messageBody = "queue Message";
        logger.info("message body:{}", messageBody);
        // 送信するメッセージの生成
        Message message = new Message(messageBody.getBytes(StandardCharsets.UTF_8));
        try {
            // Service Busへの送信
            queueClient.send(message);
            queueClient.close();
        } catch (ServiceBusException e) {
            e.printStackTrace();
            return false;
        } catch (InterruptedException e) {
            e.printStackTrace();
            return false;
        }
        return true;
    }
}
Controllerの作成
クライアントからのエンドポイントを用意し、ServiceBusに送信するServiceクラスを呼び出します。
package com.example.async.controller;

import com.example.async.domain.EnqueueService;
import org.springframework.beans.factory.annotation.Autowired;
import org.springframework.web.bind.annotation.PostMapping;
import org.springframework.web.bind.annotation.RequestMapping;
import org.springframework.web.bind.annotation.RestController;

@RestController
@RequestMapping("async")
public class AsyncController {

    @Autowired
    EnqueueService enqueueService;

    @PostMapping
    public String sendMessage() {
        boolean result = enqueueService.sendQueueMessage();
        if(!result) {
            return "Fail.";
        }
        return "Complete.";
    }
}
ローカル実行
ここまでで、ローカルからServiceBusへ送信されることを確認します。
mvn spring-boot:run
別コンソールからcurlを叩いてみます。
curl -X POST localhost:8080/async
正常に動作していればポータル上でも確認できます。

Functionsの作成
送信側が作成できたので、受信側を実装します。
Functionsのトリガー機能を使います。
Spring Cloud Functionでの実装を試みたのですが、Functions拡張機能がうまく使えずピュアJavaで実装しています。
後日再検証してみたいと思います
maven architypeからプロジェクト作成
公式ドキュメントに従って、Mavenアーキタイプからブランクプロジェクトを作成します。
対話モードになるので以下のように設定しました。
mvn archetype:generate \
    -DarchetypeGroupId=com.microsoft.azure \
    -DarchetypeArtifactId=azure-functions-archetype

[省略]

Define value for property 'groupId' (should match expression '[A-Za-z0-9_\-\.]+'): com.example.function
[INFO] Using property: groupId = com.example.function
Define value for property 'artifactId' (should match expression '[A-Za-z0-9_\-\.]+'): functions
[INFO] Using property: artifactId = functions
Define value for property 'version' 1.0-SNAPSHOT: : 0.0.1-SNAPSHOT
Define value for property 'package' com.example.function: :
Define value for property 'appName' functions-20191208134240755: : async-functions
Define value for property 'appRegion' westus: : japaneast
Define value for property 'resourceGroup' java-functions-group: : async-test
Confirm properties configuration:
groupId: com.example.function
groupId: com.example.function
artifactId: functions
artifactId: functions
version: 0.0.1-SNAPSHOT
package: com.example.function
appName: async-functions
appRegion: japaneast
resourceGroup: async-test
 Y: : y
ServiceBusをトリガーする関数の作成
以下のように実装します。
package com.example.function;

import com.microsoft.azure.functions.ExecutionContext;
import com.microsoft.azure.functions.annotation.FunctionName;
import com.microsoft.azure.functions.annotation.ServiceBusQueueTrigger;

/**
 * Azure Functions with ServiceBus Trigger.
 */
public class ServiceBusFunction {

    /**
     * ServiceBusをトリガーにする
     * @param message
     * @param context
     */
    @FunctionName("servicebus-trigger")
    public void run(
            @ServiceBusQueueTrigger(name = "message",queueName = "funcqueue", connection="SERVICE_BUS_CONNECTIONSTRING") String message,
            final ExecutionContext context) {
        context.getLogger().info("ServiceBusTrigger start.");
        context.getLogger().info(message);
    }
}
@ServiceBusQueueTriggerの設定値
| attribute | 説明 |
|---|---|
name |
任意の名前を指定します。 |
queueName |
ServiceBusのキュー名を指定します。 |
connection |
ServiceBusの接続文字列を指定します。 今回ローカル環境では host.settings.json、デプロイ時には環境変数とするための文字列を指定しています。 |
local.settings.jsonの設定
デフォルトでローカル環境用の設定ファイルが作成されます。
{
  "IsEncrypted": false,
  "Values": {
    "AzureWebJobsStorage": "UseDevelopmentStorage=true",
    "FUNCTIONS_WORKER_RUNTIME": "java",
    "SERVICE_BUS_CONNECTIONSTRING": "Endpoint=sb://serbicebusqueue.servicebus.windows.net/;SharedAccessKeyName=RootManageSharedAccessKey;SharedAccessKey=[キー値]"
  }
}
- HTTPトリガーを用いるデフォルトの設定では不要ですが、それ以外のトリガーを使用する場合、
AzureWebJobsStorageを設定する必要があります。ローカルの場合はUseDevelopmentStorage=trueを設定します。 - クラスで設定した
SERVICE_BUS_CONNECTIONSTRINGにServiceBusの接続文字列を設定します。
ローカル環境での実行
Functionsをローカルで実行し、先程、ローカル実行でServiceBusへ送信したメッセージを取得してみましょう。
mvn clean package
mvn azure-functions:run
うまくいけば以下のログが出力されるはずです。
[HTTPトリガーの場合のログ省略]

[2019/12/08 5:15:56] Executed 'Functions.servicebus-trigger' (Succeeded, Id=e1c75286-c80f-45d9-88ae-d5e8dfb2cd8a)
[2019/12/08 5:18:52] Executing 'Functions.servicebus-trigger' (Reason='New ServiceBus message detected on 'funcqueue'.', Id=07b50ad5-256e-45ee-8bfa-0fb5ddfb7172)
[2019/12/08 5:18:52] Trigger Details: MessageId: 3c3bffa6-c533-41f3-9bf4-7664e16e44bc, DeliveryCount: 1, EnqueuedTime: 2019/12/08 5:18:52, LockedUntil: 2019/12/08 5:19:52, SessionId: (null)
[2019/12/08 5:18:52] ServiceBusTrigger start.
[2019/12/08 5:18:52] queue Message
[2019/12/08 5:18:52] Function "servicebus-trigger" (Id: 07b50ad5-256e-45ee-8bfa-0fb5ddfb7172) invoked by Java Worker
[2019/12/08 5:18:52] Executed 'Functions.servicebus-trigger' (Succeeded, Id=07b50ad5-256e-45ee-8bfa-0fb5ddfb7172)
これでローカルWebアプリ -> Serbvice Bus -> ローカルFunctionsがうまく実行できることが確認できました。
Azure環境へのデプロイ
作成したアプリケーションをAzureにデプロイします。
CLIでリソースも作成できますが、Azureサンプルはdeploy時に自動で作成する場合が多く、ランダムな文字列が含まれてしまうため、ポータルでAppServiceを作成します。
AppServiceの作成
AppServiceはWebアプリのリソースを割り当てます。
同一のAppServiceに複数のアプリケーションをデプロイすることができるのでリソースの節約ができます。
ただし、CPUなどのリソースを共有するので、実運用する場合は、Functionsは従量課金プランにする、など分割した方が無難です。
ServiceBusの作成時にasync-testのリソースグループを作成したのでそちらを使います。

注意点として2019/12/07現在、FunctionsでJavaを実装する場合、AppServiceのOSはWindowsしか提供されていませんので、Windowsを選択してください。
Web Appsのデプロイ
pom.xmlにMavenのプラグインを追加します。
      <plugin>
        <groupId>com.microsoft.azure</groupId>
        <artifactId>azure-webapp-maven-plugin</artifactId>
        <version>1.8.0</version>
        <configuration>
          <schemaVersion>V2</schemaVersion>
          <resourceGroup>async-test</resourceGroup>
          <appName>async-app</appName>
          <appServicePlanName>appservice-async-test</appServicePlanName>
          <region>japaneast</region>
          <!-- AppServicePlanのプラン -->
          <pricingTier>S1</pricingTier>
          <runtime>
            <os>windows</os>
            <javaVersion>1.8</javaVersion>
            <webContainer>java 8</webContainer>
          </runtime>
          <deployment>
            <resources>
              <resource>
                <directory>${project.basedir}/target</directory>
                <includes>
                  <include>*.jar</include>
                </includes>
              </resource>
            </resources>
          </deployment>
        </configuration>
      </plugin>
mavenのazure-webapp-maven-pluginでデプロイします。
mvn clean package
mvn azure-webapp:deploy
curlコマンド
curl -H 'Content-Length:0' -X POST https://async-app.azurewebsites.net/async
Content-Lengthヘッダが必要です。
Functionsのデプロイ
雛形はブランクプロジェクト作成時に生成されるので、AppServiePlanを設定します。
      <plugin>
        <groupId>com.microsoft.azure</groupId>
        <artifactId>azure-functions-maven-plugin</artifactId>
        <configuration>
          <resourceGroup>${functionResourceGroup}</resourceGroup>
          <appName>${functionAppName}</appName>
          <region>${functionAppRegion}</region>
          <!-- AppServicePlanの設定 -->
          <appServicePlanName>appservice-async-test</appServicePlanName>

          <appSettings>
            <!-- Run Azure Function from package file by default -->
            <property>
              <name>WEBSITE_RUN_FROM_PACKAGE</name>
              <value>1</value>
            </property>
            <property>
              <name>FUNCTIONS_EXTENSION_VERSION</name>
              <value>~2</value>
            </property>
          </appSettings>
        </configuration>
        <executions>
          <execution>
            <id>package-functions</id>
            <goals>
              <goal>package</goal>
            </goals>
          </execution>
        </executions>
      </plugin>
mavenのazure-functions-maven-pluginでデプロイします。
mvn clean package
mvn azure-functions:deploy
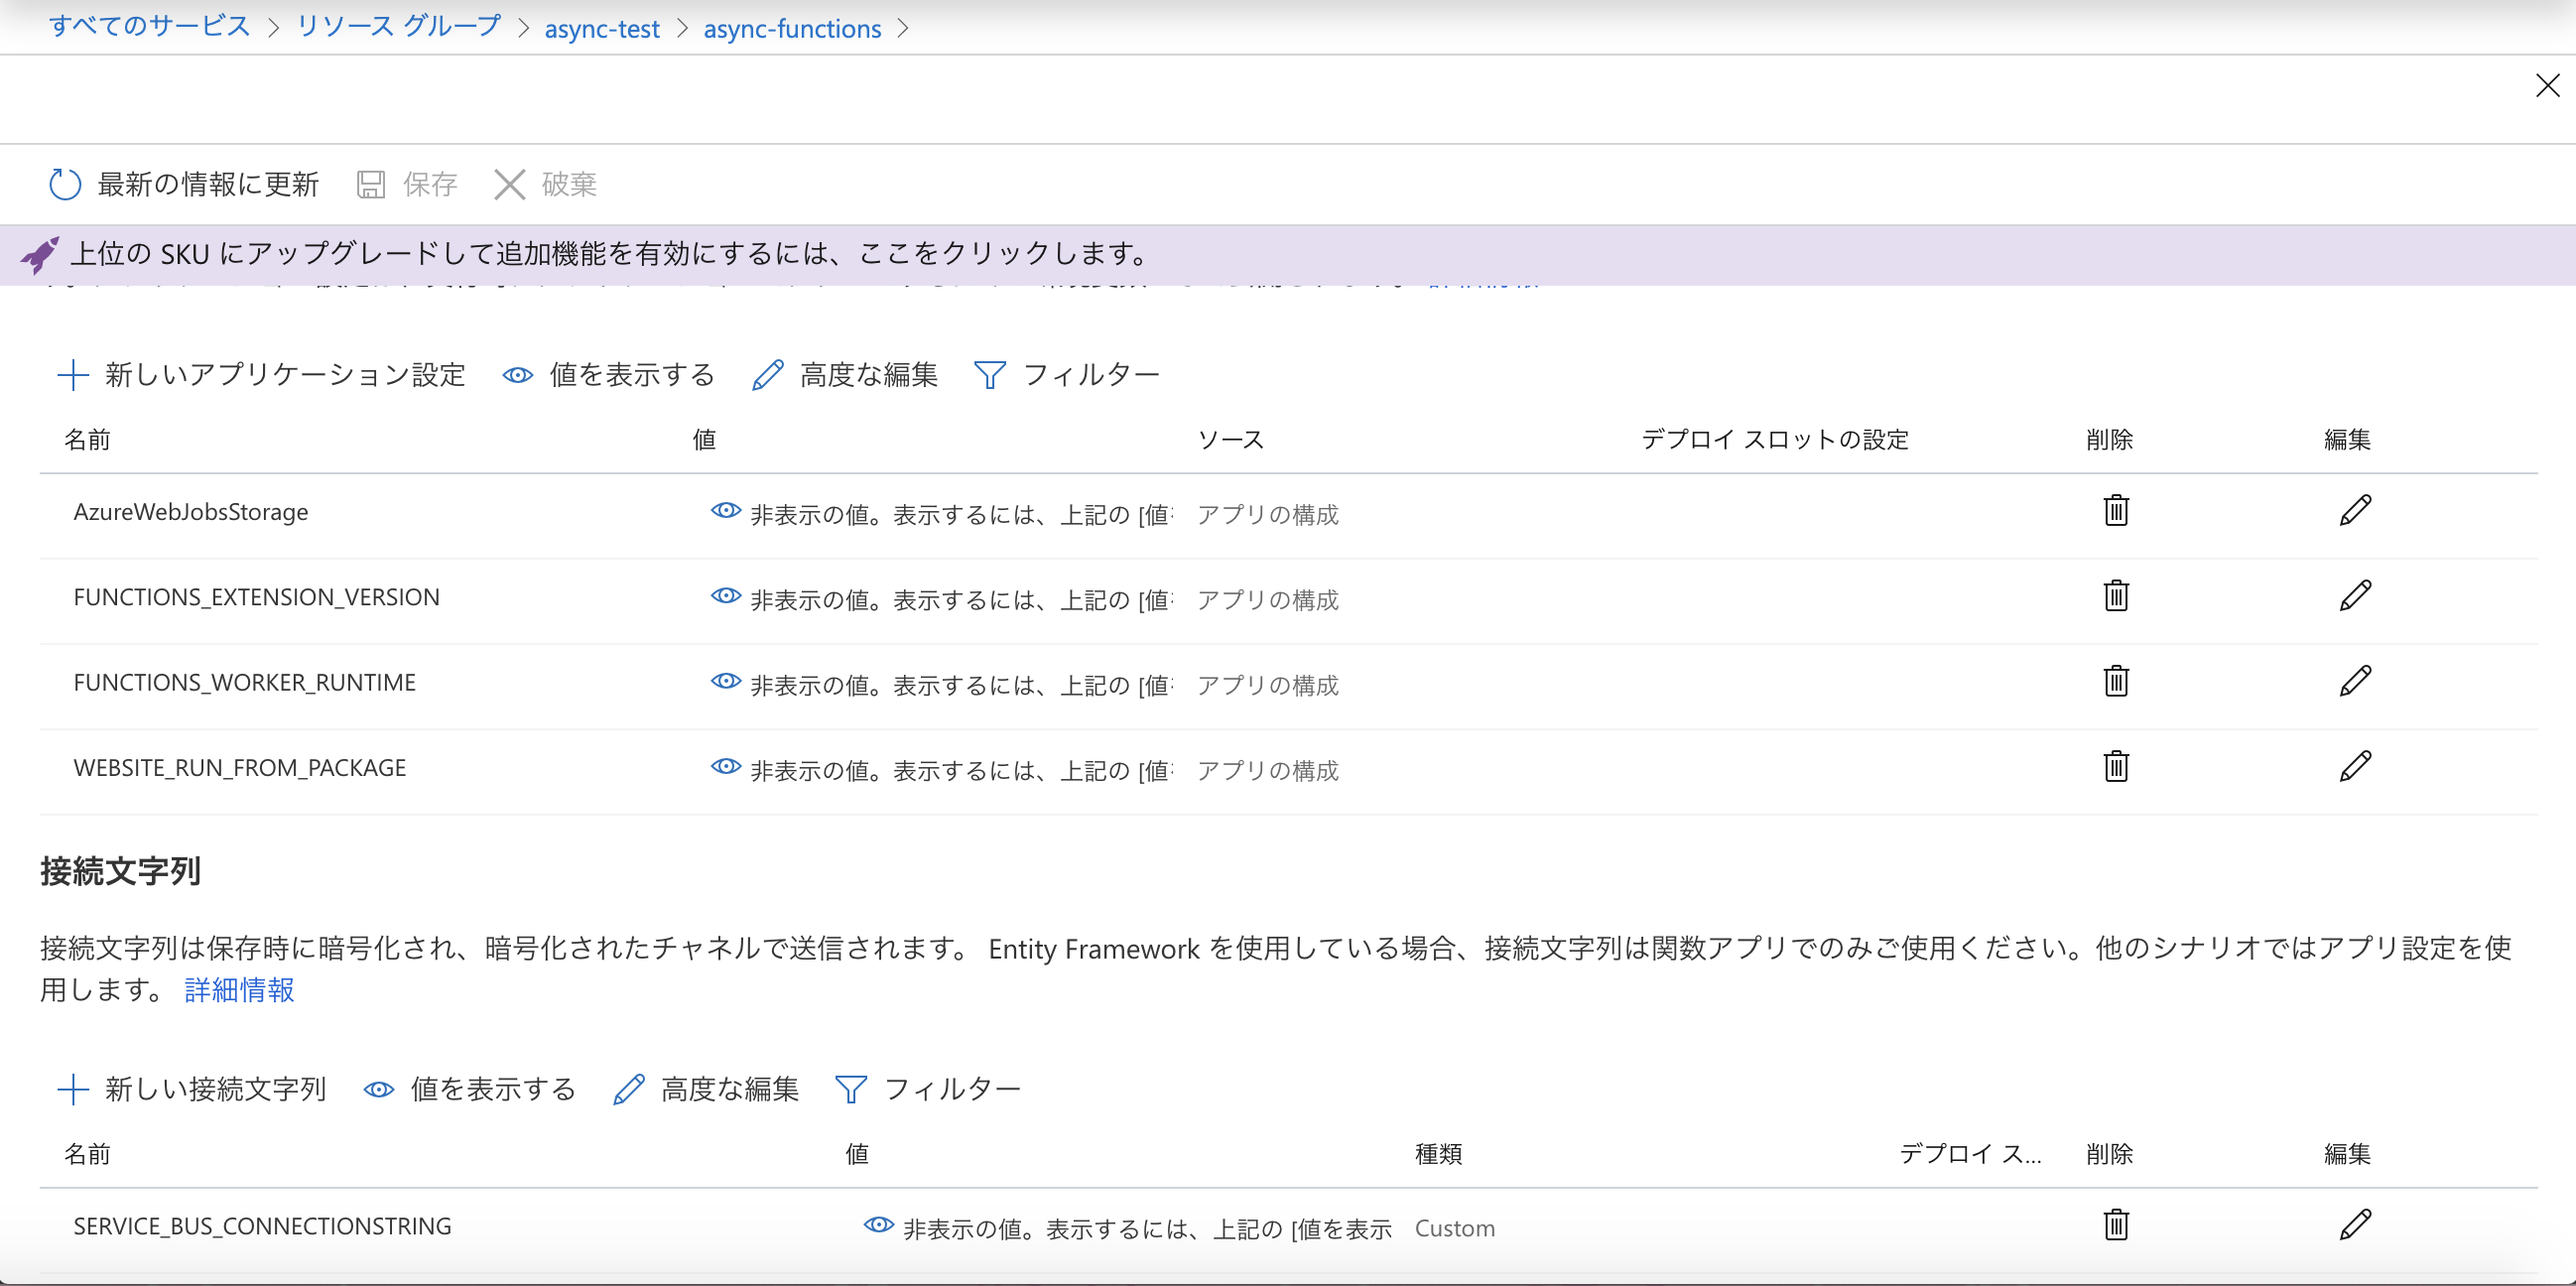
デプロイができたら関数が作成されているので、ServiceBusの接続文字列をアプリケーション設定で設定します。
サンプルソース
まとめ
結局Azureドキュメントのハンズオンになっちゃいましたが、Azure Functionsに色んな意味でハマっちゃいました。もうちょっとアプリ作り込んでやってみないとハマりポイントとかあります。
また、ローカルから直デプロイはあまりやらないと思いますので、GitHub Actionsを使ったパイプラインでのデプロイも試してみたいです。
次回、このあたり詳しくやりたいと思います。