DepthTextureについて
Cameraから描画する
-
カラーバッファ
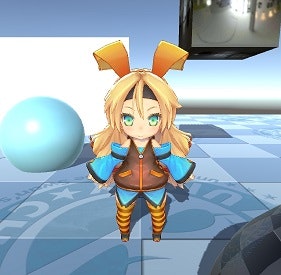
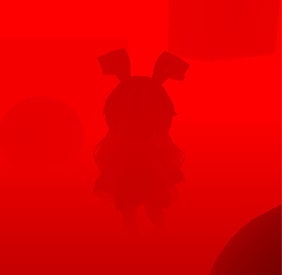
-
デプスバッファ
● 手順
- Cameraのデプスバッファ描画先にRenderTextureをアタッチする。
- OnPostRender() で加工したり、画面に出力したりします。
●サンプルコード
public class RenderDepthBuffer : MonoBehaviour
{
	private RenderTexture m_colorTex;
	private RenderTexture m_depthTex;
	public Material m_postRenderMat;

	void Start ()
	{
		Camera cam = GetComponent<Camera>();
		cam.depthTextureMode = DepthTextureMode.Depth;

		// カラーバッファ用 RenderTexture
		m_colorTex = new RenderTexture(Screen.width, Screen.height, 0, RenderTextureFormat.ARGB32);
		m_colorTex.Create();

		// デプスバッファ用 RenderTexture
		m_depthTex = new RenderTexture(Screen.width, Screen.height, 24, RenderTextureFormat.Depth);
		m_depthTex.Create();

		// cameraにカラーバッファとデプスバッファをセットする
		cam.SetTargetBuffers(m_colorTex.colorBuffer, m_depthTex.depthBuffer);
	}

	void OnPostRender()
	{
		// RenderTarget無し:画面に出力される
		Graphics.SetRenderTarget(null);

		// デプスバッファを描画する(m_postRenderMatはテクスチャ画像をそのまま描画するマテリアル)
		Graphics.Blit(m_depthTex, m_postRenderMat);
	}
}
別のカメラで利用する
カメラAで描画されたデプスバッファを元に、カメラBで別の描画を行う。
とりあえずサンプルコードだけ。
{
	// 1つ目のcameraで描画されたカラーバッファとデプスバッファ
	public RenderTexture m_firstColorTex;
	public RenderTexture m_firstDepthTex;

	// 2つ目のcameraの描画先
	private RenderTexture m_renderBuffer;

	public Material m_postRenderMat;
	public Material m_cutOffMat;

	void Start()
	{
		Camera cam = GetComponent<Camera>();

		// 二つ目のcameraの描画バッファ
		m_renderBuffer = new RenderTexture(Screen.width, Screen.height, 0, RenderTextureFormat.ARGB32);
		m_renderBuffer.Create();

		// ・カラーバッファは上記で作成したもの
		// ・デプスバッファは別のcameraで描画されたもの
		// をセットする。
		cam.SetTargetBuffers(m_renderBuffer.colorBuffer, m_firstDepthTex);
	}

	void OnPostRender()
	{
		// 描画先を完全にクリアする
		Graphics.SetRenderTarget(null);
		GL.Clear(true, true, new Color(0, 0, 0, 0));

		// 1つ目のcameraで描画されたカラーバッファを画面に描画
		Graphics.Blit(m_firstColorTex, m_postRenderMat, 0);

		// 2つ目のcameraで描画されたカラーバッファを合成
		// そのまま描画すると全て塗りつぶされてしまうので、適当にカットオフマテリアルで描画
		Graphics.Blit(m_renderBuffer, m_cutOffMat, 0);
	}
}
デプスバッファから輪郭を抽出する
-
最終結果
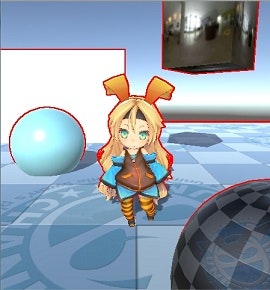
-
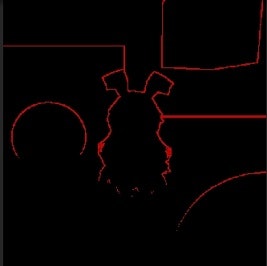
抽出された輪郭
●手順
- cameraにカラーバッファとデプスバッファのRenderTextureを設定
- OnPostRender() でカラーバッファを画面に描画。
- デプスバッファから輪郭を抽出して別のRenderTextureへ描画
- 輪郭テクスチャを画面に合成
●カメラにアタッチするコンポーネント
	private RenderTexture m_colorTex;	// カラーバッファ
	private RenderTexture m_depthTex;	// デプスバッファ
	private RenderTexture m_edgeTex;	// 輪郭描画先のバッファ

	public Material m_postRenderMat;	// カラーバッファ描画用
	public Material m_renderEdgeMat;	// 輪郭抽出シェーダー
	public Material m_cutOffMat;		// 輪郭合成用

	void OnPostRender()
	{
		// カラーバッファを転送(m_postRenderMatはテクスチャ画像をそのまま描画するマテリアル)
		Graphics.SetRenderTarget(null);
		GL.Clear(true, true, new Color(0, 0, 0, 0));
		Graphics.Blit(m_colorTex, m_postRenderMat);

		// 輪郭抽出用RenderTargetへ描画
		Graphics.SetRenderTarget(m_edgeTex);
		GL.Clear(true, true, new Color(0, 0, 0, 0));
		Graphics.Blit(m_depthTex, m_edgeTex, m_renderEdgeMat);

		// 輪郭テクスチャを画面に合成
		Graphics.SetRenderTarget(null);
		Graphics.Blit(m_edgeTex, m_cutOffMat);
	}
●輪郭抽出シェーダー
Shader "Custom/RenderDepthEdge" {
	Properties {
		_MainTex ("Depth Texture", 2D) = "white" {}
		_Threshold ("Edge Threshold", Range(0.0001, 1)) = 0.01
		_EdgeColor ("Edge Color", Color) = (1,1,1,1)
		_Thick("Thick", Range(0.1, 5)) = 1
	}

	SubShader {
		Tags { "RenderType"="Opaque" }
		ZTest Off
		ZWrite Off
		Lighting Off
		AlphaTest Off

		Pass {
			CGPROGRAM
			#pragma vertex vert
			#pragma fragment frag
			#include "UnityCG.cginc"

			sampler2D _MainTex;
			float4	_MainTex_ST;
			float _Threshold;
			float4 _EdgeColor;
			float _Thick;
			float4	_MainTex_TexelSize;	// 1テクセルを正規化した値

			struct appdata_t {
				float4 vertex : POSITION;
				float2 texcoord : TEXCOORD0;
			};
			struct v2f {
				float4 vertex : SV_POSITION;
				half2 texcoord : TEXCOORD0;
			};

			v2f vert(appdata_t v)
			{
				v2f o;
				o.vertex = mul(UNITY_MATRIX_MVP, v.vertex);
				o.texcoord = TRANSFORM_TEX(v.texcoord, _MainTex);
				return o;
			}

			fixed4 frag(v2f input) : Color
			{
				float tx = _MainTex_TexelSize.x * _Thick;
				float ty = _MainTex_TexelSize.y * _Thick;

				//※「DirectX9 シェーダープログラミングブック」を参考にしています。
				// 輪郭判定値の計算
				// (-1,-1) ┼─┼ (0, -1)
				//         │  │
				// (-1, 0) ┼─┼ (0,  0)
				// の4ピクセルの対角線同士でデプス値の差を取って2乗したものを加算する
				float col00 = Linear01Depth(tex2D(_MainTex, input.texcoord + half2(-tx, -ty)).r);
				float col10 = Linear01Depth(tex2D(_MainTex, input.texcoord + half2(  0, -ty)).r);
				float col01 = Linear01Depth(tex2D(_MainTex, input.texcoord + half2(-tx,   0)).r);
				float col11 = Linear01Depth(tex2D(_MainTex, input.texcoord + half2(  0,   0)).r);
				float val = (col00 - col11) * (col00 - col11) + (col10 - col01) * (col10 - col01);

				// 閾値以下ならクリップする
				if(val < _Threshold)
				{
					clip(-1);
				}

				fixed4 col = _EdgeColor;
				return col;
			}
			ENDCG
		}
	}
}