◆ Laravelのバージョンには気をつけようと思った話
Laravel使い始めて、まだ数日ですが、Versionの違うドキュメントを読んでしまって、実装始めると、あれ?動かない・・・・っていうことが結構あります。
なので、常にドキュメント読む時には、どのバージョンで実装されたものかを確認しましょう。
今回はまったこととしては、
-
画像をアップロードするFormを作ろうとしたら、Formのヘルパークラスがなかった。
- By default in Laravel 5.0, Html and Form are not embedded anymore.Add the following lines in the require section of composer.json file and run composer update "illuminate/html": "5.*"
- [SOLVED] Html, Form class not found in Laravel 5 - Laravel.io - The Laravel Community Portal http://laravel.io/forum/09-20-2014-html-form-class-not-found-in-laravel-5
-
Inputから画像のファイルを取得できるんだけど、Inputクラスはどこ?
- php - laravel 5 : Class 'input' not found - Stack Overflow http://stackoverflow.com/questions/31696679/laravel-5-class-input-not-found
-
テンプレートで出力するときのHTMLのイメージ要素がない?
-
Laravel 5.x で使う laravelcollective/html のシンタックスは
{!! Html::image('img/logo.png') !!}です。だいたい検索して出てくるのは{{ HTML::image('img/stuvi-logo.png') }}だったりする -
Laravel Recipes :: Generating an HTML Image Element http://laravel-recipes.com/recipes/185/generating-an-html-image-element
-
あと、地味に「use」したいクラスがどこにあるん?とかさまよったりで、意外なところで時間を食い潰しました。
というわけで、バージョンは確認しましょう。
◆ バージョン
というわけで、私の検証環境です。Mac OSXでやっています。
 $ php artisan --version
Laravel Framework version 5.3.28

 $ php --version
PHP 7.1.0 (cli) (built: Dec  2 2016 03:30:24) ( NTS )
Copyright (c) 1997-2016 The PHP Group
Zend Engine v3.1.0-dev, Copyright (c) 1998-2016 Zend Technologies
◆ 今日やること
つい・・・、時間もないのに遊んでしまった。
- 画像のアップロード
- 画像の加工
- 画像の表示
◆ 実装編
今回は、写真をアップロードしたら、[public/image]パスに保存するようにしています。
写真は、[public/image]にアップされてる写真があれば、imageエレメントで表示するという仕様です。
> 画像アップロード画面(views/bohebohe/photo.blade.php)
アップロードする画面と、アップロードした後の結果を表示する画面は、一つのテンプレートになっています。
{!! Form::open(
array(
'url' => 'bohebohe/photo/store',
'class' => 'form',
'novalidate' => 'novalidate',
'files' => true)) !!}
<div class="form-group">
{!! Form::label('Image') !!}
{!! Form::file('photo', null) !!}
</div>
<div class="form-group">
{!! Form::submit('Upload Image!') !!}
</div>
{!! Form::close() !!}
</div>
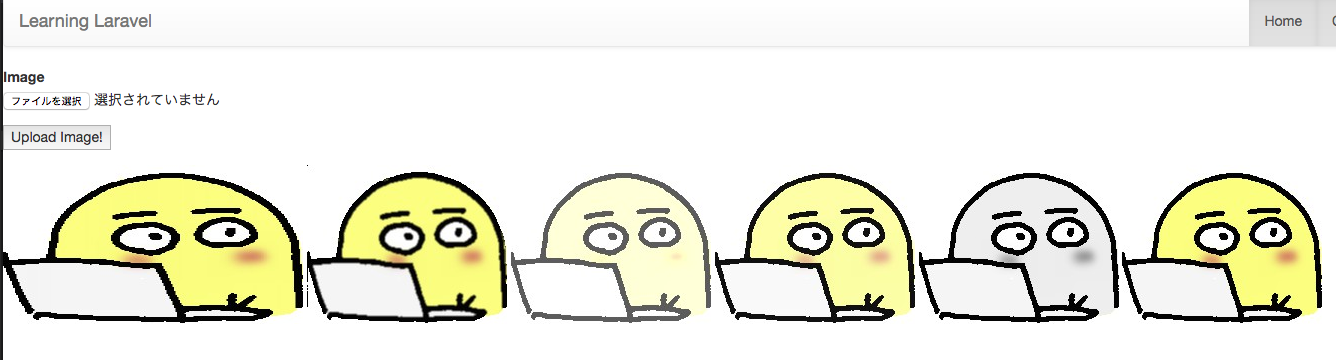
<p>アップロード結果</p>
@if(file_exists('image/resize-bohe.jpg'))
{!! Html::image('image/resize-bohe.jpg', 'bohebohe', array('class' => 'thumb')) !!}
@endif
@if(file_exists('image/blur-bohe.jpg'))
{!! Html::image('image/blur-bohe.jpg', 'bohebohe', array('class' => 'thumb')) !!}
@endif
@if(file_exists('image/bright-bohe.jpg'))
{!! Html::image('image/bright-bohe.jpg', 'bohebohe', array('class' => 'thumb')) !!}
@endif
@if(file_exists('image/gamma-bohe.jpg'))
{!! Html::image('image/gamma-bohe.jpg', 'bohebohe', array('class' => 'thumb')) !!}
@endif
@if(file_exists('image/gray-bohe.jpg'))
{!! Html::image('image/gray-bohe.jpg', 'bohebohe', array('class' => 'thumb')) !!}
@endif
@if(file_exists('image/org-bohe.jpg'))
{!! Html::image('image/org-bohe.jpg', 'bohebohe', array('class' => 'thumb')) !!}
@endif
> laravelcollective/htmlが必要です
-
そして、上記のFormを使うためには、laravelcollective/htmlが必要です。
-
composer.jsonに追加
    "require": {
        "laravelcollective/html": "~5.0"
    }
- composer update
composer update
- app.phpに追加
    'providers' => [
     ・・・・
        Collective\Html\HtmlServiceProvider::class,


    ],

    'aliases' => [
     ・・・・
        'Form' => Collective\Html\FormFacade::class,
        'Html' => Collective\Html\HtmlFacade::class,

    ],
これで利用可能です。
> 画像の加工 - Intervention Imageを使います
-
Intervention Imageを利用します
-
install
php composer.phar require intervention/image
- app.phpに追加
    'providers' => [
     ・・・・
        Intervention\Image\ImageServiceProvider::class,


    ],

    'aliases' => [
     ・・・・
        'Image' => Intervention\Image\Facades\Image::class,

    ],
-
gdを使うかImagickを使うかの選択ができます
-
メモリ周りの設定に注意
- php.ini 内で以下の値が最適化されているか確認しましょう
-
Intervention Image - Configuration
- memory_limit
- upload_max_filesize
-
様々なAPIが用意されていて、画像の加工が簡単にできます。お試しあれ!
> 画像のアップロード処理、加工処理
- キモはここです。
- Inputクラスからfileを取得して、Image::makeに渡しています。この先は、加工、保存などのメソッドを呼び出すだけです。
$photo = Input::file('photo');
Image::make($photo)->resize(300, null)->save(public_path() . '/image/' .'resize-bohe.jpg');
- use忘れずに
use Illuminate\Support\Facades\Input;
use Intervention\Image\ImageManagerStatic as Image;
- app/Controller/BohebohePhotoController.php
<?php

namespace App\Http\Controllers;

use Illuminate\Support\Facades\DB;
use Illuminate\Support\Facades\Log;
use Illuminate\Support\Facades\Input;

use Illuminate\Http\Request;
use App\Http\Controllers\Controller;

use Intervention\Image\ImageManagerStatic as Image;

class BohebohePhotoController extends Controller
{

    public function show()
    {
        return view('bohebohe.photo');
    }

    public function store(Request $request)
    {
        if($request->hasFile('photo')) {
            $photo = Input::file('photo');
             Image::make($photo)->resize(300, null)->save(public_path() . '/image/' .'resize-bohe.jpg');
             Image::make($photo)->blur()->save(public_path() . '/image/' .'blur-bohe.jpg');
             Image::make($photo)->brightness(35)->save(public_path() . '/image/' .'bright-bohe.jpg');
             Image::make($photo)->gamma(1.6)->save(public_path() . '/image/' .'gamma-bohe.jpg');
             Image::make($photo)->greyscale()->save(public_path() . '/image/' .'gray-bohe.jpg');
             Image::make($photo)->save(public_path() . '/image/' .'org-bohe.jpg');
        }
        return view('bohebohe.photo');
    }

}
◆ 参考リンク
Intervention Image - Introduction
Image Upload in Laravel 5
Laravel 5 Tutorial : Forms & HTML Class in laravel 5.3 - SCode
Upload files in laravel 5