今日はやること
さくらのレンタルサーバースタンダードで、PHP+MySQLでAPIを作成する
実装したこと
Lumenをインストールして、APIを実装しました。
◆ Lumen?
Lumen - PHP Micro-Framework By Laravel
Version5.2から、ステートレスなAPIを提供する機能だけに集中して、スリム化にシフトしています。
SessionやViewがこのバージョンから含まれなくなっています。これらが必要であればLaravelを使ってくださいとのこと
Lumen 5.2 represents a shift on slimming Lumen to focus solely focusing serving stateless, JSON APIs.
As such, sessions and views are no longer included with the framework. If you need access to these features, you should use >the full Laravel framework. Upgrading your Lumen application to the full Laravel framework mainly involves copying your >routes and classes over into a fresh installation of Laravel. Since Laravel and Lumen share many of the same components, >your classes should not require any modification.
◆ Lumenのインストール
- PHPのバージョン
- Installation - Lumen - PHP Micro-Framework By Laravel
- Server Requirementが、PHP >= 5.6.4なので、さくらのレンタルサーバーのPHPのバージョンもそうなっているか確認する。
- Composerインストールとパスの設定
- シェルの設定はお好みですが、私はbashでやりたいので、以下のサイトを参考にbashに変更して、パスの設定もしました。
- さくらのレンタルサーバのシェルをbashに変更する方法 – かきくけ子のブログ
- さくらのレンタルサーバにComposerをインストールする方法 – かきくけ子のブログ
> composerのインストール
$ mkdir -p usr/local/bin/

$ curl -sS https://getcomposer.org/installer | php -- --install-dir=usr/local/bin/
All settings correct for using Composer
Downloading...

Composer (version 1.3.0) successfully installed to: /home/{your_account}/usr/local/bin/composer.phar
Use it: php usr/local/bin/composer.phar

$ mv usr/local/bin/composer.phar usr/local/bin/composer
$ composer --version
Composer version 1.3.0 2016-12-24 00:47:03
> lumenのインストール
$ composer global require "laravel/lumen-installer"
Changed current directory to /home/enfree/.composer
Using version ^1.0 for laravel/lumen-installer
./composer.json has been created
Loading composer repositories with package information
Updating dependencies (including require-dev)
Package operations: 10 installs, 0 updates, 0 removals
  - Installing symfony/process (v3.2.1) Downloading: 100%
  - Installing psr/log (1.0.2) Downloading: 100%
  - Installing symfony/debug (v3.2.1) Downloading: 100%
  - Installing symfony/polyfill-mbstring (v1.3.0) Downloading: 100%
  - Installing symfony/console (v3.2.1) Downloading: 100%
  - Installing guzzlehttp/promises (v1.3.1) Downloading: 100%
  - Installing psr/http-message (1.0.1) Downloading: 100%
  - Installing guzzlehttp/psr7 (1.3.1) Downloading: 100%
  - Installing guzzlehttp/guzzle (6.2.2) Downloading: 100%
  - Installing laravel/lumen-installer (v1.0.2) Downloading: 100%
symfony/console suggests installing symfony/event-dispatcher ()
symfony/console suggests installing symfony/filesystem ()
Writing lock file
Generating autoload files
- パスを通します(.bash_profile)
PATH=$PATH:$HOME/bin:$HOME/usr/local/bin:~/.composer/vendor/bin
export PATH

$ source .bash_profile
$ lumen
Lumen Installer 1.0.2

Usage:
  command [options] [arguments]

Options:
  -h, --help            Display this help message
  -q, --quiet           Do not output any message
  -V, --version         Display this application version
      --ansi            Force ANSI output
      --no-ansi         Disable ANSI output
  -n, --no-interaction  Do not ask any interactive question
  -v|vv|vvv, --verbose  Increase the verbosity of messages: 1 for normal output, 2 for more verbose output and 3 for debug

Available commands:
  help  Displays help for a command
  list  Lists commands
  new   Create a new Lumen application.
◆ Lumenアプリの作成
lumen newコマンドを使うことで、新しいlumenプロジェクトを作成することができます。
lumen new blog
- 作成されたプロジェクトディレクトリ
/
├── app
│   ├── Console
│   │   ├── Commands
│   │   └── Kernel.php
│   ├── Events
│   │   ├── Event.php
│   │   └── ExampleEvent.php
│   ├── Exceptions
│   │   └── Handler.php
│   ├── Http
│   │   ├── Controllers
│   │   └── Middleware
│   ├── Jobs
│   │   ├── ExampleJob.php
│   │   └── Job.php
│   ├── Listeners
│   │   └── ExampleListener.php
│   ├── Providers
│   │   ├── AppServiceProvider.php
│   │   ├── AuthServiceProvider.php
│   │   └── EventServiceProvider.php
│   └── User.php
├── artisan
├── bootstrap
│   └── app.php
├── composer.json
├── composer.lock
├── database
│   ├── factories
│   │   └── ModelFactory.php
│   ├── migrations
│   └── seeds
│       └── DatabaseSeeder.php
├── phpunit.xml
├── public
│   └── index.php
├── readme.md
├── resources
│   └── views
├── routes
│   └── web.php
├── storage
│   ├── app
│   ├── framework
│   │   ├── cache
│   │   └── views
│   └── logs
├── tests
│   ├── ExampleTest.php
│   └── TestCase.php
└── vendor
    ├── autoload.php
    ├── bin
    ├── composer
    ├── doctrine
    ├── fzaninotto
    ├── hamcrest
    ├── illuminate
    ├── laravel
    ├── mockery
    ├── monolog
    ├── mtdowling
    ├── myclabs
    ├── nesbot
    ├── nikic
    ├── paragonie
    ├── phpdocumentor
    ├── phpspec
    ├── phpunit
    ├── psr
    ├── sebastian
    ├── symfony
    ├── vlucas
    └── webmozart
> lumenのEnvファイル
-
lumenは DotEnv PHP libraryを利用しています
-
.env_exampleファイルを.envファイルにrenameして設定する
- このファイルに設定されている値は、アプリケーション起動時に、全て$_ENVのスーパーグローバル変数にロードされます。
- Application Key
- 32文字で設定すること。設定しない場合は、ユーザーの暗号化データの機密性が保たれません。
- Time Zone
- Asia/Tokyoに設定
APP_ENV=local
APP_DEBUG=true
APP_KEY=
APP_TIMEZONE=Asia/Tokyo

DB_CONNECTION=mysql
DB_HOST=127.0.0.1
DB_PORT=3306
DB_DATABASE=homestead
DB_USERNAME=homestead
DB_PASSWORD=secret

CACHE_DRIVER=memcached
QUEUE_DRIVER=sync
Lumen APIの作成
こちらを参考にしました。なので、ソースコードのフルセットはこちらで参照してください。
- zeeshanu/rest-api-example: RESTful Blog API in Lumen 5.2
これはあくまで、上記から抜粋して自分で理解できるように書いています。
最小単位として、以下のファイルを作成したり、修正を加えました。
app
├── Helpers
│   └── Response.php
├── Http
│   ├── Controllers
│   │   └── PostsController.php
├── Models
│   └── Posts.php
├── bootstrap
│   └── app.php
├── public
│   └── index.php
├── routes
│   └── web.php
> bootstrap/app.php
DB facadeを使いたい場合、 Eloquent ORMを使いたい場合は 以下の行をコメントアウトします
$app->withFacades();
$app->withEloquent();
- Database: Getting Started - Laravel - The PHP Framework For Web Artisans
- Eloquent: Getting Started - Laravel - The PHP Framework For Web Artisans
使わずに実装もできます。
$results = app('db')->select("SELECT * FROM users");
> routes/web.php
URLと実行するクラスのルーティングを記載します
$app->group(['prefix' => 'v1'], function () use ($app) {
    $app->get('posts', ['uses' => 'PostsController@getPosts', ]);
    $app->get('posts/{id}', ['uses' => 'PostsController@getPost', ]);
    $app->post('posts', ['uses' => 'PostsController@createPost', ]);
    $app->delete('posts/{id}', ['uses' => 'PostsController@deletePost', ]);
    $app->put('posts/{id}', ['uses' => 'PostsController@updatePost', ]);
});
> Http/Controllers/PostsController.php
コントローラークラスを実装します。以下はgetの例
<?php

namespace App\Http\Controllers;

use Validator;
use App\Models\Posts;

use App\Helpers\Response;

class PostsController extends Controller
{
    protected $posts;

    function __construct(Posts $posts)
    {
        $this->posts = $posts;
    }

    public function getPosts()
    {
        $posts = $this->posts->getPosts();
        if($posts) {
            return Response::json($posts);
        }

        return Response::internalError('Unable to get the posts');
    }

    public function getPost($id)
    {
        $post = $this->posts->getPost($id);
        if( !$post ) {
            return Response::notFound('Post not found');
        }

        return Response::json($post);
    }
> Helpers/Response.php
ヘルパークラス
<?php

namespace App\Helpers;

class Response
{
    public static function json($data, $status = 200)
    {
        return response()->json($data, $status);
    }
}
> Model/Posts.php
モデル
<?php

namespace App\Models;

use Illuminate\Database\Eloquent\Model;

class Posts extends Model
{
    protected $table = 'posts';

    protected $fillable = [
        'title',
        'contents',
        'updated_at',
    ];


    public function getPosts()
    {
        $query = $this;
        return $query->paginate(20);
        //単に以下でもできる
        //return app('db')->select("SELECT * FROM posts");
    }

    public function getPost($id)
    {
        return $this->find($id);
    }
}
> MySQLのデータベース
今回、migrateの機能は使わなかった。
create table posts(id MEDIUMINT NOT NULL AUTO_INCREMENT ,title varchar(20), contents text, updated_at timestamp , PRIMARY KEY (id));
 insert into posts(title,contents, updated_at) values('Hello', 'Greetimgs', now());
> 結果
◆ Lumenをさくらレンタルサーバで動作させるために
今回、マルチドメインで設定して実行しています。
設定しているマルチドメインは
「test.com」 とします。ドキュメントルートは「www/test」です
さくらレンタルサーバの「www/test」直下に、作成したアプリのファイルをアップロードします。
> MySQLでデータベースの設定をして.envファイルを書き換えます
DB_CONNECTION=mysql
DB_HOST=mysqlXXXXXX.db.sakura.ne.jp
DB_PORT=3306
DB_DATABASE=database
DB_USERNAME=user
DB_PASSWORD=password
> エントリポイントファイルの移動
「www/test」がドキュメントルートとなっているので、以下のpublicディレクトリに入っているindex.phpファイルを「www/test/test」の直下に移動させます。
index.php
> .htaccessファイルの編集
- Optionsによる指定ができないので、コメントアウトします」
<IfModule mod_rewrite.c>
#    <IfModule mod_negotiation.c>
#        Options -MultiViews
#    </IfModule>

    RewriteEngine On

    # Redirect Trailing Slashes If Not A Folder...
    RewriteCond %{REQUEST_FILENAME} !-d
    RewriteRule ^(.*)/$ /$1 [L,R=301]

    # Handle Front Controller...
    RewriteCond %{REQUEST_FILENAME} !-d
    RewriteCond %{REQUEST_FILENAME} !-f
    RewriteRule ^ index.php [L]

    # Handle Authorization Header
    RewriteCond %{HTTP:Authorization} .
    RewriteRule .* - [E=HTTP_AUTHORIZATION:%{HTTP:Authorization}]
</IfModule>
上記で実行した場合、Request exceeded the limit of 10 internal redirects due to probable configuration error. Use 'LimitInternalRecursion' to increase the limit if necessary. Use 'LogLevel debug' to get a backtrace.と言うエラーログが出てしまったので、.htaccessファイルを書き換えています。
<IfModule mod_rewrite.c>
RewriteEngine On
RewriteCond %{ENV:REDIRECT_STATUS} ^$
RewriteCond %{REQUEST_FILENAME} !-f
RewriteCond %{REQUEST_FILENAME} !-d
RewriteRule ^ index.php [L]
</IfModule>
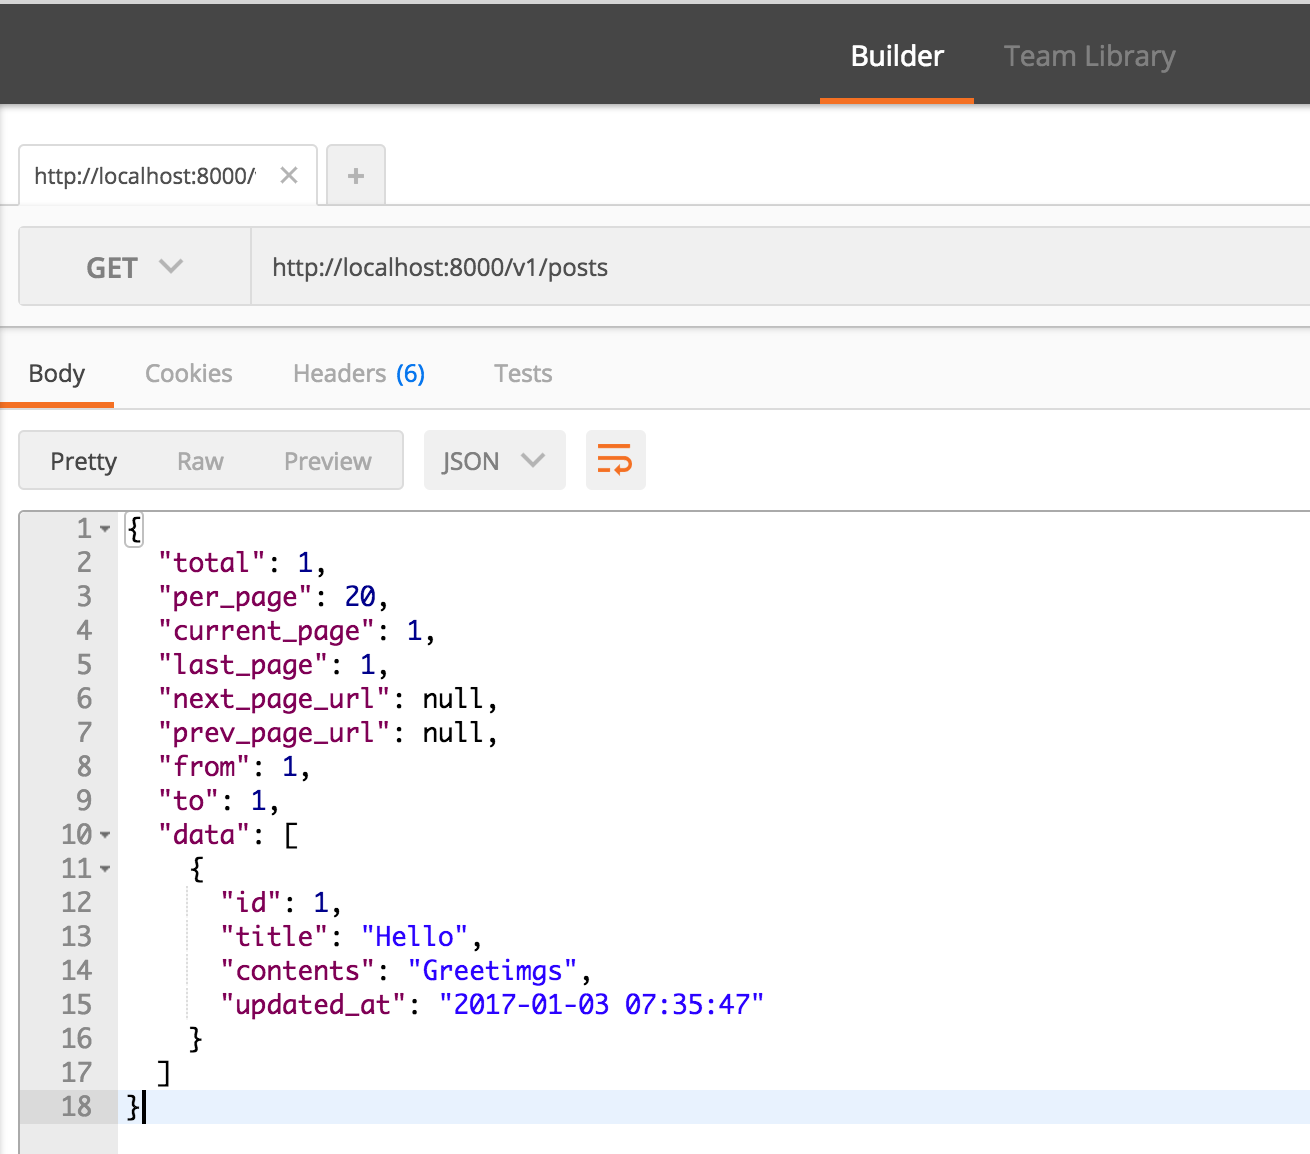
> 確認
でjsonでデータが返却されました。
> 課題
エントリポイントの「www/test/test」としなくてもいいようなRedirectRuleをかけないかな。