はじめに
皆さん、OpenID Connect を使った Web 認証/認可システムを実装していて、「サードパーティのライブラリなんかに頼りたくない!」とか「署名を自分でパースして中身見てみたい!」とか「OpenSSL の RSA_verify 呼び出すだけじゃ物足りない!自分で $m = S^e \pmod{n}$ ってやって署名検証してみたい!」って思うことよくありますよね?
ここでは、暗号関連のライブラリを使用せず、OpenID Connect の JWT の署名を自力で 検証した際に調べた内容を備忘録としてまとめてみました。
普通はライブラリ任せにする署名検証の処理も自力でやってるので、「RSA 暗号の数式も知ってるし、ライブラリ使えば暗号化もできる。だけど、平文として指定した hogehoge をどうやってあの数式に当てはめてるのか気になる」という人が読むと、もしかしたら嬉しいかもしれません。
注意事項
実際にサービスの認証/認可部分を実装しようとしている人は真似しないでください。素直にオープンソースの枯れた実装を使いましょう。こんなの自分で実装してるとどこに脆弱性が紛れ込むか分かりません。
仕事の合間のひまつぶしに読んでいただければ幸いです。
また、この記事は筆者がやりたかったことを実現するまでの過程をまとめたものなので、普通なら触れるであろう関連事項などはスルーしている部分が多いです。その辺は機会があれば改めてまとめます。
アカウント管理なんかやりたくない
昨今、なんでもかんでも Web サービス化されて、あちこちで ID / パスワード の登録を求められて、登録したもののパスワードを忘れて \(^o^)/オワタ な状況になることが増えてきています。
「サイト毎に違うパスワードにしろ」「パスワードは大文字小文字数字記号を含めて11文字以上」「メモるな」とかいろいろ言われてユーザのアカウント管理の負担は増えていく一方です。
アカウントを発行して管理するサービス提供者側も大変です。発行したアカウントの情報が漏えいでもして、さらにそのアカウントが別サービスでも使いまわされたりしていようものならこちらも \(^o^)/オワタ な状況になることは間違いありません。
というわけで、Web サービスの利用者としてもあちこちにアカウントを作ったりしたくないし、サービス提供側としても、アカウントの管理なんか自分でやりたくないわけです。どうせ最近は誰でも Google や Facebook や Yahoo! なんかのアカウント持ってるんだから、アカウントの管理は実績のある人たちに任せてこっちは都度「この人誰?」って聞いて教えてもらえばいいんです。
その仕組みとして、OpenID Connect という認証プロトコルが登場しました。
OpenID Connect
親切なことに、Google 様や Facebook 様や Yahoo! 様はこの OpenID Connect という認証プロトコルを利用して、認証を肩代わりしてくださっています。
筆者も Web サービスを実装するにあたり、アカウント管理で \(^o^)/オワタ になりたくないのでありがたく利用させていただきます。
ところで、サービス提供者は Google にどうやって「この人誰?」って聞けばいいんでしょうか。
ユーザから Google のメールアドレスとパスワードを受け取って、それを Google に投げてやれば確かに認証はできますが、そんなことしたらサービス提供者はユーザのアカウントを使ってやりたい放題できてしまいます。
OpenID Connect では、ユーザが Google 等のアカウント情報をサービス提供者に渡すことなく、サービス提供者が認証を行うことができる仕組みを提供しています。
素晴らしいですね。
OpenID Connect の仕様は OpenID Connect Core 1.0 - draft17 として公開されています。
はい、いきなり面倒な話に入ってきました。仕事の合間のひまつぶしでこんな長い文書読んでられないので、かいつまんで見ていきましょう。
まずは 1.3. Overview の図です。
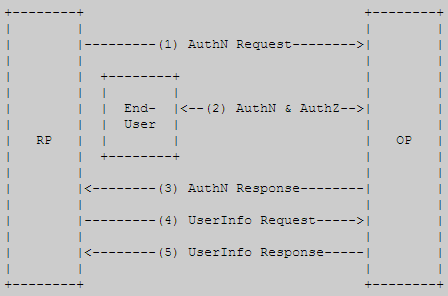
この図中の OP は、Google や Facebook 等のアカウント情報を持つサーバ、RP はその情報を利用して認証を行い Web サービスを提供するサーバを表しています。私たちがこれから実装しようとしているのは RP です。
図をよく見ると、End-User は私たちの RP とではなく、OP との間で認証、認可の手続きを行っています(図 (2) AuthN & AuthZ)。つまり、ユーザの ID / パスワードは RP を介することなく、直接 OP に渡され、認証の結果だけが RP に通知されているんですね。
フローを簡単に辿ってみると、以下の通りになります。
未認証の状態で RP にアクセスしたユーザは、「まずは認証受けてきて」と OP にリダイレクトされます(図 (1) AuthN Request)。リダイレクトされた先でユーザは自分の ID とパスワードを入力して認証(図 (2) AuthN & AuthZ)され、「このサービスがあなたの情報使おうとしてるけど許可する?」と許可を求められます。そこで「許可する」を選択すると、ユーザは再びリダイレクトで RP に戻されます(図 (3) AuthN Response)。この時、リクエストパラメータに「認証を通過した」ことを示す code が付加されているので、RP はその code を持って「この人の情報ください」と OP に問い合わせます(図 (4) UserInfo Request)。この応答としてユーザ情報が取得できれば(図 (5) UserInfo Response)、RP はユーザを認証できたことになります。
かなり駆け足になりましたが、このあたりは本記事の本題ではないので、詳しくは他の記事を参照してください。
Google Identity Platform
ここでは、Google が提供している OpenID Connect の機能を利用して、ユーザの認証をやってみましょう。登録や設定の方法はやはり他の記事に譲ります。
詳細な仕様は OpenID Connect にあります。
これも長いので、かいつまんで見ていきましょう。
先ほどのフローに従うと、まず RP 側は、未認証のユーザがアクセスしてきた際に「まずは認証受けてきて」と OP にリダイレクトする必要があります。この時、認証が終わったらまた RP 側に戻ってきてもらうためにいくつかの情報をリクエストパラメータとして指定しておく必要があります。
この部分の詳細は 2. Send an authentication request to Google にあります。
ここを読んでいくと、認証後にユーザを RP 側にリダイレクトさせるために、client_id, redirect_uri, state といったパラメータを渡していることが分かります。このあたりのパラメータを持たせた上で、ユーザを OP に一旦リダイレクトさせるわけです。
ユーザと OP の間で認証が成功したら、ユーザは RP の redirect_uri にリダイレクトされてきます。次に行う必要があるのが、ユーザがリクエストパラメータとして送信してきた code から、ID token を取得する作業です。先ほどのフローでは (4) UserInfo Request にあたります。Google のドキュメントでは 4. Exchange code for access token and ID token に詳細があります。
必要なパラメータを含めて https://www.googleapis.com/oauth2/v3/token にアクセスすると、JSON が返ってきますが、ユーザの認証が成功していれば id_token という項目が含まれています。
前置きが非常に長くなりましたが、ここからがようやく本題です。
取得できた ID token を見ると、
eyJhbGciOiJSUzI1NiIsImtpZCI6ImRhMGI1ZDQyNDRjY2ZiNzViMjcwODQxNjI5NWYwNWQ1MThjYTY5MDMifQ.eyJpc3MiOiJhY2NvdW50cy5nb29nbGUuY29tIiwiYXRfaGFzaCI6Ijd2ajAzMklIQWdzMEdNUGxOUDFkV2ciLCJhdWQiOiI5MTQ2OTk1NzE0NS1qYjg0MnUwcmNnbTg3bTIyMDlhZWxiZnRzbDlwMzU3aS5hcHBzLmdvb2dsZXVzZXJjb250ZW50LmNvbSIsInN1YiI6IjExNzQ0MjQ1MDQ0MzI0NDAzNTk1NSIsImVtYWlsX3ZlcmlmaWVkIjp0cnVlLCJhenAiOiI5MTQ2OTk1NzE0NS1qYjg0MnUwcmNnbTg3bTIyMDlhZWxiZnRzbDlwMzU3aS5hcHBzLmdvb2dsZXVzZXJjb250ZW50LmNvbSIsImVtYWlsIjoiYm9idW5kZXJzb25AZ21haWwuY29tIiwiaWF0IjoxNDQzNzY4NzcxLCJleHAiOjE0NDM3NzIzNzF9.bzNpok6tybsHOicXvbP9Q97kKO14ei3B1DXlNa8LFiZj8rQJfnm_rATRlMFEGs1fsW5Av7srDy-2JjdEbQufHbYlUBXIJh7_sBwI_qU6NIYn2t8hcGpMnXoe2z0BtkP3CyvvTINRVxA6WwHv_Teh0nzxnaxmcOVm0ajLKT603Crtt4MNur_azADTxNxYafaQ5o7XOo9V0PMM0nVy6kqn-N3IjxBPNXqQapmxub6qzJcRsOyAjOyzK1hRAuxvX9vd9fAoBf4ycpbeTWIy7nQIeEU8kl2lTNSb9DBZrsVP7GzhFRdEMDIxctcBoqXDxBuYLuSXGlnMyfSYy0sU39VBtw
のような意味不明な文字列が並んでいます。
5. Obtain user information from the ID token
によると、
An ID Token is a JWT (JSON Web Token), that is, a cryptographically signed Base64-encoded JSON object.
ということです・・・ JWT ?
JWT (JSON Web Token)
探してみると、出てきましたRFC7519。
JSON Web Token (JWT) is a compact, URL-safe means of representing claims to be transferred between two parties. The claims in a JWT are encoded as a JSON object that is used as the payload of a JSON Web Signature (JWS) structure or as the plaintext of a JSON Web Encryption (JWE) structure, enabling the claims to be digitally signed or integrity protected with a Message Authentication Code (MAC) and/or encrypted.
どうやら、JSON オブジェクトを URL-safe かつコンパクトに表現したもので、JWS または JWE と呼ばれるモノが含まれているようです。
ここではこの JWT を検証したいので、RFC7519 - 7.2. Validating a JWT に目を通してみます。
まず、
1.Verify that the JWT contains at least one period ('.') character.
です。ピリオドは 2 つ含まれています。
次に
2.Let the Encoded JOSE Header be the portion of the JWT before the first period ('.') character.
3.Base64url decode the Encoded JOSE Header following the restriction that no line breaks, whitespace, or other additional characters have been used.
4.Verify that the resulting octet sequence is a UTF-8-encoded representation of a completely valid JSON object conforming to RFC 7159 [RFC7159]; let the JOSE Header be this JSON object.
です。最初のピリオドまでの文字列を Base64url decode すると JOSE Header (JSON) が出てくるようです。やってみましょう。
$ echo -n 'eyJhbGciOiJSUzI1NiIsImtpZCI6ImRhMGI1ZDQyNDRjY2ZiNzViMjcwODQxNjI5NWYwNWQ1MThjYTY5MDMifQ' | base64 -d
{"alg":"RS256","kid":"da0b5d4244ccfb75b2708416295f05d518ca6903"}base64: 無効な入力
たしかに JSON が出てきました!
5.Verify that the resulting JOSE Header includes only parameters and values whose syntax and semantics are both understood and supported or that are specified as being ignored when not understood.
値は文字列だけなので問題なさそうです。
6.Determine whether the JWT is a JWS or a JWE using any of the methods described in Section 9 of [JWE].
RFC7516 - 9. Distinguishing between JWS and JWE Objects の手順に従って、この JWT が JWS なのか JWE なのか見分けるようです。方法はいくつかあるようですが、
The JOSE Header for a JWS can also be distinguished from the JOSE Header for a JWE by determining whether an "enc" (encryption algorithm) member exists. If the "enc" member exists, it is a JWE; otherwise, it is a JWS.
これによると、先ほどの JOSE Header に enc 要素が存在していれば JWE 、存在しなければ JWS だそうです。従って、今回の JWT は JWS であることが分かります。
7.Depending upon whether the JWT is a JWS or JWE, there are two cases:
* If the JWT is a JWS, follow the steps specified in [JWS] for
validating a JWS. Let the Message be the result of base64url
decoding the JWS Payload.
続きは JWS なら JWS の RFC に従えということらしいです。
RFC7515 - A.2. Example JWS Using RSASSA-PKCS1-v1_5 SHA-256 によると、ピリオドで区切られた 3 番目の値は Base64url encode された署名の値のようです。とりあえずこの署名の検証は後回しにして、先に進むことにします。
8.If the JOSE Header contains a "cty" (content type) value of "JWT", then the Message is a JWT that was the subject of nested signing or encryption operations. In this case, return to Step 1, using the Message as the JWT.
JOSE Header に cty は含まれていないので、ここは無視してよさそうです。
9.Otherwise, base64url decode the Message following the restriction that no line breaks, whitespace, or other additional characters have been used.
10.Verify that the resulting octet sequence is a UTF-8-encoded representation of a completely valid JSON object conforming to RFC 7159 [RFC7159]; let the JWT Claims Set be this JSON object.
- で取り出した JWS Payload 部分もまた Base64url decode すると JSON が出てくるようです。
$ echo -n 'eyJpc3MiOiJhY2NvdW50cy5nb29nbGUuY29tIiwiYXRfaGFzaCI6Ijd2ajAzMklIQWdzMEdNUGxOUDFkV2ciLCJhdWQiOiI5MTQ2OTk1NzE0NS1qYjg0MnUwcmNnbTg3bTIyMDlhZWxiZnRzbDlwMzU3aS5hcHBzLmdvb2dsZXVzZXJjb250ZW50LmNvbSIsInN1YiI6IjExNzQ0MjQ1MDQ0MzI0NDAzNTk1NSIsImVtYWlsX3ZlcmlmaWVkIjp0cnVlLCJhenAiOiI5MTQ2OTk1NzE0NS1qYjg0MnUwcmNnbTg3bTIyMDlhZWxiZnRzbDlwMzU3aS5hcHBzLmdvb2dsZXVzZXJjb250ZW50LmNvbSIsImVtYWlsIjoiYm9idW5kZXJzb25AZ21haWwuY29tIiwiaWF0IjoxNDQzNzY4NzcxLCJleHAiOjE0NDM3NzIzNzF9' | base64 -d
{"iss":"accounts.google.com","at_hash":"7vj032IHAgs0GMPlNP1dWg","aud":"91469957145-jb842u0rcgm87m2209aelbftsl9p357i.apps.googleusercontent.com","sub":"117442450443244035955","email_verified":true,"azp":"91469957145-jb842u0rcgm87m2209aelbftsl9p357i.apps.googleusercontent.com","email":"bobunderson@gmail.com","iat":1443768771,"exp":1443772371}
たしかに JSON が出てきました!しかもメールアドレスが含まれてます!
この JWT によって Google が「その人、bobunderson@gmail.com だよ」と教えてくれてるので、RP はそれをユーザ ID (と対応するもの)として扱えばいいわけです。簡単ですね。
5. Obtain user information from the ID token によると、HTTPS で直接 Google と通信していて、自分の client secret を使っている分には、この ID token を信用して使ってもよいようです。
Normally, it is critical that you validate an ID token before you use it, but since you are communicating directly with Google over an intermediary-free HTTPS channel and using your client secret to authenticate yourself to Google, you can be confident that the token you receive really comes from Google and is valid.
JWT の検証
「HTTPS で直接 Google と通信していて、自分の client secret を使っている分には、この ID token を信用して使ってもよい」ということは、裏を返せば、そうでない場合には ID token をそのまま信用してはいけないということです。
誰かが「Google がこの ID token 発行してくれたよ」と言って ID token を渡してきた場合、その ID token は偽造、改ざんされている可能性があります。そこで「この ID token は Google が発行したものだ」ということを何らかの方法で検証する必要があります。これでようやく本当の本題に入ってきました。
Validating an ID token によると、ID token の検証は 5 つのステップからなるようです。
- Verify that the ID token is a JWT which is properly signed with an appropriate Google public key.
- Verify that the value of aud in the ID token is equal to your app’s client ID.
- Verify that the value of iss in the ID token is equal to accounts.google.com or https://accounts.google.com.
- Verify that the expiry time (exp) of the ID token has not passed.
- If you passed a hd parameter in the request, verify that the ID token has a hd claim that matches your Google Apps hosted domain.
ステップ 2 ~ 5 については、単純に文字列を比較したり、UNIX time を比較したりするだけなので簡単なんですが、ステップ 1 の署名の検証はそう簡単にはいきません。Validating an ID token にも
The first step is more complex, and involves cryptographic signature checking.
とあります。なかなかハードルが高そうですが、この部分を自力でやってみるといろいろ見えてきたというのがこの記事のテーマです。
署名アルゴリズム
署名の検証をしようにも、何かとっかかりがないと始められないので、RFC7519 に戻ってみます。RFC7519 - 3. JSON Web Token (JWT) Overview を読んでいると、
The contents of the JOSE Header describe the cryptographic operations applied to the JWT Claims Set.
という一文が見つかります。cryptographic operations・・・怪しいですね。
どうやら JOSE Header は JWS Payload 部分に対する暗号関連の処理を定義しているようです。
RFC7519 - 2. Terminology によると、"JOSE Header" については RFC7515 を参照せよとあるので、そちらを見に行きます。
For a JWS, the members of the JSON object(s) representing the JOSE Header describe the digital signature or MAC applied to the JWS Protected Header and the JWS Payload and optionally additional properties of the JWS.
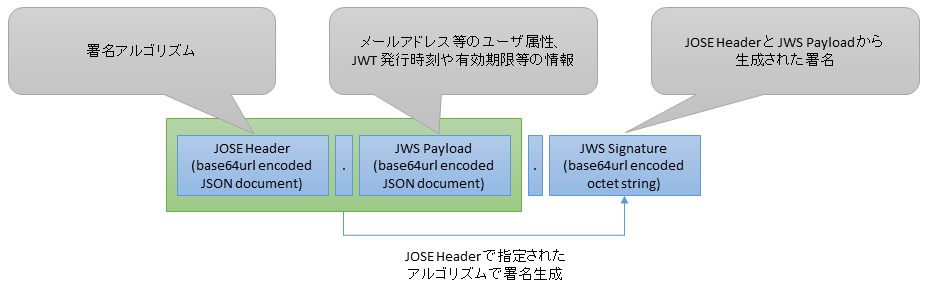
とあります。やはり、JOSE Header に JWS Payload の署名についての情報が含まれているようです。ここで、デコードした JOSE Header を改めて眺めてみることにします。
{"alg":"RS256","kid":"7d61b5075924f1baddab5d4253becb231bcecbf4"}
alg・・・アルゴリズムっぽいですね。
RFC7515 - 4.1.1. "alg" (Algorithm) Header Parameter によると、
The "alg" (algorithm) Header Parameter identifies the cryptographic algorithm used to secure the JWS.
とあります。やはりこの "RS256" という値が、JWS Payload の署名アルゴリズムを表しているようです。
ここまでで、JWT は以下のような構造であることが分かりました。
さらに読み進めると、
"alg" values should either be registered in the IANA "JSON Web Signature and Encryption Algorithms" registry established by [JWA] or be a value that contains a Collision-Resistant Name.
とあり、"alg" の value は RFC7518 で規定されていることが分かります。というわけで、RFC7518 を読んでみると、ありました。
RFC7518 - 3.1. "alg" (Algorithm) Header Parameter Values for JWS
これによると、"RS256" という値は "RSASSA-PKCS1-v1_5 using SHA-256" という電子署名アルゴリズムを指しているようです。SHA-256 というのはおなじみのハッシュ関数ですね。RSASSA-PKCS1-v1_5 って何でしょうか。RSA 暗号に関係していそうではありますが。。。
同じ RFC7518 には RFC7518 - 3.3. Digital Signature with RSASSA-PKCS1-v1_5 という節があります。そこには、
This section defines the use of the RSASSA-PKCS1-v1_5 digital signature algorithm as defined in Section 8.2 of RFC 3447 [RFC3447] (commonly known as PKCS #1), using SHA-2 [SHS] hash functions.
と書かれており、RSASSA-PKCS1-v1_5 という電子署名アルゴリズムは RFC 3447 (PKCS #1) で規定されていることが分かります。
公開鍵暗号の標準
PKCS (Public-Key Cryptography Standards) というのは、どうやら公開鍵暗号の実装にかかわる様々な標準をまとめた文書のようです。以下のように、#1 から #15 まで定められています。
| 番号 | 名前 |
|---|---|
| #1 | RSA暗号標準 |
| #2 | 廃案 |
| #3 | Diffie-Hellman鍵共有標準 |
| #4 | 廃案 |
| #5 | パスワードに基づく暗号化の標準 |
| #6 | 拡張された証明書構文の標準 |
| #7 | 暗号メッセージ構文標準 |
| #8 | 秘密鍵情報構文の標準 |
| #9 | 選択された属性タイプ |
| #10 | 証明書署名要求 |
| #11 | 暗号トークンインタフェース(Cryptoki) |
| #12 | 個人情報交換構文の標準 |
| #13 | 楕円曲線暗号の標準 |
| #14 | 疑似乱数 |
| #15 | 暗号トークン情報フォーマットの標準 |
RSASSA-PKCS1-v1_5 の詳細は、RFC3447 で規定されているようです。
RSA 暗号方式を使って署名されていることが分かったので、ここで RSA 暗号方式について簡単におさらいしておきます。
RSA 暗号方式のおさらい
まずは、秘密鍵 / 公開鍵の生成からです。
- 大きな素数 $p$ と $q$ を生成し、$n = pq$ とする
- $gcd(e, (p - 1)(q - 1)) = 1$ となる数 $e$ を定めて、$\{e, n\}$ を公開鍵とする
- $1 \equiv de \pmod{(p - 1)(q - 1)}$ となる $d$ を生成し、秘密鍵とする
暗号化 / 復号は以下のような操作になります。
- 平文を $M$ とすると $C \equiv M^e \pmod{n}$ が暗号文となる
- 暗号文 $C$ は $M \equiv C^d \pmod{n}$ で復号することができる
公開鍵 $\{e, n\}$ で暗号化されたデータは秘密鍵 $d$ を持っている人だけが復号できるのでした。
今回使う、デジタル署名の生成と検証は以下の操作になります。
- 署名するデータを $M$ とすると $S \equiv M^d \pmod{n}$ がデジタル署名となる
- データ $M$ と $m \equiv S^e \pmod{n}$ が一致すれば、$S$ は $d$ を持つ人が $M$ に対して生成した署名だということが証明される
今回の場合、ID token から生成したハッシュ値を $m$ 、JWS Signature を $S$ 、Google の公開鍵を $\{e, n\}$ とすると、$m \equiv S^{e} \pmod{n}$ が成立すれば、ID token が Google から発行されたものだということが証明できるわけです。
公開鍵の入手
さて、ID token に付与された Google の電子署名を検証するわけですが、そのためにはもちろん Google の公開鍵を入手する必要があります。公開鍵はどうやって見つければいいんでしょうか。
OpenID Connect の仕様に戻ってみると、15.3. Discovery and Registration に
しかし、事前登録のないRelying PartyとOpenID Provider間の予期しないやりとりをサポートすることを選択したならば、OpenID Discovery 1.0 [OpenID.Discovery]とOpenID Connect Dynamic Client Registration 1.0 [OpenID.Registration]の仕様で定義されているファシリティを実装することでこれを遂行するべきである(SHOULD)。
とあります。OpenID Connect Discovery 1.0 の Abstract には、
This specification defines a mechanism for an OpenID Connect Relying Party to discover the End-User's OpenID Provider and obtain information needed to interact with it, including its OAuth 2.0 endpoint locations.
と書かれています。どうやらこの OpenID Connect Discovery 1.0 という規格に、RP が OP とやりとりするためのルールが定められているようです。さらに読み進めて 3. OpenID Provider metadata を見ると、
jwks_uri
REQUIRED. URL of the OP's JSON Web Key Set [JWK] document. This contains the signing key(s) the RP uses to validate signatures from the OP.
とあります。この jwks_uri に ID token の署名を検証するための公開鍵がありそうです。Google のドキュメントに戻って The Discovery document の項目を見ると、それらしい URL があります。
試しにこの URL にアクセスしてみます。
$ curl https://accounts.google.com/.well-known/openid-configuration
{
 "issuer": "https://accounts.google.com",
 "authorization_endpoint": "https://accounts.google.com/o/oauth2/v2/auth",
 "token_endpoint": "https://www.googleapis.com/oauth2/v4/token",
 "userinfo_endpoint": "https://www.googleapis.com/oauth2/v3/userinfo",
 "revocation_endpoint": "https://accounts.google.com/o/oauth2/revoke",
 "jwks_uri": "https://www.googleapis.com/oauth2/v3/certs",
 "response_types_supported": [
  "code",
  "token",
  "id_token",
  "code token",
  "code id_token",
  "token id_token",
  "code token id_token",
  "none"
 ],
 "subject_types_supported": [
  "public"
 ],
 "id_token_signing_alg_values_supported": [
  "RS256"
 ],
 "scopes_supported": [
  "openid",
  "email",
  "profile"
 ],
 "token_endpoint_auth_methods_supported": [
  "client_secret_post",
  "client_secret_basic"
 ],
 "claims_supported": [
  "aud",
  "email",
  "email_verified",
  "exp",
  "family_name",
  "given_name",
  "iat",
  "iss",
  "locale",
  "name",
  "picture",
  "sub"
 ]
}
jkws_uri に URL があるので、さらにそこにアクセスしてみます。
$ curl https://www.googleapis.com/oauth2/v3/certs
{
 "keys": [
  {
   "kty": "RSA",
   "alg": "RS256",
   "use": "sig",
   "kid": "2b2e82106791dc8fad7815d7fb544a62f72c16fa",
   "n": "r6np6v_txgmicJ49GvxGhCKCIEcbthqRN2XvM0W8_UDoWrSn5cNvOI3hL8mRapHS673fZfLFcPLno8lfvXEXWk-1a6z4RdFniuGd6Hb6PCUmiKqz6lc8DBpaK57eWSv1ySQoVdSXqlB5NDSxQvkcme6InLK_fMhWj95ecaZeNBbVBM4NBlgRrFc-2OM221USY7s_RtlVJXCG0nBkzhVcHJrohQnq7f436Ba_WZuT7lSeZyHpHu7kCUrZY672AfDaoNM7Qe2__DUdWQvlS0v9kKQvigZquDQhnVG_dsT5jlUQPAEwru-3rorvwWvugIn8VQWmdsmXNx7JZnZ1gi6tMQ",
   "e": "AQAB"
  },
  {
   "kty": "RSA",
   "alg": "RS256",
   "use": "sig",
   "kid": "da0b5d4244ccfb75b2708416295f05d518ca6903",
   "n": "wnfD2k6iOI8IdDTKPY4J6HFOT1nKor6v2xEZ9G2n1_KtPs5-5aC8W_SvRTzXF9Ym-BeoQI5mfHSbaYafbeEDaCSVpxXja1K8n7EAlpYVGydTHgL2NLHADb-Gtkkiv8Gw9sSyea_foPW_i2YknOIyBM4A2Sxqf9VPQTSTj5zJGFtRnyQYuuTprxqj9qgZfAAhrGCizsW8bm62nH2DYORQ10rwaiY9kL4gVOPrU39vaB80YX5a2N-TRzDCzHaKlo9vSBMzysFs1WFmb9VdOLuIae1I7h50KFUIDncxv7tGrVxnYBi_etNl989JmDtDzLnPK3u4AMFEGcha52Y2QwxQeQ",
   "e": "AQAB"
  }
 ]
}
ありました!RSA の公開鍵 $\{e, n\}$ が見つかりました!
$\{e, n\}$ の組が 2 つ見えますが、ID token の JOSE Header {"alg":"RS256","kid":"da0b5d4244ccfb75b2708416295f05d518ca6903"} の kid と一致するほうの $\{e, n\}$ が鍵になりそうです。
# 公開鍵の URL が https://accounts.google.com/.well-known/openid-configuration に書かれているということは、根本的にはこの URL の SSL 証明書が JWT の正当性を保証していることになるんだろか。。。
検証してみる
これで必要なものは揃いました。
まずは署名の対象となるハッシュ値 $m$ です。これは、RFC7515 5.2. - Example JWS によると、
8.Validate the JWS Signature against the JWS Signing Input ASCII(BASE64URL(UTF8(JWS Protected Header)) || '.' || BASE64URL(JWS Payload)) in the manner defined for the algorithm being used, which MUST be accurately represented by the value of the "alg" (algorithm) Header Parameter, which MUST be present. See Section 10.6 for security considerations on algorithm validation. Record whether the validation succeeded or not.
とある通り、2番目のピリオドの手前までが平文に含まれるようです(1~7までのステップの間で、JOSE Header が JWS Protected Header として扱われるようになっています)。署名アルゴリズムとして、SHA-256 が使われているようなので、$m$ は、この平文の SHA-256 ハッシュ値だと思われます。
次に JWS Signature $S$ です。これは 2 番目のピリオドより後の部分ですね。
$\{e,n\}$ は jkws_uri から取得した公開鍵です。
これらの値から $m = S^{e} \pmod {n}$ が成立することを確認したいのですが。。。$m$ も $S$ も $e$ も $n$ もバイト列です。どう計算すればいいんでしょうか。
RFC5725 - A.2.2. Validating に戻ってみると、
We pass the public key (n, e), the JWS Signature (which is base64url decoded from the value encoded in the JWS representation), and the JWS Signing Input (which is the initial substring of the JWS Compact Serialization representation up until but not including the second period character) to an RSASSA-PKCS1-v1_5 signature verifier that has been configured to use the SHA-256 hash function.
とあります。どうやら、さきほど出てきた RSASSA-PKCS1-v1_5 に、署名の検証の具体的なアルゴリズムが定められているようです。
RSASSA-PKCS1-v1_5
では、RFC3447(PKCS#1) を見ていくことにします。この規格では、公開鍵暗号方式を利用した暗号化と復号、署名の作成と検証等の具体的なアルゴリズムが定められているようです。
今回の該当部分、RFC3447 - 8.2. RSASSA-PKCS1-v1_5 を見ていきます。この節はさらに、署名の生成と検証の節に分かれており、それぞれの操作が定義されています。署名の検証は RFC3447 - 8.2.2. Signature verification operation です。
ここでは、署名の検証の操作が RSASSA-PKCS1-V1_5-VERIFY ((n, e), M, S) として定義されています。
入力から順に確認していきましょう。
Input:
(n, e) signer's RSA public key
M message whose signature is to be verified, an octet string
S signature to be verified, an octet string of length k, where k is the length in octets of the RSA modulus n
これらはすでに手元にあります。$\{e,n\}$ については明示されていませんが、$M$ と $S$ はオクテット列(バイト列)であることがわかります。
Output:
"valid signature" or "invalid signature"
出力はもちろん有効な署名であるかそうでないかの 2 択ですね。今回は "valid signature" が出力されれば晴れて検証成功ということになります。
では早速、Step 1 から順に追っていきます。
- Length checking: If the length of the signature S is not k octets, output "invalid signature" and stop.
$S$ のバイト数と $n$ のバイト数が一致していなければ "invalid signature" を出力して終了します。
確認してみましょう。
import base64

b64_n_from_certs = 'wnfD2k6iOI8IdDTKPY4J6HFOT1nKor6v2xEZ9G2n1_KtPs5-5aC8W_SvRTzXF9Ym-BeoQI5mfHSbaYafbeEDaCSVpxXja1K8n7EAlpYVGydTHgL2NLHADb-Gtkkiv8Gw9sSyea_foPW_i2YknOIyBM4A2Sxqf9VPQTSTj5zJGFtRnyQYuuTprxqj9qgZfAAhrGCizsW8bm62nH2DYORQ10rwaiY9kL4gVOPrU39vaB80YX5a2N-TRzDCzHaKlo9vSBMzysFs1WFmb9VdOLuIae1I7h50KFUIDncxv7tGrVxnYBi_etNl989JmDtDzLnPK3u4AMFEGcha52Y2QwxQeQ=='

b64_s_from_jws = 'bzNpok6tybsHOicXvbP9Q97kKO14ei3B1DXlNa8LFiZj8rQJfnm_rATRlMFEGs1fsW5Av7srDy-2JjdEbQufHbYlUBXIJh7_sBwI_qU6NIYn2t8hcGpMnXoe2z0BtkP3CyvvTINRVxA6WwHv_Teh0nzxnaxmcOVm0ajLKT603Crtt4MNur_azADTxNxYafaQ5o7XOo9V0PMM0nVy6kqn-N3IjxBPNXqQapmxub6qzJcRsOyAjOyzK1hRAuxvX9vd9fAoBf4ycpbeTWIy7nQIeEU8kl2lTNSb9DBZrsVP7GzhFRdEMDIxctcBoqXDxBuYLuSXGlnMyfSYy0sU39VBtw=='

bin_n = base64.urlsafe_b64decode(b64_n_from_certs)
bin_s = base64.urlsafe_b64decode(b64_s_from_jws)

print('len(bin_n) = %d' % len(bin_n))
print('len(bin_s) = %d' % len(bin_s))
必要な padding を追加した上で Base64url decode してみて結果のバイト列の長さを比較してみます。
$ python3 step1.py
len(bin_n) = 256
len(bin_s) = 256
どちらも 256 バイトで一致しています。
2.RSA verification:
次のステップは、署名 $S$ を公開鍵 $\{e,n\}$ で復号する操作です。これは a ~ c の3つの操作からなっています。
a. Convert the signature S to an integer signature representative s (see Section 4.2):
s = OS2IP (S).
ここで見慣れない関数が出てきました。RFC3447 - 4.2 OS2IP で定義されているようなのでそちらを確認します。
OS2IP converts an octet string to a nonnegative integer.
OS2IP (X)
Input:
X octet string to be converted
Output:
x corresponding nonnegative integer
どうやら、バイト列を正の整数に変換する関数のようです。
ここで規定されている通りに実装すると、以下のようになります。
def OS2IP(octet_string):
    # http://tools.ietf.org/html/rfc3447#section-4.2
    x = 0
    i = 1
    for octet in reversed(octet_string):
        x += octet * i
        i *= 256

    return x
入力バイト列を 256 進数の巨大な整数だと解釈しているようです。
RSASSA-PKCS1-V1_5-VERIFY に戻ります。署名 $S$ に OS2IP を適用すると、以下のような巨大な 10 進整数になります。
int_s = OS2IP(bin_s)

print(int_s)
$ python3 step2a.py
14037804365398619033799742640081377671043057392694415291597804147713491410445513866006008669704199482642441064706170013125771718244722040567525603708239315719194626418847133365097820713692422830687511756532781524139994240604245694191169325425909683490950378139360773189150119316465859211171776644949608317203118384030102880369548355566253684947673392290546588239119176056964914307676545633029747304365762240535067374062714801022561146061109390909542430785821617643241252874218057283792444274583960379759363660222517314804403953534923619970309443919685333767236614480532808644706485562780884529114424361077491176391095
続いて RSASSA-PKCS1-V1_5-VERIFY の 2b に進みます。
b. Apply the RSAVP1 verification primitive (Section 5.2.2) to the RSA public key (n, e) and the signature representative s to produce an integer message representative m:
m = RSAVP1 ((n, e), s).
If RSAVP1 outputs "signature representative out of range," output "invalid signature" and stop.
RSA の数式 $m = S^{e} \pmod{n}$ を実行するステップのようです(RFC3447 - 5.2.2 RSAVP1)。しかし、$\{n,e\}$ は(おそらく) Base64url encode されたバイト列です。先ほどの OS2IP を $\{n,e\}$ にも適用して整数に変換した上で、RSAVP1 の適用までやってみましょう。
(この部分の仕様が明記された部分が結局見つかりませんでした。。。)
def RSAVP1(int_n, int_e, int_s):
    # http://tools.ietf.org/html/rfc3447#section-5.2.2
    if int_s < 0 or int_n - 1 < int_s:
        raise Exception('signature representative out of range')

    m = pow(int_s, int_e, int_n)

    return m
int_n = crypto.primitives.OS2IP(bin_n)

b64_e_from_certs = 'AQAB'
bin_e = base64.urlsafe_b64decode(b64_e_from_certs)
int_e = crypto.primitives.OS2IP(bin_e)

int_m = RSAVP1(int_n, int_e, int_s)

print(int_m)
$ python3 step2b.py
986236757547332986472011617696226561292849812918563355472727826767720188564083584387121625107510786855734801053524719833194566624465665316622563244215340671405971599343902468620306327831715457360719532421388780770165778156818229863337344187575566725786793391480600129482653072861971002459947277805295727097226389568776499707662505334062639449916265137796823793276300221537201727072401742985542559596685092673521228140822200236743113743661549252453726123450722876929538747702356573783116197523966334991563351853851212597377279504828784675811158154858862009196731249195722389749547251860179386006643765857644703155
次のステップです。
c. Convert the message representative m to an encoded message EM of length k octets (see Section 4.1):
EM' = I2OSP (m, k).
If I2OSP outputs "integer too large," output "invalid signature" and stop.
(文中では EM を生成すると書かれていますが、式の部分では EM' が生成されています。 https://www.rfc-editor.org/errata_search.php?rfc=3447&eid=594 によるとやはり EM = I2OSP (m, k). が正しいようです。)
このステップでは、先ほど算出した整数値 $m$ を長さ $k$ のバイト列に変換するようです。OS2IP の逆変換です。RFC3447 - 4.1 I2OSP の定義通りに実装すると以下のようなコードになります。
def I2OSP(int_v, str_len):
    # http://tools.ietf.org/html/rfc3447#section-4.1
    if int_v.bit_length() / 8 + 1 > str_len:
        raise Exception('integer too large')

    octet_string = b''
    while str_len > 0:
        if int_v > 0:
            digit = int_v % 256
            int_v = int_v >> 8
            octet_string = digit.to_bytes(1, byteorder='big') + octet_string
        else:
            octet_string = b'\x00' + octet_string

        str_len -= 1

    return octet_string
k = len(bin_n)
em = I2OSP(int_m, k)
print(binascii.b2a_hex(em))
$ python3 step2c.py
b'0001ffffffffffffffffffffffffffffffffffffffffffffffffffffffffffffffffffffffffffffffffffffffffffffffffffffffffffffffffffffffffffffffffffffffffffffffffffffffffffffffffffffffffffffffffffffffffffffffffffffffffffffffffffffffffffffffffffffffffffffffffffffffffffffffffffffffffffffffffffffffffffffffffffffffffffffffffffffffffffffffffffffffffffffffffffffffffffffffffffffffffffffffffffffffffffffffffffffffffffffffffffff003031300d0609608648016503040201050004200c066e94c392758e604ed753d81048699aa61f93af9964df09f106504c07edb3'
ここまでで、$m = S^{e} \pmod{n}$ が導出されました。
次は、$m$ と比較するために、署名対象のデータ $M$ からハッシュ値を生成します。
3.EMSA-PKCS1-v1_5 encoding: Apply the EMSA-PKCS1-v1_5 encoding
operation (Section 9.2) to the message M to produce a second
encoded message EM' of length k octets:
EM' = EMSA-PKCS1-V1_5-ENCODE (M, k).
If the encoding operation outputs "message too long," output
"message too long" and stop. If the encoding operation outputs
"intended encoded message length too short," output "RSA modulus
too short" and stop.
RFC3447 - 9.2 EMSA-PKCS1-v1_5 で定義される処理を実行して、エンコード済みのハッシュ値を生成します。この処理はいくらか複雑なので、順を追って見ていきます。
EMSA-PKCS1-v1_5-ENCODE (M, emLen)
Option:
Hash hash function (hLen denotes the length in octets of the hash function output)
Input:
M message to be encoded
emLen intended length in octets of the encoded message, at least
tLen + 11, where tLen is the octet length of the DER
encoding T of a certain value computed during the encoding
operation
Output:
EM encoded message, an octet string of length emLen
Errors:
"message too long"; "intended encoded message length too short"
まずは入出力の確認から。入力としてメッセージと出力メッセージの長さを受け取り、エンコード済みのメッセージ(バイト列)を出力するようです。また、オプションでハッシュ関数の種類も指定できるようになっています。
では処理の流れを追ってみます。
1.Apply the hash function to the message M to produce a hash value
H:
H = Hash(M).
If the hash function outputs "message too long," output "message
too long" and stop.
メッセージにハッシュ関数を適用します。これについては各言語のハッシュ関数モジュールを利用すれば求められそうです。
2.Encode the algorithm ID for the hash function and the hash value
into an ASN.1 value of type DigestInfo (see Appendix A.2.4) with
the Distinguished Encoding Rules (DER), where the type DigestInfo
has the syntax
DigestInfo ::= SEQUENCE {
digestAlgorithm AlgorithmIdentifier,
digest OCTET STRING
}
The first field identifies the hash function and the second
contains the hash value. Let T be the DER encoding of the
DigestInfo value (see the notes below) and let tLen be the length
in octets of T.
ここが実装としては一番厄介そうです。ハッシュのアルゴリズムを示す ID とハッシュ値を ASN.1 と呼ばれる記法で記述して、DER でエンコードします。
ASN.1 記法と DER エンコードについての詳細はここでは省略しますが、仕様は以下の pdf にあります。
https://www.itu.int/ITU-T/studygroups/com17/languages/X.690-0207.pdf
また、日本語だと以下のサイトに詳細に書かれています。
http://www.geocities.co.jp/SiliconValley-SanJose/3377/
digestAlgorithm には、ハッシュのアルゴリズムを表す OID(Object ID) と、ハッシュアルゴリズムのパラメータ(NULL) が SEQUENCE として格納されます。OID の値は、RFC3447 - A.2.4 RSASSA-PKCS1-v1_5 -> RFC3447 - B.1 Hash functions と辿った先に書かれています。今回の ID Token で使われている SHA-256 だと、
id-sha256 OBJECT IDENTIFIER ::= {
joint-iso-itu-t(2) country(16) us(840) organization(1)
gov(101) csor(3) nistalgorithm(4) hashalgs(2) 1
}
とあることから、2.16.840.1.101.3.4.2.1 であることが分かります。
digest のほうは、ハッシュ値のバイナリが OCTET STRING としてそのまま入ります。
DER エンコード後の値の 16 進ダンプは以下の通りになります。(先頭から 3 ビット目の構造化フラグを ON にしておく必要があります。)
3031300d06096086480165030402010500042004b459d578f2fe14a4b30e0ab7991096521c445a620ce90e5bf7329ef43c3484
3.If emLen < tLen + 11, output "intended encoded message length too
short" and stop.
次はエンコード後の値の長さチェックです。
$emLen = k > len(tLen) + 11$ なので問題なさそうです。
4.Generate an octet string PS consisting of emLen - tLen - 3 octets
with hexadecimal value 0xff. The length of PS will be at least 8
octets.
出力サイズを $emLen$ にするため、0xff のパディングバイト列を生成します。
5.Concatenate PS, the DER encoding T, and other padding to form the
encoded message EM as
EM = 0x00 || 0x01 || PS || 0x00 || T.
- Output EM.
固定の 3 バイトとパディングバイト列、DER エンコードされたハッシュ値の情報を結合して、EMSA-PKCS1-v1_5-ENCODE (M, emLen) の出力とします。
このあたりの処理については、日本語だと以下の blog が分かりやすいです。
http://blog.livedoor.jp/k_urushima/archives/979220.html
ASN.1 エンコードの部分はモジュールで隠蔽されてしまっていますが、EMSA-PKCS1-v1_5-ENCODE のコードは以下のようになります。
def EMSA_PKCS1_V1_5_ENCODE(os_m, em_len, hash_function='sha256'):
    # http://tools.ietf.org/html/rfc3447#section-9.2
    digest_info = asn1.types.ASN1Sequence()

    digest_algo = asn1.types.ASN1Sequence()
    algo_identifier = asn1.types.ASN1ObjectIdentifier()
    if hash_function == 'sha256':
        algo_identifier.oid = '2.16.840.1.101.3.4.2.1'
    else:
        raise Exception('unsupported hash function')
    digest_algo.children.append(algo_identifier)

    null_obj = asn1.types.ASN1Null()
    digest_algo.children.append(null_obj)

    digest_info.children.append(digest_algo)

    h = hashlib.new(hash_function)
    h.update(os_m)
    digest = asn1.types.ASN1OctetString(h.digest())
    digest_info.children.append(digest)

    bin_digest_info = digest_info.encode()
    t_len = len(bin_digest_info)

    if em_len < t_len + 11:
        raise Exception('intended encoded message length too short')

    ps_len = int(em_len - t_len - 3)

    byte_array = []
    byte_array.append(0x00)
    byte_array.append(0x01)
    for i in range(ps_len):
        byte_array.append(0xff)
    byte_array.append(0x00)

    return bytes(byte_array) + bin_digest_info
m_from_jws = 'eyJhbGciOiJSUzI1NiIsImtpZCI6ImRhMGI1ZDQyNDRjY2ZiNzViMjcwODQxNjI5NWYwNWQ1MThjYTY5MDMifQ.eyJpc3MiOiJhY2NvdW50cy5nb29nbGUuY29tIiwiYXRfaGFzaCI6Ijd2ajAzMklIQWdzMEdNUGxOUDFkV2ciLCJhdWQiOiI5MTQ2OTk1NzE0NS1qYjg0MnUwcmNnbTg3bTIyMDlhZWxiZnRzbDlwMzU3aS5hcHBzLmdvb2dsZXVzZXJjb250ZW50LmNvbSIsInN1YiI6IjExNzQ0MjQ1MDQ0MzI0NDAzNTk1NSIsImVtYWlsX3ZlcmlmaWVkIjp0cnVlLCJhenAiOiI5MTQ2OTk1NzE0NS1qYjg0MnUwcmNnbTg3bTIyMDlhZWxiZnRzbDlwMzU3aS5hcHBzLmdvb2dsZXVzZXJjb250ZW50LmNvbSIsImVtYWlsIjoiYm9idW5kZXJzb25AZ21haWwuY29tIiwiaWF0IjoxNDQzNzY4NzcxLCJleHAiOjE0NDM3NzIzNzF9'

bin_m = m_from_jws.encode('utf-8')

em_dash = EMSA_PKCS1_V1_5_ENCODE(bin_m, k)
print(binascii.b2a_hex(em_dash))
$ python3 step3.py
b'0001ffffffffffffffffffffffffffffffffffffffffffffffffffffffffffffffffffffffffffffffffffffffffffffffffffffffffffffffffffffffffffffffffffffffffffffffffffffffffffffffffffffffffffffffffffffffffffffffffffffffffffffffffffffffffffffffffffffffffffffffffffffffffffffffffffffffffffffffffffffffffffffffffffffffffffffffffffffffffffffffffffffffffffffffffffffffffffffffffffffffffffffffffffffffffffffffffffffffffffffffffffff003031300d0609608648016503040201050004200c066e94c392758e604ed753d81048699aa61f93af9964df09f106504c07edb3'
4.Compare the encoded message EM and the second encoded message EM'.
If they are the same, output "valid signature"; otherwise, output
"invalid signature."
ついに最後のステップです。署名から算出した EM と、ID Token の JOSE Header と JWS Payload のハッシュ値から算出した EM' とが一致すれば検証成功です。。。
$ python3 step2c.py
b'0001ffffffffffffffffffffffffffffffffffffffffffffffffffffffffffffffffffffffffffffffffffffffffffffffffffffffffffffffffffffffffffffffffffffffffffffffffffffffffffffffffffffffffffffffffffffffffffffffffffffffffffffffffffffffffffffffffffffffffffffffffffffffffffffffffffffffffffffffffffffffffffffffffffffffffffffffffffffffffffffffffffffffffffffffffffffffffffffffffffffffffffffffffffffffffffffffffffffffffffffffffffff003031300d0609608648016503040201050004200c066e94c392758e604ed753d81048699aa61f93af9964df09f106504c07edb3'
$ python3 step3.py
b'0001ffffffffffffffffffffffffffffffffffffffffffffffffffffffffffffffffffffffffffffffffffffffffffffffffffffffffffffffffffffffffffffffffffffffffffffffffffffffffffffffffffffffffffffffffffffffffffffffffffffffffffffffffffffffffffffffffffffffffffffffffffffffffffffffffffffffffffffffffffffffffffffffffffffffffffffffffffffffffffffffffffffffffffffffffffffffffffffffffffffffffffffffffffffffffffffffffffffffffffffffffffff003031300d0609608648016503040201050004200c066e94c392758e604ed753d81048699aa61f93af9964df09f106504c07edb3'
一致しています!!
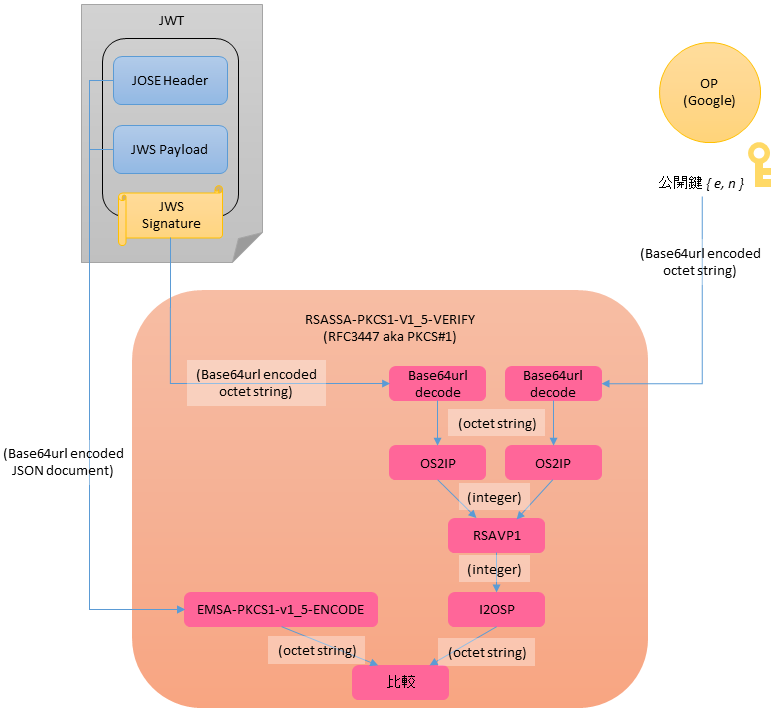
署名検証の全体の流れを図にしてみました。
おわりに
非常に長々と書いてきましたが、署名の検証だけでも自力でやろうとするとかなり大変だということがお分かりいただけたかと思います。筆者も正直甘く見てました。
本日の結論: 巨人の肩に乗ろう!!