Raspberry Pi 4 に CentOS 7 をインストールして自宅の無線LANアクセスポイントを構築したので手順をまとめておきます。
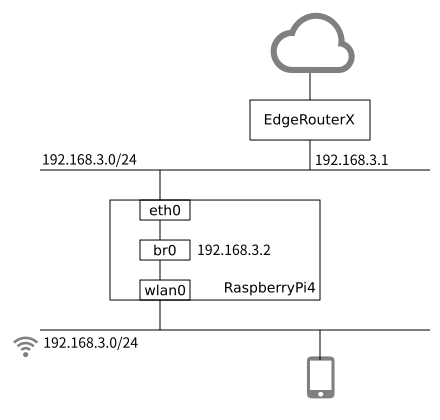
ネットワーク構成は以下の通りです。インターネットとはEdgeRouterXを介して接続されていて、LAN側のゲートウェイのアドレスは192.168.3.1です。また、このインタフェースではDHCPとDNSのサービスが動作しています。
今回は、CentOSの仮想ブリッジを利用して、EdgeRouterXから出ている192.168.3.0/24のネットワークをそのまま無線LAN側に接続しています。
起動用 SD の作成
armv7 向け CentOS7 のイメージをダウンロードして起動用 SD カードに書き込みます。
SD カードは作業用 PC に挿入されていて、/dev/sdd で認識されている状態です。このあたりは適宜読み替えてください。(マウントされていると失敗するので、アンマウントしておきます)
$ wget https://people.centos.org/pgreco/images/forrpi4v2/CentOS-Userland-7-armv7hl-RaspberryPI-Minimal-exp4-1810-sda.raw.xz
$ tar xf CentOS-Userland-7-arm7hl-RaspberryPI-Minimal-exp4-1810-sda.raw.xz
$ sudo dd bs=4M if=CentOS-Userland-7-armv7hl-RaspberryPI-Minimal-exp4-1810-sda.raw of=/dev/sdd conv=fsync status=progress
ネットワークの初期設定
SD カードを Raspberry Pi 4 に挿入して電源を投入し、しばらく待つと DHCP で IP アドレスを取得して root で SSH ログインが可能な状態になります。初期パスワードは centos です。IP アドレスはルータのログ等から適当に調べます。
$ ssh root@192.168.3.xxx

[root@localhost ~]# passwd     # root パスワードの変更

[root@localhost ~]# hostnamectl set-hostname rpap     # ホスト名の変更

[root@localhost ~]# timedatectl set-timezone Asia/Tokyo     # タイムゾーンの設定

[root@localhost ~]# systemctl stop firewalld          # firewalld を無効にする
[root@localhost ~]# systemctl disable firewalld

[root@localhost ~]# vi /etc/sysconfig/selinux         # selinux を無効にする
    -SELINUX=enforcing
    +SELINUX=disabled

[root@localhost ~]# vi /etc/NetworkManager/NetworkManager.conf     # DNSの自動設定を無効にする
    +dns=none     # [main]セクションの中に追記
[root@localhost ~]# vi /etc/resolv.conf     # DNSの設定
    -# Generated by NetworkManager
    +nameserver 192.168.3.1

[root@localhost ~]# vi /etc/sysconfig/network-scripts/ifcfg-br0     # 新規作成
    +NAME=br0
    +DEVICE=br0
    +TYPE=Bridge
    +BOOTPROTO=static
    +ONBOOT=yes
    +IPADDR=192.168.3.2
    +NETMASK=255.255.255.0
    +NETWORK=192.168.3.0
    +GATEWAY=192.168.3.1

[root@localhost ~]# vi /etc/sysconfig/network-scripts/ifcfg-eth0     # 新規作成
    +NAME=eth0
    +DEVICE=eth0
    +TYPE=Ethernet
    +BOOTPROTO=static
    +ONBOOT=yes
    +BRIDGE=br0

[root@localhost ~]# vi /etc/sysconfig/network-scripts/ifcfg-wlan0     # 無線LANインタフェースの設定を新規作成
    +NAME=wlan0
    +DEVICE=wlan0
    +TYPE=Ethernet
    +BOOTPROTO=static
    +ONBOOT=yes
    +BRIDGE=br0
MACアドレスランダム化を無効にする
CentOS7 の NetworkManager は、無線 LAN クライアントの位置情報追跡を困難にするため、定期的に無線 LAN インタフェースの MAC アドレスを変更する機能がデフォルトで有効になっています。
AP として動作させる場合にこの機能が有効になっていると、変更のタイミングで接続が切れたりするので、無効にしておきます。
[root@localhost ~]# vi /etc/NetworkManager/conf.d/30-no-mac-randomization.conf
   +[device-mac-randomization]
   +wifi.scan-rand-mac-address=no
必要なパッケージの追加
[root@localhost ~]# yum -y install iptables-services bridge-utils net-tools bind-utils tcpdump wget
無線LANインタフェースの設定ファイル取得
[root@localhost ~]# wget -O /usr/lib/firmware/brcm/brcmfmac43455-sdio.txt https://raw.githubusercontent.com/RPi-Distro/firmware-nonfree/master/brcm/brcmfmac43455-sdio.txt
hostapd のインストール
[root@localhost ~]# vi /etc/yum.repos.d/epel.repo     # 新規作成
    +[epel]
    +name=Epel rebuild for armhfp
    +baseurl=https://armv7.dev.centos.org/repodir/epel-pass-1/
    +enabled=1
    +gpgcheck=0
[root@localhost ~]# yum -y install wireless-tools hostapd
[root@localhost ~]# mv /etc/hostapd/hostapd.conf .     # バックアップ
[root@localhost ~]# vi /etc/hostapd/hostapd.conf       # 新規作成
    +ctrl_interface=/var/run/hostapd
    +ctrl_interface_group=wheel
    +macaddr_acl=0
    +auth_algs=1
    +ignore_broadcast_ssid=0
    +wpa=2
    +wpa_key_mgmt=WPA-PSK
    +rsn_pairwise=CCMP
    +wpa_passphrase=hogehoge
    +driver=nl80211
    +interface=wlan0
    +bridge=br0
    +hw_mode=g
    +channel=1
    +ssid=ore_no_musen_lan
    +country_code=JP
    +ieee80211d=1
[root@localhost ~]# systemctl enable hostapd
無線LANパワーマネジメントの無効化
無線LANのパワーマネジメントが有効になっていると、起動後時間が経過するとパフォーマンスが低下するため、これを無効にします。hostapdが起動したタイミングで無効になります。
[root@localhost ~]# vi /usr/lib/systemd/system/hostapd.service
    +ExecStartPost=/sbin/iw dev wlan0 set power_save off
仮想ブリッジを通過するパケットに iptables を適用する
CentOS 7 のデフォルトでは、仮想ブリッジを通過するパケットには iptables のルールが適用されないようなので、これを変更します。
[root@localhost ~]# /etc/sysconfig/modules/br_netfilter.modules
    +#!/bin/sh
    +/sbin/modprobe br_netfilter >/dev/null 2>&1
[root@localhost ~]# chmod 755 /etc/sysconfig/modules/br_netfilter.modules
これで、iptables の FORWARD チェインのルールが適用されるようになります。
再起動
[root@localhost ~]# shutdown -r now
しばらく待つと SSID が ore_no_musen_lan なアクセスポイントが出てきます。
