Raspberry Piを使用した撮影をする上で
まず通る所が、キーボード操作による撮影が多いと思います。
しかしながら、大量の画像を取るとなると
高〇名人ばりの連射が必要なので一般人には到底無理。
なので自動で撮影して楽が出来ないかと思い作成。
今回は部下(生贄1号)が出来たので一緒に作成しました
環境
Raspberry Pi 3 Model B+
os Raspbian(Bastar)
Python 3.7.3
opencv 4.1.0.25
使用カメラ ELECOM UCAM-C750FBBK
ライブラリ
import cv2
import os
import sys
import datetime
import RPi.GPIO as GPIO
from time import sleep
import time
今回はGPIOを使用するので
撮影基本セットに追加したのと
タイマー使うので+しています。
基本設定
GPIO.setmode(GPIO.BCM)
GPIO.setup(22, GPIO.OUT)
GPIO.setup(24, GPIO.IN, pull_up_down=GPIO.PUD_DOWN)
GPIO.setup(25, GPIO.OUT)
今回はブレッドボードにタクトスイッチをつけて
撮影開始・終了の使い方をするのでそれが出来る様な設定にしています。
撮影プログラム
def save_frame_camera_cycle(device_num, dir_path, basename, cycle, ext='jpg', delay=1, window_name='frame'):
    cap = cv2.VideoCapture(0)

    if not cap.isOpened():
        return

    os.makedirs(dir_path, exist_ok=True)
    base_path = os.path.join(dir_path, basename)

  n = 0
    while True:
        ret, frame = cap.read()
        cv2.imshow(window_name, frame)

        if GPIO.input(24) == GPIO.HIGH:
            GPIO.output(25, GPIO.HIGH)

            while True:

                ret,frame = cap.read()
                cv2.imshow(window_name, frame)
                key = cv2.waitKey(1) & 0xFF
                if n == cycle:
                    n = 0
                    GPIO.output(25, GPIO.HIGH)
                    cv2.imwrite('{}_{}.{}'.format(base_path, datetime.datetime.now().strftime('%F %T'), ext), frame)
                    print("shoot")
                n += 1

                if GPIO.input(22) == GPIO.HIGH:
                    GPIO.output(25, GPIO.LOW)
                    print ("stop")
                    time.sleep(1)
                    break
        else:
            GPIO.output(25, GPIO.LOW)

        if GPIO.input(22) == GPIO.HIGH:
            GPIO.output(25, GPIO.LOW)
            print ("end")
            break

    cv2.destroyWindow(window_name)
    GPIO.cleanup()

save_frame_camera_cycle(0,'/home/pi/Desktop/GPIO/test/photo', 'test', 20)
タクトスイッチ(24)を押すと1秒ごとに撮影します。
タクトスイッチ(22)を押すと撮影停止。
停止状態でタクトスイッチ(24)を押すと撮影再開。
停止状態でタクトスイッチ(22)を押すと撮影終了。
撮影中はLED(25)が点灯。
色々と調べながら作成したので細かな部分までは理解していませんが
撮影出来ているのでOKとしています。
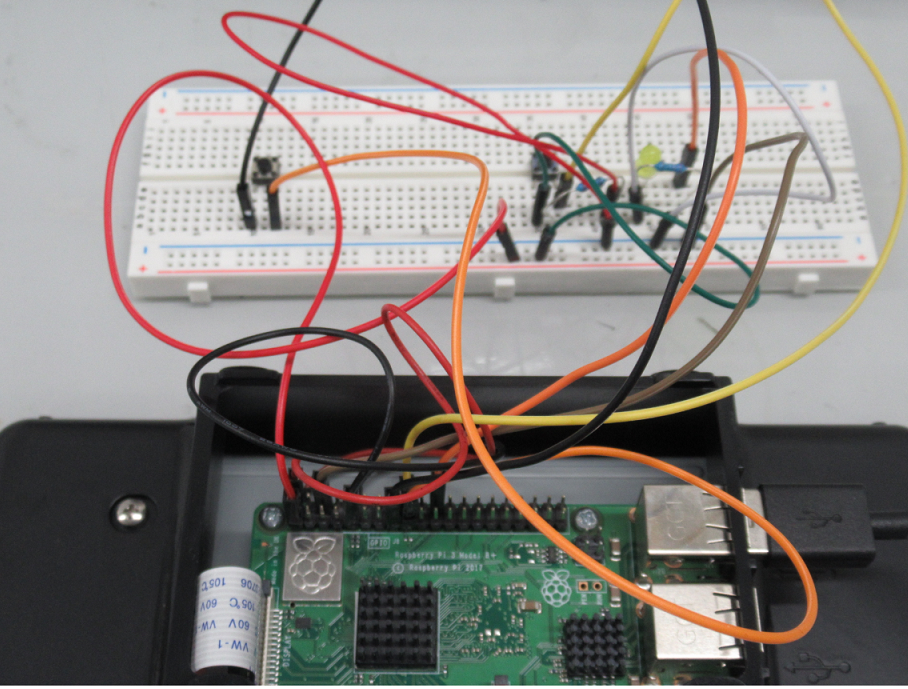
実配線
ブレッドボードへの配線は様々な資料を元に配線してこんな感じ。
まとめ
4時間ほど動作させましたが、止まることなく動きました。
ただ、枚数指定で自動停止とまではいかなかったので
現在作成中です。
色々とWEB上を巡回して知らべていますがなかなかどうしてうまくいかない今日この頃
以上です。
