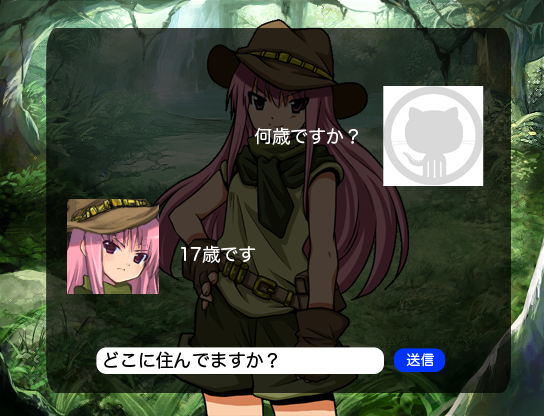
チャットゲームを作る記事の後編です。前回Pusherとcocos製ゲームを繋いだので、今回はアプリサーバとゲームを繋ぎます。
Parse.comの紹介

Parse.comはmBaaSのひとつで、以前Facebookに買収されたことで大きな話題を呼びました。似たようなmBaaSが多い中で
- ドキュメントが充実している
- クライアント用SDKの機能が豊富
- 障害が起きてもすぐ分かる(http://status.parse.com/)
- DashBoardのUIが綺麗
など、提供されている機能はもちろんのこと細かい部分まで丁寧に作られている印象があります。
データを保存してみる
cocosで作ったゲームからデータを保存してみます。Parse.comでのデータストアは明示されていませんが、障害時のエラーメッセージから恐らく実体はMongoDBなので、例えばチャットゲームの場合このように表現できます。

データの読み書きにはREST APIが提供されているので、それらを使って通信します。
local xhr = cc.XMLHttpRequest:new()
xhr.responseType = cc.XMLHTTPREQUEST_RESPONSE_JSON
xhr:setRequestHeader("X-Parse-Application-Id", "YOUR_APP_ID")
xhr:setRequestHeader("X-Parse-REST-API-Key", "YOUR_API_KEY")
xhr:setRequestHeader("Content-Type", "application/json")
xhr:open("POST", "https://api.parse.com/1/classes/Message)
xhr:registerScriptHandler(function()
    if xhr.readyState == 4 and (xhr.status >= 200 and xhr.status < 207) then
        print(xhr.response)
    else
        print("xhr.readyState is:", xhr.readyState, "xhr.status is: ",xhr.status)
    end
end)
xhr:send(json.encode({text = "17歳です"}))
※前回同様、クライアントサイドから認証なしでデータを書き込むのは危険なので、実際に稼働させる際はガイドラインに従って設計すべきです。
CloudCode
データを保存することができたので、Pusherに送信して他の端末にメッセージを送りましょう。Parse.comにはCloudCodeという仕組みがあって、サーバーサイドのロジックやデータ保存時のバリデーション等を行えます。ここでは、メッセージが保存された後そのメッセージをPusherに送信するようにしてみます。
var crypto = require('crypto');

var PUSHER_ID     = "YOUR_PUSHER_ID";
var PUSHER_KEY    = "YOUR_PUSHER_KEY";
var PUSHER_SECRET = "YOUR_PUSHER_SECRET";

var sign = function(str) {
    return crypto.createHmac('sha256', PUSHER_SECRET).update(str).digest('hex');
}

var push = function(body, success, error) {
    body = JSON.stringify(body);
    var method = "POST";
    var path = "/apps/" + PUSHER_ID + "/events";
    var query = "auth_key=" + PUSHER_KEY;
    query += "&auth_timestamp=" + parseInt(new Date().getTime() / 1000, 10);
    query += "&auth_version=1.0";
    query += "&body_md5=" + crypto.createHash('md5').update(body, 'utf8').digest('hex');
    query += "&auth_signature=" + sign([method, path, query].join('\n'));
    Parse.Cloud.httpRequest({
        method: method,
        url: "http://api.pusherapp.com" + path + "?" + query,
        headers: {
            'Content-Type': 'application/json'
        },
        body: body,
        success: success,
        error: error
    });
}

Parse.Cloud.afterSave("Message", function(req) {
    push({
        name    : "talk",
        data    : JSON.stringify({"text":req.object.get("text")}),
        channel : "talk_room"
    }, function(httpResponse) {
        console.log(httpResponse.text);
    }, function(httpResponse) {
        console.error(httpResponse.status + ': ' + httpResponse.text);
    });
});
pushではPusher用の認証情報を組み立ててCloudCodeのHTTPリクエストAPIで送信しています。afterSaveは指定したクラスのデータが保存される度に呼ばれるコードで、ここではMessageの保存時にその内容をPusherに送信しています。
組み合わせる
最後に、ここまで紹介した要素を組み合わせてチャットゲームを完成させましょう。UIの部分を除いた送受信の処理は以下のようになります。
local json = require("json")

function init()
    local ws = cc.WebSocket:create("ws://ws.pusherapp.com/app/{YOUR_APP_KEY}?protocol=7")
    ws:registerScriptHandler(function(msg)
        msg = json.decode(msg)
        if msg.event == "pusher:connection_established" then
            ws:sendString(json.encode({
                event = "pusher:subscribe",
                data = { channel = "teen_room" }
            }))
        elseif msg.event == "talk"
            local data = json.decode(msg.data) -- ※dataはさらにjsonエンコードされているのでデコードしています
            showMessage(data.text)
        end
    end, cc.WEBSOCKET_MESSAGE)
end

function send()
    local xhr = cc.XMLHttpRequest:new()
    xhr.responseType = cc.XMLHTTPREQUEST_RESPONSE_JSON
    xhr:setRequestHeader("X-Parse-Application-Id", "YOUR_APP_ID")
    xhr:setRequestHeader("X-Parse-REST-API-Key", "YOUR_API_KEY")
    xhr:setRequestHeader("Content-Type", "application/json")
    xhr:open("POST", "https://api.parse.com/1/classes/Message)
    xhr:registerScriptHandler(function()
        if xhr.readyState == 4 and (xhr.status >= 200 and xhr.status < 207) then
            print(xhr.response)
        else
            print("xhr.readyState is:", xhr.readyState, "xhr.status is: ",xhr.status)
        end
    end)
    xhr:send(json.encode({text = getInputText()}))
end

臼井の会さんの素材を利用させてもらっています
まとめ
cocosで作ったゲームにリアルタイム通信機能を実装する方法について書きました。記事の大半が各mBaaSの機能の紹介になってしまいcocosのアドベントカレンダーとしてどうなんだろう、という反省の気持ちもややありますが、クライアントサイドでのエンジニアリングに注力したいcocosだからこそサーバーサイドを手軽に実装できる選択肢を持っておくことが重要なのではと思いこのテーマで書きました。
明日はmettoboshiさんによるAppwarp / Cubism SDKの話です。割と近い話になるんじゃないかと楽しみにしています:)