近況報告
エンジニア転職成功しました。YouTubeもはじめました。
著者略歴
著者:YUUKI
ポートフォリオサイト:Pooks
現在:RailsTutorial2周目
第11章 アカウントの有効化 難易度 ★★★★★ 10時間(エラー頻発の為)
挫折しないRailsチュートリアルの進め方を先にお読みください↓↓
現時点では、新規登録したユーザーは初めから全ての機能にアクセスできるようになっている。
本章では、アカウントを有効化するステップを新規登録の途中に差し込むことで、本当にそのメールアドレスの持ち主なのか、確認できるようにする。
具体的には
①有効化トークンやダイジェストを関連付けておく
②有効化トークンを含めたリンクをユーザーにメールで送信
③ユーザーがそのリンクをクリックすると有効化
このような仕組みで、メールアドレスの持ち主であることを証明させる。
第12章でも似たような仕組みを使って、ユーザーがパスワードを忘れた時にパスワードを再設定できる仕組みを実装する。
これらの機能ごとに新しいリソースを作成し、コントローラ/ルーティング/データベース以降/の例について、1つずつ学んでいく。
最後に、Railsの開発環境や本番環境からメールを実際に送信する方法についても学ぶ。
アカウントを有効化する段取りは、ユーザーログイン&ユーザーの記憶と似ている。
①ユーザーの初期状態を「有効化されていない(unactivated)」にする
②ユーザー登録が行われたときに、有効化トークンと、それに対応する有効化ダイジェストを生成する
③有効化ダイジェストはDBに保存。有効化トークンはメールアドレスと一緒に、ユーザーに送信する有効化用メールのリンクに仕込んでおく
④ユーザーがメールのリンクをクリックしたら、アプリケーションはメールアドレスをキーにしてユーザーを探し、DB内に保存しておいた有効化ダイジェストと比較することで、トークンを認証する
⑤ユーザーを認証できたら、ユーザーのステータスを「有効化されていない」から「有効化済み(activated)」に変更する。
都合の良いことに、今回実装するアカウント有効化やパスワード再設定の仕組みと、以前に実装したパスワードや記憶トークンの仕組みにはよく似た点が多いので、多くのアイデアを使い回すことができる。
例えば、User.digestやUser.new_token、改良版のuser.authenticated?メソッドなど
検索キー、string、digest、authenticationごとの点
| 検索キー | string | digest | authentication |
|---|---|---|---|
| password | password_digest | authenticate(password) | |
| id | remember_token | remember_digest | authenticated?(:remember, token) |
| activation_token | activation_digest | authenticated?(:activation, token) | |
| reset_token | reset_digest | authenticated?(:reset, token) |
出典:表 11.1: ログイン/記憶トークン/アカウントの有効化/パスワードの再設定で似ている点
今章でアカウント有効化に必要なリソース、データモデルを作っていく。
アカウント有効化時のメール送信部分は
メイラーを使って作っていく。
また、authenticated?メソッドを使って、実際にアカウントを有効化する部分も実装していく。
11.1 AccountActivationsリソース
8章で扱ったセッション機能を使って、アカウント有効化の作業をリソースとしてモデル化する。
アカウントの有効化リソースはActive Recordのモデルとは関係ないため、関連付けはしない。
その代わり、この作業に必要なデータ(有効化トークンや有効化ステータスなど)をUserモデルに追加する。
アカウント有効化もリソースとして扱いたいが、いつもとは少し使い方が異なる。
例えば、有効化用のリンクにアクセスして有効化のステータスを変更する部分では、RESTのルールに従うとPATCHリクエストとupdateアクションになるべき。
しかし、有効化リンクはメールでユーザーに送られる。
ユーザーがこのリンクをクリックすれば、それはブラウザで普通にクリックしたときと同じであり、その場合ブラウザから発行されるのは(updateアクションで使うPATCHリクエストではなく)GETリクエストになってしまう。
このため、ユーザーからのGETリクエストを受けるために、updateアクションではなくeditアクションに変更して使っていく。
$ git checkout -b account-activation
11.1.1 AccountActivationsコントローラ
UsersリソースやSessionsリソースのときと同様に、AccountActivationsリソースを作るために、
まずはAccountActivationsコントローラを生成する。
$ rails g controller AccountActivations
ここで、有効化のメールには
edit_account_activation_url(activation_token, ...)
これは、editアクションへの名前付きルートが必要になるということ。
そこで、まずは名前付きルートを扱えるようにするため、ルーティングにアカウント有効化用のresources行を追加する。
Rails.application.routes.draw do
  get 'sessions/new'

  get 'users/new'

  root 'static_pages#home'
  get     '/help',    to: 'static_pages#help'
  get     '/about',   to: 'static_pages#about'
  get     '/contact', to: 'static_pages#contact'
  get     '/signup',  to: 'users#new'
  post    '/signup',  to: 'users#create'
  get     '/login',   to: 'sessions#new'
  post    '/login',   to: 'sessions#create'
  delete  '/logout',  to: 'sessions#destroy'
  resources :users                                      # usersリソースをRESTfullな構造にするためのコード。
  resources :account_activations, only: [:edit]         # editアクションのみaccount_activationsリソースを適用
end
| HTTPリクエスト | URL | Action | 名前付きルート |
|---|---|---|---|
| GET | /account_activation//edit | edit | edit_account_activation_url(token) |
出典:表 11.2: アカウント有効化用のRESTfulなルーティング設定 (リスト 11.1)
これからアカウント有効化用のデータモデルとメイラーを作って行く。
演習
1:テストがパスすることを確認
確認済み
2:名前付きルートでは、_pathではなく_urlを使うように記してある。その理由は?
_urlは(http://~)を指定してメールから飛べるようにしている。
(_pathだと相対パスな為http://〜からの指定ができない)
11.1.2 AccountActivationのデータモデル
有効化のメールは一位の有効化トークンが必要。
例えば送信メールとデータベースのそれぞれに同じ文字列を置いておく方法がある。
しかし、この方法だとデータベースの内容が漏れた時、多大な被害に繋がってしまう。
攻撃者がDBへのアクセスに成功して、新しく登録されたユーザーアカウントの有効化トークンを盗み取り、本来のユーザーが使う前にそのトークンを使ってしまうケースなど、セキュリティが甘いケースに繋がってしまう。
このような事態を防ぐために、パスワードの実装や記憶トークンの実装と同じように、仮想的な属性を使ってハッシュ化した文字列をDBに保存するようにする。
具体的には
user.activation_token
このようなコードで仮想属性の有効化トークンにアクセスし
user.authenticated?(:activation, token)
Userモデルで編集したauthenticated?メソッドを使って、activated属性を追加して論理値を取るようにする。
これで、自動生成の論理値メソッドと同じような感じで、ユーザーが有効であるかどうかをテストできるようになる。
if user.activated?
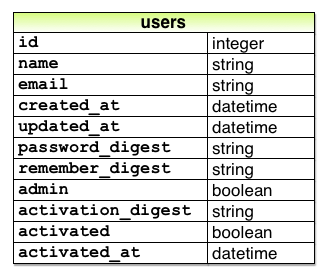
ユーザーを有効化した時の、変更後のデータモデルはこうなる
出典:図 11.1: Userモデルにユーザー有効化用の属性を追加する
次のマイグレーションをコマンドラインで実行し、データモデルを追加すると、3つの属性が新しく追加される。
rails g migration add_activation_to_users ¥
次に、admin属性の時と同様に、activated属性のデフォルトの論理値をfalseにしておく。
class AddActivationToUsers < ActiveRecord::Migration[5.1]
  def change
    add_column :users, :activation_digest, :string
    add_column :users, :activated, :boolean, default: false
    add_column :users, :activated_at, :datetime
  end
end
マイグレーションを実行して変更を反映。
$ rails db:migrate
Activeトークンのコールバック
ユーザーが新しい登録を完了するためには必ずアカウントの有効化が必要になる。
その為、「有効化トークン」や「有効化ダイジェスト」はユーザーオブジェクトが作成される前に、生成されるようにしておく必要がある。
メールアドレスをDB保存時も、保存前に全部小文字に変換するようにしたが、その時はbefore_saveコールバックにdowncaseメソッドをバインドした。
オブジェクトにbefore_saveコールバックを用意しておくと、オブジェクトが保存される直前、オブジェクトの作成時や更新時にそのコールバックが呼び出される。
しかし、今回はオブジェクトが作成された時だけコールバックを呼び出したい。
(それ以外の時は呼び出したくない)
そこで、before_createコールバックを使う。
before_create :create_activation_digest
このコードはメソッド参照と呼ばれるもので、こうするとRailsはcreate_activation_digestというメソッドを探し、ユーザーを作成する前に実行するようになる。
6章では、before_saveに明示的にブロックを渡していたが、メソッド参照の方がおすすめ。
また、create_activation_digest(作成した有効化記憶トークンメソッド)メソッド自体はUserモデル内でしか使わない為、privateキーワードの中に書く。
private

   def create_activation_digest
      # 有効化トークンとダイジェストを作成および代入する
   end
クラス内でprivateキーワードより下に記述したメソッドが非公開なのは、コンソールで確かめられる。
>> User.first.create_activation_digest
  User Load (0.2ms)  SELECT  "users".* FROM "users" ORDER BY "users"."id" ASC LIMIT ?  [["LIMIT", 1]]
NoMethodError: private method `create_activation_digest' called for #<User:0x007f8da4098e98>
Did you mean?  restore_activation_digest!
        from (irb):1
今回はbefore_createコールバックを使う目的は、トークンとそれに対応するダイジェストを割り当てるためである。
self.activation_token = User.new_token
self.activation_digest = User.digest(activation_token)
このコードでは、記憶トークンや記憶ダイジェストのために作ったメソッドを使いまわしている。
9章で扱ったrememberメソッドと比べてみる。
# 永続セッションのためにユーザーをデータベースに記憶する
def remember
  self.remember_token = User.new_token
  update_attribute(:remember_digest, User.digest(remember_token))
end
主な違いは、後者のupdate_attributeの使い方にある。
この違いは、記憶トークンやダイジェストは既にDBにいるデータベースのために作成されるのに対し、before_createコールバックの方はユーザーが作成される前に呼び出される。
このコールバックがあることで、User.newで新しいユーザーが定義されると、activation_token属性やactivation_digest属性が得られるようになる。
後者のactivation_digest属性は既にDBのカラムとの関連付けができあがっているので、ユーザーが保存されるときに一緒に保存される。
上記の説明をUserモデルに実装してみる。
class User < ApplicationRecord
  # インスタンス変数の定義
  attr_accessor :remember_token , :activation_token                             # 記憶トークンと有効化トークンを定義
  before_save :downcase_email                                                   # DB保存前にemailの値を小文字に変換する
  before_create :create_activation_digest                                       # 作成前に適用

private

  # メールアドレスを全て小文字にする

  def downcase_email
    self.email = email.downcase                                                 # emailを小文字化してUserオブジェクトのemail属性に代入
  end

  # 有効化トークンとダイジェストを作成および代入する

  def create_activation_digest
    self.activation_token   =   User.new_token                                  # ハッシュ化した記憶トークンを有効化トークン属性に代入
    self.activation_digest  =   User.digest(activation_token)                   # 有効化トークンをBcryptで暗号化し、有効化ダイジェスト属性に代入
  end
サンプルユーザーの作成とテスト
seedsファイルを更新しサンプルユーザーを作成、
fixtureを更新してテスト時のサンプルユーザーを事前に作成しておく。
User.create!(name:                    "Example User",
             email:                   "example@railstutorial.org",
             password:                "foobar",
             password_confirmation:   "foobar",
             admin:     true,
             activated: true,
             activated_at: Time.zone.now )

99.times do |n|
  name          = Faker::Name.name
  email         = "example-#{n+1}@railstutorial.org"
  password      = "password"
  User.create!(name:  name,
              email: email,
              password:              password,
              password_confirmation: password,
              activated: true,
              activated_at: Time.zone.now)
end
Time.zone.nowはRailsの組み込みヘルパーであり、サーバーのタイムゾーンに応じたタイムスタンプを返す。
michael:
  name: Michael Example
  email: michael@example.com
  password_digest: <%= User.digest('password') %>
  admin: true
  activated: true
  activated_at: <%= Time.zone.now %>

archer:
  name: Sterling Archer
  email: duchess@example.gov
  password_digest: <%= User.digest('password') %>
  activated: true
  activated_at: <%= Time.zone.now %>

lana:
  name: Lana Kane
  email: hands@example.gov
  password_digest: <%= User.digest('password') %>
  activated: true
  activated_at: <%= Time.zone.now %>

malory:
  name: Malory Archer
  email: boss@example.gov
  password_digest: <%= User.digest('password') %>
  activated: true
  activated_at: <%= Time.zone.now %>

<% 30.times do |n| %>
user_<%= n %>:
  name:  <%= "User #{n}" %>
  email: <%= "user-#{n}@example.com" %>
  password_digest: <%= User.digest('password') %>
  activated: true
  activated_at: <%= Time.zone.now %>
<% end %>
DBを初期化して、サンプルデータを再度生成し直し、変更を反映
$ rails db:migrate:reset
$ rails db:seed
演習
1:テストが通ることを確認
確認済み
2:コンソールからUserクラスのインスタンスを生成し、そのオブジェクトからcreate_activation_digestメソッドを呼び出そうとするとNoMethodErrorが発生することを確認。また、そのUserオブジェクトからダイジェストの値も確認。
>> user = User.new
>> user.create_activation_digest
NoMethodError: private method `create_activation_digest' called for #<User:0x000000045483b0>
Did you mean?  restore_activation_digest!
        from (irb):2
>> user.digest
NoMethodError: undefined method `digest' for #<User:0x000000045483b0>
        from (irb):3
>> user.activation_digest
=> nil
3:6章で、email.downcase!を使いemail属性を変更する方法を学んだ。(破壊的メソッド)
このメソッドを使って、user.rbのdowncase_emailメソッドを改良してみる。
  def downcase_email
    email.downcase!                                                             # emailを小文字化してUserオブジェクトのemail属性に代入
  end
$ rails t
11 tests, 15 assertions, 0 failures, 0 errors, 0 skips
テストがパスしたのでOK。
11.2 アカウント有効化のメール送信
データのモデル化が終わったので、今度はアカウント有効化メールの送信に必要なコードを追加する。
このメソッドではAction Mailerライブラリを使ってUserのメイラーを追加する。
このメイラーはUsersコントローラのcreateアクションで有効化リンクをメールで送信するために使う。
メイラーの構成はコントローラのアクションとよく似ており、メールのテンプレートをビューと同じ要領で定義する。
このテンプレートの中に有効化トークンと、メールアドレスを有効にするアカウントのアドレスのリンクを含め、使っていく。
11.2.1 送信メールのテンプレート
メイラーは、モデルやコントローラと同様にrails generateで生成できる。
$ rails g mailer UserMailer account_activation password_reset
このコマンドを実行したことにより、今回必要となるaccount_activationメソッドと、次章で必要となるpassword_resetメソッドが生成された。
また、上記のコマンドは生成したメイラーごとに、ビューのテンプレートが2つずつ生成される
アカウント有効化メイラーのビュー2つ
①テキストメール用のテンプレート
②HTMLメール用のテンプレート
アカウント有効化に使うテンプレートを確認してみる。
User#account_activation

<%= @greeting %>, find me in app/views/user_mailer/account_activation.text.erb
<h1>User#account_activation</h1>

<p>
  <%= @greeting %>, find me in app/views/user_mailer/account_activation.html.erb
</p>
また、mailerディレクトリの中に生成されたメイラーファイルapplication_mailer.rbとuser_mailer.rbの2つも確認。
この2つのファイルはメールの動きを設定する(モデルで言うコントローラみたいなもの)
class ApplicationMailer < ActionMailer::Base
  default from: 'from@example.com'
  layout 'mailer'
end
class UserMailer < ApplicationMailer

  # Subject can be set in your I18n file at config/locales/en.yml
  # with the following lookup:
  #
  #   en.user_mailer.account_activation.subject
  #
  def account_activation
    @greeting = "Hi"

    mail to: "to@example.org"
  end

  # Subject can be set in your I18n file at config/locales/en.yml
  # with the following lookup:
  #
  #   en.user_mailer.password_reset.subject
  #
  def password_reset
    @greeting = "Hi"

    mail to: "to@example.org"
  end
end
application_mailerでは、アプリケーション全体で共通のデフォルトのfromアドレスがある。
user_mailerではmail to:にて宛先のメールアドレスを設定している。
また、メールフォーマットに対応するメイラーレイアウトも使われている。
生成されるHTMLメイラーのレイアウトやテキストメイラーのレイアウトはapp/views/layoutsで確認できる。
生成されたコードにはインスタンス変数@greetingも含まれている。
このインスタンス変数は、丁度普通のビューでコントローラのインスタンス変数を利用できるのと同じように、メイラービューで利用できる。
最初に、生成されたテンプレートをカスタマイズして、実際に有効化メールで使えるようにする。
次に、ユーザーを含むインスタンス変数を作成してビューで使えるようにし、user.emailにメールを送信する。
user_mailer.rbでは、mailにsubjectキーを引数として渡している。この値は、メールの件名にあたる。
class ApplicationMailer < ActionMailer::Base
  default from: 'noreply@example.com'
  layout 'mailer'
end
class UserMailer < ApplicationMailer

  def account_activation(user)
    @user = user
    mail to: user.email, subject: "Account activation"
  end

  def password_reset
    @greeting = "Hi"

    mail to: "to@example.org"
  end
end
テンプレートビューは、通常のビューと同様ERBで自由にカスタマイズできる。
ここでは挨拶文にユーザー名を含め、カスタムの有効化リンクを追加する。
この後、Railsサーバーでユーザーをメールアドレスで検索して有効化トークンを認証できるようにしたいので、リンクにはメールアドレスとトークンを両方含めておく必要がある。
AccountActivationsリソースで有効化をモデル化したので、トークン自体は名前付きルートの引数で使われる。
edit_account_activation_url(@user.activation_token, ...)
例えば
edit_user_url(user)
上のメソッドは、絶対パスのuser_urlでurlを生成し、引数のユーザーの編集ページにアクセスする
つまり
http://www.example.com/account_activations/q5lt38hQDc_959PVoo6b7A/edit
上記のURLのq5lt38hQDc_959PVoo6b7Aという部分はnew_tokenメソッドで生成されたもの。
URLで使えるようにBase64でエンコードされている。
これは丁度/users/1/editの1のようなユーザーIDと同じ役割を果たす。
このトークンは、特にAccountActivationsコントローラのeditアクションではparamsハッシュでparams[:id]として参照できる。
クエリパラメータを使って、このURLにメールアドレスをうまく組み込んでみる。
account_activations/q5lt38hQDc_959Voo6b7A/edit?email=foo%40example.com
この時、メールアドレスの@は%40と言う文字にエスケープしている。
(@は通常URLでは扱えない)
Railsでクエリパラメータを設定するには、名前付きルートに対して、次のようなハッシュを追加しする。
edit_account_activation_url(@user.activation_token, email: @user.email)
このようにして名前付きルートでクエリパラメータを定義すると、Railsが特殊な文字を自動的にエスケープしてくれる。
コントローラでparams[:email]からメールアドレスを取り出す時には、自動的にエスケープを解除してくれる。
ここまでできれば、user_mailerで定義した@userインスタンス変数、editへの名前付きルート、ERBを組み合わせて、必要なリンクを作成できる。
アカウント有効化のHTMLテンプレートでは、正しいリンクを組み立てるためにlink_toメソッドを使われている。
こんにちは <%= @user.name %>,

YUUKIのポートフォリオへようこそ!下記リンクをクリックしたらあなたのアカウントは有効化されます♫:

<%= edit_account_activation_url(@user.activation_token, email: @user.email) %>
<h1>YUUKIのポートフォリオ</h1>

<p>こんにちは <%= @user.name %>,</p>

<p>
 YUUKIを有効化する:
</p>

<%= link_to "Activate", edit_account_activation_url(@user.activation_token,
                                                    email: @user.email ) %>
演習
1:コンソールを開き、CGIモジュールのescapeメソッドでメールアドレスの文字列をエスケープできることを確認してみる。
このメソッドでDon't panic!をエスケープすると、どんな結果になるか?
> CGI.escape('foo@example.com')
=> "foo%40example.com"
>>
11.2.2 送信メールのプレビュー
テンプレートで定義した実際の表示を確認するため、メールプレビューという裏技を使ってみる。
Railsでは、特殊なURLにアクセスするとメールのメッセージをその場でプレビューすることができる。
メールを実際に送信しなくてもいいので大変便利。
これを利用するには、アプリケーションのdevelopment環境(開発環境)の設定に手を加える必要がある。
Rails.application.configure do
  # Don't care if the mailer can't send.
  config.action_mailer.raise_delivery_errors = true
  config.action_mailer.delivery_method = :test
  host = 'us-east-2.console.aws.amazon.com'
  config.action_mailer.default_url_options = { host: host, protocol: 'https' }
このように、host名のとこに自分の開発環境のホスト名を記入する。
developmentサーバーを再起動してdevelopmentの設定を読み込んだら、次はUserメイラーのプレビューファイルを更新する。
# Preview all emails at http://localhost:3000/rails/mailers/user_mailer
class UserMailerPreview < ActionMailer::Preview

  # Preview this email at http://localhost:3000/rails/mailers/user_mailer/account_activation
  def account_activation
    UserMailer.account_activation
  end

  # Preview this email at http://localhost:3000/rails/mailers/user_mailer/password_reset
  def password_reset
    UserMailer.password_reset
  end

end
user_mailer.rbファイルで指定したaccount_activation(user)の引数には有効なUserオブジェクトを渡す必要があるため、このままではプレビューファイルは動かない。
これを回避するため、user変数が開発用データベースの最初のユーザーになるよう定義して、それをUserMailer.account_activation_tokenの引数として渡す。
# Preview all emails at http://localhost:3000/rails/mailers/user_mailer
class UserMailerPreview < ActionMailer::Preview

  # Preview this email at http://localhost:3000/rails/mailers/user_mailer/account_activation
  def account_activation
    user = User.first
    user.activation_token = User.new_token
    UserMailer.account_activation(user)
  end

  # Preview this email at http://localhost:3000/rails/mailers/user_mailer/password_reset
  def password_reset
    UserMailer.password_reset
  end

end
ここで、user.activation_tokenの値にも代入している点に注目。
アカウント有効化ビューのテンプレートでは、アカウント有効化のトークンが必要なので、代入は省略できない。
なお、activation_tokenは仮の属性でしかないので、DBのユーザーはこの値を実際には持っていない(ダイジェストしかない)
演習
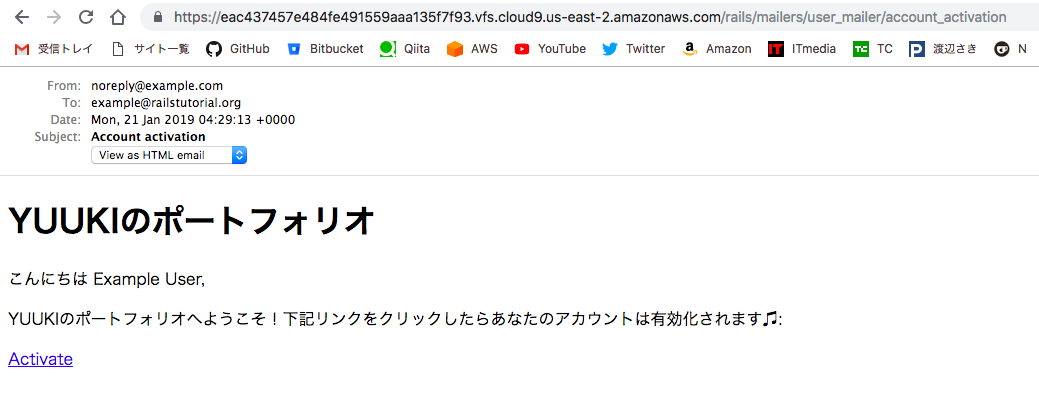
1:Railsのプレビュー機能を使って、ブラウザから先ほどのメールを表示してみる。
Dateの欄にはどんな内容が表示されているか?
アクセスした時刻が表示されている。
11.2.3 送信メールのテスト
最後に、このメールプレビューのテストも作成して、プレビューをダブルチェックできるようにする。
mailer作成時にテストも自動で生成されているので、これを利用すればテストの作成は簡単。
require 'test_helper'

class UserMailerTest < ActionMailer::TestCase
  test "account_activation" do
    mail = UserMailer.account_activation
    assert_equal "Account activation", mail.subject
    assert_equal ["to@example.org"], mail.to
    assert_equal ["from@example.com"], mail.from
    assert_match "Hi", mail.body.encoded
  end

  test "password_reset" do
    mail = UserMailer.password_reset
    assert_equal "Password reset", mail.subject
    assert_equal ["to@example.org"], mail.to
    assert_equal ["from@example.com"], mail.from
    assert_match "Hi", mail.body.encoded
  end

end
上記のテストでは、assert_matchというメソッドが使われており、これを使えば正規表現で文字列をテストできる
assert_match 'foo',   'foobar'  #true
assert_match 'baz',   'foobar'  #false
assert_match '/¥w+/', 'foobar'  #true
assert_match '/¥w+/', '$#!*+@'  #false
assert_matchメソッドを使って、名前・有効化トークン・エスケープ済みメールアドレスがメール本文に含まれているかどうかをテストする。
また、
CGI.escape(user.email)
こうすることで、引数に取ったemailをエスケープ処理することができる。
require 'test_helper'

class UserMailerTest < ActionMailer::TestCase

  test "account_activation" do
    user = users(:michael)
    user.activation_token = User.new_token
    mail = UserMailer.account_activation(user)
    assert_equal "Account activation", mail.subject
    assert_equal [user.email], mail.to
    assert_equal ["noreply@example.com"], mail.from
    assert_match user.name,               mail.body.encoded
    assert_match user.activation_token,   mail.body.encoded
    assert_match CGI.escape(user.email),  mail.body.encoded
  end
end
なお、このテストではまだ失敗する。
上記テストコードでは、fixtureユーザーに有効化トークンを追加している点に注目。
(user.activation_token = のところ)
追加しない場合は、空白になる。
なお、生成されたパスワード設定のテストも削除しているが、のちに戻す。
このテストをパスさせるには、テストファイル内のドメイン名を正しく設定する必要がある。
  config.action_mailer.delivery_method = :test
  config.action_mailer.default_url_options = { host: 'example.com' }
これでテストはパスする。
$ rails t
1 tests, 9 assertions, 0 failures, 0 errors, 0 skips
*ここで注意だが、account_activation.htmlにて、pタグで長く名付けるとassert_matchでテストが失敗する。
例
<p>
 YUUKIのポートフォリオへようこそ!下記リンクをクリックしたらあなたのアカウントは有効化されます:
</p>
失敗
<p>
 有効化:
</p>
成功
2:CGI.escapeの部分を削除するとテストが失敗することを確認
確認済み
11.2.4 ユーザーのcreateアクションを更新
あとはユーザー登録を行うcreateアクションに数行追加するだけで、メイラーをアプリケーションで実際に使うことができる。
  def create
    @user = User.new(user_params)                                               # newビューにて送ったformの中身(nameやemailの値)をuser_paramsで受け取り、ユーザーオブジェクトを生成、@userに代入
    if @user.save
      UserMailer.account_activation(@user).deliver_now                          # アカウント有効化メールの送信
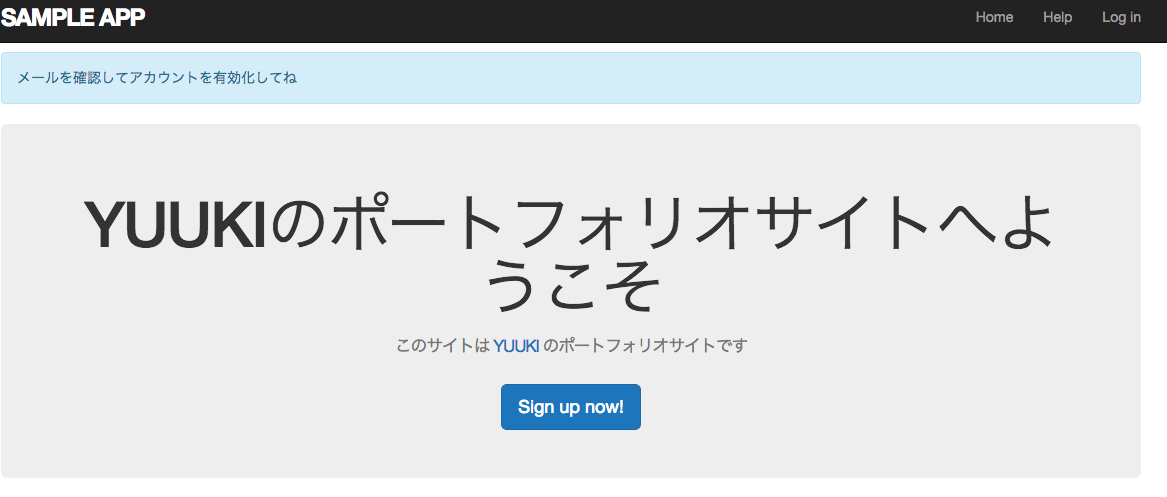
      flash[:info] = "メールを確認してアカウントを有効化してね"                 # アカウント有効化メッセージの表示
      redirect_to root_url                                                      # ホームへ飛ばす
    else
      render 'new'
    end
  end
ここで、UserMailerを使って入力されたメールアドレス宛にアカウント有効化のメッセージを送っている点と、
ユーザー登録時にリダイレクト先をroot_urlへ飛ばしてる点に、
ログインしないように変更した点に注目。
登録時のリダイレクトの挙動が変更されたため、テストは失敗する。
そこで、該当箇所のテストはとりあえずコメントアウトしておく。
  test "valid signup information" do                                            # 新規登録が成功(フォーム送信)したかのテスト
    get signup_path                                                             # signup_path(/signup)ユーザー登録ページにアクセス
    assert_difference 'User.count', 1 do                                        # User.countでユーザー数をカウント、1とし、ユーザー数が変わったらtrue、変わってなければfalse
      post users_path, params: { user: { name:                 "Example User",  # signup_path(/signup)からusers_path(/users)へparamsハッシュのuserハッシュの値を送れるか検証
                                        email:                 "user@example.com",
                                        password:              "password",
                                        password_confirmation: "password" } }
    end
    follow_redirect!                                                            # 指定されたリダイレクト先(users/show)へ飛べるか検証
    #assert_template 'users/show'                                                # users/showが描画されているか確認
    assert_not   flash.blank?                                                   # flashが空ならfalse,空じゃなければtrue
    #assert is_logged_in?                                                        # 新規登録時にセッションが空じゃなければtrue
  end
この状態で実際に新規ユーザーとして登録してみる。
サーバーログ(rails sの画面)を確認
UserMailer#account_activation: processed outbound mail in 177.1ms
Sent mail to itotasuku2@gmail.com (6.6ms)
Date: Tue, 22 Jan 2019 06:07:32 +0000
From: noreply@example.com
To: ●●@gmail.com
Message-ID: <5c46b32415fe1_3ed625687987001@ip-172-31-25-8.mail>
Subject: Account activation
Mime-Version: 1.0
Content-Type: multipart/alternative;
 boundary="--==_mimepart_5c46b32414b75_3ed625687986994e";
 charset=UTF-8
Content-Transfer-Encoding: 7bit


----==_mimepart_5c46b32414b75_3ed625687986994e
おぉ、アカウント有効化メールアドレスが表示されている。
ただし、これは実際にメールが生成されるわけではないので注意。
のちに実際のメールを送信する方法を詳解する。
演習
1:新規ユーザー登録でリダイレクト先が適切なURLに変わったことを確認。その後、Railsサーバーのログから送信メールの有効化トークンの値を確認。
Redirected to https://eac437457e484fe491559aaa135f7f93.vfs.cloud9.us-east-2.amazonaws.com/
Completed 302 Found in 470ms (ActiveRecord: 11.3ms)
リダイレクト先がroo_urlの指示通り、ホームページへリダイレクトできている。
"authenticity_token"=>"GqyypcjNdXgYvimMg9lCL6tXBhcYqsMIBqIA6R9EkgU+34HzSxxH4TmLun6dMaeiM9RwFfaImLGm5KspzMKxNg=="
有効化トークン(authenticity_token)がハッシュ化されている
2:コンソールを開き、DB常にユーザーが作成されたことを確認。
また、ユーザーはDB上にはいるが、有効化のステータスがfalseのままになっていることを確認。
>> user = User.find(101)
>> user.activated?
=> false
11.3 アカウントを有効化する
メールが生成できたら、今度はAccountActivationsコントローラのeditアクションを書いていく。
また、アクションへのテストを書き、しっかりとテストできていることが確認できたら、AccountActivationsコントローラからUserモデルにコードを移していく。
11.3.1 authenticated?メソッドの抽象化
有効化トークンとメールはそれぞれ
params[:id]
params[:email]
で参照できる。
なので、パスワードのモデルと記憶トークンで学んだことを元に、次のようなコードでユーザーを検索して認証することにする。
user = User.find_by(email: params[:email])
if user && user.authenticated?(:activation, params[:id])
上のコードで使っているauthenticated?メソッドは、アカウント有効化のダイジェストと、渡されたトークンが一致するかどうかをチェックしている。
ただし、このメソッドは記憶トークン用なので、今は正常に動作しない。
# トークンがダイジェストと一致したらtrueを返す
def authenticated?(remember_token)
  return false if remember_digest.nil?
  BCrypt::Password.new(remember_digest).is_password?(remember_token)
end
remember_digestはUserモデルの属性なので、モデル内では次のように置き換えることができる。
self.remember_digest
今回は、上記のコードのrememberの部分をどうにかして変数として扱いたい。
つまり、次のコードの例のように、状況に応じて呼び出すメソッドを切り替えたい。
self.FOOBAR.digest
これから実装するauthenticated?メソッドでは、受け取ったパラメータに応じて呼び出すメソッドを切り替える手法を使う。
この手法をメタプログラミングと呼ぶ。
今回はsendメソッドを用いてペアプログラミングを行う。
このメソッドは、渡されたオブジェクトにメッセージを送ることによって、呼び出すメソッドを動的に決めることができる。
Railsコンソールでやってみる。
まずは、Rubyのオブジェクトに対してsendメソッドを実行し、配列の長さを得る。
$ rails c
                                                                Running via Spring preloader in process 19959
Loading development environment (Rails 5.1.6)
>> a = [1,2,3]
=> [1, 2, 3]
>> a.length
=> 3
>> a.send(:length)
=> 3
>> a.send("length")
=> 3
この時、sendを通してシンボルの:lengthや文字列の"length"は、いずれもlengthメソッドと同じ結果になった。つまり、どちらもオブジェクトにlengthメソッドを渡しているため、等価である。
もう1つの例は、DBの最初のユーザーが持つactivation_digest属性にアクセスする。
$ rails c
Running via Spring preloader in process 7511
Loading development environment (Rails 5.1.6)
>> user = User.first
  User Load (0.2ms)  SELECT  "users".* FROM "users" ORDER BY "users"."id" ASC LIMIT ?  [["LIMIT", 1]]
=> #<User id: 1, name: "Example User", email: "example@railstutorial.org", created_at: "2019-01-20 02:17:40", updated_at: "2019-01-20 02:17:40", password_digest: "$2a$10$ambbgHUgH.09zBb8AbfXqOPn2//.8cblJ2qQKEsPXyA...", remember_digest: nil, admin: true, activation_digest: "$2a$10$Hv0qwXYkDj7k6huuD.Kfguk4/2eyMimSbllKnJ0rIJv...", activated: true, activated_at: "2019-01-20 02:17:40">
>> user.activation_digest
=> "$2a$10$Hv0qwXYkDj7k6huuD.Kfguk4/2eyMimSbllKnJ0rIJvJKstLZfLba"
>> user.send(:activation_digest)
=> "$2a$10$Hv0qwXYkDj7k6huuD.Kfguk4/2eyMimSbllKnJ0rIJvJKstLZfLba"
>> user.send("activation_digest")
=> "$2a$10$Hv0qwXYkDj7k6huuD.Kfguk4/2eyMimSbllKnJ0rIJvJKstLZfLba"
>> attribute = :activation
=> :activation
>> user.send("#{attribute}_digest")
=> "$2a$10$Hv0qwXYkDj7k6huuD.Kfguk4/2eyMimSbllKnJ0rIJvJKstLZfLba"
>>
最後の例では、シンボル:activationと等しいattribute変数を定義し、文字列の式展開(interpolation)を使って引数を正しく組み立ててから、sendに渡している。
文字列activationでも同じことができるが、Rubyではシンボルを使うのが一般的。
"#{attribute}_digest"
シンボルと文字列どちらを使った場合でも、上のコードでは次のように文字列に変換される。
"activation_digest"
sendメソッドの動作原理を理解した所で、この仕組みを利用してauthenticated?メソッドを書き換えてみる。
def authenticated?(remember_token)
  digest = self.send("remember_digest")
  return false if digest.nil?
  BCrypt::Password.new(digest).is_password?(remember_token)
end
上のコードの各引数を一般化し、文字列の式展開も利用すると、次のようなコードになる。
def authenticated?(attritubte, token)
 digest = self.send("#{attritubte}_digest")
 return false if digest.nil?
  BCrypt::Password.new(digest).is_password?(token)
end
他の認証でも使えるように、上では2番目の引数tokenの名前を変更して一般化している点に注意。
また、このコードはモデル内にあるのでselfは省略することもできる。
最終的にRubyらしく書かれたコードは以下
def authenticated?(attribute, token)
  digest = send("#{attribute}_digest")
  return false if digest.nil?
  BCrypt::Password.new(digest).is_password?(token)
ここまでできれば、次のように呼び出すことでauthenticated?の従来の振る舞いを再現できる。
user.authenticated?(:remember, remember_token)
抽象化したauthenticated?メソッドをUserモデルに書いてみる。
  # トークンがダイジェストと一致したらtrueを返す
  def authenticated?(attribute, token)
    digest = send("#{attribute}_digest")
    return false if digest.nil?
    BCrypt::Password.new(digest).is_password?(token)
  end
この時点ではテストは失敗する。
テストが失敗する理由はcurrent_userメソッドとnilダイジェストのテストの両方で、
authenticated?が古いママとなっており、さらに引数も2つではなくまだ1つのままだから。
これを解消するため、両者を更新して、新しい一般的なメソッドを使うようにする。
  def current_user
    if (user_id = session[:user_id])                                            # 一時的なセッションユーザーがいる場合処理を行い、user_idに代入
      @current_user ||= User.find_by(id: user_id)                               # 現在のユーザーがいればそのまま、いなければsessionユーザーidと同じidを持つユーザーをDBから探して@current_user(現在のログインユーザー)に代入
    elsif (user_id = cookies.signed[:user_id])                                  # user_idを暗号化した永続的なユーザーがいる(cookiesがある)場合処理を行い、user_idに代入
      user = User.find_by(id: user_id)                                          # 暗号化したユーザーidと同じユーザーidをもつユーザーをDBから探し、userに代入
        if user && user.authenticated?(:remember, cookies[:remember_token])     # DBのユーザーがいるかつ、受け取った記憶トークンを暗号化した記憶ダイジェストと、remember値が入ってるユーザーがいる場合処理を行う
        log_in user                                                             # 一致したユーザーでログインする
        @current_user = user                                                    # 現在のユーザーに一致したユーザーを設定
        end
    end
  end
  test "authenticated? should return false for a user with nil digest" do       # authenticatedメソッドで記憶ダイジェストを暗号化できるか検証
    assert_not @user.authenticated?(:remember, '')                              # @userのユーザーの記憶ダイジェストと、引数で受け取った値が同一ならfalse、異なるならtrueを返す
  end
上記の変更を加えたらテストは成功する。
$ rails t
11 tests, 15 assertions, 0 failures, 0 errors, 0 skips
このようなリファクタリングを施すとエラーが発生しやすくなるので、しっかりしたテストスイートが不可欠。
演習
1:コンソール内でユーザーを作成してみる。
新しいユーザーの記憶トークンと有効化トークンはどのような値になっているか?
また、各トークンに対応するダイジェストの値はどうなっているか?
>> user = User.create(name: "tesuto4", email: "tesuto@test.co.jp", password: "tesuto4", password_confirmation: "tesuto4")
   (0.1ms)  SAVEPOINT active_record_1
  User Exists (0.3ms)  SELECT  1 AS one FROM "users" WHERE LOWER("users"."email") = LOWER(?) LIMIT ?  [["email", "tesuto@test.co.jp"], ["LIMIT", 1]]
  SQL (2.8ms)  INSERT INTO "users" ("name", "email", "created_at", "updated_at", "password_digest", "activation_digest") VALUES (?, ?, ?, ?, ?, ?)  [["name", "tesuto4"], ["email", "tesuto@test.co.jp"], ["created_at", "2019-01-23 04:17:30.872700"], ["updated_at", "2019-01-23 04:17:30.872700"], ["password_digest", "$2a$10$Edcro0emsnf9BuYd0WXzMuHYGxzKI1AFiBh.kPtLz6qc81Okuf0by"], ["activation_digest", "$2a$10$d9vrDK5aEZCfFgaQIE/CUuLjRjrjAWHLomBJ/7u.4PdumyRNGqJQ2"]]
   (0.1ms)  RELEASE SAVEPOINT active_record_1
=> #<User id: 102, name: "tesuto4", email: "tesuto@test.co.jp", created_at: "2019-01-23 04:17:30", updated_at: "2019-01-23 04:17:30", password_digest: "$2a$10$Edcro0emsnf9BuYd0WXzMuHYGxzKI1AFiBh.kPtLz6q...", remember_digest: nil, admin: false, activation_digest: "$2a$10$d9vrDK5aEZCfFgaQIE/CUuLjRjrjAWHLomBJ/7u.4Pd...", activated: false, activated_at: nil>
>> user.remember_token
=> nil
>> user.activation_token
=> "l39qT2c2s5LXb1r5C3OmjQ"
>> user.remember_digest
=> nil
>> user.activation_digest
=> "$2a$10$d9vrDK5aEZCfFgaQIE/CUuLjRjrjAWHLomBJ/7u.4PdumyRNGqJQ2"
アカウント有効化用のトークン・ダイジェストは生成されたが、ユーザーが有効化していないので、記憶トークン/記憶ダイジェスト値はnil。
2:authenticated?メソッドを使って、先ほどの各トークン/ダイジェストの組み合わせで認証が成功することを確認。
>> user.remember_token = User.new_token
=> "JfMcsK1wbYkz8L_uG2kzhA"
>> user.update_attribute(:remember_digest, User.digest(user.remember_token))
   (0.2ms)  SAVEPOINT active_record_1
  SQL (0.2ms)  UPDATE "users" SET "updated_at" = ?, "remember_digest" = ? WHERE "users"."id" = ?  [["updated_at", "2019-01-23 04:37:39.302291"], ["remember_digest", "$2a$10$WiFAB0sIsY9pXkoioQ9nDeb3Z0VbdJbqZTe3kUWN7fAavjo5YOY.a"], ["id", 102]]
   (0.1ms)  RELEASE SAVEPOINT active_record_1
=> true
まず記憶トークンと記憶ダイジェストを生成。
>> user.authenticated?(:remember,user.remember_token)
=> true
引数に渡したダイジェスト値と、トークン値が一致したらtrue
trueが返ってきたので、認証が成功した。
(ログインが成功した)
11.3.2 editアクションで有効化
authenticated?メソッドを完成させたので、editアクションを書いてみる。
このアクションでは、paramsハッシュで渡されたメールアドレスに対応するユーザーを認証する。
ユーザーが有効であることを確認する中核派、次の部分になる。
if user && !user.activated? && user.authenticated?(:activation, params[:id])
!user.activated?という記述に注目。
このコードは既に有効になっているユーザーを誤って再度有効化しないために必要。
正当であろうとなかろうと、有効化が行われるとユーザーはログイン状態になる。
もしこのコードがなければ、攻撃者がユーザーの有効化リンクを後から盗みだしてクリックするだけで、本当のユーザーとしてログインできてしまう。
そうした攻撃を防ぐためにこのコードは非常に重要。
上記の論理値に基づいてユーザーを認証するには、ユーザーを認証してからactivated_atタイムスタンプを更新する必要がある。
user.update_attribute(:activated,    true)
user.update_attribute(:activated_at, Time.zone_now)
上記のコードをeditアクションで使う。
これで日付更新ができる。
class AccountActivationsController < ApplicationController
  def edit
    user = User.find_by(email: params[:email])
    if user && !user.activated? && user.authenticated?(:activation, params[:id])
      user.update_attribute(:activated,     true)
      user.update_attribute(:activated_at,  Time.zone.now)
      log_in user
      flash[:success] = "アカウントを有効にしたンゴよ〜"
      redirect_to user
    else
      flash[:danger] = "きみはまだまだだね^^"
      redirect_to root_url
    end
  end
end
有効化のアクションを書いたら、実際にアカウントを有効化させてみる。
ブラウザでユーザーを新規登録後、rails sに載っているURLを貼り付けて有効化ページにアクセスする。
この状態ではユーザーのログイン方法を変更していないのでこれでは何の意味もない。
ということで、ユーザーの有効化を行う為に、
ユーザーが有効である場合のみログインできるようにログイン方法を変更する必要がある。
これを行うには、user.activated?がtrueの場合にのみログインを許可し、
そうでない場合はルートURLにリダイレクトしてwarningで警告を表示する。
  # ユーザーを新規作成する

  def create
    @user = User.find_by(email: params[:session][:email].downcase)              # paramsハッシュで受け取ったemail値を小文字化し、email属性に渡してUserモデルから同じemailの値のUserを探して、user変数に代入
    if @user && @user.authenticate(params[:session][:password])                 # user変数がデータベースに存在し、なおかつparamsハッシュで受け取ったpassword値と、userのemail値が同じ(パスワードとメールアドレスが同じ値であれば)true
      if @user.activated?                                                       # userが有効の処理
        log_in @user                                                            # sessions_helperのlog_inメソッドを実行し、sessionメソッドのuser_id(ブラウザに一時cookiesとして保存)にidを送る
        params[:session][:remember_me] == '1' ? remember(@user) : forget(@user) # ログイン時、sessionのremember_me属性が1(チェックボックスがオン)ならセッションを永続的に、それ以外なら永続的セッションを破棄する
        redirect_back_or @user                                                  # userの前のページもしくはdefaultにリダイレクト
      else                                                                      # userが有効でない処理
        message   = "アカウントは有効ではありません"
        message  += "メールで送られたURLから有効化してね"
        flash[:warning] = message
        redirect_to root_url
      end
    else
      flash.now[:danger] = 'Invalid email/password combination'                 # flashメッセージを表示し、新しいリクエストが発生した時に消す
      render 'new'                                                              # newビューの出力
    end
  end
演習
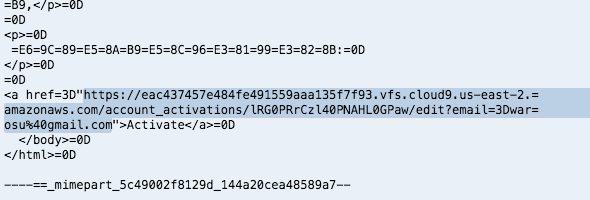
1:コンソールからメールのURLを調べて、有効化トークンはどれか確認する。
<a href="https://eac437457e484fe491559aaa135f7f93.vfs.cloud9.us-east-2.amazonaws.com/account_activations/cDACvOyopUBbsOnFsIr2sg/edit?email=tyaou%40example.com">Activate</a>
これのcDACv〜の部分。
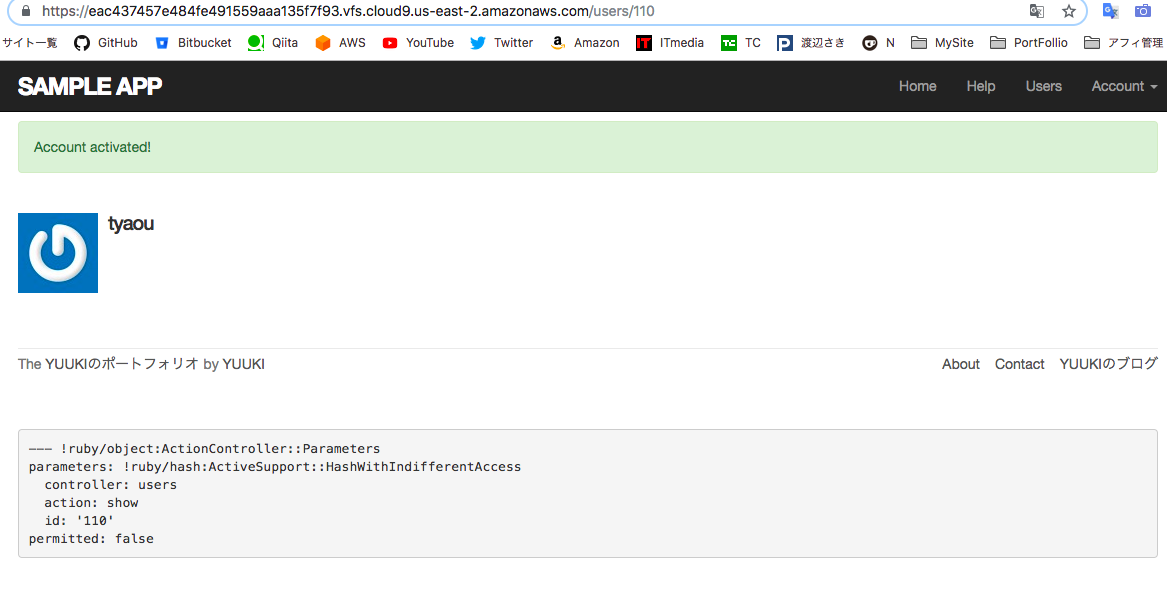
2:URLから有効化リンクに飛んでユーザーの認証に成功し、有効化できることを確認する。
また、有効化ステータスがtrueになるかも確認。
$ rails c
Running via Spring preloader in process 29877
Loading development environment (Rails 5.1.6)
>> user = User.find(110)
  User Load (0.2ms)  SELECT  "users".* FROM "users" WHERE "users"."id" = ? LIMIT ?  [["id", 110], ["LIMIT", 1]]
=> #<User id: 110, name: "tyaou", email: "tyaou@example.com", created_at: "2019-01-24 10:06:17", updated_at: "2019-01-24 10:06:27", password_digest: "$2a$10$7/vxN5esSjb1gxWrtZb9K.vkYnnbL/GsI5JwMx9/Kqh...", remember_digest: nil, admin: false, activation_digest: "$2a$10$Ty2/gM.jACJf3ll87jO9gO/hrVRkdgRHZdx57lakxbm...", activated: true, activated_at: "2019-01-24 10:06:27">
>> user.activated
=> true
OK。
有効化に半日格闘した
何回やってもeditアクションの
if user && !user.activated? && user.authenticated?(:activation, params[:id])
のautenticated?の部分がtrueにならずに色々試行錯誤したのだが、
結果、account_activation.html.erbを全部日本語から英語にしたら直った。
<h1>YUUKI</h1>

<p>hello <%= @user.name %>,</p>

<p>
 activate:
</p>

<%= link_to "Activate", edit_account_activation_url(@user.activation_token,
                                                    email: @user.email ) %>
こうしたってこと。
日本語だとメイラーのHTMLが文字化けしてURLが正しく発行されないので注意。
まじで疲れたよ・・・
11.3.3 有効化のテストとリファクタリング
アカウント有効化の統合テストを追加する。
正しい情報でユーザー登録を行った場合のテストは既にあるので、7章で書いたテストに若干手を加える。
require 'test_helper'

class UsersSignupTest < ActionDispatch::IntegrationTest
  # test "the truth" do
  #   assert true
  # end

  def setup
    ActionMailer::Base.deliveries.clear                                         # Mailerファイルを初期化しユーザーをセットアップ
  end

  test "invalid signup information" do                                          # 新規登録が失敗(フォーム送信が)した時用のテスト
    get signup_path                                                             # ユーザー登録ページにアクセス
    assert_no_difference 'User.count' do                                        # User.countでユーザー数が変わっていなければ(ユーザー生成失敗)true,変わっていればfalse
    post signup_path, params: { user: {    name: "",                             # signup_pathからusers_pathに対してpostリクエスト送信(/usersへ)、paramsでuserハッシュとその下のハッシュで値を受け取れるか確認
                                          email: "user@invalid",
                                          password:              "foo",
                                          password_confirmation: "bar" } }
    end
  assert_template 'users/new'                                                   # newアクションが描画(つまり@user.save失敗)されていればtrue、なければfalse
  assert_select   'div#error_explanation'                                       # divタグの中のid error_explanationが描画されていれば成功
  assert_select   'div.field_with_errors'                                       # divタグの中のclass field_with_errorsが描画されていれば成功
  assert_select   'form[action="/signup"]'                                      # formタグの中に`/signup`があれば成功

  end

  test "valid signup information with account activation" do                    # 新規登録が成功(フォーム送信)したかのテスト
    get signup_path                                                             # signup_path(/signup)ユーザー登録ページにアクセス
    assert_difference 'User.count', 1 do                                        # User.countでユーザー数をカウント、1とし、ユーザー数が変わったらtrue、変わってなければfalse
      post users_path, params: { user: { name:                 "Example User",  # signup_path(/signup)からusers_path(/users)へparamsハッシュのuserハッシュの値を送れるか検証
                                        email:                 "user@example.com",
                                        password:              "password",
                                        password_confirmation: "password" } }
    end
    assert_equal 1, ActionMailer::Base.deliveries.size                          # Actionメイラーが1かどうか検証
    user = assigns(:user)                                                       # usersコントローラの@userにアクセスし、userに代入
    assert_not user.activated?                                                  # userが有効化されていればfalse、されていなければtrue
    # 有効化していない状態でログインしてみる
    log_in_as(user)                                                             # 有効化されていないuserでログイン
    assert_not is_logged_in?                                                    # 有効化されていなければtrue
    # 有効化トークンが不正な場合
    get edit_account_activation_path("invalid token", email: user.email)
    assert_not is_logged_in?
    # トークンは正しいがメールアドレスが無効な場合
    get edit_account_activation_path(user.activation_token, email: 'wrong')
    assert_not is_logged_in?
    # 有効化トークンが正しい場合
    get edit_account_activation_path(user.activation_token, email: user.email)
    assert user.reload.activated?
    follow_redirect!                                                            # 指定されたリダイレクト先(users/show)へ飛べるか検証
    assert_template 'users/show'                                                # users/showが描画されているか確認
    assert is_logged_in?                                                        # 新規登録時にセッションが空じゃなければtrue
  end

end
このテストで重要な行はこれ
assert_equal 1, ActionMailer::Base.deliveries.size
このコードは、配信されたメッセージがきっかり1つであるかどうかを確認している。
配列deliveriesは変数なので、setupメソッドでこれを初期化しておかないとdeliveries.clear、並行して行われる他のテストでメールが配信されたときにエラーが発生してしまう。
また、assignsメソッドを使うと対応するアクション内のインスタンス変数にアクセスできるようになる。
例えば、Usersコントローラのcreateアクションでは@userというインスタンス変数が定義されているが、テストでassings(:user)と書くとこのインスタンス変数にアクセスできるようになる。
これでテストはパスする。
$ rails t
2 tests, 14 assertions, 0 failures, 0 errors, 0 skips
テストができたので、ユーザー操作の一部をコントローラからモデルに移動するというリファクタリング行う準備ができた。
Userモデルでは、activateメソッドを作成してユーザーの有効化属性を更新し、send_activation_emailメソッドを作成して有効化メールを送信する。
  # アカウントを有効にする
  def activate
    update_attribute(:activated,        true)
    update_attribute(:activated_at,     Time.zone.now)
  end

  # 有効化用のメールを送信する
  def send_activation_email
    UserMailer.account_activation(self).deliver_now
  end

private

  # メールアドレスを全て小文字にする

  def downcase_email
    self.email = email.downcase                                                 # emailを小文字化してUserオブジェクトのemail属性に代入
  end

  # 有効化トークンとダイジェストを作成および代入する

  def create_activation_digest
    self.activation_token   =   User.new_token                                  # ハッシュ化した記憶トークンを有効化トークン属性に代入
    self.activation_digest  =   User.digest(activation_token)                   # 有効化トークンをBcryptで暗号化し、有効化ダイジェスト属性に代入
  end
  def create
    @user = User.new(user_params)                                               # newビューにて送ったformの中身(nameやemailの値)をuser_paramsで受け取り、ユーザーオブジェクトを生成、@userに代入
    if @user.save
      @user.send_activation_email                                               # アカウント有効化メールの送信
      flash[:info] = "メールを確認してアカウントを有効化してね"                 # アカウント有効化メッセージの表示
      redirect_to root_url                                                      # ホームへ飛ばす
    else
      render 'new'
    end
  end
class AccountActivationsController < ApplicationController

  def edit
    user = User.find_by(email: params[:email])
    if user && !user.activated? && user.authenticated?(:activation, params[:id])
      user.activate
      log_in user
      flash[:success] = "Account activated!"
      redirect_to user
    else
      flash[:danger] = "Invalid activation link"
      redirect_to root_url
    end
  end
end
user.rbではuser.という記法を使っていない点に注目。
Userモデルにはそのような変数はないので、これがあるとエラーになる。
-user.update_attribute(:activated,    true)
-user.update_attribute(:activated_at, Time.zone.now)
+update_attribute(:activated,    true)
+update_attribute(:activated_at, Time.zone.now)
userをselfに切り替える方法もあるが、selfは必ずしも必須ではない。
これで、リファクタリングを施したテストがパスすればOK。
2 tests, 14 assertions, 0 failures, 0 errors, 0 skips
演習
1:activateメソッドはupdate_attributeを二回呼び出しているが、
これは各行で1回ずつDBへ問い合わせしていることになる。
update_attributeの呼び出しを1回のupdate_columnsというメソッドでまとめてみる。
また、変更後テストがパスするかも確認。
  # アカウントを有効にする
  def activate
    update_columns(activated: true, activated_at: Time.zone.now)
  end
11 tests, 15 assertions, 0 failures, 0 errors, 0 skips
2:現在は/usersのユーザーindexページを開くと全てのユーザーが表示され、/users/:idのようにidと指定すると個別のユーザーを表示できる。
しかし、非有効ユーザーは表示する意味がないので、その動作をusers_controller.rbで変更する。
  def index
    @users = User.where(activated: true).paginate(page: params[:page])          # Userを取り出して分割した値を@usersに代入
  end

  def show
    @user = User.find(params[:id])                                              # paramsで:idパラメータを受け取る(/users/1にアクセスしたら1を受け取る)
    redirect_to root_url and return unless @user.activated?                     # activatedがfalseならルートURLヘリダイレクト
  end
3:ここまでの演習問題で変更したコードをテストするために、/usersと/users/:idの両方に対する統合テストを作成する。
fixtureに非有効化ユーザーを作成
non_activated:
 name: Non Activated
 email: non_activated@example.gov
 password_digest: <%= User.digest('password') %>
 activated: false
 activated_at: <%= Time.zone.now %>
setupでテストユーザーを読み込む
  test "should not allow the not activated attribute" do
    log_in_as (@non_activated_user)                                             # 非有効化ユーザーでログイン
    assert_not @non_activated_user.activated?                                   # 有効化でないことを検証
    get users_path                                                              # /usersを取得
    assert_select "a[href=?]", user_path(@non_activated_user), count: 0         # 非有効化ユーザーが表示されていないことを確認
    get user_path(@non_activated_user)                                          # 非有効化ユーザーidのページを取得
    assert_redirected_to root_url                                               # ルートurlにリダイレクトされればtrue
  end
11.4 本番環境でのメール送信
ここまでの実装で、development環境に置けるアカウント有効化の流れは完成した。
次はサンプルアプリケーションの設定を変更し、production(実行)環境で実際にメールを送信してみる。
具体的には、
①無料のサービス(SendGrid)を利用してメール送信の設定をする
②アプリケーションの設定
③デプロイ
という順に行う。
SendGridの使い方
本番環境からメールを送信するために、SendGridというHerokuアドオンを利用してアカウントを検証する。
チュートリアルでは、starter tierというサービスを使う。
(1日のメール数が最大400通という制限があるが、無料で利用できる)
SendGridをHerokuで利用するためには、クレジットカードの登録が必要。
https://heroku.com/verify
にアクセスし、クレジットカードを登録する。
アドオンをアプリケーションに追加するには
$ heroku addons:create sendgrid:starter
Creating sendgrid:starter on ⬢ yuuki-heroku-sample... free
Created sendgrid-rectangular-51178 as SENDGRID_PASSWORD, SENDGRID_USERNAME
Use heroku addons:docs sendgrid to view documentation
次に、SendGridアドオンの設定を行う。
production環境のSMTPに情報を記入する
本番Webサイトのアドレスをhost変数に定義する必要もある。
  # Ignore bad email addresses and do not raise email delivery errors.
  # Set this to true and configure the email server for immediate delivery to raise delivery errors.
  config.action_mailer.raise_delivery_errors = false
  config.action_mailer.delivery_method = :smtp
  host = 'https://yuuki-heroku-sample.herokuapp.com'
  config.action.mailer.default_url_options = { host: host }
  ActionMailer::Base.smtp_settings = {
    :address        => 'smtp.sendgrid.net',
    :port           => '587',
    :authentication => :plain,
    :user_name      => ENV['SENDGRID_USERNAME'],
    :password       => ENV['SENDGRID_PASSWORD'],
    :domain         => 'heroku.com',
    :enable_starttle_auto => true
  }
ここで重要なのが、
user_nameとpasswordのハッシュに実際の値を記入しないこと
ソースコードに直接機密情報を書き込むのは危険。
そのような情報は環境変数に記述し、そこからアプリケーションに読み込む必要がある。
今回の場合、そうした変数はSendGridアドオンが自動的に設定してくれるが、のちに環境変数を自分で設定しなければならない。
のちに扱うHerokuの環境変数を表示したい場合は、次のコマンドを実行する。
$ heroku config:get SENDGRID_USERNAME
〇〇@heroku.com
$ heroku config:get SENDGRID_PASSWORD
〇〇
この時点で、トピックブランチをmasterにマージしておく
$ git add -A
$ git commit -m "Add account activation"
$ git checkout master
$ git merge account-activation
続いて、リモートリポジトリにプッシュし、herokuにデプロイ。
$ rails t
$ git push
$ git push heroku
$ heroku run rails db:migrate
ここで、デプロイ後のページで有効かメールを送信してみる。
しかし、なかなかメールが届かない・・・。
*SendGridを確認したところ、スパムアカウント扱いされてアカウントが停止されてしまいました。
処理済みとなっていますが、本来なら送信済みになる筈です。
仕方なく、heroku logsからアカウント有効化URLをクリック。
URLをクリックする。
有効化完了。
SendGridはすぐにスパム判定をしてしまうようで、自分と同じTutorialを読んでいる方もこの部分で苦戦している様子。
演習
1:本番環境でメールを送る。
確認済み
2:実査にメールをクリックして有効化したあと、heorku logsから有効化に関するログがどうなっているかを調べる
2019-01-26T13:43:36.501607+00:00 heroku[router]: at=info method=GET path="/account_activations/BLndwjAJEDxPtb90w3aNpQ/edit?email,yuukitetsuyanet%40gmail.com" host=yuuki-heroku-sample.herokuapp.com request_id=1129f9d8-c64a-476e-81b2-2d3d9a1fceff fwd="122.50.45.13" dyno=web.1 connect=1ms service=113ms status=302 bytes=1031 protocol=https
2019-01-26T13:43:36.712279+00:00 heroku[router]: at=info method=GET path="/users/2" host=yuuki-heroku-sample.herokuapp.com request_id=4f7857c1-a5ba-485f-abe6-feccfa902f9e fwd="122.50.45.13" dyno=web.1 connect=1ms service=19ms status=200 bytes=4444 protocol=https
一応、heroku run rails cでユーザーYUUKIのactivationがtrueか確認してみる。
$ heroku run rails c
$ user = User.find(2)
$ user.activated
=> true
OK。
単語集
- バインド
関連付けるというIT用語。
- before_create
オブジェクト生成時のみ適用させるコールバック。
- Action Mailer
ActionMailerを使用することで、アプリケーションのメイラークラスやビューで、メールを送信することができる。
ActionMailerはActionMailer::Baseを継承し、app/mailerに配置され、app/views にあるビューと関連付けられる。
具体的な使い方は、まずメールを送信する為のメイラーとビューを生成し、メイラー内のアクションでメール送信の動きを付け、メイラービューでメールとして送られる中身のテンプレートを作成する。
- クエリパラメータ
URLの末尾で指定される?の部分。?の部分の後にパラメータを埋め込む。
実際のパラメータ値を「クエリ文字列」と呼び、その種類にはアクセス解析や広告からの流入を調べるパシッブパラエータと、実際のページのコンテンツの内容を変更させるアクティブパラメータがある
- assert_match
第二引数が第一引数の正規表現にマッチする場合はtrue
使い方
assert_match (正規表現, string,[msg] )
- メタプログラミング
プログラムでプログラムを作成するというもの。Rubyでは様々なメソッドで利用可能だが、この章ではsendメソッドを用いてメタプログラミングを行う
- send
動的にメソッドを呼べるメソッド。
- update_columns
update_attributeメソッドの呼び出しを1行でまとめ、DBへの問い合わせを一回にまとめることができるメソッド。
