- How to use in English is below of this page.
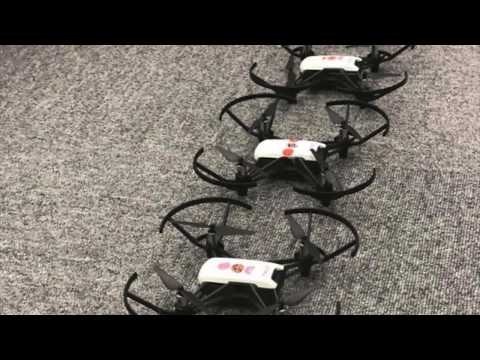
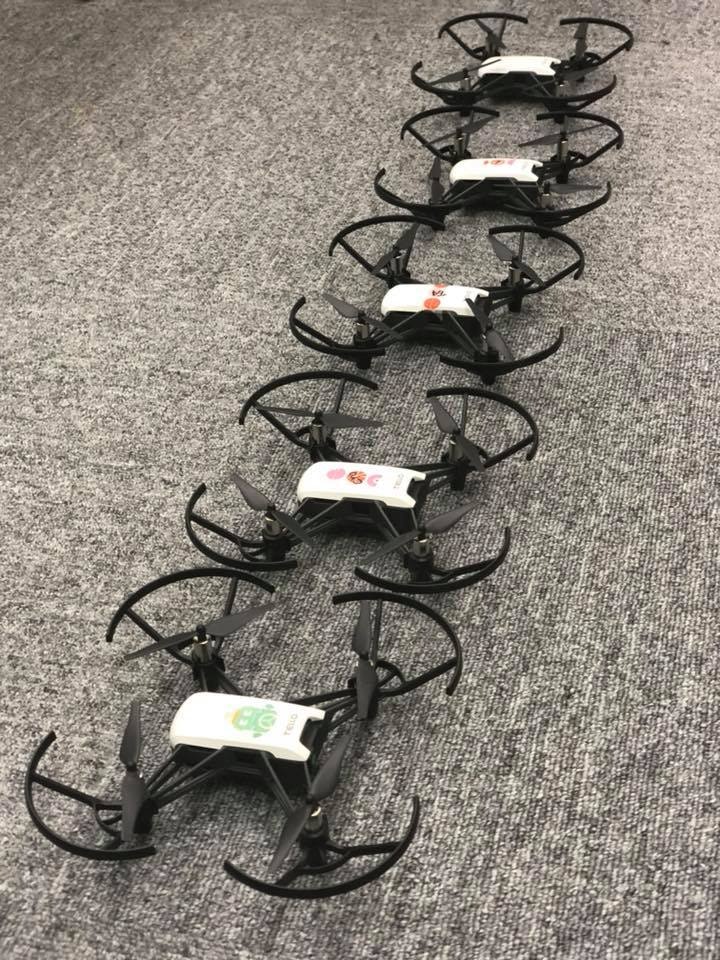
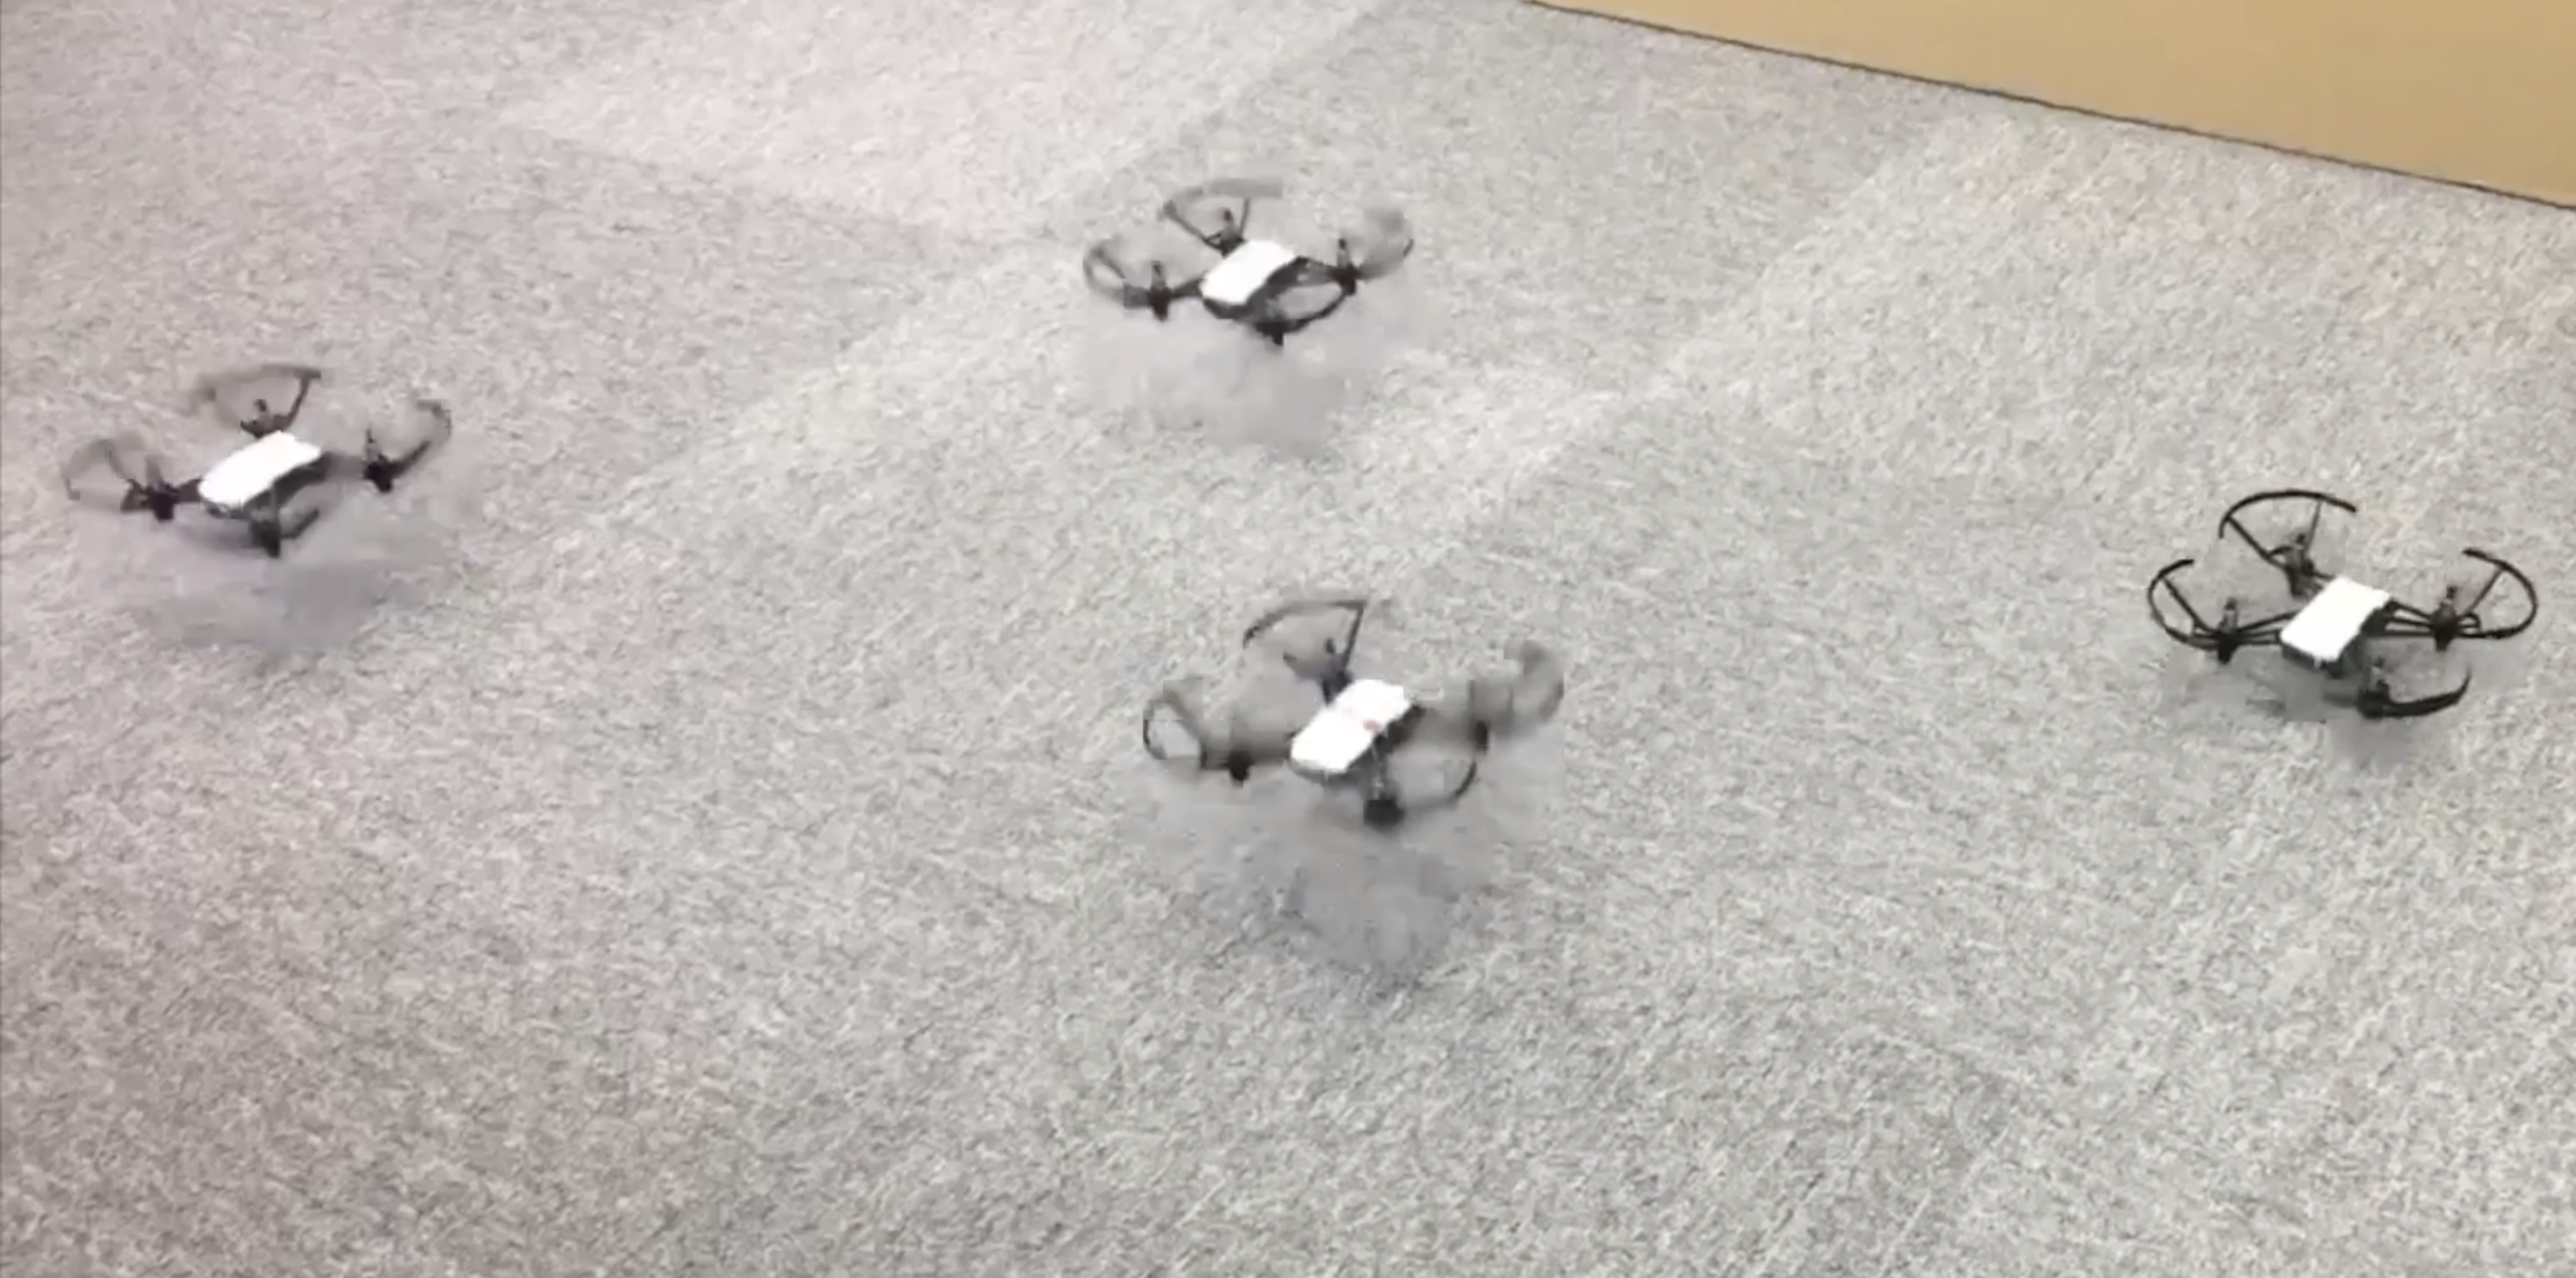
YouTube : DJI Tello formation flight Controlled by ESP32
小型ドローン Tello
DJIの小型ドローンTelloは80g程度の小型軽量ながら、ビジョンポジショニングセンサ(下方カメラ)や気圧センサなどを備え飛行時の安定性に優れた機体です。値段が手頃(税込み12,800円)なこともあり発売と同時に品薄状態となった人気ドローンです。
※ 実際にはRyze Techの製品でありDJIは技術協力という立場ですが、DJI StoreなどDJIの販売ルートで扱われています。
Tello SDK
TelloにはTello SDKが用意されており、プログラマブルに制御できるようになっています。
Telloはスマートフォンからコントロール可能な多くのドローンのように、WiFi AP(アクセスポイント)として稼働します。APとして接続したあとはUDPストリームで動作コマンドを送ればプログラマブルに制御できます。
しかし、この時TelloのIPアドレスおよびUDPポートが固定となっています。
Tello <<- IP: 192.168.10.1 / UDP PORT: 8889 ->> PC or Mobile Device
Tello SDKドキュメントより抜粋
そのためTelloとスマートフォン(あるいはPCなど)は、それぞれに別ネットワークセグメントとして1対1で接続する必要があります。
ESP32による編隊飛行
手ごろな価格のTelloがプログラミングできるとなればやってみたいのが編隊飛行。しかし、スマートフォンやPCをTelloと同じ台数だけそろえるのはいろんな意味で負担が大きいですよね…。
ん? WiFi APに接続してUDPストリームが流すのならESP32で出来るじゃないか。なぜか手元にESP32 BreakOut Boardが4つもあるし。(笑
というわけで、作ってみました「ESP32 Tello Controller」。
YouTube : DJI Tello formation flight ドローン編隊飛行 Controlled by ESP32
ソースコード
まずはサンプル的にペタッと貼れるように1ファイルで書いています。WiFiへの2つの異なる動作モード、APモードとClientモードをまとめて書いてしまっているので分かりにくいかもしれません。が、逆に両モードへのサンプルとして活用頂ければと思います。
Arduino IDEでのESP32環境(ライブラリなど)の構築はここでは説明しません。
// --
// Tello controller for ESP32
// written by bishi 2018.04.06
// --
# include <WiFi.h>
# include <WiFiUdp.h>
# include <FS.h>
# include <SPIFFS.h>

// -- literal
// pin
const int buttonPin = 2;
const int ledPin = 4;

// WiFi - AP mode (for self)
String ssidAp = "TELLO-Controller";
String passwordAp = "tellocon";
const IPAddress ipAp(192, 168, 4, 1);
const IPAddress gatewayAp = ipAp;
const IPAddress subnetAp(255, 255, 255, 0);
const int udpPortAp = 1060;
const int receiveBufferLen = 64;

// WiFi - Client mode (for Tello)
String ssidTello = "TELLO-XXXXXX";  // overridden later
String passwordTello = "password";  // overridden later
String ipTello = "192.168.10.1";
const int udpPortTello = 8889;

// function prototype
void writeSsid(String arg);
void writePass(String arg);
void writeDroneCmd(String arg);
void clearDroneCmd(String arg);

// command table
typedef void (pfunc)(String);
typedef struct
{
  char *cmd;    // command code
  pfunc *func;  // function pointer
} settingCommand_t;

settingCommand_t settingCommandTable[] =
{
  // command code   function pointer
  {"ssid",          writeSsid },      // write ssid to SSID.txt
  {"pass",          writePass },      // write password to PASS.txt
  {"cmd",           writeDroneCmd },  // write command to DRONECMD.txt
  {"clear",         clearDroneCmd },  // clear DRONECMD.txt
  {NULL,            NULL }            // terminator
};

// -- variable
// pin
int buttonState = HIGH;

// WiFi - AP mode (for self)
WiFiUDP udp;
char receiveBuffer[receiveBufferLen];

// WiFi - Client mode (for Tello)
bool connectedTello = false;

// other
bool settingModeEnable = false;

// -- setup function
void setup() {
  // serial
  Serial.begin(115200);

  // pin
  pinMode(buttonPin, INPUT_PULLUP);
  pinMode(ledPin, OUTPUT);
  delay(100); // required delay
  digitalWrite(ledPin, HIGH);

  // file system (on internal Flash memory)
  SPIFFS.begin(true);

  // -- determine the operation mode at startup
  buttonState = digitalRead(buttonPin);
  if (buttonState == LOW) {
    settingModeEnable = true;
  }
  Serial.print("settingModeEnable : ");
  Serial.println(settingModeEnable);

  if (settingModeEnable == true) {

    // -- setting mode
    // WiFi
    Serial.println("Initialize WiFi");
    WiFi.softAP(ssidAp.c_str(), passwordAp.c_str());
    delay(100); // required delay
    WiFi.softAPConfig(ipAp, gatewayAp, subnetAp);
    IPAddress myIP = WiFi.softAPIP();
    Serial.print("AP IP address : ");
    Serial.println(myIP);

    // UDP
    udp.begin(udpPortAp);
    Serial.print("AP UDP port : ");
    Serial.println(udpPortAp);
    digitalWrite(ledPin, LOW);

  } else {

    // -- client mode
    // WiFi connect to Tello
    ssidTello = readTextFile("SSID.txt");
    Serial.print("SSID Tello : ");
    Serial.println(ssidTello);
    passwordTello = readTextFile("PASS.txt");
    Serial.print("Password Tello : ");
    Serial.println(passwordTello);
    connectToWiFi(ssidTello.c_str(), passwordTello.c_str());
    digitalWrite(ledPin, LOW);
  }
}

// -- main loop function
void loop() {
  // check mode
  if (settingModeEnable == true) {

    // -- setting mode
    digitalWrite(ledPin, HIGH);
    settingProcess();

  } else {

    // -- client mode
    if (connectedTello == true)
    {
      digitalWrite(ledPin, HIGH);
      buttonState = digitalRead(buttonPin);
      if (buttonState == LOW) {
        controlTelloProcess();
      }
    } else {
      digitalWrite(ledPin, LOW);
    }
  }
}

// -- setting mode process function
void settingProcess(void)
{
  int receiveLength = udp.parsePacket();
  if (receiveLength) {
    udp.read(receiveBuffer, receiveBufferLen);
    String onePacket = String(receiveBuffer).substring(0, receiveLength);
    Serial.println(onePacket);
    selectFunction(onePacket);
  }
}

// -- select function from table
void selectFunction(String packet)
{
  int index = packet.indexOf(":");
  int len = packet.length();
  String rcvCmd = packet.substring(0, index);

  int i = 0;
  while (settingCommandTable[i].cmd != NULL)
  {
    // serch matched command from table
    if (rcvCmd.equals(settingCommandTable[i].cmd))
    {
      // call function
      String arg = packet.substring(index+1, len);
      settingCommandTable[i].func(arg);
      break;
    }
    i++;
  }
}

// -- client(controll Tello) mode process function
void controlTelloProcess(void)
{
  String fileData = readTextFile("DRONECMD.txt");
  int fileDataLen = fileData.length();
  int indexPos = 0;
  int startPos = 0;
  int delayIndexPos = 0;

  while(1)
  {
    indexPos = fileData.indexOf(",", startPos);
    if (indexPos != -1)
    {
      // cut text to comma
      String sendData = fileData.substring(startPos, indexPos);

      if (sendData.startsWith("delay "))
      {
        delayIndexPos = sendData.indexOf(" ");
        String arg = sendData.substring(delayIndexPos + 1);
        Serial.print("delay : ");
        Serial.println(arg);
        delay(arg.toInt());

      } else {
        // send to UDP
        Serial.print("send : ");
        Serial.println(sendData);
        udp.beginPacket(ipTello.c_str(), udpPortTello);
        udp.printf(sendData.c_str());
        udp.endPacket();
      }
      startPos = indexPos + 1;

    } else {
      // end of file
      break;
    }
  }
  Serial.println("finish!");
}

// -- write ssid to SSID.txt
// registered functions in table
void writeSsid(String arg)
{
  writeTextFile("SSID.txt", arg, "w");
}

// -- write password to PASS.txt
// registered functions in table
void writePass(String arg)
{
  writeTextFile("PASS.txt", arg, "w");
}

// -- write command to DRONECMD.txt
// registered functions in table
void writeDroneCmd(String arg)
{
  // append csv format data to end of file
  String writeArg = arg + ',';
  writeTextFile("DRONECMD.txt", writeArg, "a");
}

// -- clear DRONECMD.txt
// registered functions in table
void clearDroneCmd(String arg)
{
  writeTextFile("DRONECMD.txt", arg, "w");
}

// -- write data to file(internal flash memory)
void writeTextFile(String filename, String text, char *mode) {
  File fd = SPIFFS.open("/" + filename, mode);
  if (!fd) {
    Serial.println("open error:write");
  }
  fd.print(text);
  fd.close();
}

// -- read data from file(internal flash memory)
String readTextFile(String filename) {
  File fd = SPIFFS.open("/" + filename, "r");
  String text = fd.readStringUntil('\n');
  if (!fd) {
    Serial.println("open error:read");
  }
  fd.close();
  return text;
}

// start connect to WiFi AP(Tello)
void connectToWiFi(const char *ssid, const char *password){
  Serial.print("Connecting : ");
  Serial.println(ssid);

  // delete old config
  WiFi.disconnect(true);

  //register event handler
  WiFi.onEvent(wifiEvent);

  WiFi.begin(ssid, password);
  Serial.println("Waiting for WiFi connection...");
}

//wifi event handler
void wifiEvent(WiFiEvent_t event){

  switch(event) {
    case SYSTEM_EVENT_STA_GOT_IP:
        // connected
        Serial.println("WiFi connected!");
        Serial.print("IP address : ");
        Serial.println(WiFi.localIP());

        //initialize UDP
        udp.begin(WiFi.localIP(), udpPortTello);
        connectedTello = true;
        break;

    case SYSTEM_EVENT_STA_DISCONNECTED:
        // disconnected
        Serial.println("WiFi lost connection");
        connectedTello = false;
        break;
  }
}
準備するもの
- ESP32マイコンボード(例 : Unopuino32S)
- Arduino IDE(ESP32ライブラリのインストールが必要です)
- Mac or PC (Pythonのインストールが必要です)
- ESP32用ソースコード(このページのもの)
- Pythonで書かれたTello動作シーケンスコード(このページのものを参考に)
- Tello SDK 公式資料 : https://dl-cdn.ryzerobotics.com/downloads/tello/0228/Tello+SDK+Readme.pdf
使い方
ESP32 Tello Controllerには2つのモードがあります。
- APモード : PCから接続して動作シーケンスをESP32に書き込む。
- Clientモード : Telloへ接続してワンボタンでTelloを制御する。
■APモード
- IO2に割り当てたボタンを押しながら電源を入れるとAPモードになります。(IO4に割り当てたLEDは起動時から点灯を続けます)
- AP名"TELLO-Controller"として起動するので、PCのWiFi設定から"TELLO-Controller"を探して接続します。パスワードは"tellocon"です。
- この状態でMacならターミナル、Windowsならコマンドプロンプトを起動して、次のサンプルのような動作シーケンスを記述したPythonスクリプトを動かします。すると、PCからESP32 Tello Controllerへ動作シーケンスが送信されESP32内のFlashに格納されます。
python commandSequenceSample.py
from time import sleep
import socket

messageArray = [
 	"ssid:TELLO-XXXXXX",
 	"pass:paSswOrd",
	"clear:",
	"cmd:command",
	"cmd:takeoff",
	"cmd:delay 10000",
	"cmd:left 60",
	"cmd:delay 5000",
	"cmd:cw 360",
	"cmd:delay 10000",
	"cmd:flip l",
	"cmd:delay 3000",
	"cmd:land",
	"cmd:delay 5000"
]

ip = "192.168.4.1"
port = 1060
sock = socket.socket(socket.AF_INET, socket.SOCK_DGRAM)

for item in messageArray:
	sock.sendto(item.encode(encoding='utf-8'), (ip, port))
	sleep(0.3)
"messageArray"に記述されているのがESP32 Tello Controllerへ送信するコマンド群です。
- ssid : Tello本体のSSID
- pass : Tello本体のパスワード
この2つはTelloへの動作シーケンスとは別の領域に格納されるので、一旦送ってしまえば動作シーケンスを書き換えるときには省いてしまって結構です。このようにすることにより複数機体を同期させる時、最初に各機体別に接続情報を送っておいて、その後の動作シーケンスは同じファイルを使い回して送ることが出来ます。
- clear : 動作シーケンス領域クリア
動作シーケンス(cmd行)は送るたびにESP32 Tello ControllerのFlashに追記されていきます。このコマンドを送ることで動作シーケンス領域のデータを消去します。
- cmd : Tello SDKコマンド
Tello SDKドキュメントに記載されているコマンドをそのまま記述します。ただし"delay"はTello SDKのコマンドではなく、各コマンド間の待ち時間を[ms]単位で指定します。
■Clientモード
- Telloの電源を入れます。
- ESP32 Tello Controllerの電源を入れるとClientモードになります。(LEDは起動時に数秒点灯してから消灯します)
- そのまま待っているとESP32 Tello ControllerがTelloへの接続を完了してLEDが点灯します。
- ボタンを押すと格納されている動作シーケンスの通りにTelloへデータが送られてTelloが飛行を開始します。
Things to prepare
- ESP32 microcomputer board(example : Unopuino32S)
- Arduino IDE(required Installation of ESP32 library)
- Mac or PC (required Installation of Python)
- Program code for ESP32(It's written on this page)
- Command sequence code for Tello(Please refer to written on this page)
- Tello SDK Official document : https://dl-cdn.ryzerobotics.com/downloads/tello/0228/Tello+SDK+Readme.pdf
How to use
ESP32 Tello Controller has two modes.
1.AP(Access Point) mode : Connect from PC, and write command sequence to ESP32.
2.Client mode : Connect to Tello, and start control for Tello by one button.
<AP(Access Point) mode>
- Enabled IO2 pin, turn on power of ESP32. and to be AP mode.
- Connect from the Mac(or PC) to the AP named "TELLO-Controller". The password is "tellocon".
- In Mac, start the Terminal.(PC : the command prompt)
- Run Python script.
python commandSequenceSample.py
Please customize "messageArray" as necessary.
- ssid : Tello's SSID.
- pass : Tello's Password.
- clear : Initialize command sequence.
- cmd : Tello's SDK command. but delay command is not official command. delay command is set for wait time[ms].
<Client mode>
- turn on power of Tello.
- turn on power of ESP32, and to be Client mode.
- When startup ESP32, The LED(IO4) will light for few seconds. And it disappears.
- When ESP32 connected to Tello, LED light again.
- Push button(IO2), Tello flies according to the command sequence.
おわりに
これでTelloとESP32を複数用意すればワンボタンで同期編隊飛行ができます。
APモードで一旦動作シーケンスを書き込んでしまえば、PCを繋がずともワンボタンでTelloを自動コントロール出来るので屋外でのバッテリー駆動でも使いやすいかと思います。
とはいっても、各Tello間にお互いを認識するセンサもなくコマンド送りっぱなしの制御なので、実際にどの程度うまく動くのかは環境に寄るところが大きいです。飛行の際には安全な場所で生温かく見守るくらいの心持ちで試すのがよろしいかと思います。(笑
また今回はあくまでサンプルなので必要なエラー処理も入っていません。実際に動作させてTelloを壊してしまうことのないようにご注意下さいませ。