ダウンロードのプログレスバーやボタンを押した時のフィードバックなど、アニメーションはアプリに欠かせない要素の一つです。今回は Shape Shifter というツールをご紹介したいと思います。
Shape Shifter とは?
alexjlockwood/ShapeShifter にもあるとおり、 SVG 形式のアイコンのアニメーションを作成するためのツールです。

Shape Shifter の画面構成
まずは Shape Shifter の画面構成を見てみましょう。この記事では下図の名称で呼ぼうと思います。

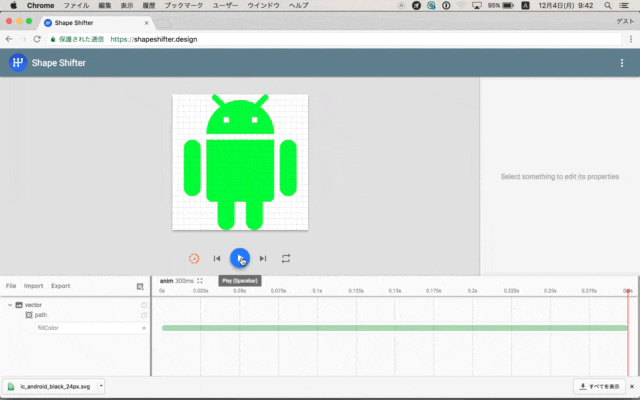
プレビュー画面
アニメーションのプレビューを確認できます。
左からスローモーション、巻き戻し、再生、早送り、繰り返しのボタンが並んでいます。巻き戻しはアニメーションの最初の位置、早送りはアニメーションの最後の位置に移動します。
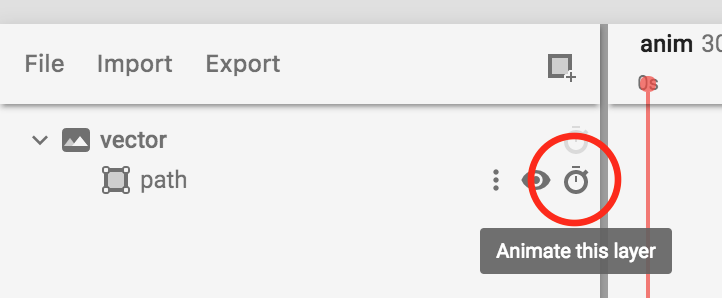
画像の管理
画像を管理できます。
SVG などで定義されているパスやクリップパス、グループが表示されます。
それらを追加したり、SVG や VectorDrawable を読み込ませたり出力することもできます。
また、Shape Shifter の編集内容を保存することもできます。
アニメーションの時間
それぞれのアニメーションの時間が表示されています。
また、アニメーションの合計時間を変更することもできます。
パラメーター
画像の管理に表示されているパスなどやアニメーションの時間のパラメータを編集できます。
画像の管理、アニメーションの時間で選択しているパラメーターが表示されます。
SVG や VectorDrawable の準備
Shape Shifter を使う前に SVG や VectorDrawable を用意しましょう。Sketch などのツールで SVG 形式に書き出したり、Material icons からダウンロードもできます。
また、画像の管理の File から Demo を選択すると、あらかじめ用意されたアニメーションを読み込むことも可能です。
Shape Shifter の使い方
大まかな手順です。
- 画像の管理から SVG や VectorDrawable を読み込ませます

- 画像の管理からパスなどの左端にあるタイマーのアイコンを押してアニメーションを追加します
- 追加したいアニメーションを選択します
 今回は fillColor を選択します。
-
アニメーションの時間からアニメーションを選択してパラメータを編集します
startTime は開始時間、endTime は終了時間、interpolator は値の変化量、fromValue は開始時の値、toValue は終了時の値です。
今回は #000 から #0F0 に変化するアニメーションにしてみます。 -
アニメーションを確認します
-
2 から 4 を繰り返します
-
アニメーションが完成したら画像の管理からエクスポートします
今回は Animated Vector Drawable でエクスポートして、xml ファイルを作成します。

<animated-vector
    xmlns:android="http://schemas.android.com/apk/res/android"
    xmlns:aapt="http://schemas.android.com/aapt">
    <aapt:attr name="android:drawable">
        <vector
            android:name="vector"
            android:width="24dp"
            android:height="24dp"
            android:viewportWidth="24"
            android:viewportHeight="24">
            <path
                android:name="path"
                android:pathData="M 6 18 C 6 18.55 6.45 19 7 19 L 8 19 L 8 22.5 C 8 23.33 8.67 24 9.5 24 C 10.33 24 11 23.33 11 22.5 L 11 19 L 13 19 L 13 22.5 C 13 23.33 13.67 24 14.5 24 C 15.33 24 16 23.33 16 22.5 L 16 19 L 17 19 C 17.55 19 18 18.55 18 18 L 18 8 L 6 8 L 6 18 Z M 3.5 8 C 2.67 8 2 8.67 2 9.5 L 2 16.5 C 2 17.33 2.67 18 3.5 18 C 4.33 18 5 17.33 5 16.5 L 5 9.5 C 5 8.67 4.33 8 3.5 8 Z M 20.5 8 C 19.67 8 19 8.67 19 9.5 L 19 16.5 C 19 17.33 19.67 18 20.5 18 C 21.33 18 22 17.33 22 16.5 L 22 9.5 C 22 8.67 21.33 8 20.5 8 Z M 15.53 2.16 L 16.83 0.86 C 17.03 0.66 17.03 0.35 16.83 0.15 C 16.63 -0.05 16.32 -0.05 16.12 0.15 L 14.64 1.63 C 13.85 1.23 12.95 1 12 1 C 11.04 1 10.14 1.23 9.34 1.63 L 7.85 0.15 C 7.65 -0.05 7.34 -0.05 7.14 0.15 C 6.94 0.35 6.94 0.66 7.14 0.86 L 8.45 2.17 C 6.97 3.26 6 5.01 6 7 L 18 7 C 18 5.01 17.03 3.25 15.53 2.16 Z M 10 5 L 9 5 L 9 4 L 10 4 L 10 5 Z M 15 5 L 14 5 L 14 4 L 15 4 L 15 5 Z"
                android:fillColor="#000"
                android:strokeWidth="1"/>
        </vector>
    </aapt:attr>
    <target android:name="path">
        <aapt:attr name="android:animation">
            <objectAnimator
                android:propertyName="fillColor"
                android:duration="300"
                android:valueFrom="#000"
                android:valueTo="#00ff00"
                android:valueType="colorType"
                android:interpolator="@android:interpolator/fast_out_slow_in"/>
        </aapt:attr>
    </target>
</animated-vector>
Android アプリへの実装
エクスポートした xml ファイルを ImageView に適用して、AnimatedVectorDrawable#start() をすればアニメーションができるようになります。
class MainActivity : AppCompatActivity() {

    override fun onCreate(savedInstanceState: Bundle?) {
        super.onCreate(savedInstanceState)
        setContentView(R.layout.activity_main)

        findViewById<ImageView>(R.id.image).setOnClickListener({
            val drawable = (it as ImageView).drawable as AnimatedVectorDrawable
            if (!drawable.isRunning) {
                drawable.start()
            }
        })
    }
}
アニメーションの繰り返し
ローディングなどアニメーションを繰り返す必要がある場合は AnimatedVectorDrawable#registerAnimationCallback(AnimationCallback) を利用する必要がありますが、このメソッドは API level 23 未満は使えません。そこで SupportLibrary の AnimatedVectorDrawableCompat を利用するように変更したのですが、うまく繰り返すことができなかったので下記の方法で対応しました。
val imageView = findViewById<ImageView>(R.id.image)
if (Build.VERSION.SDK_INT >= Build.VERSION_CODES.M) {
    (imageView.drawable as Animatable2).registerAnimationCallback(object : Animatable2.AnimationCallback() {
        override fun onAnimationEnd(drawable: Drawable) {
            (drawable as Animatable).start()
        }
    })
} else {
    (imageView.drawable as Animatable2Compat).registerAnimationCallback(object : Animatable2Compat.AnimationCallback() {
        override fun onAnimationEnd(drawable: Drawable?) {
            imageView.postDelayed({ (drawable as Animatable).start() }, 20)
        }
    })
}
まとめ
いかがだったでしょうか。アニメーションの実装方法は色々あると思いますが、Shape Shifter はとても強力なアニメーションツールだと思います。Demo を参考に効果的なアニメーションを作成してみてはいかがでしょうか?


参考
Re-animation – Google Developers – Medium
An Introduction to Icon Animation Techniques | Android Design Patterns