こんにちは。エンジニアの平形です。
Microsoftが提供するBotのサービスであるAzure BOT Serviceのフロントエンドについてお話しします。
今回話す事
Azure BOT ServiceのフロントUIのスタイルのカスタマイズ方法。
今回話さない事
Azure BOT Serviceのバックエンドの話は割愛します。
以下の記事でAzure BOT Serviceの始め方を超絶丁寧に解説してくれていますのでこちらをご覧ください。
https://qiita.com/taiki_yoshida/items/d48d6286ce5b8f3aa2a8
Azure BOT Service
現在previewのステータスですが、すでに実際のプロダクトに導入されており今後の進展が期待できるBotのサービスです。
Azure BOT Serviceの概要はこちら
https://azure.microsoft.com/ja-jp/services/bot-service/
Azure BOT Serviceを使うとMSが提供するAIパーツのAPI群であるCognitive Servicesと組み合わせて賢いAIのChatBotの開発を簡単に始める事ができます。
Cognitive Serviceの概要はこちら
https://azure.microsoft.com/ja-jp/services/cognitive-services/
事前準備
Azure BOT Serviceを準備します。
以下の記事の通りに作業してください。
https://qiita.com/taiki_yoshida/items/d48d6286ce5b8f3aa2a8
テンプレートはこの記事の通りQuestion and AnswerでCognitive ServicesのQnA Makerを利用します。
Web Chatチャネル
今回使うチャネルはWeb Chatチャネルです。
Azureのコンソールで事前準備として作成したBotを開き、以下のEditを押します。

以下のEmbed codeをhtmlファイルに貼り付けます。
 **※ のちにこのsecret keyは必要になるので控えておいてください。**
そのままだと高さが狭くなるのでiframeのheightを調整します。
<!DOCTYPE html>
<html lang="en">
<head>
    <meta charset="UTF-8">
    <title>Title</title>
</head>
<body>
<iframe height="600px" src='https://webchat.botframework.com/embed/xxx-bot?s=secret_key'></iframe>
</body>
</html>
これを開くと、以下のようにbotのUIが表示できます。

こんなに簡単にchatのUIが完成します。
本編
ここからが本番です。
これからこのUIのスタイルをカスタマイズしていきます。
まず先にお話ししておかなければいけないのは先ほど登場したiframeのソースに指定されていたembed urlは今後使いません。
Azure側で用意してくれたこのembed urlはすでに自動的にUIが組み込まれたもので、この中をカスタマイズするのは困難です(できないわけじゃない)。
ソースからビルドしていきます。
準備しておくもの
- 先ほど登場したsecretKey
- botId
botIdは以下で確認できます。

BotFramework-WebChat
MSがGitHubで公開しているWebChatのUIのリポジトリです。
https://github.com/Microsoft/BotFramework-WebChat
これを使ってスタイルをカスタマイズしていきます。
ビルド
まず、このリポジトリのReadmeのBuilding Web Chatの通りに、作業します。
※ npm がすでにインストール済みである事が前提です。
git clone git@github.com:Microsoft/BotFramework-WebChat.gitcd BotFramework-WebChatnpm installnpm run build
index.htmlを配置
<!DOCTYPE html>
<html>
<head>
    <meta charset="UTF-8"/>
    <meta name="viewport" content="width=device-width, initial-scale=1.0, maximum-scale=1.0, user-scalable=no"/>
    <title>Bot Chat</title>
    <link href="botchat.css" rel="stylesheet"/>
</head>
<body>
<div id="BotChat"></div>

<script src="botchat.js"></script>

<script>
    const model = {
        "userId": "userId",
        "userName": "You",
        "botId": "xxxxxxxxxxxx",// 先ほど控えたbotId
        "botIconUrl": "https://bot-framework.azureedge.net/bot-icons-v1/bot-framework-default-7.png",
        "botName": "xxxxxxxxxxxx",// 先ほど控えたbotId
        "secret": "xxxxxxxxxxxxxxxxxxx",// 先ほど控えたsecretKey
        "iconUrl": "https://bot-framework.azureedge.net/bot-icons-v1/bot-framework-default-7.png",
        "directLineUrl": "https://webchat.botframework.com/v3/directline",
        "webSocketEnabled": "true"
    };

    BotChat.App({
        directLine: {
            secret: model.secret,
        },
        user: {id: model.userId, name: model.userName},
        bot: {id: model.botId, name: model.botName},
        resize: 'detect'
    }, document.getElementById("BotChat"));
</script>
</body>
</html>
botIdとsecretKeyを書き換えます。
※ 今回は説明を簡略化する為にiframeは使っていません。
ちなみに、さきほどビルドしたファイルでこのhtmlから読み込まれているものは以下の2ファイルのみです。
- botchat.css
- botchat.js
ここまでの動作確認
ブラウザで開きます。

先ほどと同じ画面が表示されたかと思います。
スタイルのカスタマイズ
以下修正します。
//Note: for Adaptive cards 0.5.6, you must use rgb, rgba, or the 6-digit hex (do not use 3 digit hex shortcut)
$c00: #000000;
$c01: #ffffff;
$c02: rgba(0, 0, 0, 0.2);
$c03: #8a8a8a;
$c04: #999999;
$c05: #cccccc;
$c06: #0063b1;
$c07: #0ddd56; // ヘッダと本人のメッセージのバックグラウンドカラーを緑に変更
$c08: #808c95;
$c09: #9309f1; // botのメッセージのバックグラウンドカラーを紫に変更
$c10: #dbdee1;
$c11: #d2dde5;
$c12: #ffa333;

$c_brand: $c07;
$c_shadow: $c02;
$c_chrome: $c10;
$c_textHeading: $c08;
$c_textLight: $c04;

$c_messageFromMe: $c07;
$c_messageFromThem: $c09;
ビルドします。
npm run build-css
確認しましょう。
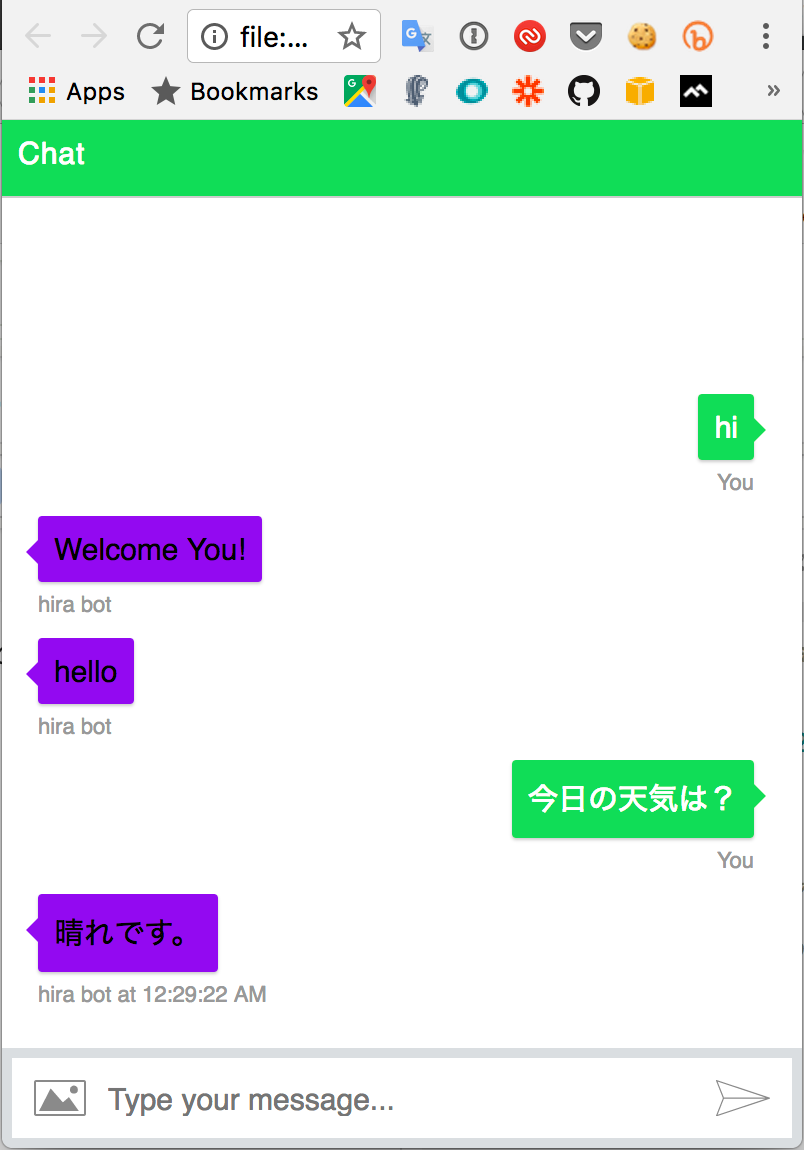
無事、スタイルの変更ができましたね。
なお、色の変更の他にも、
-
src/scss/includes/settings.scss-> 各種サイズの変更 -
src/scss/botchat.scss-> より詳細なカスタマイズ
が可能です。
最後に
今回は、WebChatのUIをビルドする事でスタイルをカスタマイズする方法をお伝えしました。
このWebChatはReactアプリケーションとしてTypeScriptで実装されており、中の処理を弄れば振る舞いをカスタマイズする事が可能です。
あと、既存のReactアプリケーションにコンポーネントとしてChatを組み込む事も可能です。
詳細は以下のReadmeをご覧ください。
https://github.com/Microsoft/BotFramework-WebChat
以上です。