はじめに
本稿は Material Design の Exposed dropdown menu の初期設定から実装までのメモ書きです。
※ Android アプリに Exposed dropdown menu を組み込むための最低限の情報が一通り含まれています。
◆ Exposed dropdown menu とは?
Material Design で Exposed dropdown menu と定義されているもので、選択されているアイテムがメニュー上に表示されるメニューです。
Filled exposed dropdown menu と Outlined exposed dropdown menu の 2 種類が存在します。
▼ Filled exposed dropdown menu
 |
|---|
▼ Outlined exposed dropdown menu
 |
|---|
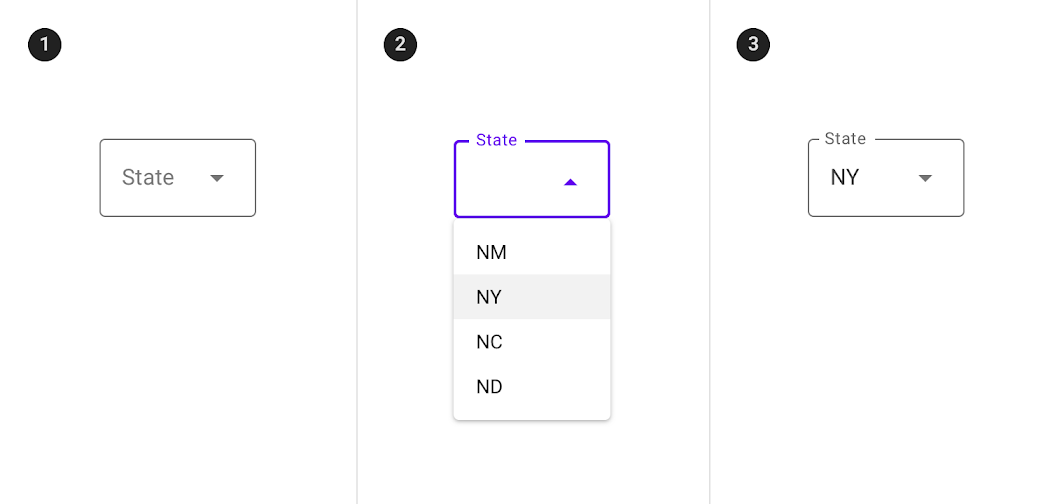
- 非活性状態
- 活性状態
- 非活性かつ値がセットされている状態
※ 図はこちらから引用したものです
◆ 本メモの目的
本メモでは、Exposed dropdown menu を Android アプリ内で利用するための技術的情報を扱います。
デザインそのものに関する説明は行いません。1
◆ 参考情報
- Exposed dropdown menu
- Exposed Dropdown Menus
- Getting started with Material Components for Android
- Android 用の Material Components を扱うための説明
- https://material.io/develop/android/docs/getting-started
基本設定
以下に、Android Studio 上で作成した直後の Android Project に対して設定する方法を示します。
※ 下記サンプルと異なる設定をしたい場合などは Getting started with Material Components for Android 及び Exposed Dropdown Menus を参考にしてください。
◆ Dependency
- レポジトリを指定します。2
- Android Studio で Android 用プロジェクトを作成した場合はデフォルトで設定されています。
allprojects
allprojects {
    repositories {
        google()
        jcenter()
    }
}
android module
- Android module に依存関係を設定します。
- バージョンは ここ から確認してください。
- 本稿執筆時は 1.1.0 を利用しました。
dependencies {
    implementation 'com.google.android.material:material:<version>'
}
◆ Material Styles
theme もしくは styles に Theme.MaterialComponents.* に由来するものを設定する必要があります。
以下に、Android Studio の Android Project で自動作成されたコード に対して theme の親を書き換える例を示します3:
※ 書き換えたのは Theme.MaterialComponents.Light の部分のみです
<resources>
    <!-- Base application theme. -->
    <style name="AppTheme" parent="Theme.MaterialComponents.Light">
        <!-- Customize your theme here. -->
        <item name="colorPrimary">@color/colorPrimary</item>
        <item name="colorPrimaryDark">@color/colorPrimaryDark</item>
        <item name="colorAccent">@color/colorAccent</item>
    </style>
</resources>
style が正しく設定されていない場合は、以下のようなエラーが発生します。
Caused by: android.view.InflateException: Binary XML file line #9: Binary XML file line #9: Error inflating class com.google.android.material.textfield.TextInputLayout
Caused by: android.view.InflateException: Binary XML file line #9: Error inflating class com.google.android.material.textfield.TextInputLayout
実装例
◆ Filled/Outlined のサンプル
以下に、Filled exposed dropdown menu と Outlined exposed dropdown menu の両方を表示するレイアウトを示します。

☆ 画面レイアウト
- 起動直後に AutoCompleteTextView がフォーカスを得ないように、トップレベルで
android:descendantFocusability="beforeDescendants"及びandroid:focusableInTouchMode="true"を設定しています。 - 文字の直接入力を避けるため、
android:editable="false"を指定しています。4
<?xml version="1.0" encoding="utf-8"?>
<androidx.constraintlayout.widget.ConstraintLayout xmlns:android="http://schemas.android.com/apk/res/android"
    xmlns:app="http://schemas.android.com/apk/res-auto"
    xmlns:tools="http://schemas.android.com/tools"
    android:layout_width="match_parent"
    android:layout_height="match_parent"
    android:descendantFocusability="beforeDescendants"
    android:focusableInTouchMode="true"
    android:padding="16dp"
    tools:context=".MainActivity">

    <TextView
        android:id="@+id/filled_exposed_dropdown_desc"
        android:layout_width="match_parent"
        android:layout_height="wrap_content"
        android:text="Filled exposed dropdown menu"
        app:layout_constraintBottom_toTopOf="@id/filled_exposed_dropdown_container"
        app:layout_constraintEnd_toEndOf="parent"
        app:layout_constraintStart_toStartOf="parent"
        app:layout_constraintTop_toTopOf="parent"
        app:layout_constraintVertical_chainStyle="packed" />

    <com.google.android.material.textfield.TextInputLayout
        android:id="@+id/filled_exposed_dropdown_container"
        style="@style/Widget.MaterialComponents.TextInputLayout.FilledBox.ExposedDropdownMenu"
        android:layout_width="match_parent"
        android:layout_height="wrap_content"
        android:hint="State"
        app:layout_constraintBottom_toTopOf="@id/outlined_exposed_dropdown_desc"
        app:layout_constraintLeft_toLeftOf="parent"
        app:layout_constraintRight_toRightOf="parent"
        app:layout_constraintTop_toBottomOf="@id/filled_exposed_dropdown_desc">

        <AutoCompleteTextView
            android:id="@+id/filled_exposed_dropdown"
            android:layout_width="match_parent"
            android:layout_height="wrap_content"
            android:editable="false" />
    </com.google.android.material.textfield.TextInputLayout>

    <TextView
        android:id="@+id/outlined_exposed_dropdown_desc"
        android:layout_width="match_parent"
        android:layout_height="wrap_content"
        android:layout_marginTop="100dp"
        android:text="Outlined exposed dropdown menu"
        app:layout_constraintBottom_toTopOf="@id/outlined_exposed_dropdown_container"
        app:layout_constraintEnd_toEndOf="parent"
        app:layout_constraintStart_toStartOf="parent"
        app:layout_constraintTop_toBottomOf="@id/filled_exposed_dropdown_container" />

    <com.google.android.material.textfield.TextInputLayout
        android:id="@+id/outlined_exposed_dropdown_container"
        style="@style/Widget.MaterialComponents.TextInputLayout.OutlinedBox.ExposedDropdownMenu"
        android:layout_width="match_parent"
        android:layout_height="wrap_content"
        android:hint="State"
        app:layout_constraintBottom_toBottomOf="parent"
        app:layout_constraintLeft_toLeftOf="parent"
        app:layout_constraintRight_toRightOf="parent"
        app:layout_constraintTop_toBottomOf="@id/outlined_exposed_dropdown_desc">

        <AutoCompleteTextView
            android:id="@+id/outlined_exposed_dropdown"
            android:layout_width="match_parent"
            android:layout_height="wrap_content"
            android:editable="false" />
    </com.google.android.material.textfield.TextInputLayout>
</androidx.constraintlayout.widget.ConstraintLayout>
◆ メニューアイテムを扱うサンプル
☆ 画面レイアウト
<?xml version="1.0" encoding="utf-8"?>
<androidx.constraintlayout.widget.ConstraintLayout xmlns:android="http://schemas.android.com/apk/res/android"
    xmlns:app="http://schemas.android.com/apk/res-auto"
    xmlns:tools="http://schemas.android.com/tools"
    android:layout_width="match_parent"
    android:layout_height="match_parent"
    android:descendantFocusability="beforeDescendants"
    android:focusableInTouchMode="true"
    android:padding="16dp"
    tools:context=".MainActivity">

    <TextView
        android:id="@+id/outlined_exposed_dropdown_desc"
        android:layout_width="match_parent"
        android:layout_height="wrap_content"
        android:text="Outlined exposed dropdown menu"
        app:layout_constraintBottom_toTopOf="@id/outlined_exposed_dropdown_container"
        app:layout_constraintEnd_toEndOf="parent"
        app:layout_constraintStart_toStartOf="parent"
        app:layout_constraintTop_toTopOf="parent"
        app:layout_constraintVertical_chainStyle="packed" />

    <com.google.android.material.textfield.TextInputLayout
        android:id="@+id/outlined_exposed_dropdown_container"
        style="@style/Widget.MaterialComponents.TextInputLayout.OutlinedBox.ExposedDropdownMenu"
        android:layout_width="match_parent"
        android:layout_height="wrap_content"
        android:hint="State"
        app:layout_constraintBottom_toBottomOf="parent"
        app:layout_constraintLeft_toLeftOf="parent"
        app:layout_constraintRight_toRightOf="parent"
        app:layout_constraintTop_toBottomOf="@id/outlined_exposed_dropdown_desc">

        <AutoCompleteTextView
            android:id="@+id/outlined_exposed_dropdown"
            android:layout_width="match_parent"
            android:layout_height="wrap_content"
            android:editable="false" />
    </com.google.android.material.textfield.TextInputLayout>
</androidx.constraintlayout.widget.ConstraintLayout>
☆ アイテム用レイアウト
<?xml version="1.0" encoding="utf-8"?>
<TextView xmlns:android="http://schemas.android.com/apk/res/android"
    android:layout_width="match_parent"
    android:layout_height="wrap_content"
    android:padding="16dp"
    android:ellipsize="end"
    android:maxLines="1"
    android:textAppearance="?attr/textAppearanceSubtitle1"/>
☆ メニューアイテムの設定
package com.objectfanatics.myapplication

import android.os.Bundle
import android.widget.ArrayAdapter
import android.widget.AutoCompleteTextView
import androidx.appcompat.app.AppCompatActivity

class MainActivity : AppCompatActivity() {
    override fun onCreate(savedInstanceState: Bundle?) {
        super.onCreate(savedInstanceState)
        setContentView(R.layout.activity_main)

        // get AutoCompleteTextView
        val autoCompleteTextView =
            findViewById<AutoCompleteTextView>(R.id.outlined_exposed_dropdown)

        // create and set menu items
        val menuItems = listOf("MN", "NY", "NC", "ND")
        val adapter = ArrayAdapter(this, R.layout.dropdown_menu_popup_item, menuItems)
        autoCompleteTextView.setAdapter(adapter)

        // set default menu item
        autoCompleteTextView.setText("NY", false)
    }
}
おわりに
◆ やったこと
Material Design の Exposed dropdown menu の利用法を、最低限一通り確認してみました。
◆ 備考
Material Design を提供する側の視点で見ると、デザインの定義や比較的抽象度の低い UI 部品の提供など、必要な情報を提供できているように思えます。そして、これらの情報やリソースを有機的に組み合わせることにより、開発側は高い自由度が得られます。
しかし、これはあくまでも汎用の infrastructure であり、これをアプリ開発で直接的に利用するというのは危険な気がします。理由は、特定アプリ開発に利用するには自由度が高すぎるからです。それは、各エンジニアがそれぞれ微妙に異なるUIを作成してしまう可能性が高いことを意味します。
実際問題、アイテムの選択を AutoCompleteTextView の text に文字列を直接入れるとか、どんだけ bug prone なんだよという感じです。
ということで、Exposed dropdown menu でもその他のデザイン要素にしても、アプリ開発に適用する時には、以下のようなアプローチをとるのが良いと思われます。
- アプリのデザインガイドラインを策定する。
- デザインガイドラインに準じたカスタムコンポーネントを用意する。
- アプリ開発はカスタムコンポーネントをベースに行う。
以上、おしまい。
ソース
非公開レポジトリに間借りしたブランチなので現状は非公開
GitHub
※ たぶん後日、別エントリでカスタムコンポーネントの例を上げると思います。
-
google() は https://maven.google.com/web/index.html#com.google.android.material:material, jcenter() は https://bintray.com/bintray/jcenter で内容の確認ができます。 ↩
-
この例では Theme.MaterialComponents.Light.DarkActionBar を利用しましたが、こちら に書かれた他の選択肢も検討してみてください。 ↩
-
執筆当時は
android:inputType="none"では入力を防げませんでした。 ↩

