Azure上に仮想マシンを立てる際、今後のことも考えてTerraformを使用したのでやり方をまとめておきます。
ここではTerraformの詳しい解説は省略します。
バージョン
Terraform v0.12.1
provider.azurerm v1.30.1
変数
変更がしやすいように名前などを変数で定義しました。変数定義をするファイルvariables.tfはこのようになりました。
variable "resource_group_name" {
  default = "RG-hogehoge-MaaS"
}

variable "location" {
  default = "japaneast"
}

variable "Vnet_name" {
  default = "hogehoge-Vnet"
}

variable "Vnet_address_space" {
  default = "10.0.0.0/16"
}

variable "subnet_name" {
  default = "hogehoge-subnet"
}


variable "public_ip_name" {
  default = "hogehoge-public-ip"
}

variable "security_group" {
  default = "hogehoge-security-group"
}

variable "network_interface_name" {
  default = "hogehoge-network-interface"
}

variable "NIC_name" {
  default = "hogehoge-NIC"
}

variable "VM_name" {
  default = "hogehoge-VM"
}

variable "VM_size" {
  default = "Standard_B2S"
}

variable "os_disk_name" {
  default = "hogehoge-os-disk"
}

variable "computer_name" {
  default = "hogehoge-computer"
}

variable "admin_username" {
  default = "hogehoge-admin"
}

variable "admin_password" {
  default = "hogehoge1234!"
}
次にコードの解説です。
プロバイダーの設定
始めにプロバイダーを設定します。Azureを利用するのでazurermを指定します。サービスプリンシパルを使用する場合はid, passwordを指定します。詳しくはドキュメントを読んでください。
https://docs.microsoft.com/ja-jp/azure/virtual-machines/linux/terraform-install-configure
provider "azurerm" {
    subscription_id = "xxxxxxx-xxxx-xxxx-xxxx-xxxxxxxxxxxx"
    client_id       = "xxxxxxx-xxxx-xxxx-xxxx-xxxxxxxxxxxx"
    client_secret   = "xxxxxxx-xxxx-xxxx-xxxx-xxxxxxxxxxxx"
    tenant_id       = "xxxxxxx-xxxx-xxxx-xxxx-xxxxxxxxxxxx"
}
サービスプリンシパルを使用しないなら、事前にAzureへログインしておくとidの指定が省略できます。
# az login
リソースグループの作成
次にリソースグループを作成しています。事前に作成したリソースグループを利用するならここで作成する必要はありません。
resource "azurerm_resource_group" "hogehoge" {
  name = "${var.resource_group_name}"
  location = "${var.location}"
}
リソースグループ名とリージョンを設定しています。ここから先で作成するリソースは全てこのリソースグループ内で作成します。具体的にはresource_group_nameを${azurerm_resource_group.hogehoge.name}とすることで同じリソースグループ名を指定できます。このように変数を使ったり参照しておくと変更があったときに対応がしやすいです。
ネットワークの作成
仮想マシンのネットワークを設定します。
// 仮想ネットワーク
resource "azurerm_virtual_network" "hogehoge" {
  name = "${var.Vnet_name}"
  address_space = ["${var.Vnet_address_space}"]
  location = "${azurerm_resource_group.hogehoge.location}"
  resource_group_name = "${azurerm_resource_group.hogehoge.name}"
}

// インターフェースへ適用するサブネット設定
resource "azurerm_subnet" "hogehoge" {
    name                 = "${var.subnet_name}"
    resource_group_name  = "${azurerm_resource_group.hogehoge.name}"
    virtual_network_name = "${azurerm_virtual_network.hogehoge.name}"
    address_prefix       = "10.0.2.0/24"
}

// パブリック IP アドレス
resource "azurerm_public_ip" "hogehoge" {
  name = "${var.public_ip_name}"
  location = "${azurerm_resource_group.hogehoge.location}"
  resource_group_name = "${azurerm_resource_group.hogehoge.name}"
  allocation_method = "Dynamic"
}

// ネットワーク セキュリティ グループ
resource "azurerm_network_security_group" "hogehoge" {
    name ="${var.security_group}"
    location = "${azurerm_resource_group.hogehoge.location}"
    resource_group_name = "${azurerm_resource_group.hogehoge.name}"

    security_rule {
        name                       = "SSH"
        priority                   = 1001
        direction                  = "Inbound"
        access                     = "Allow"
        protocol                   = "Tcp"
        source_port_range          = "*"
        destination_port_range     = "22"
        source_address_prefix      = "*"
        destination_address_prefix = "*"
    }
    security_rule {
        name                       = "HTTP"
        priority                   = 1001
        direction                  = "Inbound"
        access                     = "Allow"
        protocol                   = "Tcp"
        source_port_range          = "*"
        destination_port_range     = "80"
        source_address_prefix      = "*"
        destination_address_prefix = "*"
    }
}

// ネットワーク インターフェイス
resource "azurerm_network_interface" "hogehoge" {
    name                = "${var.network_interface_name}"
    location            = "${azurerm_resource_group.hogehoge.location}"
    resource_group_name = "${azurerm_resource_group.hogehoge.name}"
    network_security_group_id = "${azurerm_network_security_group.hogehoge.id}"

    ip_configuration {
        name                          = "${var.NIC_name}"
        subnet_id                     = "${azurerm_subnet.hogehoge.id}"
        private_ip_address_allocation = "Dynamic"
        public_ip_address_id          = "${azurerm_public_ip.hogehoge.id}"
    }
}
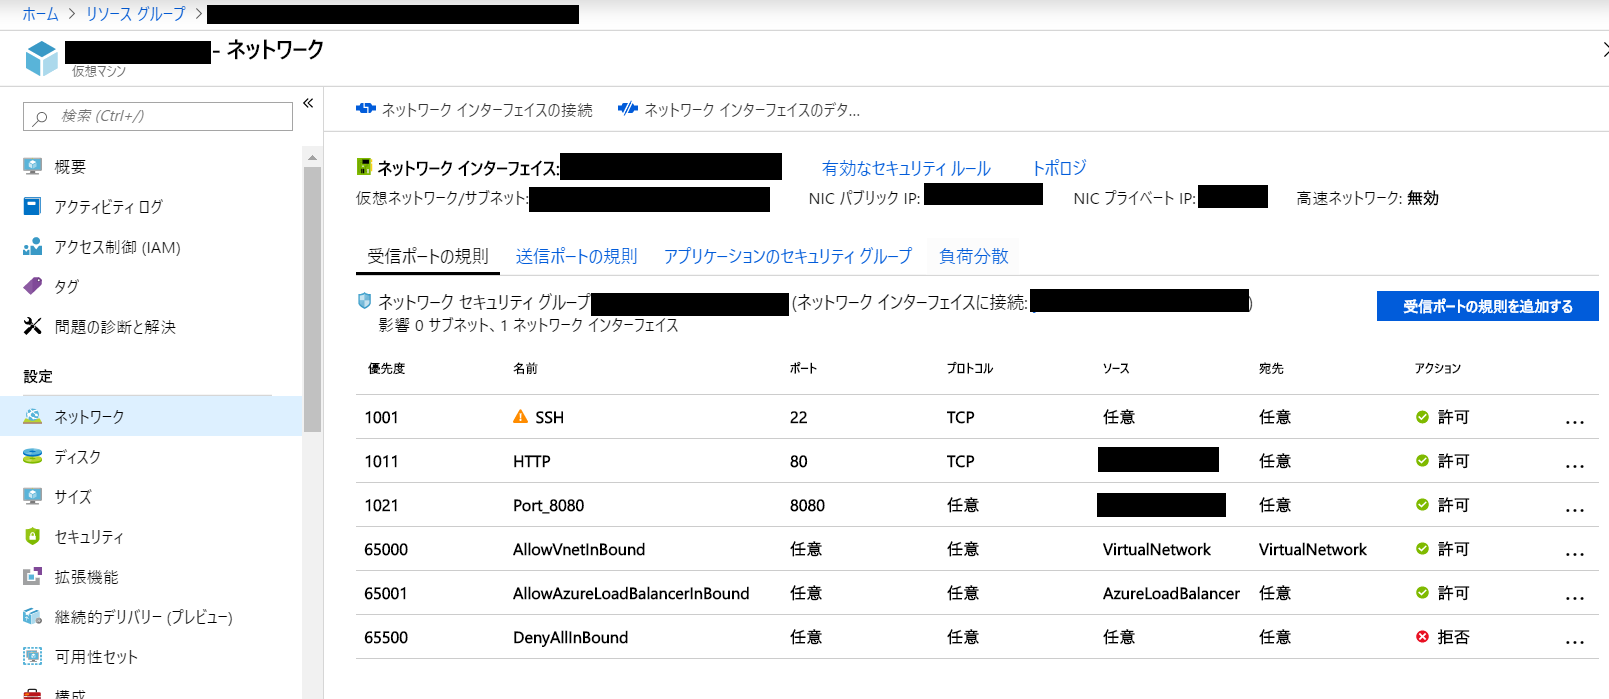
ネットワーク セキュリティグループの設定で記述しているsecurity_ruleはこの画面に適用されます。(port8080の設定を後から追加しています)

下の3つはデフォルトで設定されているものです。
AzureのVMはデフォルトではポートが開いていないため、サーバーを建てて外部から接続しようと思ってもできないことがあります(僕はそこで詰まりました)。
そのためdestination_port_rangeの設定は忘れずにしてください。また、乗っけたコードには*としていますが、セキュリティの観点からsource_address_prefixでアクセス元アドレスを指定するようにしてください。
ネットワーク必要ないよ!って場合でもインターフェースの設定だけはする必要があるようです。試したわけではないので、詳しくはドキュメントを読んでください。
https://www.terraform.io/docs/providers/azurerm/r/virtual_machine.html
VMの作成
最後にお待ちかねVMの設定です。
resource "azurerm_virtual_machine" "hogehoge" {
  name = "${var.VM_name}"
  location = "${azurerm_resource_group.hogehoge.location}"
  resource_group_name = "${azurerm_resource_group.hogehoge.name}"
  network_interface_ids = ["${azurerm_network_interface.hogehoge.id}"]
  vm_size = "${var.VM_size}"

// 使用するイメージ
    storage_image_reference {
      publisher = "Canonical"
      offer     = "UbuntuServer"
      sku       = "18.04-LTS"
      version   = "latest"
    }

// ディスク
    storage_os_disk {
      name = "${var.os_disk_name}"
      caching           = "ReadWrite"
      create_option     = "FromImage"
      managed_disk_type = "Standard_LRS"
    }

    os_profile {
      computer_name  = "${var.computer_name}"
      admin_username = "${var.admin_username}"
      admin_password = "${var.admin_password}"
    }

    os_profile_linux_config {
        disable_password_authentication = false
    }
}
やはり詳しくはドキュメントを読んでもらいたいのですが、ピックアップして簡単に解説します。
network_interface_idsには先ほど作成したネットワークインターフェースのidを指定します。idは${azurerm_network_interface.hogehoge.id}という形で参照します。
vm_sizeではVMのサイズを設定しています。Standard_B2Sのように指定します。ここを間違えるとお金が飛ぶので注意しましょう。
storage_image_referenceではVMに乗っけるイメージを設定できます。ここではUbuntuの最新版を指定しています。
os_profileではusernameとpasswordを設定しています。ログインに必要になるので忘れないようにしましょう。
最終的なコード
これらをつなぎ合わせたコードでVMとその周りの環境を作成します。
provider "azurerm" {
}

resource "azurerm_resource_group" "hogehoge" {
  name = "${var.resource_group_name}"
  location = "${var.location}"
}

resource "azurerm_virtual_network" "hogehoge" {
  name = "${var.Vnet_name}"
  address_space = ["${var.Vnet_address_space}"]
  location = "${azurerm_resource_group.hogehoge.location}"
  resource_group_name = "${azurerm_resource_group.hogehoge.name}"
}

resource "azurerm_subnet" "hogehoge" {
    name                 = "${var.subnet_name}"
    resource_group_name  = "${azurerm_resource_group.hogehoge.name}"
    virtual_network_name = "${azurerm_virtual_network.hogehoge.name}"
    address_prefix       = "10.0.2.0/24"
}

resource "azurerm_public_ip" "hogehoge" {
  name = "${var.public_ip_name}"
  location = "${azurerm_resource_group.hogehoge.location}"
  resource_group_name = "${azurerm_resource_group.hogehoge.name}"
  allocation_method = "Dynamic"
}

resource "azurerm_network_security_group" "hogehoge" {
    name ="${var.security_group}"
    location = "${azurerm_resource_group.hogehoge.location}"
    resource_group_name = "${azurerm_resource_group.hogehoge.name}"

    security_rule {
        name                       = "SSH"
        priority                   = 1001
        direction                  = "Inbound"
        access                     = "Allow"
        protocol                   = "Tcp"
        source_port_range          = "*"
        destination_port_range     = "22"
        source_address_prefix      = "*"
        destination_address_prefix = "*"
    }
    security_rule {
        name                       = "HTTP"
        priority                   = 1001
        direction                  = "Inbound"
        access                     = "Allow"
        protocol                   = "Tcp"
        source_port_range          = "*"
        destination_port_range     = "80"
        source_address_prefix      = "*"
        destination_address_prefix = "*"
    }
}

resource "azurerm_network_interface" "hogehoge" {
    name                = "${var.network_interface_name}"
    location            = "${azurerm_resource_group.hogehoge.location}"
    resource_group_name = "${azurerm_resource_group.hogehoge.name}"
    network_security_group_id = "${azurerm_network_security_group.hogehoge.id}"

    ip_configuration {
        name                          = "${var.NIC_name}"
        subnet_id                     = "${azurerm_subnet.hogehoge.id}"
        private_ip_address_allocation = "Dynamic"
        public_ip_address_id          = "${azurerm_public_ip.hogehoge.id}"
    }
}

resource "azurerm_virtual_machine" "hogehoge" {
  name = "${var.VM_name}"
  location = "${azurerm_resource_group.hogehoge.location}"
  resource_group_name = "${azurerm_resource_group.hogehoge.name}"
  network_interface_ids = ["${azurerm_network_interface.hogehoge.id}"]
  vm_size = "${var.VM_size}"

    storage_image_reference {
      publisher = "Canonical"
      offer     = "UbuntuServer"
      sku       = "18.04-LTS"
      version   = "latest"
    }

    storage_os_disk {
      name = "${var.os_disk_name}"
      caching           = "ReadWrite"
      create_option     = "FromImage"
      managed_disk_type = "Standard_LRS"
    }

    os_profile {
      computer_name  = "${var.computer_name}"
      admin_username = "${var.admin_username}"
      admin_password = "${var.admin_password}"
    }

    os_profile_linux_config {
        disable_password_authentication = false
    }
}
デプロイ
設定を書き終わったら初期化して
# terraform init
デプロイ!
......の前に一旦確認。
# terraform plan
表示されるデプロイシミュレーションで問題が無ければAzureにデプロイ!
# terraform aplly