動画
以前までの記事
最後の内容にて、
pythonでデバイスドライバを書き、メモリリードの値取得にトライした。
import time

if __name__ == '__main__':
  for i in range(0,5) :
    with open('/dev/BeuatoCtrl0', mode='w') as f:
      f.write("r 68 2 ")

    time.sleep(1)

    with open('/dev/BeuatoCtrl0', mode='r') as f:
      print(f.readline())
自作で作ったデバイスドライバは、
echo命令やcat命令を使用して、実行出来たので、
それをそのままpythonコードに反映させることが出来た。
今度はrospyを使って、
ジャイロセンサの値を常時取得できるプログラムを作ってみるとしよう。
github
rospyの構成
ノード
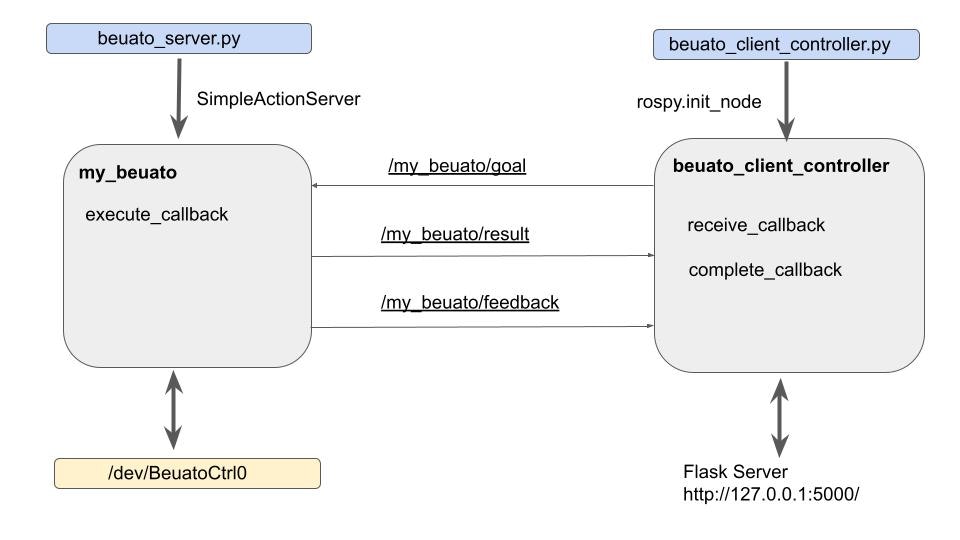
ノードは2つ。
| ノード名 | 説明 |
|---|---|
| my_beuato | デバイスコントロール、ROSサーバ |
| beuato_client_controller | ROSクライアント、Flaskから見たらサーバ |
ROS Topicは、goal, result, feedbackがあるが、これはSimpleActionServerを使えば自動的に利用できるものである。
Publisher, Subscriber
ノードのtopicの話をする時、
それぞれがpublisherなのか、subscriberなのかを理解する必要がある。
| Topic | Publisher | Subscriber |
|---|---|---|
| /my_beuato/goal | beuato_client_controller | my_beuato |
| /my_beuato/result | my_beuato | beuato_client_controller |
| /my_beuato/feedback | my_beuato | beuato_client_controller |
Callback
SimpleActionServerにexecute_callbackが紐付けられる。
/my_beuato/goalからリクエストが来ると、
そのリクエストのコールバックとして実行される。
また、データ転送の進捗出力(/my_beuato/feedback)、データ転送結果(/my_beuato/result)を通知する。
beuato_client_controllerは、その実行を受けたときに、
コールバックとしてそれぞれreceive_callback、complete_callbackを実行する。
rostopicの構成
catkin_create_pkgを実行後、
プロジェクトのフォルダとしてactionというフォルダを作成し、
BeuatoBalancer.actionを作成する。
# Goal
bool is_capture_mode      # true:preempted requestが来るまでサンプリング
                          # false: sampling_number分だけデータを取得
uint32 sampling_number    # is_capture_mode=falseのときに
                          # 取得するデータ数
---
# Result
uint32 sampling_number    # サンプリングしたデータ数
bool is_suspend_for_error # エラーによって中断したか
int32 errorcode           # is_suspend_for_error=trueのときのエラーコード
---
# Feedback
int16 ad_gyro             # ジャイロセンサの値
float32 time              # データ取得した時間
float32 predicted_period  # データ取得周期(推定値)
ここで提示されたactionファイルは
from beuato_monitor_test.msg import BeuatoBalancerAction,
                  BeuatoBalancerResult, BeuatoBalancerFeedback
とすると、Actionサーバ、Result、Feedbackを与えることが出来る。
初期化で
class BeuatoBalancerServer(object):
  _feedback = BeuatoBalancerFeedback()
  _result = BeuatoBalancerResult()
とし、
self._as.publish_feedback(self._feedback)
としてフィードバックを返し、
self._as.set_succeeded(self._result)
として結果を返す。
なお、外部中断要求があった場合、
self._as.set_preempted(self._result)
とし、中断した結果を渡す。
上記を、成功した時、及びユーザ定義関数
suspend_loop関数:ループの要求停止命令があったときに実行(set_preempted)
abort_loop関数:エラーがあったときに実行(set_succeeded)
を設定している。
Error Code
ここで考えた内容を使って、エラーコードをbeuato_server.pyとbeuato_client_controller.pyで共有する。
scriptsフォルダの中に、common_driverフォルダを作成し、
beuato_errorcode.pyを作成。
そこにエラーコードとして列挙体を定義して、
beuato_server.pyとbeuato_client_controller.pyでステートエラーを共有する。
from enum import Enum

class BeuatoErrorCode(Enum):
    OK = 0
    DEVICE_NOT_FOUND = -100
    DEVICE_ACCESIBILITY_ERROR = -101
setup.pyはbeuato_monitor_testのディレクトリ内に保存。
from distutils.core import setup
from catkin_pkg.python_setup import generate_distutils_setup
d = generate_distutils_setup(
  packages=['common_driver'],
  package_dir={'': 'scripts'},
  requires=['std_msgs', 'rospy']
)
setup(**d)
CMakeLists.txtに
catkin_python_setup()

generate_messages(
// 省略 //
の追記を忘れないようにする。
列挙体のロードは以下の構文で実装。
from common_driver.beuato_errorcode import BeuatoErrorCode
from common_driver.beuato_errorcode import BeuatoErrorCode
beuato_client_controllerからflaskの実行
上記の記事を参考に、
beuato_client_controllerでflaskを平行で実行させる。
通常と異なる点として、
rospyのinit_nodeも同時にサブスレッドに与える必要がある。
def init():
    rospy.init_node('beuato_client_controller', disable_signals=True)
    action_client.wait_for_server()

threading.Thread(target=lambda: init()).start()
また、rosrunではflaskのルートディレクトリに問題が起きるので、
記事同様launchフォルダにhtml_render.launchを作成し、外部変更できるようにする。
<launch>
  <node pkg="beuato_monitor_test" type="beuato_client_controller.py"
        name="beuato_client_controller"
        respawn="true" output="screen">
    <param name="flask_root_path"
   value="$(find beuato_monitor_test)/scripts/" />
  </node>
</launch>
flaskのルーティング
ここでは、いくつかのルーティングを与えた。
なお、リクエストは簡略化のため、全てGETで実行しているものとする。
| ルーティング | 動作 | 説明 |
|---|---|---|
| / | /dashboardにリダイレクト | index.htmlに相当 |
| /dashboard | index.htmlを表示 | グラフ表示や操作の画面 |
| /capture_start | /dashboardにリダイレクト | データ取得 |
| /capture_stop | /dashboardにリダイレクト | データ取得終了 |
| /sampling | /dashboardにリダイレクト | データ取得(固定長サンプリングデータ) |
| /api/recent | Web API | 最新のデータ取得 |
データ取得動作
@app.route('/capture_start')
def capture_start():
  data_board.clear()
  goal = BeuatoBalancerGoal()
  goal.is_capture_mode = True
  action_client.send_goal(goal, feedback_cb=receive_callback, done_cb=complete_callback)

  return redirect('/dashboard')
ここで、send_goalを送ることで、rospy serverに転送条件を通達する。
進捗を教えてくれるreceive_callback関数と、
完了を教えてくれるcomplete_callback関数を保持する。
データ取得停止
@app.route('/capture_stop')
def capture_stop():
  action_client.cancel_goal()

  return redirect('/dashboard')
cancel_goalはrospy serverに中断のメッセージを通達する。
DataBoardクラス
receive_callback関数が実行されると、
DataBoardクラスに自動的にデータを格納する。
pandas.DataFrameを使用し、
データの追加の関数を
import pandas as pd

### 省略

class DataBoard:

### 省略

  def add(self, time, value):
    df_add = pd.DataFrame( {'time' : [time], 'value' : [value]})
    self._data = pd.concat([self._data, df_add ], ignore_index=True)
として作成。
refer_time, refer_value関数を使えば、
その情報を配列取得するようにする。
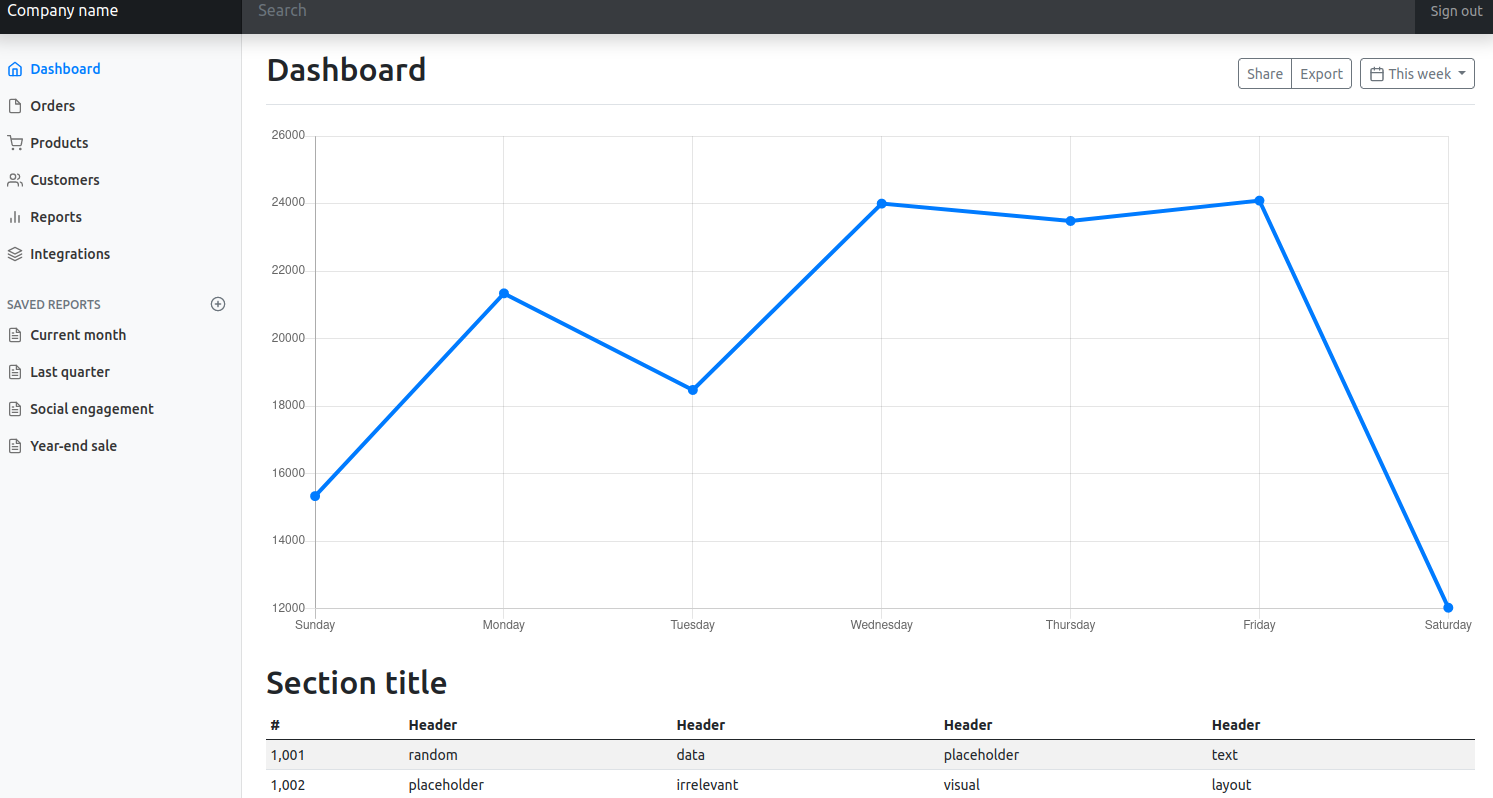
Web Template (フロントエンド)
bootstrap
私はガチ設計は出来ないので、
bootstrapに外観の仕事を丸投げ。
bootstrap 5.0.2の
Dashboard Templateを使用する。
bootstrap自体は、コンパイル済みのライブラリをダウンロードした後、
beuato_monitor_test/scriptsフォルダの中に
"static"フォルダを作成。

staticフォルダに、ダウンロードしたbootstrapのフォルダを入れて、
bootstrap-5.0.2-distというフォルダにして入れてしまう。
こうすると、flaskのルートディレクトリ(scriptsフォルダ)からbootstrapのライブラリを使ってくれる。
htmlファイル
今回はindex.htmlのみしか使用しない。
flaskのルートディレクトリ(scriptsフォルダ)から、templates/dashboardにindex.htmlを保存。
注意点として、そのままでは動かず、
staticフォルダから、cssやjsをロードする必要があるので、
最後のscriptタグにいくつか小細工をする。
url_forは次のサイトとか。
まあ、flaskの組み込み関数です。
css側
  <head>
    <meta charset="utf-8">
    <meta name="viewport" content="width=device-width, initial-scale=1">
    <meta name="description" content="">
    <meta name="author" content="Mark Otto, Jacob Thornton, and Bootstrap contributors">
    <meta name="generator" content="Hugo 0.84.0">
    <title>myBeuato Measurement</title>
    <link rel="canonical" href="https://getbootstrap.com/docs/5.0/examples/dashboard/">
  <link href="{{ url_for('static', filename='/bootstrap-5.0.2-dist/css/bootstrap.min.css') }}" rel="stylesheet">
    <style>
      .bd-placeholder-img {
        font-size: 1.125rem;
        text-anchor: middle;
        -webkit-user-select: none;
        -moz-user-select: none;
        user-select: none;
      }

      @media (min-width: 768px) {
        .bd-placeholder-img-lg {
          font-size: 3.5rem;
        }
      }
    </style>

    <link href="{{url_for('static', filename='dashboard/dashboard.css')}}" rel="stylesheet">
  </head>
js側
<script src="{{url_for('static', filename='/bootstrap-5.0.2-dist/js/bootstrap.bundle.min.js')}}"></script>
<script src="https://cdn.jsdelivr.net/npm/feather-icons@4.28.0/dist/feather.min.js" integrity="sha384-uO3SXW5IuS1ZpFPKugNNWqTZRRglnUJK6UAZ/gxOX80nxEkN9NcGZTftn6RzhGWE" crossorigin="anonymous"></script><script src="https://cdn.jsdelivr.net/npm/chart.js@2.9.4/dist/Chart.min.js" integrity="sha384-zNy6FEbO50N+Cg5wap8IKA4M/ZnLJgzc6w2NqACZaK0u0FXfOWRRJOnQtpZun8ha" crossorigin="anonymous"></script>
<script src="https://code.jquery.com/jquery-3.6.0.min.js"></script>
<script src="{{url_for('static', filename='dashboard/dashboard.js')}}"></script>
要は、flaskのルートディレクトリからstaticを探し、該当するjsファイルやcssファイルを読み込んでいるだけ。
また、おなじみのjqueryの宣言文も追加する必要はある。
ajax
jqueryの$.ajaxを使用して、dashboard.jsのグラフ描画タイミングを調整
$.ajax({
  url: '/api/recent',
  type: 'get',
  data : {},
  cache: true,
  dataType: 'json'
 })
 .done(function(response){
   /* 成功時の処理 */
 })
 .fail(function(xhr) {
   /* 失敗時の処理 */
 });
成功時の処理のところで、改めてdashboardの固有の処理やデータ処理を追加することで、グラフ描画することが出来る。
実行
順番に、
- デバイスドライバのインストール
- roscore
- ros_server.py実行
- ros_client_controller.py実行
- ブラウザで表示
とやっていく。
Terminator
ROSの開発にはTerminatorが必須である。
今回も最低4窓動作確認で、別のディレクトリで読み込む必要があるので注意。
デバイスドライバのインストール
これの通り。
usbhidの動作を止める。
$ cd cmake-cpp/beuato_usb/myBeuatoDriver.ko
$ sudo bash driver_recog.sh
デバイスドライバ(cmake-cpp/beuato_usb/myBeuatoDriver.ko)をインストール。
$ sudo insmod myBeuatoDriver.ko
アンインストール時は
$ sudo rmmod myBeuatoDriver
roscore
任意のディレクトリで
$ roscore
と実行して、ros coreプログラムを立ち上げ。
ros_server.py
$ cd rospy
$ source devel/setup.bash
$ rosrun beuato_monitor_test ros_server.py
とすると、ROSサーバが立ち上がる。
立ち上がったことの確認として、
SimpleActionServerのROS Topicが正しく宣言されているかを確認する。
$ rostopic list
/my_beuato/cancel
/my_beuato/feedback
/my_beuato/goal
/my_beuato/result
/my_beuato/status
/rosout
/rosout_agg
ros_client_controller.py
flaskを同時に立ち上げる必要があるので、rosrunを使用できない。
html_render.launchを直に実行する。
$ roslaunch beuato_monitor_test html_render.launch
実行すると、127.0.0.1:5000/にflaskサーバが立てられ、
相互応答確認が可能。
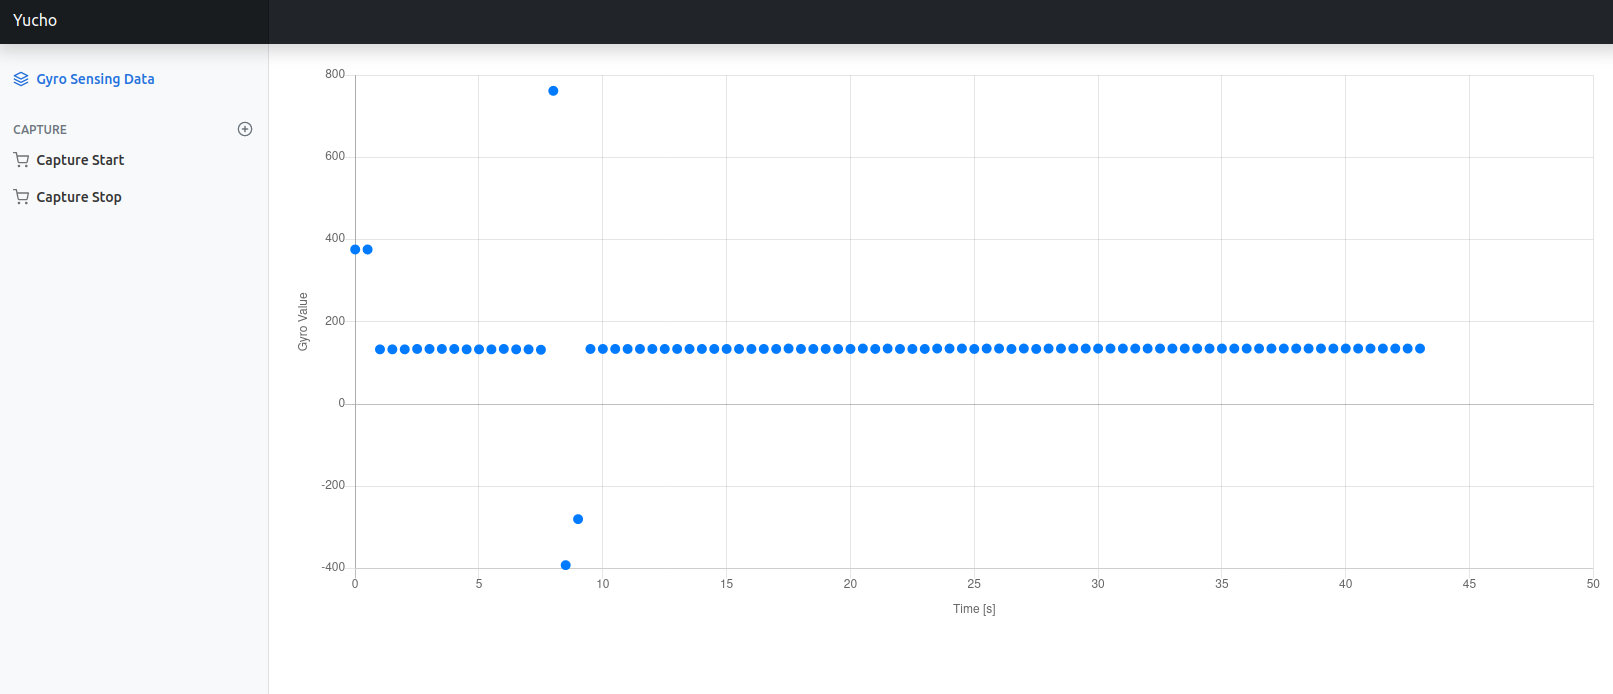
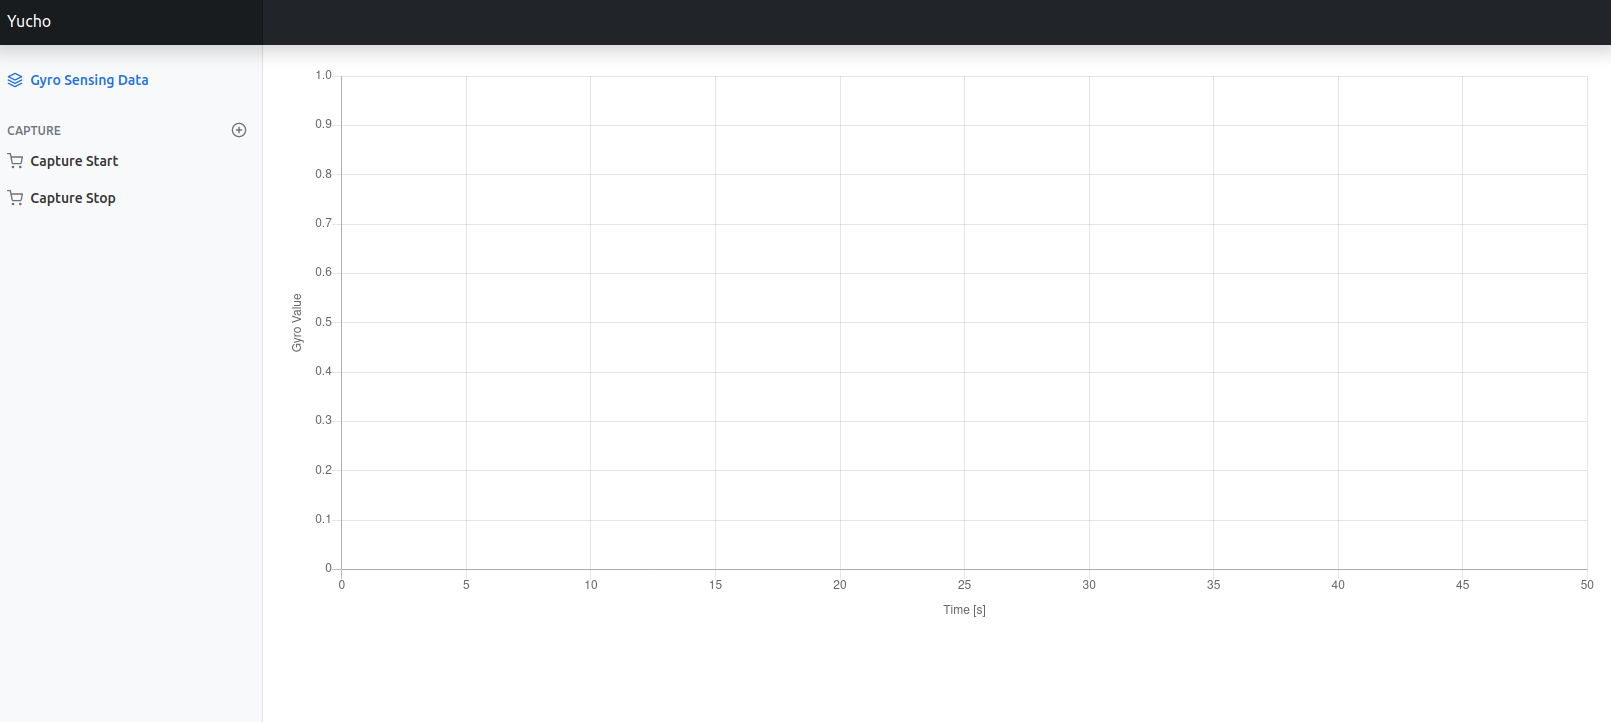
動作確認
空のデータ
"Capture Start"を押すと、ビュートバランサー2(倒立振子)のジャイロセンサの値を取得
サンプリングレートは500ms
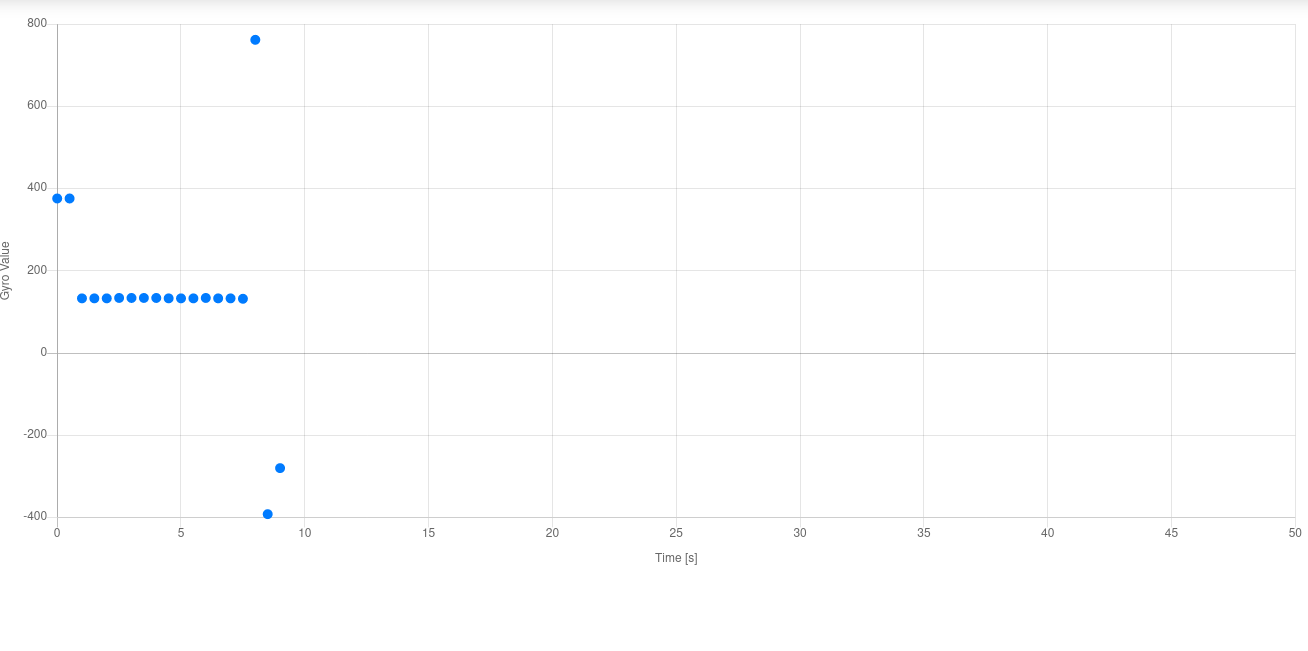
"Capture Stop"を押すと、キャプチャ動作が止まる。