関連記事のリンク先の記事で登録したユーザーを使用してログイン(ユーザー認証)を実装します。
タイトルの通りFirebaseのAuthentication
環境
- Windows(10)
- Firebase
- Vue(2.6.14)
- Vuetify(2.6.2)
- router()
- Vue CLI(4.5.15)
- npm(8.4.1)
- node.js(16.13.0)
事前準備
- FirebaseAuthenticationを使用してユーザー作成機能(作成済み)
- Firebaseのプロジェクト作成
- Vueプロジェクトの生成
手順
対象のファイル作成
1. routerのindex.jsのメンテ
今回はrouter使って画面遷移しているので、ここにログイン・TOP画面の遷移について追記します。
- ありか
{project_root}
    └ src
      └ router
      └ index.js
- 改修内容
import Vue from 'vue'
import VueRouter from 'vue-router'
import Home from '../views/Home.vue'

Vue.use(VueRouter)

const routes = [
  {
    path: '/home',
    name: 'Home',
    component: Home
  },
  {
    path: '/about',
    name: 'About',
    // route level code-splitting
    // this generates a separate chunk (about.[hash].js) for this route
    // which is lazy-loaded when the route is visited.
    component: () => import(/* webpackChunkName: "about" */ '../views/About.vue')
  },
  { // ★ ユーザー登録編で追記
    path: '/',
    name: 'Users',
    component: () => import('../views/Users.vue')
  },
  { // ★ Loginへの遷移を追記
    path: '/login',
    name: 'Login',
    component: () => import('../views/Login.vue')
  },
  {// ★ Topへの遷移追記
    path: '/top',
    name: 'Top',
    component: () => import('../views/Top.vue')
  }
]

const router = new VueRouter({
  routes
})

export default router
2. viewsフォルダにLogin.vueの作成
ユーザー作成と同様にScriptタグの中身は公式で公開されているソースコードほぼそのままです。
こちらもすごく親切。
ログイン成功時のレスポンス情報は、デフォルトではブラウザのStorage>IndexedDBに保存されるようです。
- 配置先
{project_root}
    └ src
       └ views
      └ Login.vue
- 中身
<template>
  <v-container>
    <v-row
        justify="center" align-content="center"
    >
      <v-col cols="md">
        <v-card>
          <v-card-title>ログイン</v-card-title>
            <v-form
                ref="form"
            >
              <v-row
                  justify="center" align-content="center"
              >
                <v-col
                    cols="10"
                >
                  <v-text-field
                      label="ログインID"
                      v-model="email"
                  ></v-text-field>
                  <v-text-field
                      label="パスワード"
                      v-model="pw"
                  ></v-text-field>
                  <v-spacer></v-spacer>
                  <v-btn
                      depressed
                      color="primary"
                      @click="login()"
                  >
                      ログイン
                  </v-btn>
                </v-col>
              </v-row>
            </v-form>
        </v-card>
      </v-col>
    </v-row>
  </v-container>
</template>

<script>
import firebaseApp from '../plugins/firebaseConfig'
import { getAuth, signInWithEmailAndPassword } from "firebase/auth";

const auth = getAuth(firebaseApp)

export default {
  name: 'Login',
  data: () => ({
    email: '',
    pw: ''
  }),
  methods: {
    login: function () {
      signInWithEmailAndPassword(auth, this.email, this.pw)
        .then((userCredential) => {
          const user = userCredential.user
          console.log('create user success.' + user)
          // ★成功レスポンスだった場合は『this.$router.push('/top')』で遷移します
          this.$router.push('/top')
        })
        .catch((error) => {
          const errorCode = error.code
          const errorMessage = error.message
          console.log('errorCode: ' + errorCode)
          console.log('errorMessage: ' + errorMessage)
          alert('認証失敗')
        })
    }
  }
}
</script>
3. さらにviewsフォルダにTop.vueの作成
ログイン成功後に遷移するためのページを作成します。
- 配置先
{project_root}
    └ src
       └ views
      └ Top.vue
- 中身
<template>
  <h1>TOPページですよ</h1>
</template>

<script>
  export default {
    name: 'Top'
  }
</script>
4. 動作確認
たぶん問題ないと思いますが、npm run serveしてたら、念のため一回再起動してみてください。
ブラウザを開いて、ログインページにアクセスします。
デフォルトなら、http://localhost:8080/#/loginもしくは、
http://{プライベートIPとか}:8080/#/loginでアクセスできます。
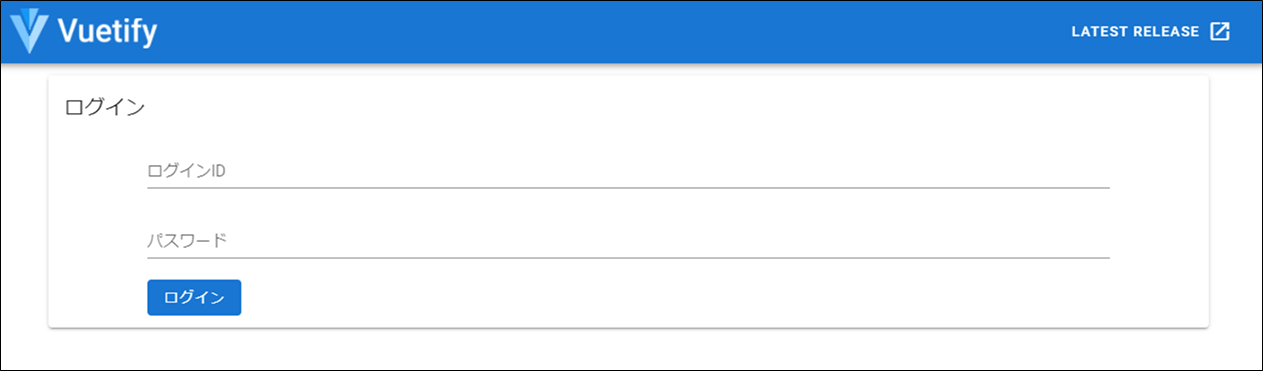
続いて、Firebaseに登録してある、メアド・パスワードを入力しログインボタンをクリックします。
エラーにならず、下記のページが表示されたらログイン成功です。

補足ですが、URLの『#』はrouterのindex.jsいじれば取っ払えます。
あとがき
バックエンドをずっとやってきましたけど、ユーザー認証がこんなにも楽だなんて・・・
Google様様です。
リソースへのアクセス制御とかもできるらしい。
ただ、ユーザー情報を氏名とかは登録できるっぽいけど、住所とか付随情報は別途保存しないとダメです。
Authenticationなんで、そりゃそうだって感じですけどね(笑)
Vuetifyも初めて使ってるんですが、公式のリファレンスも情報が豊富でだいぶ助かります。
こりゃ開発のスピード上がりそう。
そして余談ですが、signInWithEmailAndPasswordの処理を共通コンポーネントなどにするときは非同期で処理がされるので、.thenとかにreturnを書いても値が取得できないです。