iOS11より、iOS標準フレームワーク Vision.framework を使うと、顔認識ができるらしいので今更ながら使ってみました。
概要
カメラ画像から顔を検出し、顔部分に矩形を表示します。
試した環境
- Xcode 11.3
- iOS 13.2
- swift 5
実行サンプル
ぱくたそフリー素材で実験
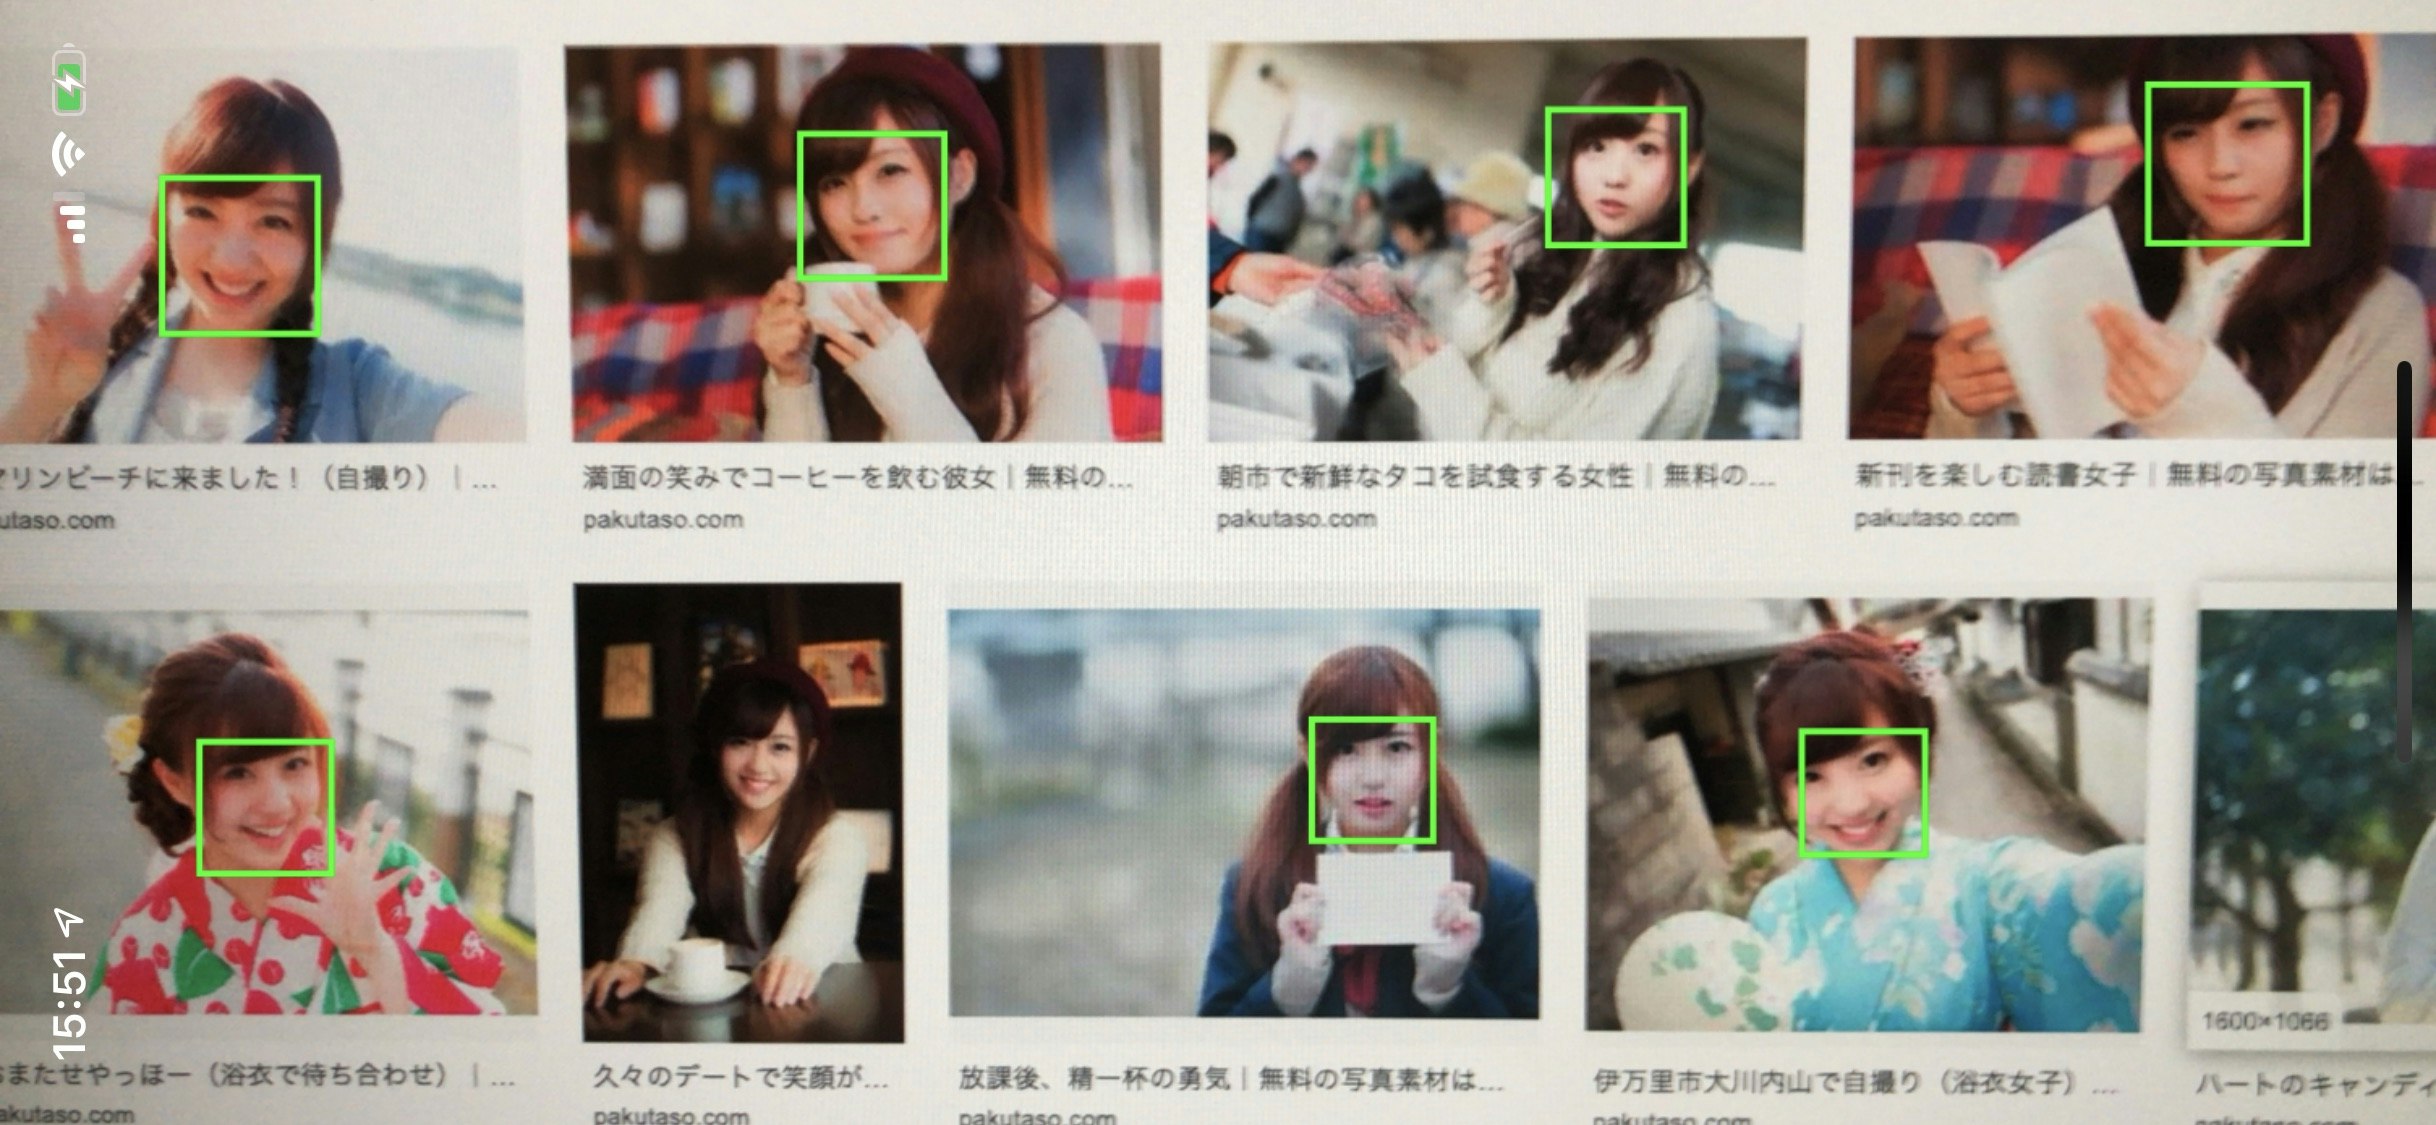
ディスプレイ画質の問題のせいもありそうですが、顔にちょっと髪がかかってたりすると少し認識が悪い。
Google画像検索「顔」で実験
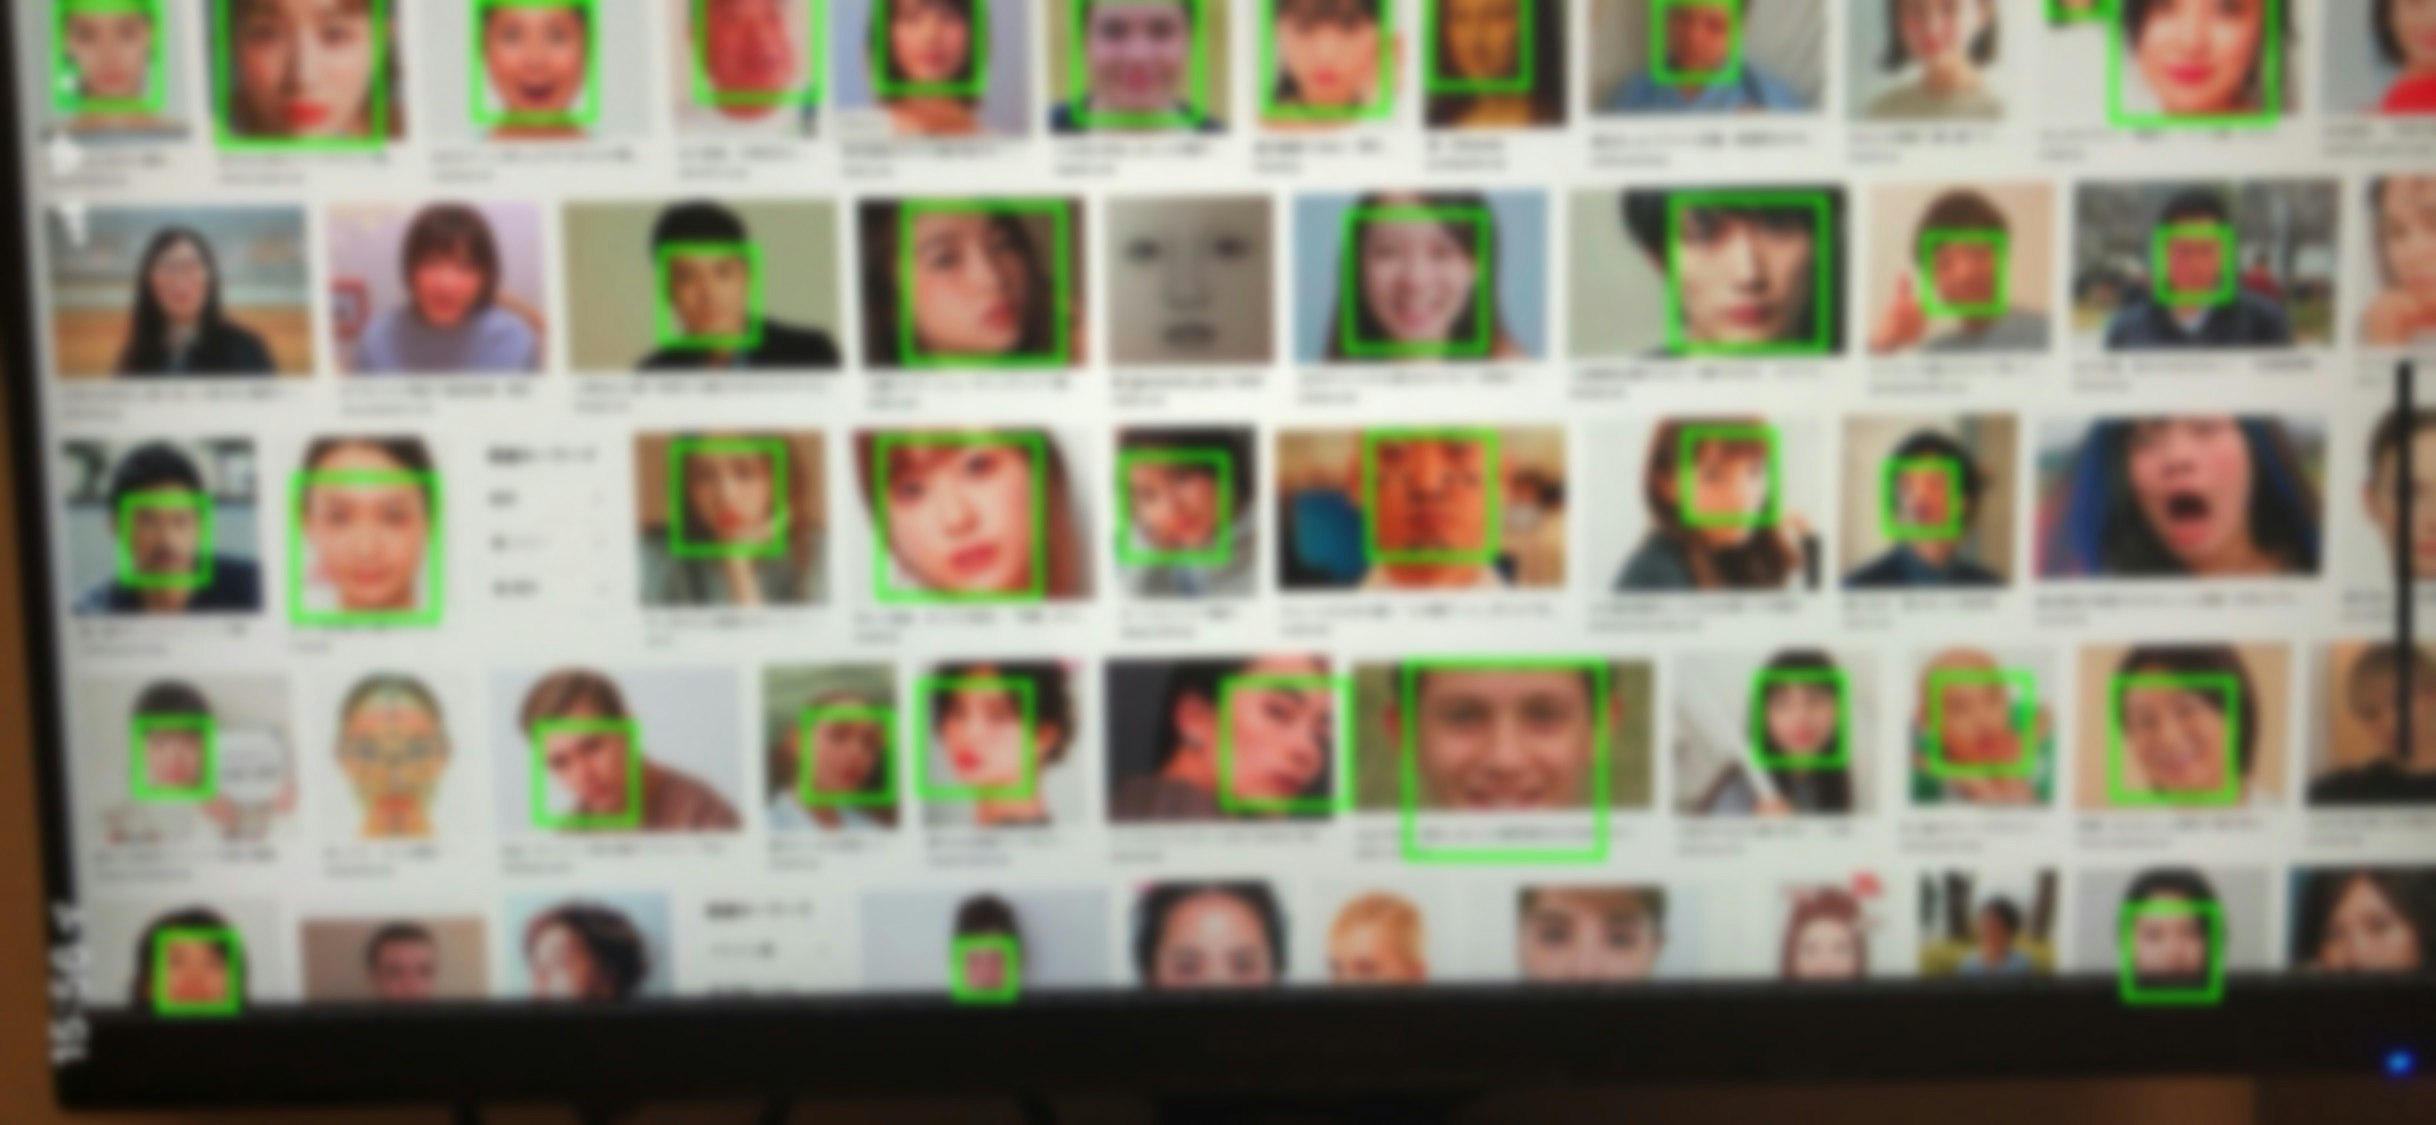
顔が沢山あっても、アップだと良く認識します。
(画像はぼかしてます
コード説明
VNImageRequestHandler
を利用して、 pixelBuffer から、顔情報を配列取得します。
結果は
VNDetectFaceRectanglesRequest
に非同期で戻されます。
顔情報は VNFaceObservation です。
    /// 顔認識情報の配列取得 (非同期)
    private func getFaceObservations(pixelBuffer: CVPixelBuffer, completion: @escaping (([VNFaceObservation])->())) {
        let request = VNDetectFaceRectanglesRequest { (request, error) in
            guard let results = request.results as? [VNFaceObservation] else {
                completion([])
                return
            }
            completion(results)
        }

        let handler = VNImageRequestHandler(cvPixelBuffer: pixelBuffer, options: [:])
        try? handler.perform([request])
    }
pixcelBuffer は カメラから取得した sampleBuffer を CMSampleBufferGetImageBuffer を使って変換します。
imageView には、 sampleBuffer から取得した生成をセット。
    /// カメラからの映像取得デリゲート
    func captureOutput(_ output: AVCaptureOutput, didOutput sampleBuffer: CMSampleBuffer, from connection: AVCaptureConnection) {
        guard let pixelBuffer = CMSampleBufferGetImageBuffer(sampleBuffer) else {
            return
        }
        getFaceObservations(pixelBuffer: pixelBuffer) { [weak self] faceObservations in
            guard let self = self else { return }
            let image = self.getFaceRectsImage(sampleBuffer: sampleBuffer, faceObservations: faceObservations)
            DispatchQueue.main.async { [weak self] in
                self?.previewImageView.image = image
            }
        }
    }
またその際、 VNFaceObservation から正規化された画像の位置が取得できるので、
その情報をもとに、矩形を画像に書き込みます。
        let imageSize = CGSize(width: width, height: height)
        let faseRects = faceObservations.compactMap {
            getUnfoldRect(normalizedRect: $0.boundingBox, targetSize: imageSize)
        }
        faseRects.forEach{ self.drawRect($0, context: newContext) }
    /// 正規化された矩形位置を指定領域に展開
    private func getUnfoldRect(normalizedRect: CGRect, targetSize: CGSize) -> CGRect {
        return CGRect(
            x: normalizedRect.minX * targetSize.width,
            y: normalizedRect.minY * targetSize.height,
            width: normalizedRect.width * targetSize.width,
            height: normalizedRect.height * targetSize.height
        )
    }
    /// コンテキストに矩形を描画
    private func drawRect(_ rect: CGRect, context: CGContext) {
        context.setLineWidth(4.0)
        context.setStrokeColor(UIColor.green.cgColor)
        context.stroke(rect)
    }
コード全体
import UIKit
import AVFoundation
import Vision

class FaceViewController: UIViewController {

    @IBOutlet weak var previewImageView: UIImageView!

    private let avCaptureSession = AVCaptureSession()

    override func viewDidLoad() {
        super.viewDidLoad()
        setupCamera()
    }

    override func viewDidDisappear(_ animated: Bool) {
        super.viewDidDisappear(animated)
        self.avCaptureSession.stopRunning()
    }

    /// カメラのセットアップ
    private func setupCamera() {
        self.avCaptureSession.sessionPreset = .photo

        let device = AVCaptureDevice.default(for: .video)
        let input = try! AVCaptureDeviceInput(device: device!)
        self.avCaptureSession.addInput(input)

        let videoDataOutput = AVCaptureVideoDataOutput()
        videoDataOutput.videoSettings = [kCVPixelBufferPixelFormatTypeKey as String : Int(kCVPixelFormatType_32BGRA)]
        videoDataOutput.alwaysDiscardsLateVideoFrames = true
        videoDataOutput.setSampleBufferDelegate(self, queue: .global())

        self.avCaptureSession.addOutput(videoDataOutput)
        self.avCaptureSession.startRunning()
    }

    /// コンテキストに矩形を描画
    private func drawRect(_ rect: CGRect, context: CGContext) {
        context.setLineWidth(4.0)
        context.setStrokeColor(UIColor.green.cgColor)
        context.stroke(rect)
    }

    /// 顔認識情報の配列取得 (非同期)
    private func getFaceObservations(pixelBuffer: CVPixelBuffer, completion: @escaping (([VNFaceObservation])->())) {
        let request = VNDetectFaceRectanglesRequest { (request, error) in
            guard let results = request.results as? [VNFaceObservation] else {
                completion([])
                return
            }
            completion(results)
        }

        let handler = VNImageRequestHandler(cvPixelBuffer: pixelBuffer, options: [:])
        try? handler.perform([request])
    }

    /// 正規化された矩形位置を指定領域に展開
    private func getUnfoldRect(normalizedRect: CGRect, targetSize: CGSize) -> CGRect {
        return CGRect(
            x: normalizedRect.minX * targetSize.width,
            y: normalizedRect.minY * targetSize.height,
            width: normalizedRect.width * targetSize.width,
            height: normalizedRect.height * targetSize.height
        )
    }

    /// 顔検出位置に矩形を描画した image を取得
    private func getFaceRectsImage(sampleBuffer :CMSampleBuffer, faceObservations: [VNFaceObservation]) -> UIImage? {

        guard let imageBuffer = CMSampleBufferGetImageBuffer(sampleBuffer) else {
            return nil
        }

        CVPixelBufferLockBaseAddress(imageBuffer, CVPixelBufferLockFlags(rawValue: 0))

        guard let pixelBufferBaseAddres = CVPixelBufferGetBaseAddressOfPlane(imageBuffer, 0) else {
            CVPixelBufferUnlockBaseAddress(imageBuffer, CVPixelBufferLockFlags(rawValue: 0))
            return nil
        }

        let width = CVPixelBufferGetWidth(imageBuffer)
        let height = CVPixelBufferGetHeight(imageBuffer)
        let bitmapInfo = CGBitmapInfo(rawValue:
            (CGBitmapInfo.byteOrder32Little.rawValue | CGImageAlphaInfo.premultipliedFirst.rawValue)
        )

        guard let newContext = CGContext(
            data: pixelBufferBaseAddres,
            width: width,
            height: height,
            bitsPerComponent: 8,
            bytesPerRow: CVPixelBufferGetBytesPerRow(imageBuffer),
            space: CGColorSpaceCreateDeviceRGB(),
            bitmapInfo: bitmapInfo.rawValue
            ) else
        {
            CVPixelBufferUnlockBaseAddress(imageBuffer, CVPixelBufferLockFlags(rawValue: 0))
            return nil
        }

        let imageSize = CGSize(width: width, height: height)
        let faseRects = faceObservations.compactMap {
            getUnfoldRect(normalizedRect: $0.boundingBox, targetSize: imageSize)
        }
        faseRects.forEach{ self.drawRect($0, context: newContext) }

        CVPixelBufferUnlockBaseAddress(imageBuffer, CVPixelBufferLockFlags(rawValue: 0))

        guard let imageRef = newContext.makeImage() else {
            return nil
        }
        let image = UIImage(cgImage: imageRef, scale: 1.0, orientation: UIImage.Orientation.right)

        return image
    }
}


extension FaceViewController : AVCaptureVideoDataOutputSampleBufferDelegate{

    /// カメラからの映像取得デリゲート
    func captureOutput(_ output: AVCaptureOutput, didOutput sampleBuffer: CMSampleBuffer, from connection: AVCaptureConnection) {
        guard let pixelBuffer = CMSampleBufferGetImageBuffer(sampleBuffer) else {
            return
        }
        getFaceObservations(pixelBuffer: pixelBuffer) { [weak self] faceObservations in
            guard let self = self else { return }
            let image = self.getFaceRectsImage(sampleBuffer: sampleBuffer, faceObservations: faceObservations)
            DispatchQueue.main.async { [weak self] in
                self?.previewImageView.image = image
            }
        }
    }
}
github
becky3/face_detection: 【Swift】Vision.frameworkでカメラ画像の顔認識を行う【iOS】
https://github.com/becky3/face_detection
参考サイト
-
[iOS 11] 画像解析フレームワークVisionで顔認識を試した結果
https://dev.classmethod.jp/smartphone/iphone/ios-11-vision/ -
[iOS]リアルタイムで画像処理をする時の カメラの内部パラメーターの取得方法 - Qiita
https://qiita.com/shirahama_x/items/421d0d343d9629e66794