1. はじめに
前回の記事[1]ではNeobotix社が公開しているリポジトリを利用し、Gazebo上でマニピュレーター付きロボットのシミュレーションを試行することができました。しかしながら、自律走行機能が実現できていなかったため、本記事ではその課題解決に取り組みました。
2. 実行環境
- CPU: CORE i7 7th Gen
- メモリ: 32GB
- GPU: GeForce RTX 2070
- OS: Ubuntu22.04(WSL2ではなくPCに直接インストール)
- ROS2: Humble
- Nvidia Driver: 535
- 対象ロボット: Neobotix社 MPO-700(マニピュレーター搭載)
3. 構築手順
3.1 リポジトリのクローン
前回の記事[1]でクローンしたリポジトリだけでは、自律走行できませんので、以下の「neobotix/neo_localization2」「neobotix/neo_local_planner2」「neobotix/neo_nav2_bringup」をクローンしてきます。
クローン先は記事[1]で作成したワークスペースです。そして私の環境はROS2 HumbleですのでHumbleに対応したブランチを以下のコマンドでクローンしてきます。
cd ~/ros2_mmo500/src
git clone --branch humble https://github.com/neobotix/neo_localization2.git
git clone --branch humble https://github.com/neobotix/neo_local_planner2.git
git clone --branch humble https://github.com/neobotix/neo_nav2_bringup.git
注:この記事ではクローン先のファイル名はros2_mmo500としていますが、ここは適当で大丈夫です。
3.2 ビルド
前回の記事[1]から追加でインストールする必要のあるパッケージはありませんでしたので、以下のコマンドでビルドしました。
cd ~/ros2_mmo500
colcon build
4. シミュレーション結果
ビルド完了後、以下のコマンドでシミュレーション環境(Gazebo)とrviz2起動しました。
source ~/ros2_mmo500/install/setup.bash
ros2 launch neo_simulation2 simulation.launch.py
source ~/ros2_mmo500/install/setup.bash
ros2 launch neo_simulation2 navigation.launch.py
source ~/ros2_mmo500/install/setup.bash
ros2 launch neo_nav2_bringup rviz_launch.py
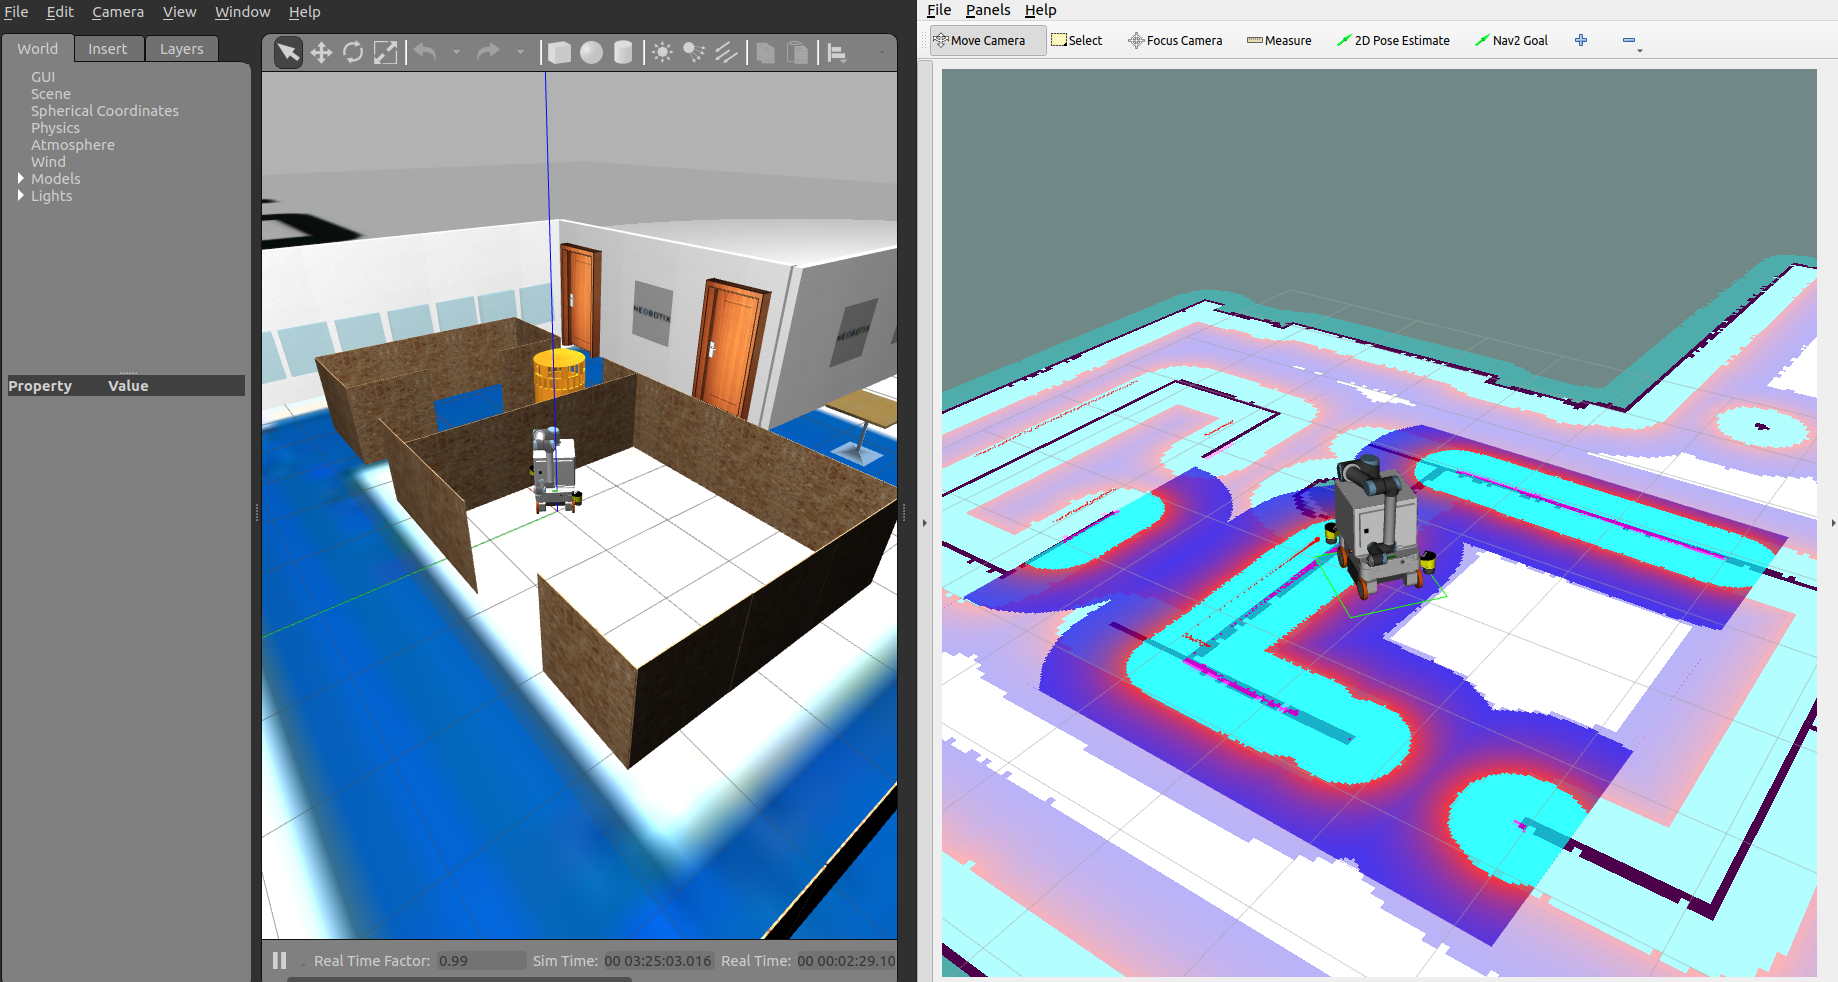
起動したときの画像が以下です。左の画面がGazeboで、右の画面がrviz2の画像です。rviz2で
地図が読み込まれていることに加え、ロボットに搭載されているLidarで周辺環境を認識できていることが読み取れます。
そして、rviz2の「Nav2 Goal」で移動させたいところを指定すると、ロボットのMPO-700(マニピュレーター搭載)がその位置に自律走行して移動することが確認できました。
またKimらの論文[2]では、ロボットが自律走行後にマニピュレーターで塗装を行うシミュレーションを行っています。本記事では、このシミュレーションを再現するために、自律走行後に以下のコマンドを実行しました。
source ~/ros2_mmo500/install/setup.bash
ros2 topic pub --once /arm_controller/joint_trajectory trajectory_msgs/JointTrajectory '
{
  "joint_names": ["ur10shoulder_pan_joint", "ur10shoulder_lift_joint", "ur10elbow_joint", "ur10wrist_1_joint", "ur10wrist_2_joint", "ur10wrist_3_joint"],
  "points": [
    {
        "positions": [0.0, -0.5, 1.0, 0.0, 0.0, 0.0],
        "time_from_start": { "sec": 2, "nanosec": 0 }
      },
      {
        "positions": [0.0, -0.5, 1.2, 0.0, 0.0, 0.0],
        "time_from_start": { "sec": 4, "nanosec": 0 }
      },
      {
        "positions": [0.0, -0.5, 1.4, 0.0, 0.0, 0.0],
        "time_from_start": { "sec": 6, "nanosec": 0 }
      },
      {
        "positions": [0.0, -0.5, 1.6, 0.0, 0.0, 0.0],
        "time_from_start": { "sec": 8, "nanosec": 0 }
      },
      {
        "positions": [0.0, -0.5, 1.8, 0.0, 0.0, 0.0],
        "time_from_start": { "sec": 10, "nanosec": 0 }
      }
  ]
}'
以下が上記の手順で、「ロボットが自律走行後にマニピュレーターで塗装を行う」という様子をシミュレーションで再現した動画です。
5. まとめ
Neobotix社の公開リポジトリを活用し、Gazeboシミュレーション環境下で、マニピュレーターを搭載したロボットによる自律走行と簡単な塗装作業(平面壁へのスプレーガンなどによる塗装作業)を再現することに成功しました。これは、前回の記事[1]で挙げた以下の3つの課題のうち、「②マニピュレーター付きロボットの自律走行は実現できていない」と「③マニピュレーターの動作制御が不十分」という課題について、目標の位置に自律走行で到達し、マニピュレーターで簡単な直線軌跡を再現できる程度に改善できたと考えています。
前回の記事[1]で挙げた課題:
①マニピュレーター付きロボットが意図せずわずかに移動する
②マニピュレーター付きロボットの自律走行は実現できていない
③マニピュレーターの動作制御が不十分
今後はKimらの論文[2]を参考に、より現実に近い塗装作業のシミュレーションを目指していきたいと思います。また、本件については「①マニピュレーター付きロボットが意図せずわずかに移動する」という課題の解決も視野に入れています。
参考記事やサイト
[1]マニピュレーター付きロボットをシミュレーション環境(Gazebo)に読み込んで動かしてみた
[2]Development of BIM-integrated construction robot task planning and simulation system
