目的 : ディレクトリ構造をExcelの表に反映し、資料を作成する。
前提 : WindowsOS (Versionは特に問わない。)
①まずは「Ctrl + R」 → 「cmd」と入力し、コマンドプロンプトを開く。
②下記コマンドを実行する。
cd [任意のディレクトリ]
tree /F  > 任意のファイル名.txt
③コマンドによって出力したファイル内容は下記のように出力される。
/Fを指定 → ディレクトリとファイルの両方が出力。
/Fを指定しない → ディレクトリのみ出力。
Folder PATH listing for volume OS
Volume serial number is 562D-EA37
C:.
│  tree.txt
│
├─.metadata
│  │  .lock
│  │  .log
│  │  version.ini
(下に続く)
④ファイルの中身をすべてコピーする。
「Ctrl + A」 → 「Ctrl + C」
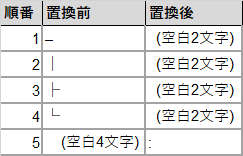
⑤テキストエディタで下記の表※のとおり、順に置換を実行する。

⑥編集後のTreeファイルのテキストをコピーする。
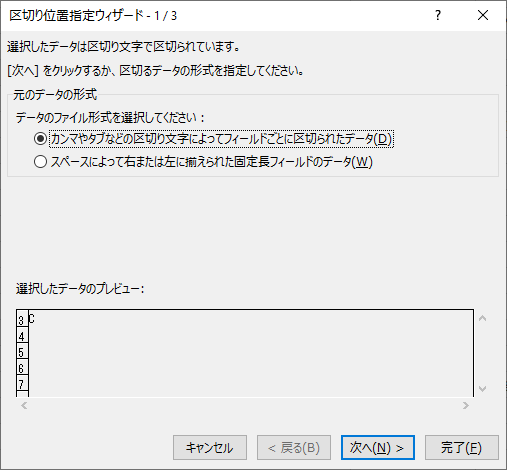
⑦Excelで区切り位置指定ウィザードを開く。
⑧「カンマやタブなどの区切り文字によってフィールドごとに区切られたデータ」を選択する。
⑨「次へ」を選択する。

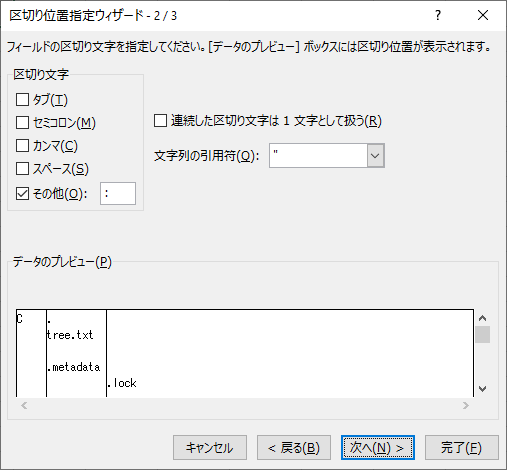
⑩「その他」のみにチェックを入れる。
⑪区切り文字に「:」を指定する。

⑫「完了」を選択する。
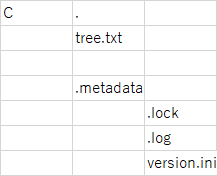
完成 : ディレクトリ構造を維持したまま、1セルに1ディレクトリもしくは1ファイルを格納することができた。

※順番5で置換文字列を「:」にした理由は、WindowsOSでファイルパスに入力されることがないため、ディレクトリ構造を確実にExcelのセルに格納することができるため。
ディレクトリの階層が深い場合は、下記コードを利用して階層をグループ化すると良い。
参考: https://www.shegolab.jp/entry/excel-macro-outline-tree
Option Explicit

' 項番階層の区切り文字
Const NUMBER_SEPARATOR = "-"
' Const NUMBER_SEPARATOR = "."

Sub アウトライン_インデント階層()
    outlineTree probe:="indentLevel"
End Sub

Sub アウトライン_列下げ階層()
    outlineTree probe:="columnPosition"
End Sub

Sub アウトライン_項番階層()
    outlineTree probe:="multiNumbered"
End Sub

Private Sub outlineTree(probe As String)
    If TypeName(Selection) <> "Range" Then Beep: Exit Sub

    Dim titleRng As Range
    Set titleRng = Intersect(ActiveSheet.UsedRange, Selection.Areas(1))
    If titleRng Is Nothing Then Beep: Exit Sub

    Application.ScreenUpdating = False

    ActiveSheet.Outline.SummaryRow = xlAbove
    titleRng.ClearOutline
    Call traverseList(titleRng, 0, probe:=probe)

    Application.ScreenUpdating = True
End Sub

Private Function traverseList(curRng As Range, curLevel As Integer, probe As String, Optional doProc As String = "doGroup") As Range
    Dim i As Integer
    For i = 1 To curRng.Rows.Count - 1
        Dim subRng As Range
        Dim nextLevel As Integer

        Set subRng = Intersect(curRng, curRng.Offset(i))
        nextLevel = Application.Run(probe, subRng.Rows(1), curLevel)
        If nextLevel > curLevel Then
            Set subRng = traverseList(subRng, nextLevel, probe, doProc)
            Set subRng = Application.Run(doProc, subRng, nextLevel)
            i = i - 1 + subRng.Rows.Count
        ElseIf nextLevel < curLevel Then
            Exit For
        End If
    Next
    Set traverseList = curRng.Resize(i)
End Function

Private Function indentLevel(itemRow As Range, level As Integer) As Integer
    With itemRow.Cells(1)
        indentLevel = IIf(IsEmpty(.Value), 8, .indentLevel)
    End With
End Function

Private Function columnPosition(itemRow As Range, level As Integer) As Integer
    columnPosition = 0
    Dim c As Range
    For Each c In itemRow.Cells
        If Not IsEmpty(c) Then Exit Function
        columnPosition = columnPosition + 1
    Next
End Function

Private Function multiNumbered(itemRow As Range, level As Integer) As Integer
    With itemRow.Cells(1)
        multiNumbered = IIf(IsEmpty(.Value), 8, UBound(Split(.Text, NUMBER_SEPARATOR)))
    End With
End Function

Private Function doGroup(ByVal rng As Range, level As Integer) As Range
    rng.Rows.Group
    Set doGroup = rng
End Function

Private Function doInsertParent(ByVal rng As Range, level As Integer) As Range
    rng.Rows(1).EntireRow.Insert
    Set doInsert = Range(rng, rng.Offset(-1))
End Function