iOSアプリについて切っても切れないのがTableViewだろう
便利だし頻繁に使用する
少しコードを書かないといけないので最初はむずかしいかも
備忘録として残しておく
まず、TableViewを作成する方法は2種類ある
①TableViewControllerを使用する方法
②ViewControllerの上にTableViewをおく方法
どちらでも同じだが①の方が簡単
②の場合は、AutoLayoutの設定しておかないと、表示がくずれてしまう。
以前作成した、TabberのサンプルのFirstViewにボタンを2つ追加し
それぞれ①と②で実装した画面に遷移する方法を記載する
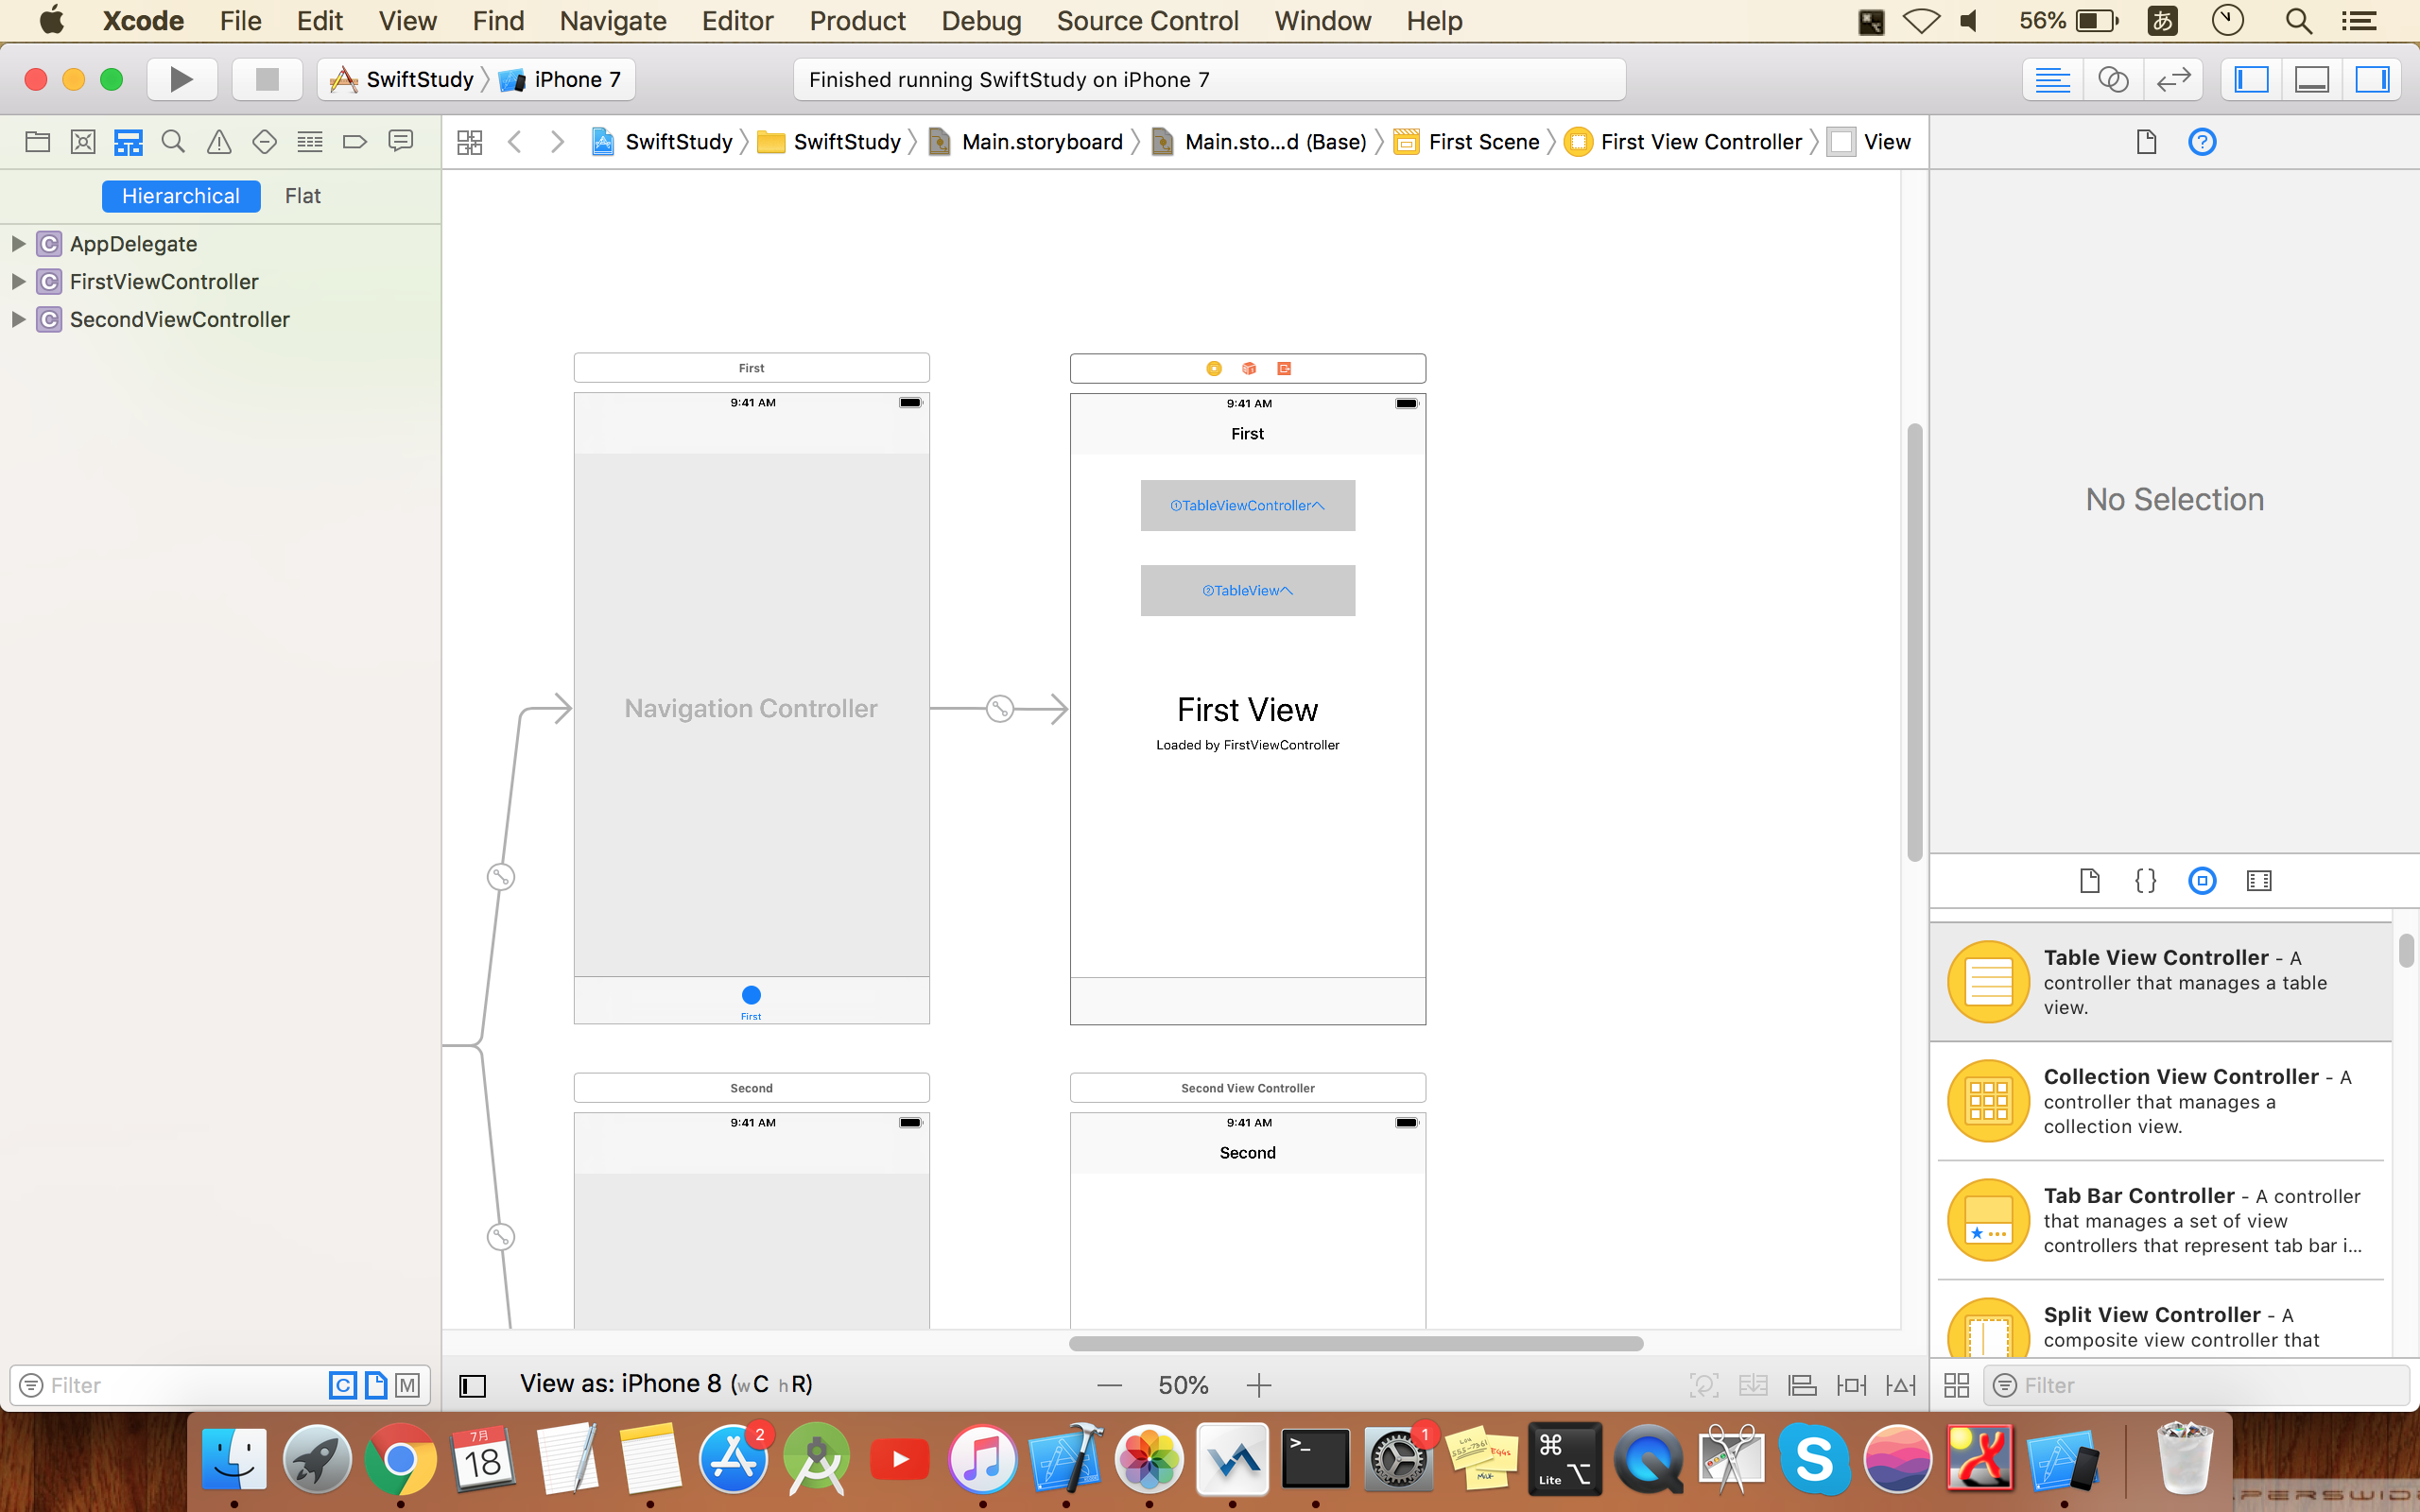
ちなみに表示させるTableViewの画面は下記のように一般的なsectionがあって、Cellがあるようにする。
こんなイメージ
section_1
cell_1_1
section_2
cell_2_1
cell_2_2
section_3
cell_3_1
cell_3_2
cell_3_3
ではまず①から記載
①TableViewControllerを使用する方法
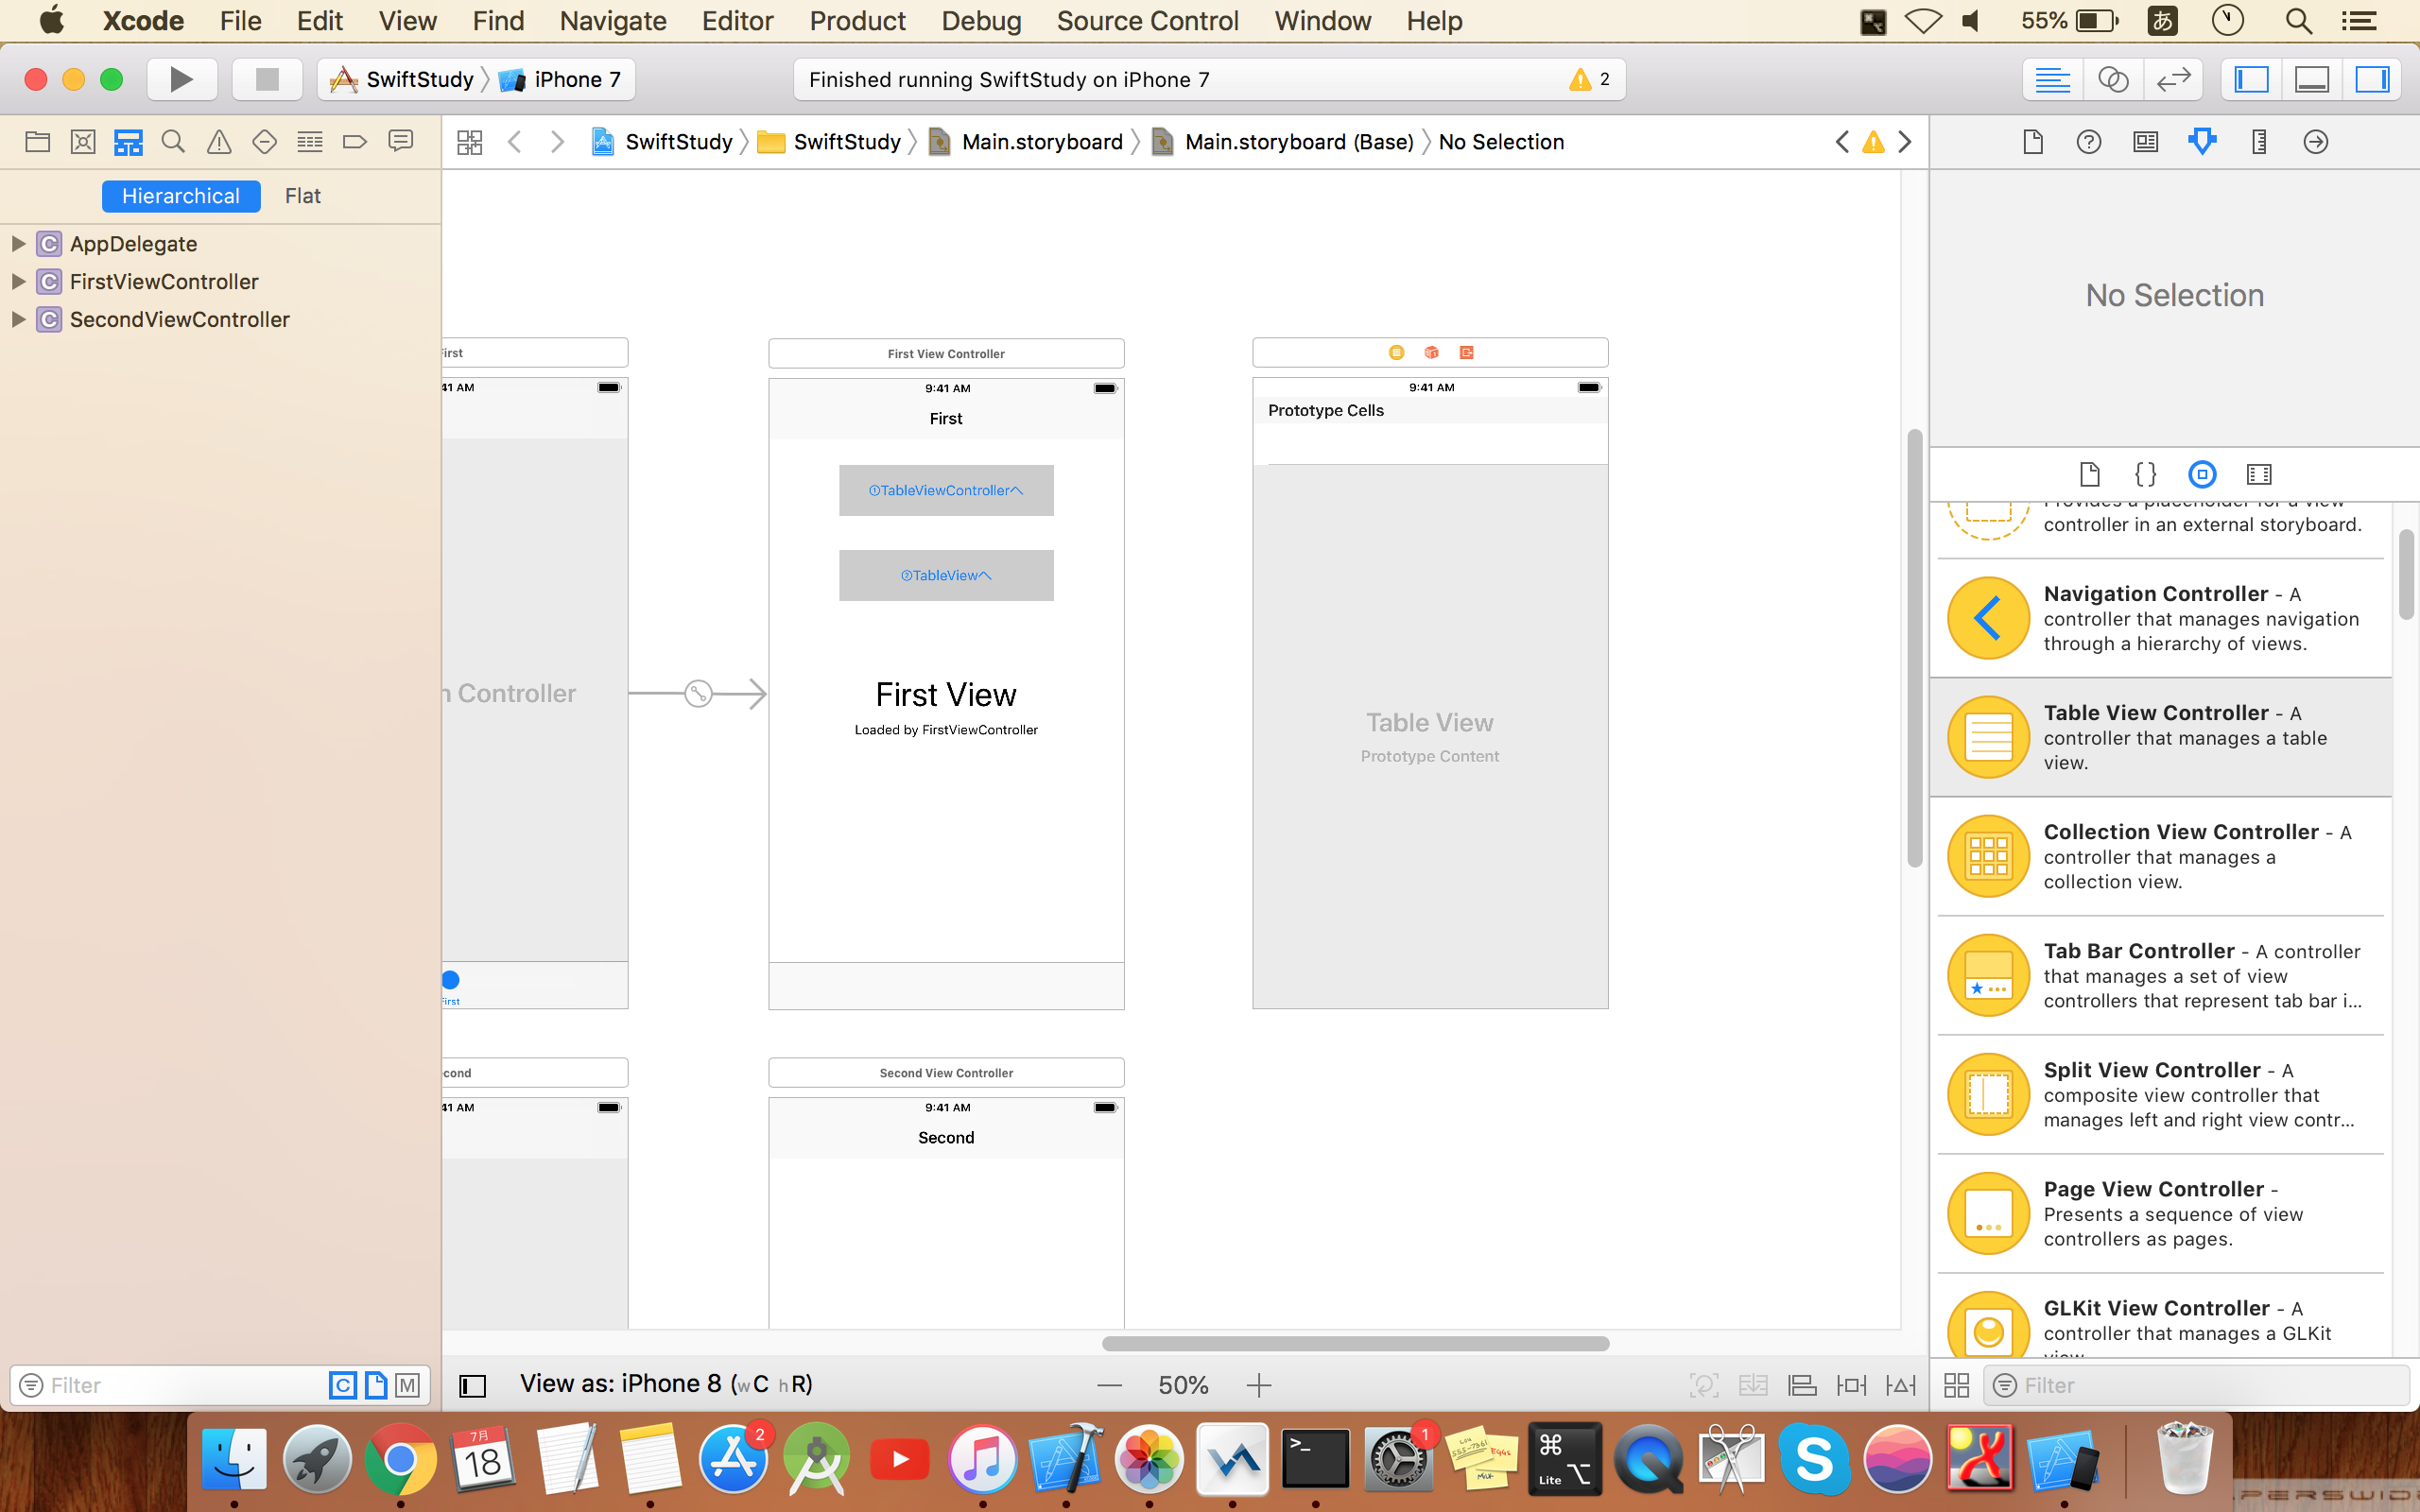
まずStoryboardにTableViewControllerを追加する
そしてこの追加した画面用のControllerソースコードを追加する。
左のプロジェクトを選んで、右クリックから
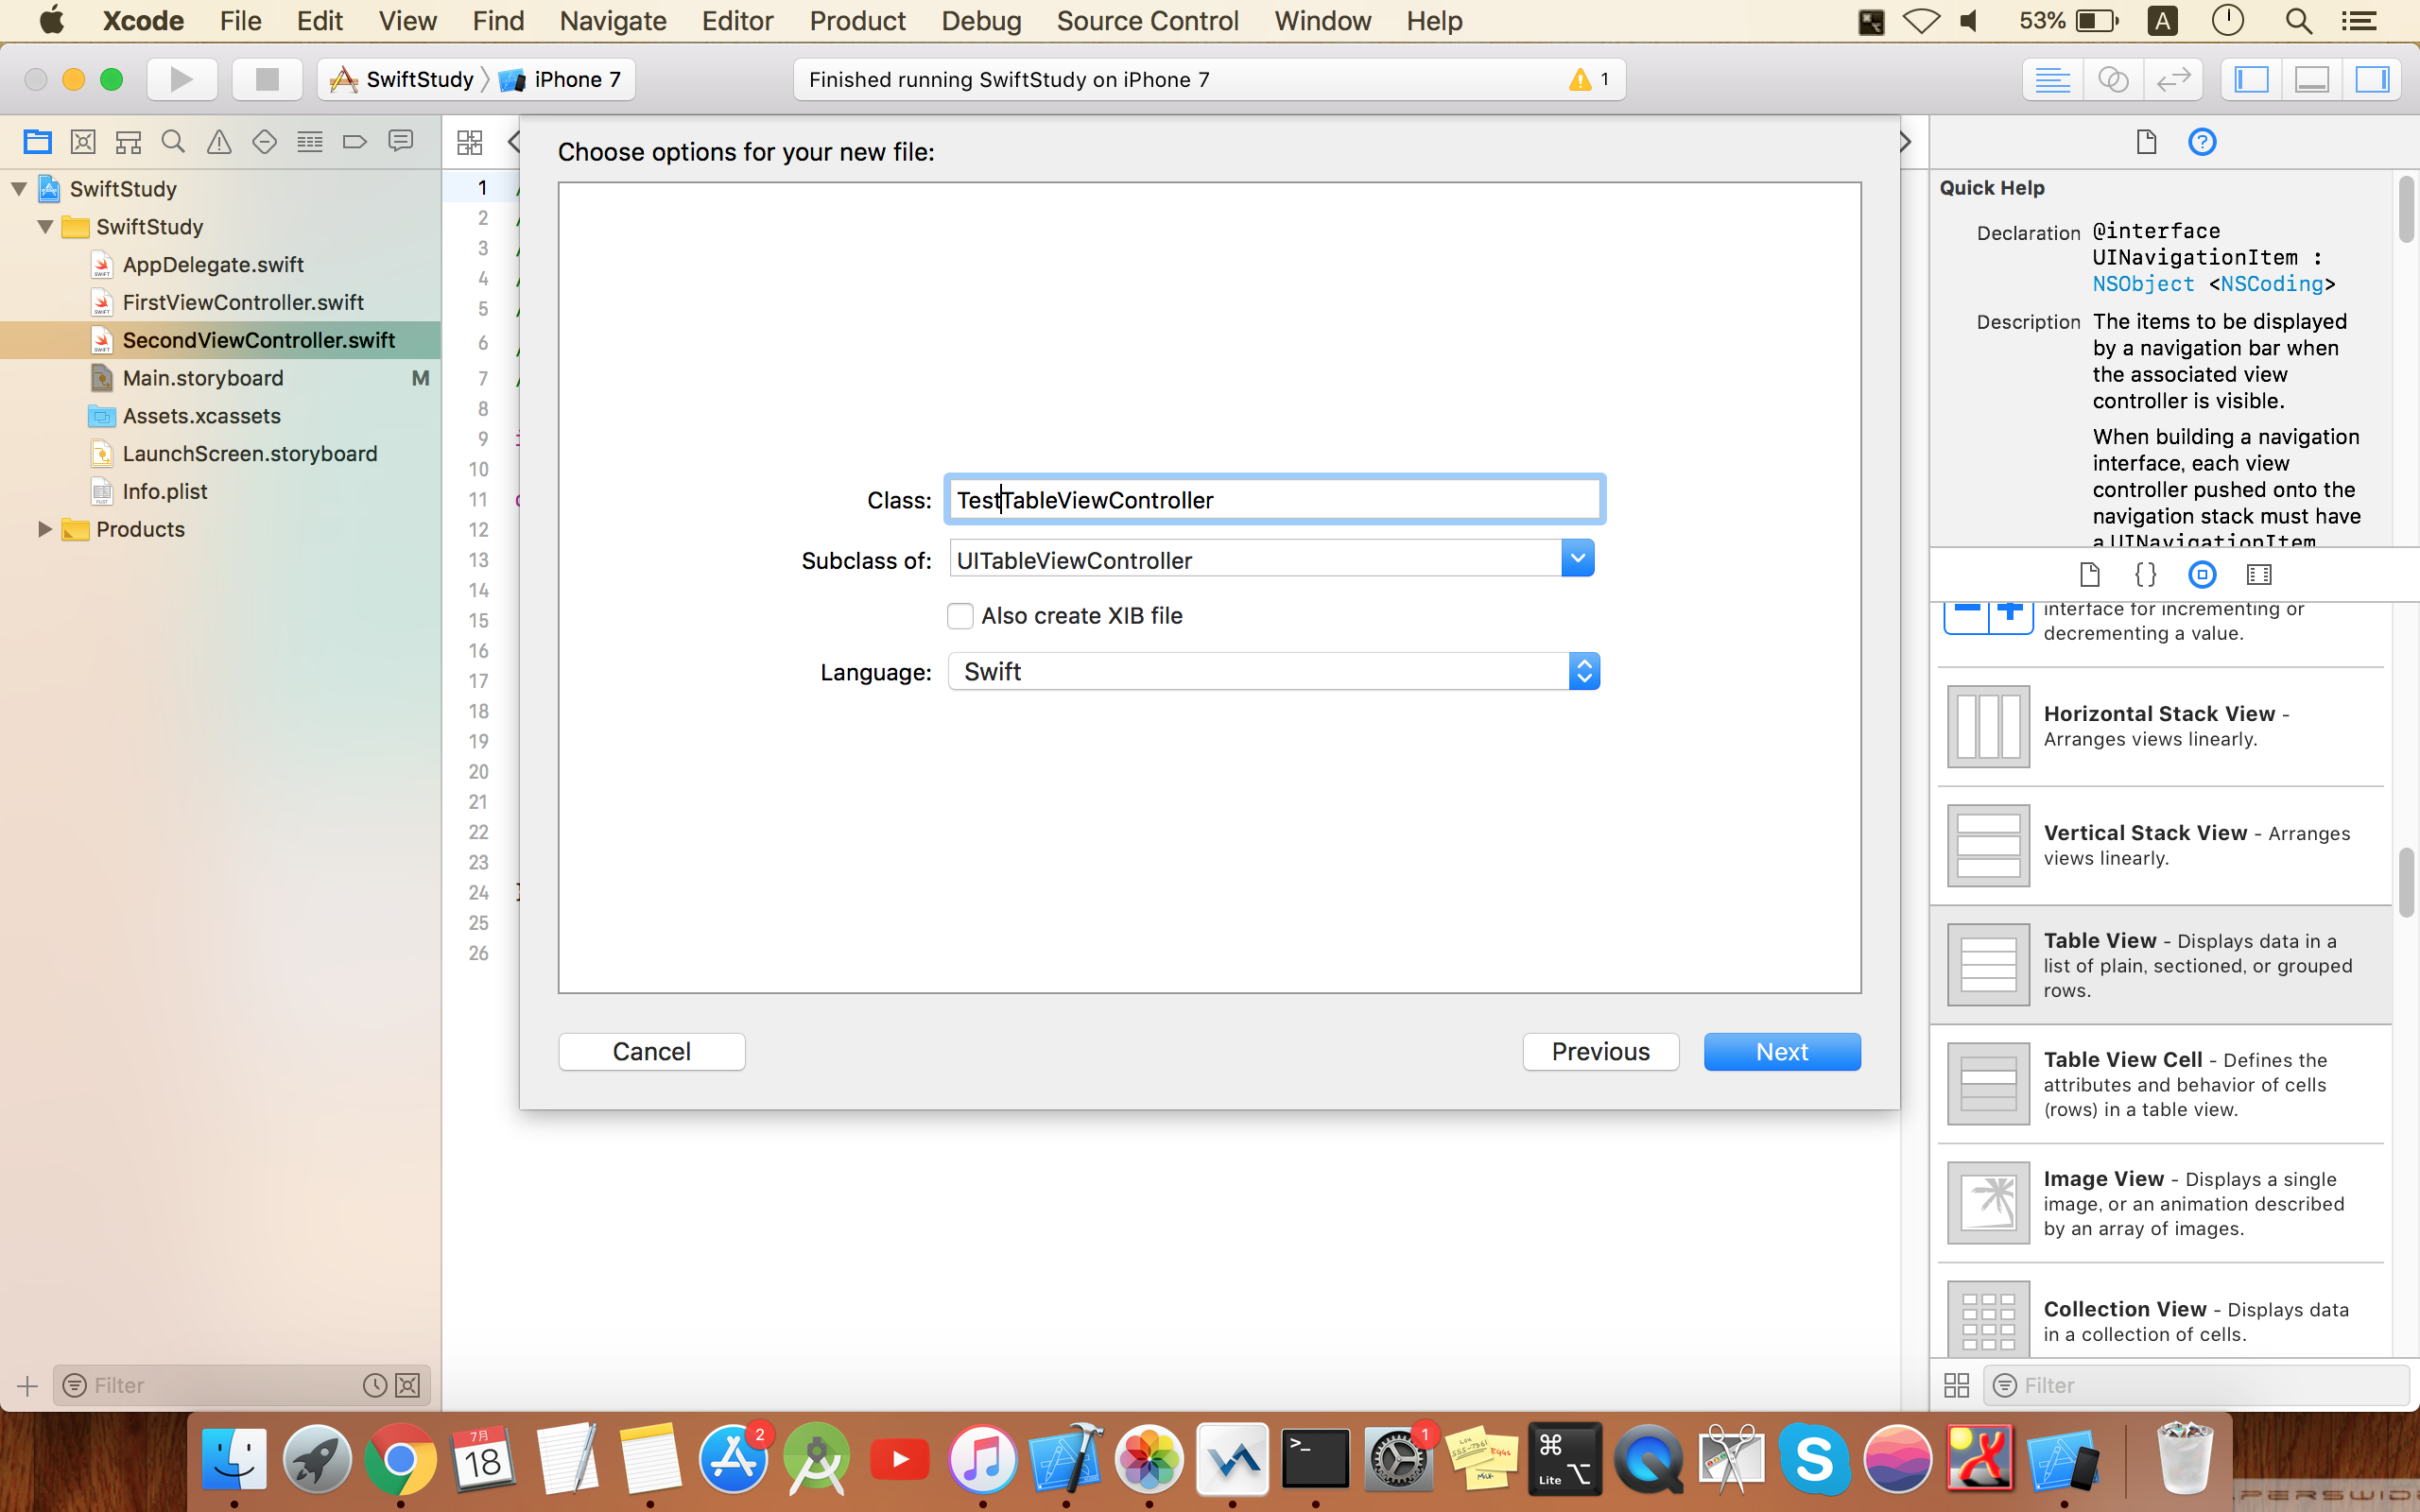
New file.. を選んで、Cocoa Touch Classを選択
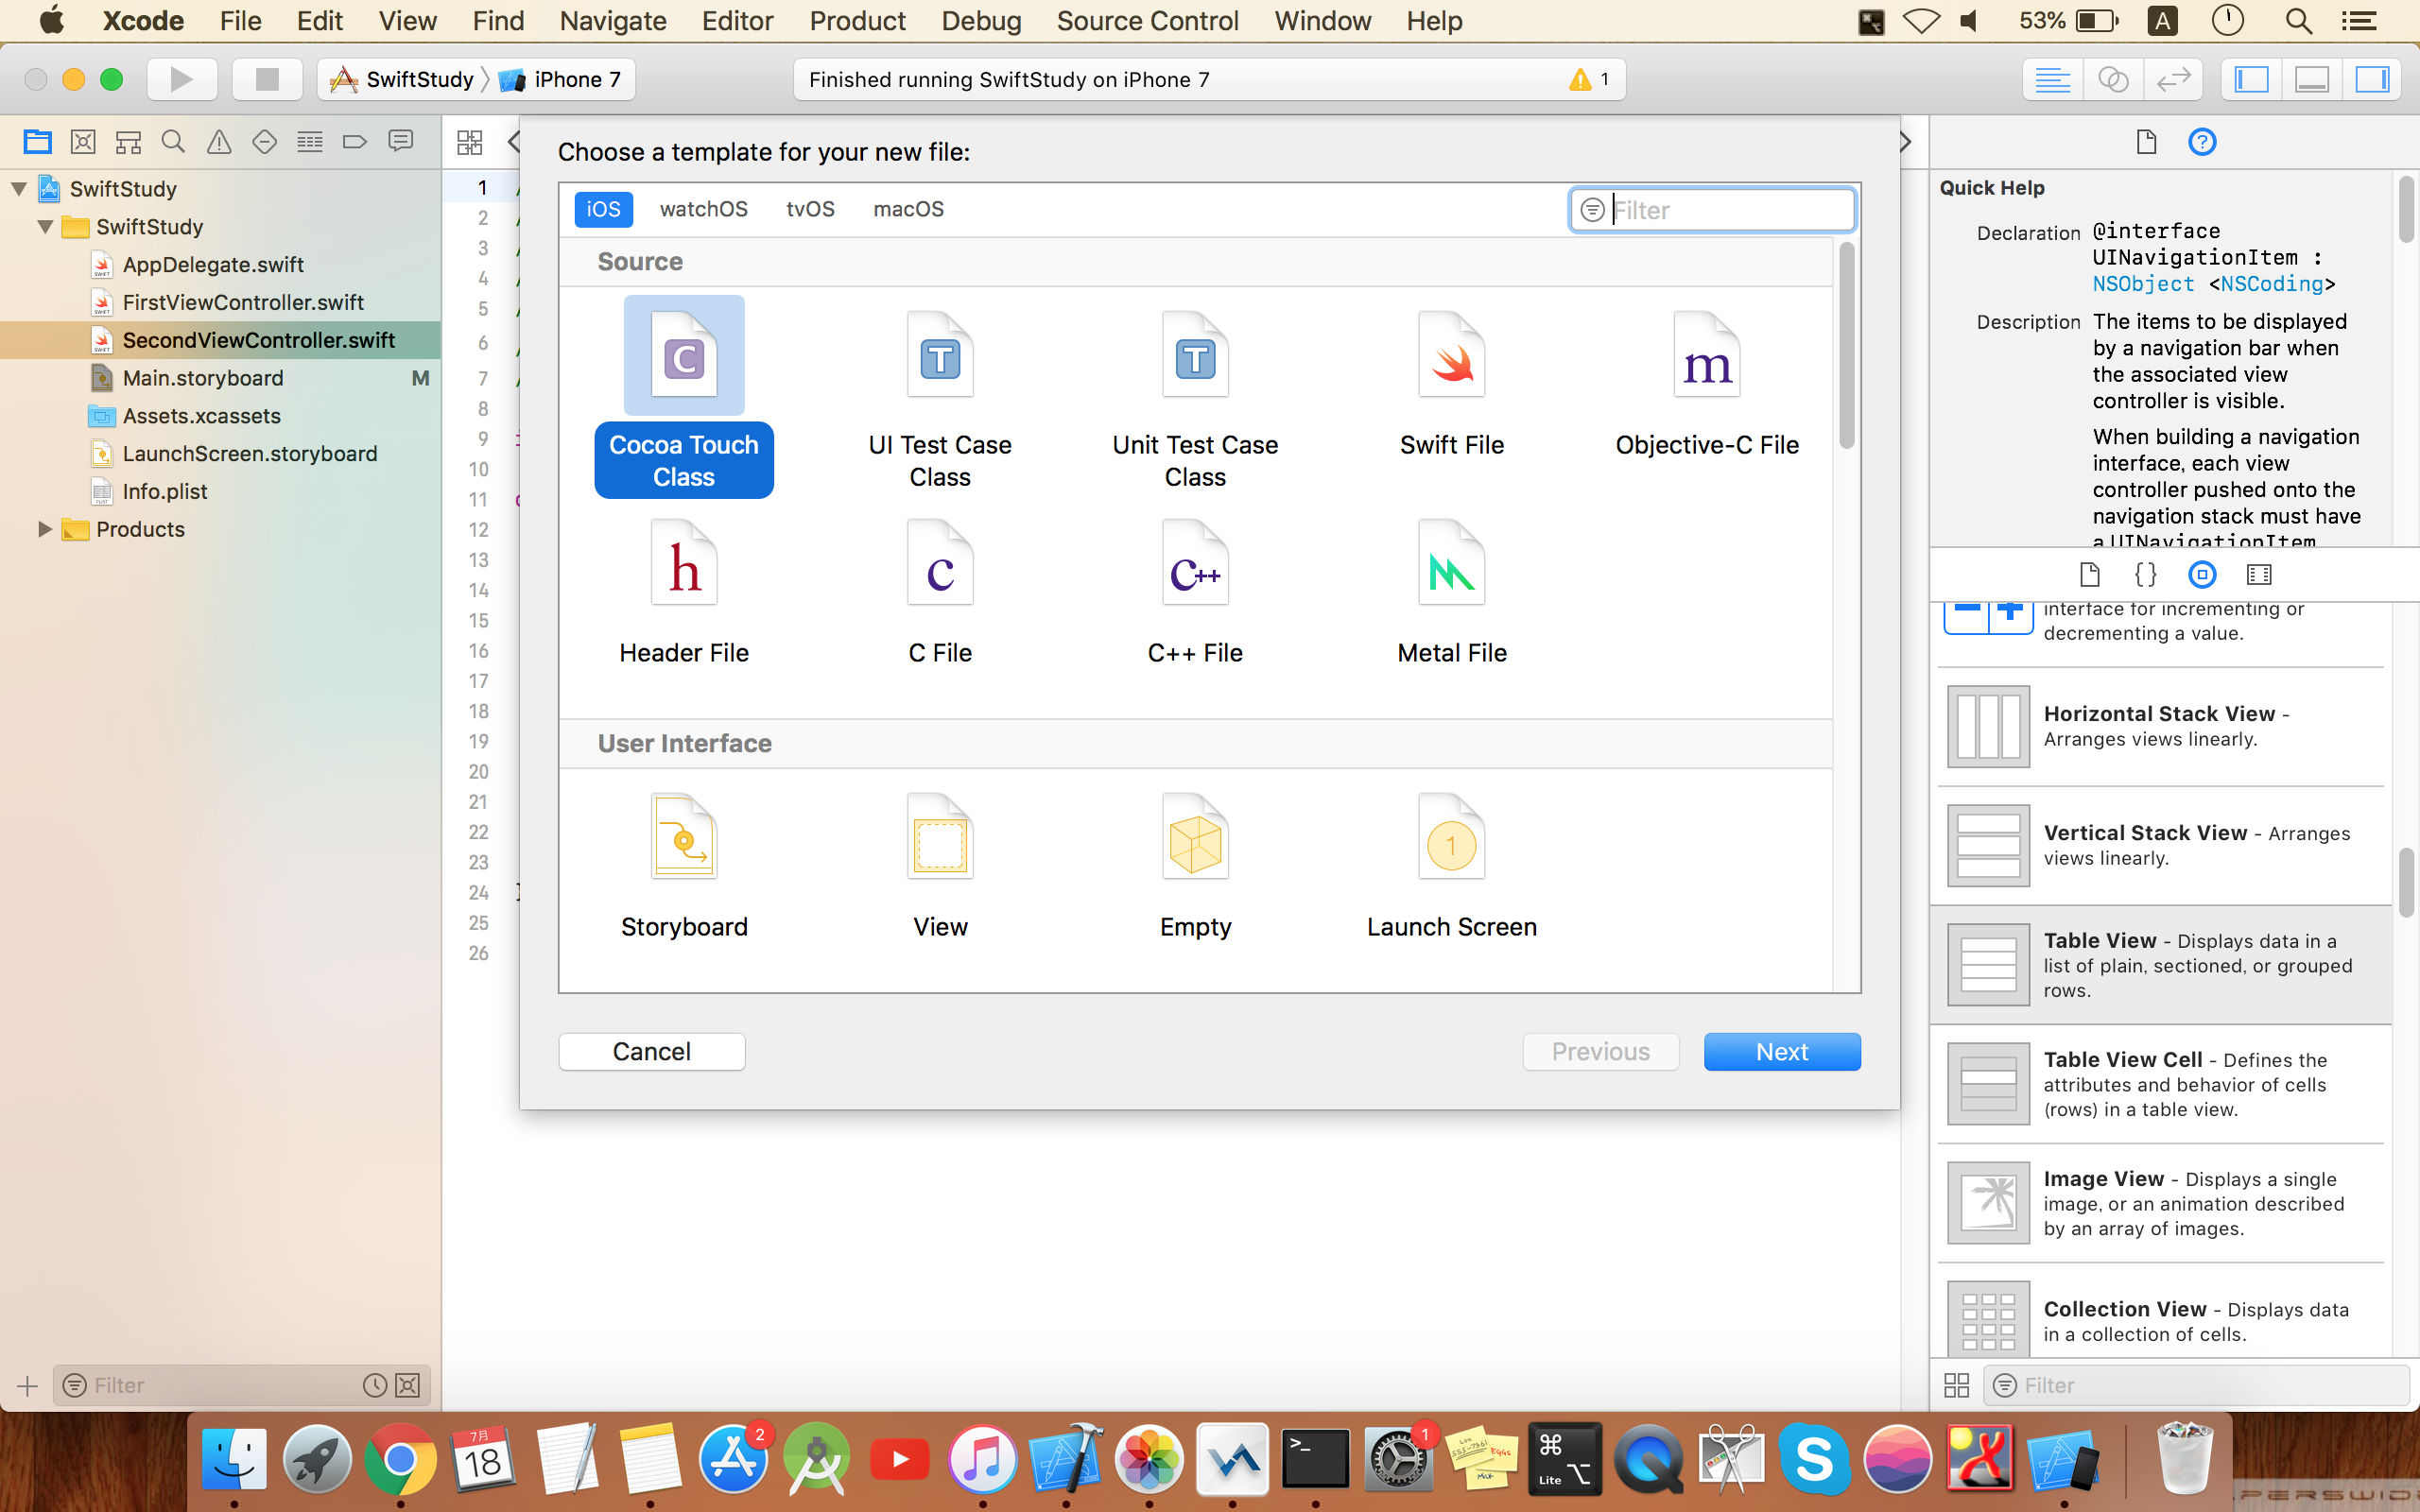
Class名を今回はTestTableViewControllerにした
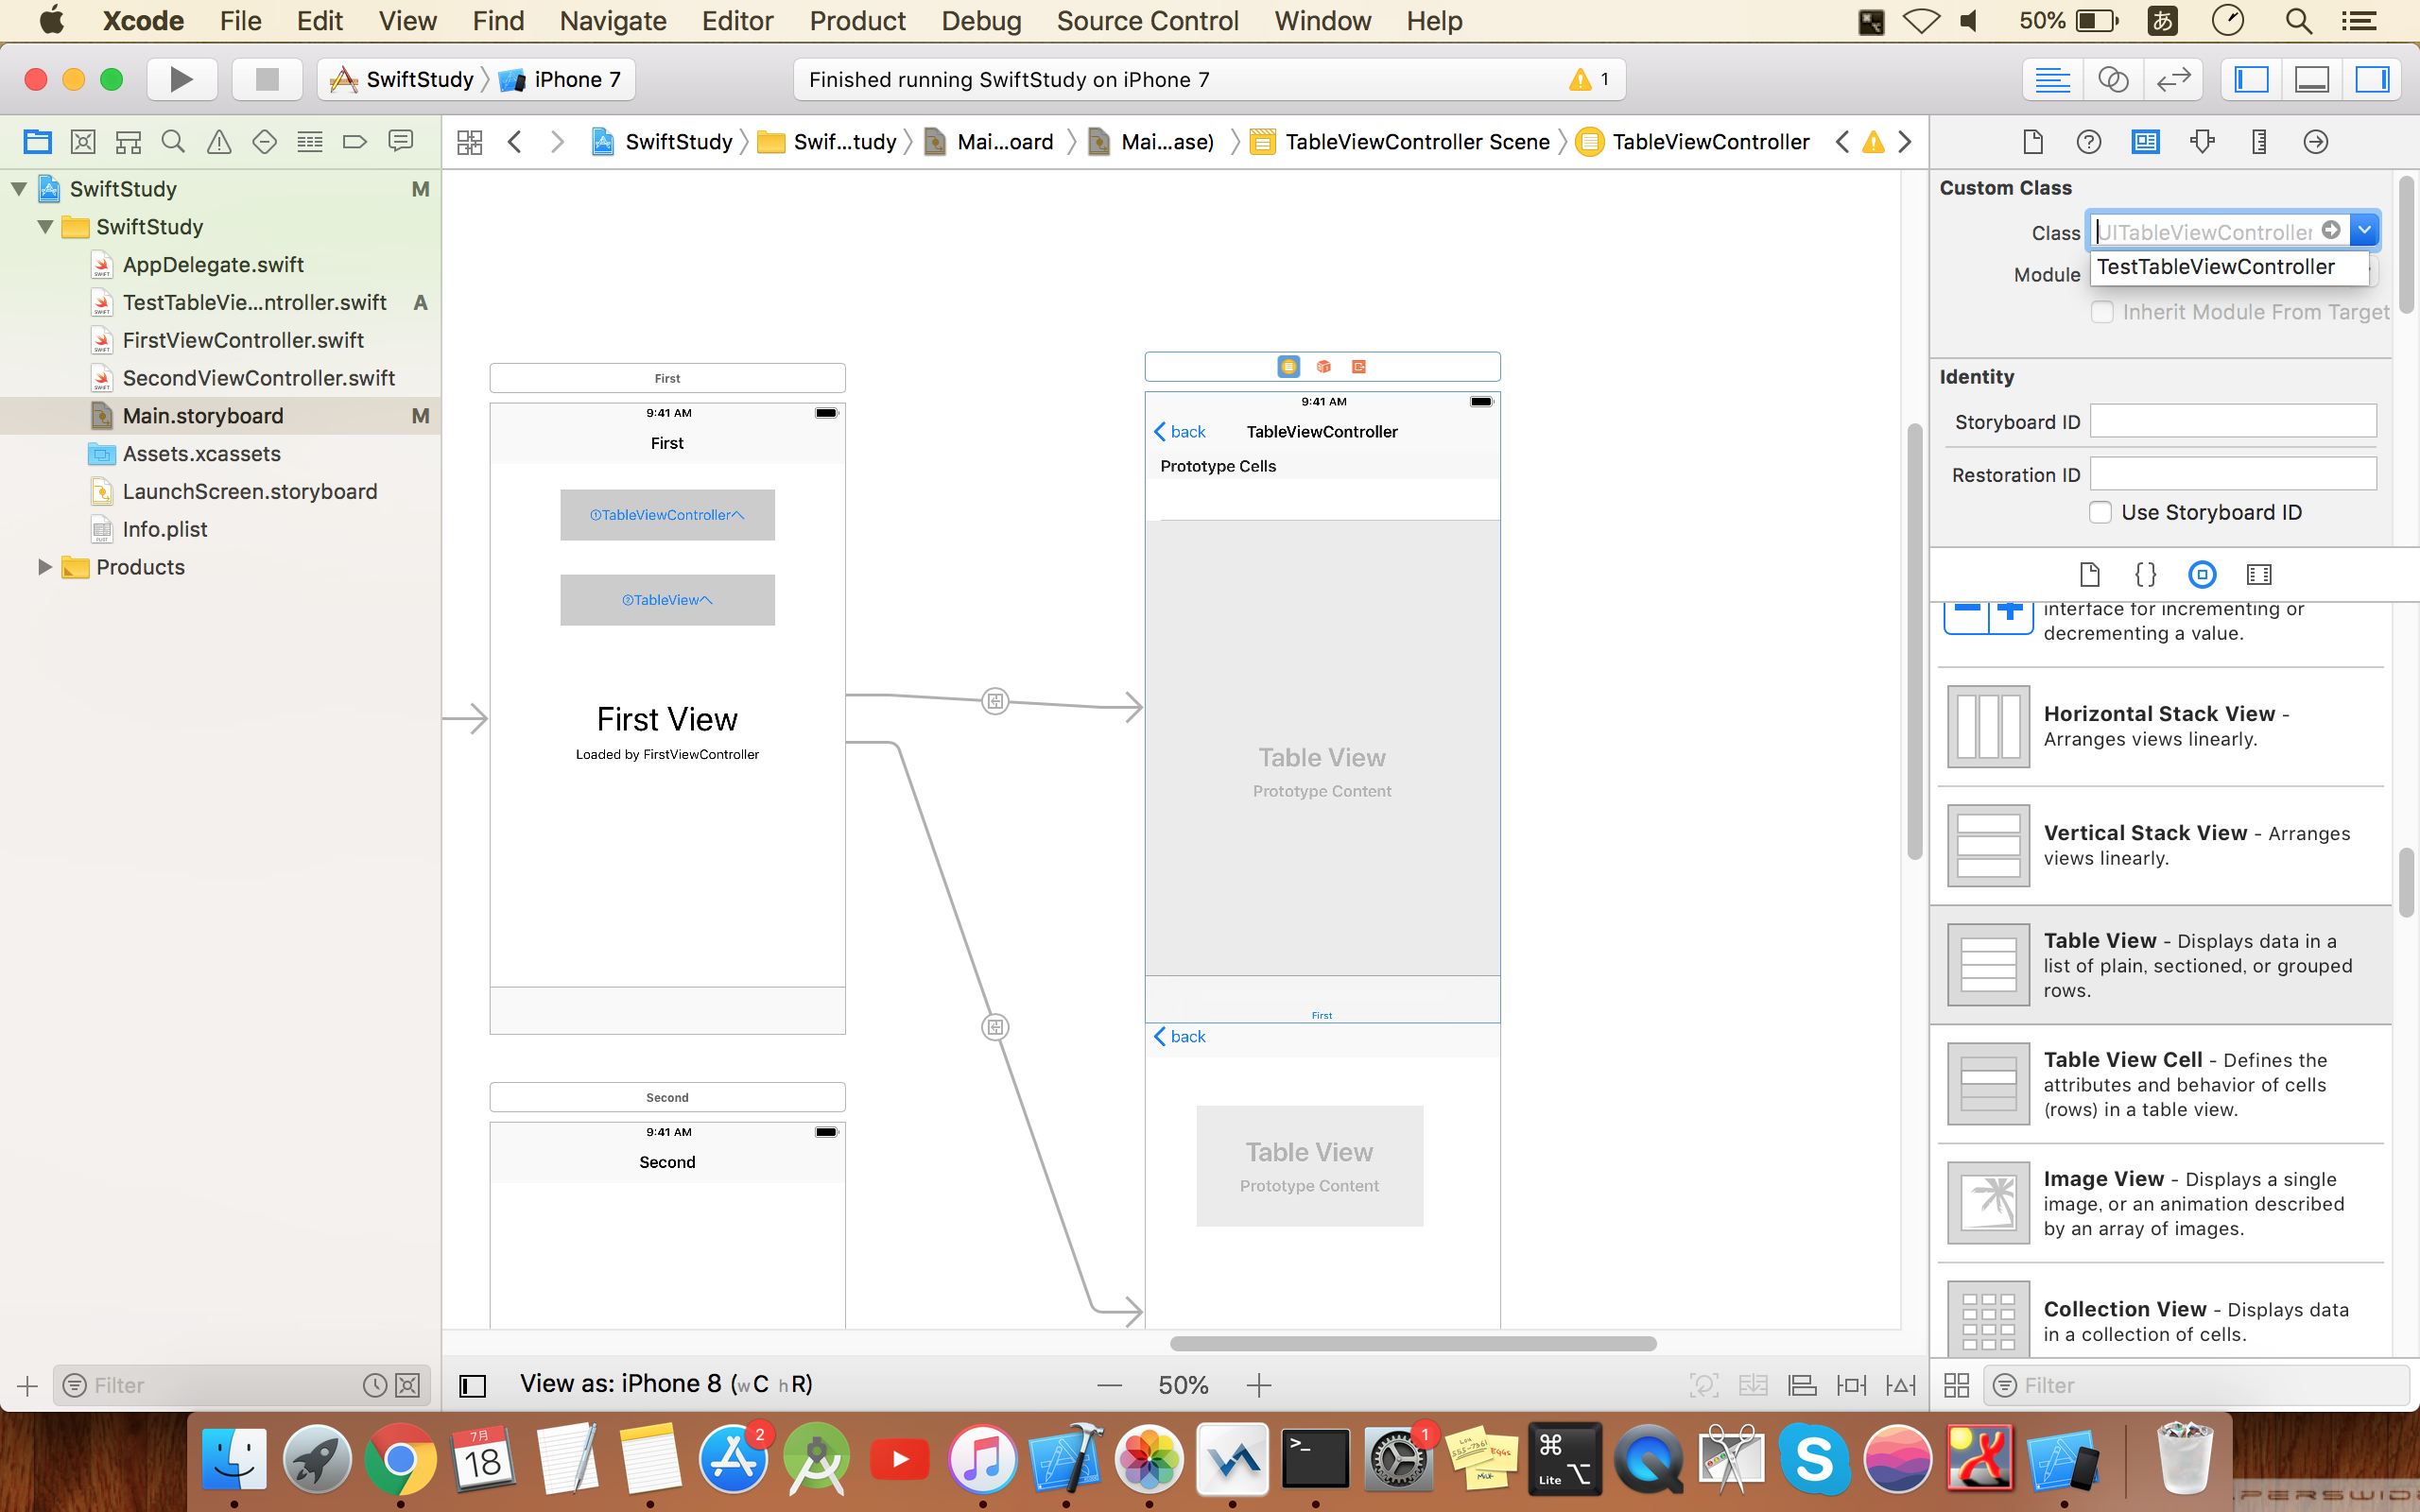
次にStoryboardの追加したViewと追加したソースを紐づける
下図のように左から3つ目のタブを選んで、Custom Classにて先ほど追加したTestTableViewControllerを選択する。
あとはTestTableViewControllerに必要な処理を記載していくだけ
今回は下記のように記載した
import UIKit

class TestTableViewController: UITableViewController {

    let sectionList = ["section_1", "section_2", "section_3"]
    let cellList_1 = ["cell_1_1"]
    let cellList_2 = ["cell_2_1", "cell_2_1"]
    let cellList_3 = ["cell_3_1", "cell_3_2", "cell_3_3"]

    override func viewDidLoad() {
        super.viewDidLoad()
    }

    //セクション数を設定
    override func numberOfSections(in tableView: UITableView) -> Int {
        return sectionList.count
    }

    //セクションのタイトル設定
    override func tableView(_ tableView: UITableView, titleForHeaderInSection section: Int) -> String? {
        return sectionList[section]
    }

    //セクションごとのCell数を設定
    override func tableView(_ tableView: UITableView, numberOfRowsInSection section: Int) -> Int {
        if section == 0 {
            return cellList_1.count
        } else if section == 1 {
            return cellList_2.count
        } else {
            return cellList_3.count
        }
    }

    //Cell内に表示させる文言などを設定
    override func tableView(_ tableView: UITableView, cellForRowAt indexPath: IndexPath) -> UITableViewCell {
        // セルを取得する
        let cell: UITableViewCell = UITableViewCell(style: UITableViewCellStyle.value1, reuseIdentifier: "MyCell")

        // セルに表示する値を設定する
        if indexPath.section == 0 {
            switch indexPath.row {
            case 0:
                cell.textLabel?.text = cellList_1[indexPath.row]
                break
            default:
                break
            }
        } else if indexPath.section == 1 {
            switch indexPath.row {
            case 0:
                cell.textLabel?.text = cellList_2[indexPath.row]
                break
            case 1:
                cell.textLabel?.text = cellList_2[indexPath.row]
                break
            default:
                break
            }
        } else if indexPath.section == 2 {
            switch indexPath.row {
            case 0:
                cell.textLabel?.text = cellList_3[indexPath.row]
                break
            case 1:
                cell.textLabel?.text = cellList_3[indexPath.row]
                break
            case 2:
                cell.textLabel?.text = cellList_3[indexPath.row]
                break
            default:
                break
            }
        }
        return cell
    }

    // セルが選択された時の動作を設定
    override func tableView(_ tableView: UITableView, didSelectRowAt indexPath: IndexPath) {
        tableView.deselectRow(at: indexPath, animated: true)
        if indexPath.section == 0 {
            if indexPath.row == 0 {
                print("cell_1_1 tapped")
            } else if indexPath.row == 1 {
                print("cell_1_2 tapped")
            } else if indexPath.row == 2 {
                print("cell_1_3 tapped")
            }
        } else if indexPath.section == 1 {
            if indexPath.row == 0 {
                print("cell_2_1 tapped")
            } else if indexPath.row == 1 {
                print("cell_2_2 tapped")
            } else if indexPath.row == 2 {
                print("cell_2_3 tapped")
            }
        } else if indexPath.section == 2 {
            if indexPath.row == 0 {
                print("cell_3_1 tapped")
            } else if indexPath.row == 1 {
                print("cell_3_2 tapped")
            } else if indexPath.row == 2 {
                print("cell_3_3 tapped")
            }
        }
    }
}
上記は本当に最低限のものだけ
次に②の場合
②ViewControllerの上にTableViewをおく方法
まずStoryboardにViewControllerを追加する
そして部品のTableViewを上に貼り付ける
Autolayoutを設定
※設定方法詳細に関しては後日記載することにする
その上から部品のTableViewCellを追加する
こんな感じ
そしてこの追加した画面用のControllerソースコードを追加する。
左のプロジェクトを選んで、右クリックから
New file.. を選んで、Cocoa Touch Classを選択
Class名を今回はTestViewControllerにした
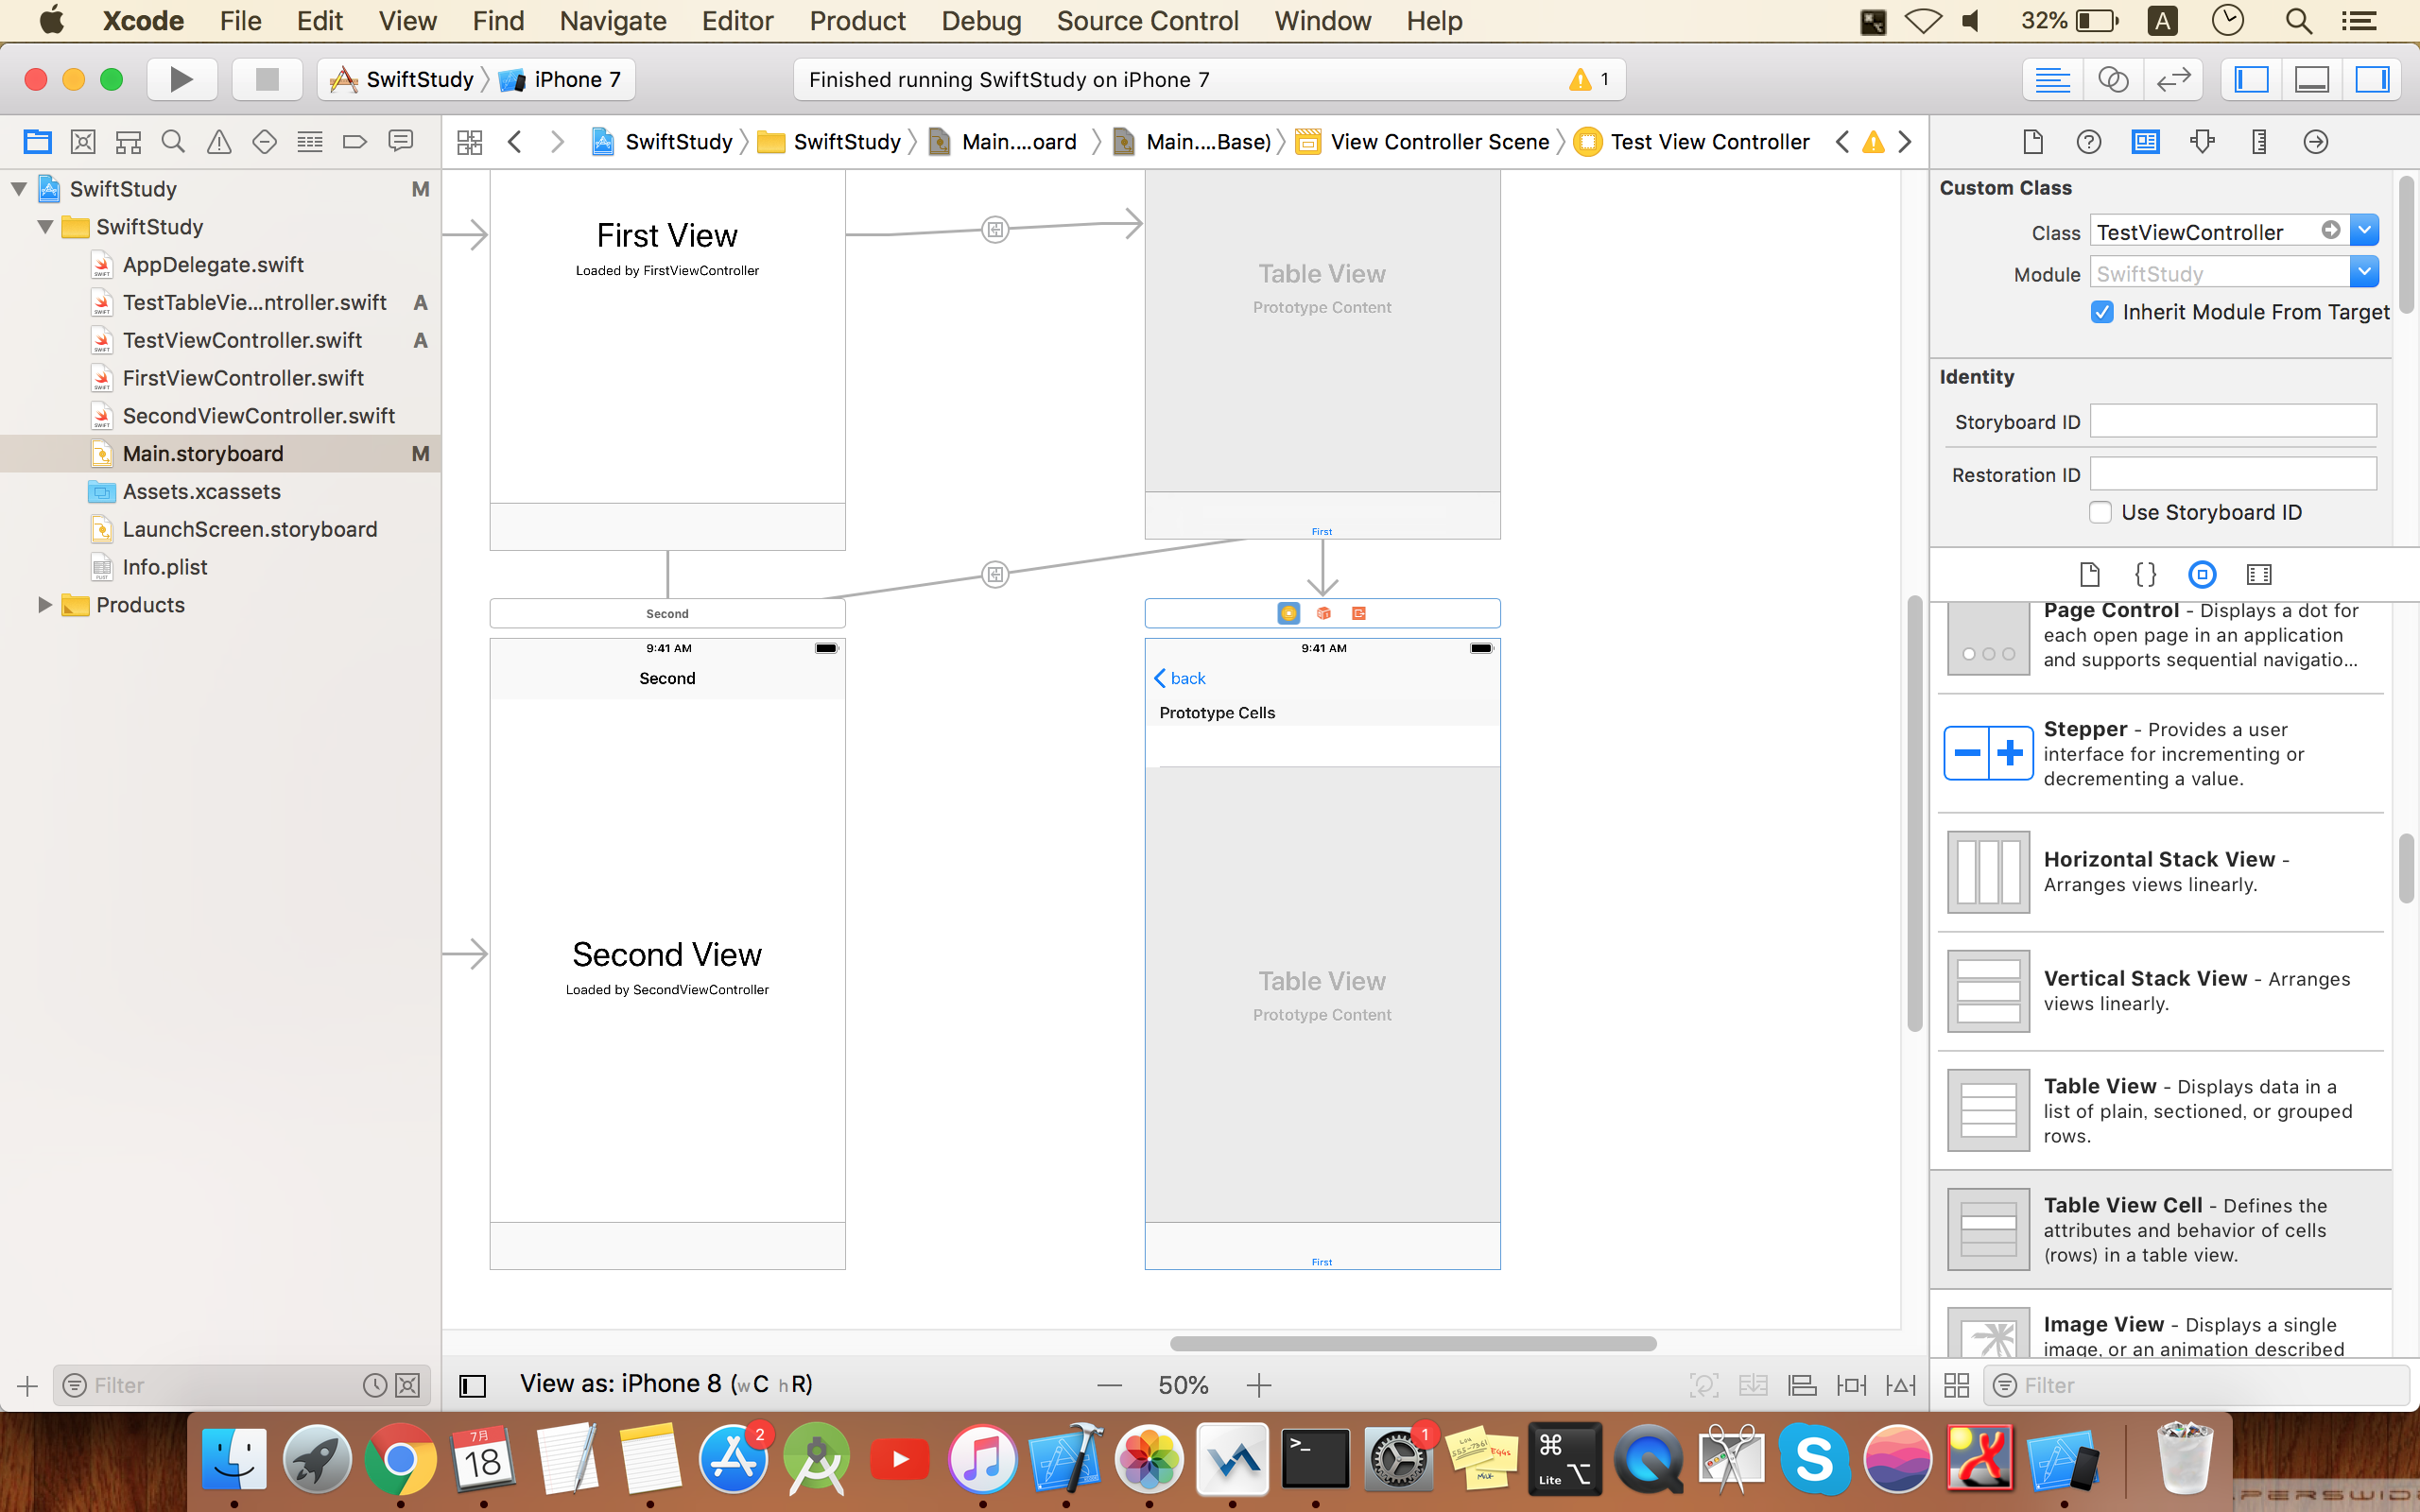
次にStoryboardの追加したViewと追加したソースを紐づける
下図のように左から3つ目のタブを選んで、Custom Classにて先ほど追加したTestViewControllerを選択する。
TestViewControllerに必要な処理を記載していく
import UIKit

class TestViewController: UIViewController, UITableViewDelegate, UITableViewDataSource {
    let sectionList = ["section_1", "section_2", "section_3"]
    let cellList_1 = ["cell_1_1"]
    let cellList_2 = ["cell_2_1", "cell_2_1"]
    let cellList_3 = ["cell_3_1", "cell_3_2", "cell_3_3"]

    override func viewDidLoad() {
        super.viewDidLoad()
    }

    //セクション数を設定
    func numberOfSections(in tableView: UITableView) -> Int {
        return sectionList.count
    }

    //セクションのタイトル設定
    func tableView(_ tableView: UITableView, titleForHeaderInSection section: Int) -> String? {
        return sectionList[section]
    }

    //セクションごとのCell数を設定
    func tableView(_ tableView: UITableView, numberOfRowsInSection section: Int) -> Int {
        if section == 0 {
            return cellList_1.count
        } else if section == 1 {
            return cellList_2.count
        } else {
            return cellList_3.count
        }
    }

    //Cell内に表示させる文言などを設定
    func tableView(_ tableView: UITableView, cellForRowAt indexPath: IndexPath) -> UITableViewCell {
        // セルを取得する
        let cell: UITableViewCell = UITableViewCell(style: UITableViewCellStyle.value1, reuseIdentifier: "MyCell")

        // セルに表示する値を設定する
        if indexPath.section == 0 {
            switch indexPath.row {
            case 0:
                cell.textLabel?.text = cellList_1[indexPath.row]
                break
            default:
                break
            }
        } else if indexPath.section == 1 {
            switch indexPath.row {
            case 0:
                cell.textLabel?.text = cellList_2[indexPath.row]
                break
            case 1:
                cell.textLabel?.text = cellList_2[indexPath.row]
                break
            default:
                break
            }
        } else if indexPath.section == 2 {
            switch indexPath.row {
            case 0:
                cell.textLabel?.text = cellList_3[indexPath.row]
                break
            case 1:
                cell.textLabel?.text = cellList_3[indexPath.row]
                break
            case 2:
                cell.textLabel?.text = cellList_3[indexPath.row]
                break
            default:
                break
            }
        }
        return cell
    }

    // セルが選択された時の動作を設定
    func tableView(_ tableView: UITableView, didSelectRowAt indexPath: IndexPath) {
        tableView.deselectRow(at: indexPath, animated: true)
        if indexPath.section == 0 {
            if indexPath.row == 0 {
                print("cell_1_1 tapped")
            } else if indexPath.row == 1 {
                print("cell_1_2 tapped")
            } else if indexPath.row == 2 {
                print("cell_1_3 tapped")
            }
        } else if indexPath.section == 1 {
            if indexPath.row == 0 {
                print("cell_2_1 tapped")
            } else if indexPath.row == 1 {
                print("cell_2_2 tapped")
            } else if indexPath.row == 2 {
                print("cell_2_3 tapped")
            }
        } else if indexPath.section == 2 {
            if indexPath.row == 0 {
                print("cell_3_1 tapped")
            } else if indexPath.row == 1 {
                print("cell_3_2 tapped")
            } else if indexPath.row == 2 {
                print("cell_3_3 tapped")
            }
        }
    }
}
※よく忘れてしまうのが下記
これを忘れると動作しない
Storyboardで行う、DelegateとDatasourceの紐付け作業である。
画像のように両方右ドラックで接続して完了
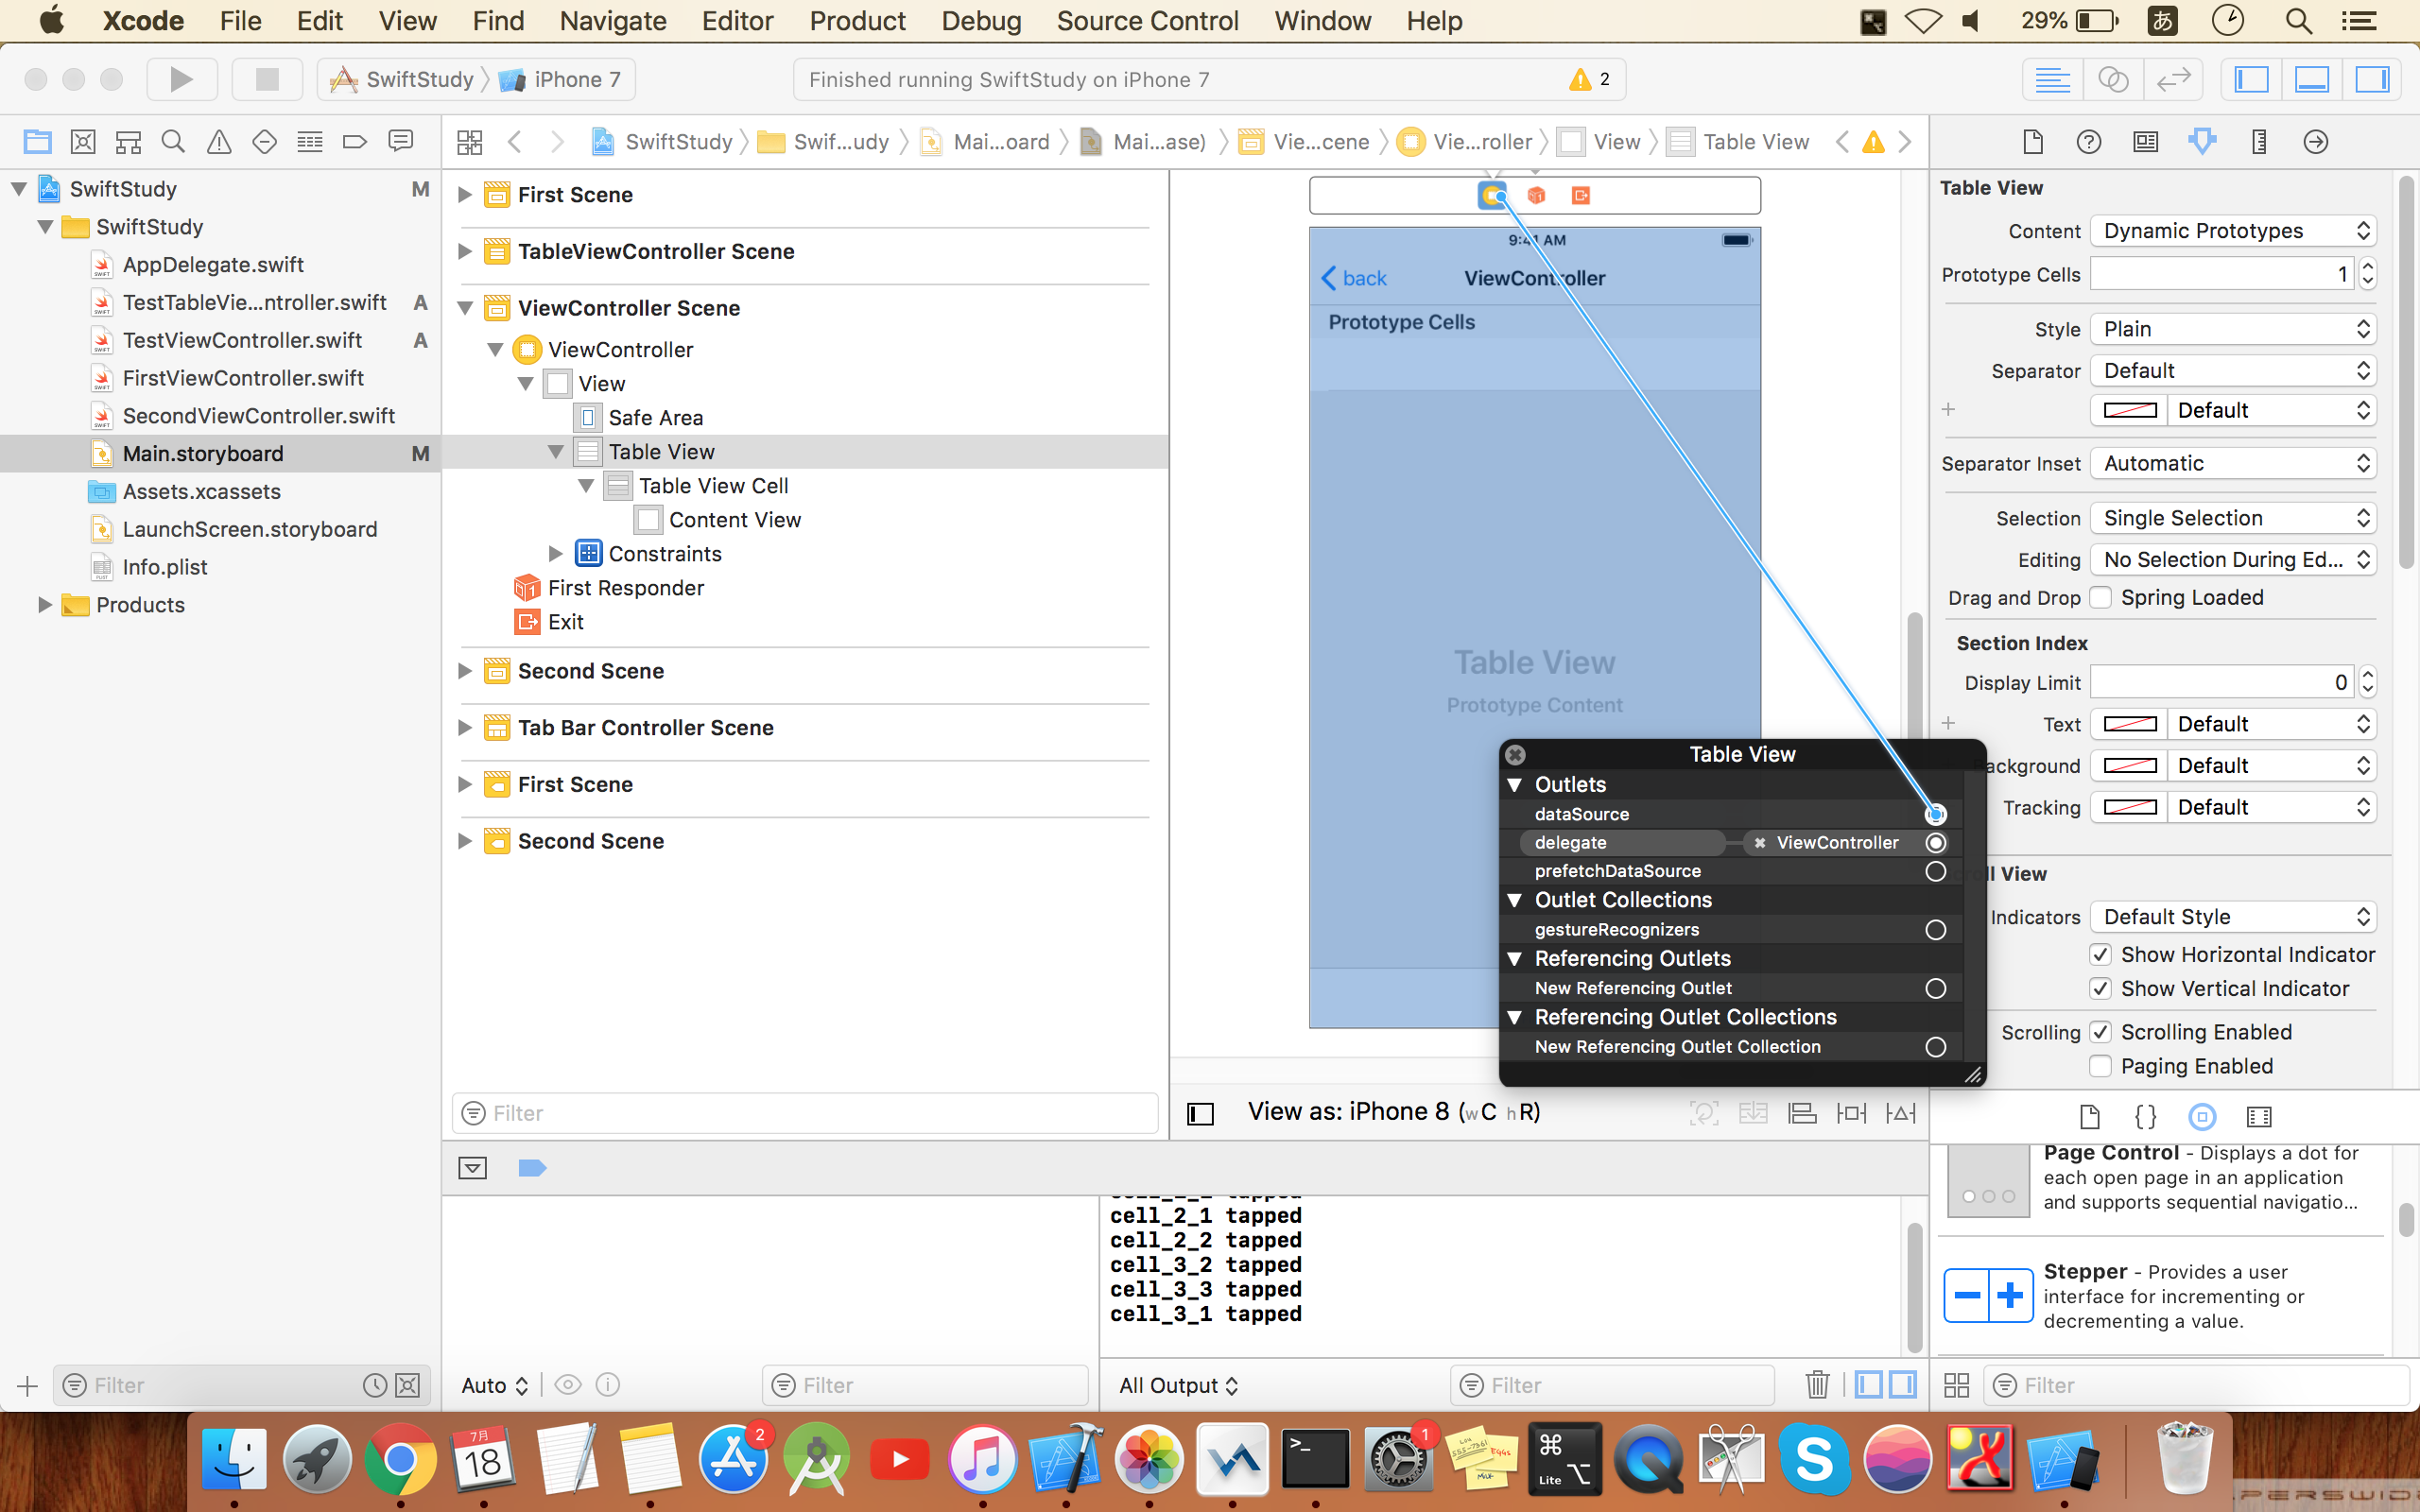
②の場合はメソッドを全部書かないといけなかったり、Delegateの紐付けを自分でやる必要があったりとめんどくさい。
だが、画面の一部はTableViewで画面上部に何か他のViewを表示させたりする場合に使用するので実際だと②の方がよく使うかも