こんなん作ってます。
前回作ったもの:https://playcanv.as/b/6yisdCs4/
今回作り直したもの:https://playcanv.as/b/hVH3ZMjI/
※本解説よりも開発が進んでいることもございますのでご了承ください。
ここまでやってきて気付いたこと
障害物との当たり判定、どないしようかと。
今まで入力受付もキャラクターの状態遷移もメインループの中で処理を書いてきましたが、壁とかの障害物との当たり判定までそこに書くのは・・・すげーめんどいし、バグの温床になりかねない。
幸い、PlayCanvasは物理エンジンを用意していて剛体を使えば自動的にやってくれるのでそれを使っちゃいましょう。
今回の目標
前回までの内容を物理エンジンを使う仕様に書き直す。
Playerのエンティティを作り直す
3Dモデルそのものに剛体を与えるといろいろとセンシティブだったので(初心者には早かった)、単純な図形&不可視なエンティティを作ってその上に乗せる事にしました。
今まで使っていたAsset(Sandyモデル)はSandyという名前にして、ModelでエンティティをRoot直下に作成、名前をPlayerにします。
そしてPlayerの下にSandyをぶら下げてください。

次にCollision(当たり判定)を作成します。

ADD COMPONENTでCollisionを選択、TypeはCapsuleでSandyを覆うようにしてください。
当たり判定がどのくらいの大きさかはビューワで確認できます。
各タイプの属性についてはドキュメントをご参照ください。
次はADD COMPONENTでRIGIDBODY(剛体)を追加。
TYPEはDynamic、AngularFactorは1で。(それ以外はデフォルトの値で結構です)
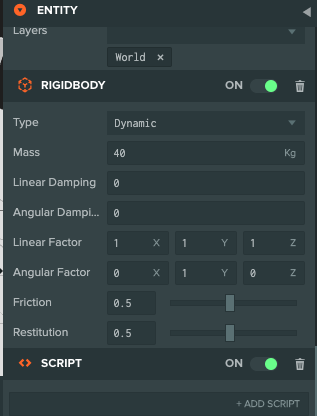
ちなみにCollisionの設定フォームについてくる「IMPORT AMMO」ボタンをクリックしちゃいましょ。
これ、物理エンジンです。

Ammo.jsを追加し終えるとASSETSにAmmoディレクトリが追加されます。

地面と壁の設置
ちなみにこのままだと、サンディちゃんが落ちていきます
地面(Plane)が物理的に存在してないので(笑)
というわけで、地面(Plane)にもCollision(当たり判定)とRIGIDBODY(剛体)を追加します。
RIGIDBODYはTypeをStaticにしてください。


ついでに今回から壁としてBOXを二つ追加し、同様に当たり判定と剛体を設定します。

RIGIDBODYのTypeについては解説してくれるところがあちこちにあるのでそちらをご参照あれ。
とりあえずスクリプトを作り直した
var CtrlSandy = pc.createScript('ctrlSandy');

//キャラ名前
CtrlSandy.attributes.add('charaname', {
    type: 'string',
    default: 'Sandy'
});

//歩くスピード
CtrlSandy.attributes.add('amountWalk', {
    type: 'number'
});
//ダッシュスピード
CtrlSandy.attributes.add('amountRun', {
    type: 'number'
});
//ターンスピード
CtrlSandy.attributes.add('amountTurn', {
    type: 'number'
});

//コントロール用定数
var C_KEY_UP = 1;
var C_KEY_DOWN = 2;
var C_KEY_LEFT = 4;
var C_KEY_RIGHT = 8;
var C_KEY_Z = 16;
var C_KEY_X = 32;


//状態定数
var STATUS = {
    IDLE : 0,
    WALK : 1,
    RUN : 2,
    ATTACK : 3
};


// initialize code called once per entity
CtrlSandy.prototype.initialize = function() {
    //キーボードイベント
    this.app.keyboard.on(pc.EVENT_KEYDOWN, this.onKeyDown, this);
    this.app.keyboard.on(pc.EVENT_KEYUP, this.onKeyUp, this);

    //アニメーションブレンディング変数
    this.blendTime = 0.2;

    //現在のアニメーション
    this.animation = "idle.json";

    //状態変数
    this.state = STATUS.IDLE;
    this.preState = STATUS.IDLE;

    //runフラグ
    this.run=0;

    //移動フラグ
    this.move = 0;

    //方向返還フラグ
    this.turn = 0;

};

// update code called every frame
CtrlSandy.prototype.update = function(dt) {
    // エンティティがみている方向を取得する
    var forward = this.entity.forward;

    // カーソルキーで移動ベクトルを決定
    var x = 0.0, z = 0.0;

    switch(this.state){
        case STATUS.IDLE:
            break;
        case STATUS.WALK:
            //移動する方向を決定
            if(Math.abs(this.move)>0){
                x += forward.x;
                z += forward.z;
            }else{
                //移動しないのであればエンティティにかかってる移動量の速度をリセット
                this.entity.rigidbody.linearVelocity = pc.Vec3.ZERO;
            }

            if(!this.turn){
                //方向変換しないのであればエンティティにかかっている方向変換の速度をリセット
                this.entity.rigidbody.angularVelocity = pc.Vec3.ZERO;
            }
            //this.entity.rigidbody.applyTorque(0, this.amountTurn, 0);
            break;
        case STATUS.RUN :
            //(走っている状態で)移動する方向を決定
            if(this.move > 0){
                x += forward.x;
                z += forward.z;
            }
            break;
        case STATUS.ATTACK :
            break;
    }

    //移動ベクトル
    var vectorMove = new pc.Vec3();

    //移動距離
    var amountMove = this.move;

    //加速度を与えてターン
    this.entity.rigidbody.applyTorque(0, this.turn * this.amountTurn, 0);

    //加速度を与えて移動
    if (x !== 0 && z !== 0) {
        vectorMove.set(x, 0, z).normalize().scale(amountMove);
        this.entity.rigidbody.applyForce(vectorMove);
    }
};

//アニメーション切り替え(stateが切り替わるときだけ切り替える)
CtrlSandy.prototype.setAnimation = function (anime) {
    if(this.state !== this.preState){
        this.animation = anime;
        this.mainCharacter = this.entity.findByName(this.charaname);
        this.mainCharacter.animation.play(anime, this.blendTime);
    }
};

//state切り替え
CtrlSandy.prototype.setState = function(next){
    this.preState = this.state;
    this.state = next;
};

//キーダウンイベント
CtrlSandy.prototype.onKeyDown = function (event) {
    // Check event.key to detect which key has been pressed
    switch(event.key){
        case pc.KEY_UP:
            if(this.run){
                this.move = this.amountRun;
                this.setState(STATUS.RUN);
                this.setAnimation("run.json");
            }else{
                this.move = this.amountWalk;
                this.setState(STATUS.WALK);
                this.setAnimation("walk.json");
            }
            break;
        case pc.KEY_DOWN:
            this.move = -1 * this.amountWalk;
            this.setState(STATUS.WALK);
            this.setAnimation("walk.json");
            break;
        case pc.KEY_LEFT:
            this.setState(STATUS.WALK);
            this.setAnimation("walk.json");
            this.turn = 1;
            break;
        case pc.KEY_RIGHT:
            this.setState(STATUS.WALK);
            this.setAnimation("walk.json");
            this.turn = -1;
            break;
        case pc.KEY_Z:
            this.run = 1;
            if(this.state == STATUS.WALK){
                this.move = this.amountRun;
                this.setState(STATUS.RUN);
                this.setAnimation("run.json");
            }
            break;
        case pc.KEY_X:
            if( this.move !== this.amountWalk){
                this.setState(STATUS.ATTACK);
                this.setAnimation("kick.json");
            }
            break;
    }
};

//キーアップイベント
CtrlSandy.prototype.onKeyUp = function (event) {
    switch(event.key){
        case pc.KEY_UP:
        case pc.KEY_DOWN:
            if(this.state !== STATUS.ATTACK){
                this.setState(STATUS.IDLE);
                this.setAnimation("idle.json");
                this.move = 0;
            }
            this.entity.rigidbody.linearVelocity = pc.Vec3.ZERO;
            break;
        case pc.KEY_LEFT:
        case pc.KEY_RIGHT:
            if(this.state !== STATUS.ATTACK){
                this.setState(STATUS.IDLE);
                this.setAnimation("idle.json");
                this.turn = 0;
            }
            this.entity.rigidbody.angularVelocity = pc.Vec3.ZERO;
            break;
        case pc.KEY_Z:
            this.run = 0;
            if(this.state == STATUS.RUN){
                if(this.turn !== 0 || this.move !== 0){
                    this.setState(STATUS.WALK);
                    this.setAnimation("walk.json");
                }else{
                    this.setState(STATUS.IDLE);
                    this.setAnimation("idle.json");
                }
            }
            break;
        case pc.KEY_X:
            break;
    }
};
定数や列挙型で示しているようなゲーム自体の流れは端折って(今後さらに変えていくので)、重要な変更点だけについて書いていきます。
キーボードイベント
キーボード入力をメインループ(update)内ではなく、イベントハンドラでとってくるようにしました。
※今後はあちこちで起こる当たり判定をPlayCanvas+Ammo.jsにゆだねていくと思うので、一極集中になりがちなメインループ内に処理を書いていくコーディングスタイルは控えようかなと思った次第です。
initialize内でイベントを作成して、各イベントハンドラでキャラクターの状態・アニメーション・移動・方向転換について処理しています。
// initialize code called once per entity
CtrlSandy.prototype.initialize = function() {
    //キーボードイベント
    this.app.keyboard.on(pc.EVENT_KEYDOWN, this.onKeyDown, this);
    this.app.keyboard.on(pc.EVENT_KEYUP, this.onKeyUp, this);
    ・・・


//キーダウンイベント
CtrlSandy.prototype.onKeyDown = function (event) {
    // Check event.key to detect which key has been pressed
    switch(event.key){
        case pc.KEY_UP:
    ・・・

//キーアップイベント
CtrlSandy.prototype.onKeyUp = function (event) {
    switch(event.key){
        case pc.KEY_UP:
        case pc.KEY_DOWN:
    ・・・
物理現象として移動、方向変換
前回まで
移動は
this.entity.translateLocal(0,0,-0.1);//Z軸方向に−0.1移動
方向変換は
this.entity.rotateLocal(0, 15, 0);//Y軸で15度
と、XYZの軸を直接いじることで移動と方向変換をしていました。
これを使った場合、物理エンジンを使った当たり判定は使用されません・・・というわけで、物理現象を起こす形で移動や方向変換を起こしてみました。
物理エンジンを使った移動
まず移動は、エンティティが向いている方向を取得して
var forward = this.entity.forward;
水平方向にだけ移動させたいので、X軸とZ軸だけの移動ベクトルを取得
var x = 0.0, z = 0.0;

x += forward.x;
z += forward.z;
平面方向のベクトルを新規生成
//移動ベクトル
var vectorMove = new pc.Vec3();

//移動距離
var amountMove = this.move;

//正規化した水平方向だけの単位ベクトルを新規生成、キャラの移動量をかけて加速度ベクトルを生成
//剛体をそれで吹っ飛ばす(?)
if (x !== 0 && z !== 0) {
    vectorMove.set(x, 0, z).normalize().scale(amountMove);
    this.entity.rigidbody.applyForce(vectorMove);
}
止めるときは剛体のlinearVelocityプロパティにすべてゼロのベクトルを渡します。
this.entity.rigidbody.linearVelocity = pc.Vec3.ZERO;
物理エンジンを使った方向変換
こちらは移動よりかは楽かなと。
//剛体のY軸を中心に加速度を与えてターンさせる
this.entity.rigidbody.applyTorque(0, this.turn * this.amountTurn, 0);
止めるときは剛体のangularVelocityプロパティにすべてゼロのベクトルを渡します。
this.entity.rigidbody.angularVelocity= pc.Vec3.ZERO;
ざっと説明しましたが、
座標の値を直接変更するやり方から物理エンジンで速度を与えるやり方に変えてみました。
https://playcanv.as/b/hVH3ZMjI/

これでスクリプトで判定と処理を書かなくても、キャラクターが壁や床を突き抜けることがなくなります。
ちなみに壁のない方向へ走ると、、、落ちますw
課題
今のところキーを押しっぱなしにするとキャラの加速が続いて、やがて制御できないスピードになります(笑)
一定のスピードに達したところで加速しないようプログラムできないかな、と。
それと、Xキーを押したらATTACKの状態になって後ろ廻し蹴りのアニメーションに遷移するようにしていますが、
1. 攻撃中はほかの操作を全く受けないようにして
2. 蹴りのアニメーションが終わったときにIDLEの状態に戻す
という仕様にしたいところなのですが、問題が2.なんですよね。
どこでアニメーションの終わりをゲットしたらいいのか、試行錯誤中です。
課題2、解決しました
本項ははがさんのご協力により解決しました。ありがとうございました。
まず、キーダウンでATTACKへ移行、後ろ廻し蹴りのアニメーションを起動。
CtrlSandy.prototype.onKeyDown = function (event) {
    // Check event.key to detect which key has been pressed
    switch(event.key){
        ・・・
        case pc.KEY_X:
            if( this.move !== this.amountWalk){
                this.mainCharacter = this.entity.findByName(this.charaname);
                this.mainCharacter.animation.loop = false;
                this.setState(STATUS.ATTACK);
                this.setAnimation("kick.json");
            }
            break;
    }
updateイベント内のthis.stateでswitchしてるところで、
switch(this.state){
        ・・・
        case STATUS.ATTACK :
            this.mainCharacter = this.entity.findByName(this.charaname);
            if(!this.mainCharacter.animation.playing){
                this.setState(STATUS.IDLE);
                this.setAnimation("idle.json");
                console.log("ATTACK FINISHED!!");
                this.mainCharacter.animation.loop = true;
            }
            break;
    }
としました。
解説すると
1.キーダウンでATTACK状態へ移行、Playerエンティティ直下の"Sandy"アセットをmainCharacterで参照し、ここでloopをオフにする。
2.ループについて、エディタ上でSandyアセット上のアニメーションはループ状態になっており、ここでオフにしないとアニメーションの終了を検知できないままとなるため。
3.update関数内、stateがATTACKのときにPlayerエンティティ直下の"Sandy"のアセットをmainCharacterで参照。mainCharacterが持つanimationインスタンスのplayingプロパティを監視することでアニメーションの完了を検知
4.アニメーションが完了したらアイドリング状態へ移行、アニメーションもアイドリングへ切り替える。この時、Sandyアセットのループをオンに戻しておく。
といったところです。
animationオブジェクトのplayingは公式のAPIリファレンスの載ってないというワナです。
オブジェクトの中身はconsole.logでみたほうがいいらしい!!
課題1、解決しました
エンティティの剛体の速度(angularVelocity/linearVelocity)を取得して、加速度の大きさを制御することができました。
    //ターン
    console.log("angularVelocity:"+this.entity.rigidbody.angularVelocity.length());
    if(Math.abs(this.entity.rigidbody.angularVelocity.length()) < 2){
        this.entity.rigidbody.applyTorque(0, this.turn * this.amountTurn, 0);
    }

    //移動
    console.log("linearVelocity:"+this.entity.rigidbody.linearVelocity.length());
    if(Math.abs(this.entity.rigidbody.linearVelocity.length()) < 8){
        if (x !== 0 && z !== 0) {
            vectorMove.set(x, 0, z).normalize().scale(amountMove);
            this.entity.rigidbody.applyForce(vectorMove);
        }
    }