はじめに
しばらくさわってなかったらcreate-react-appがTypeScriptをサポートして開発しやすくなったあげくプロジェクトのソースが関数コンポーネントベースになってた。これはReact Hooksをちゃんと使わないといけないなと思ったので勉強がてらにタイトルみたいなことをやってみることにしました
できたものはこちら
create-react-appをセットアップする
npm i -g create-react-app
create-react-app firebase-auth-example --typescript
cd firebase-auth-example
yarn start
Webブラウザでlocalhost:3000が表示されたら成功です
いったんCTRL-Cでサーバーを停止してFirebaseとMaterial UIをインストールしておきます
npm i -S firebase
npm i -S @material-ui/core @material-ui/icons
Firebase Authorization をセットアップする
Firebase Consoleから適当なプロジェクトを作成して[Autorization] -> ログイン方法 -> ログイン プロバイダからGoogleを選択します

有効にするをONにしてプロジェクトサポートメールを選択して保存をクリックします

コンソール左上の歯車アイコンをクリックします

マイアプリからWebアプリ</>アイコンをクリックします

アプリのニックネームに適当な名前を入力しアプリを登録をクリックします

アプリが登録できると以下のようなスクリプトが表示されます
<!-- The core Firebase JS SDK is always required and must be listed first -->
<script src="https://www.gstatic.com/firebasejs/7.2.3/firebase-app.js"></script>

<!-- TODO: Add SDKs for Firebase products that you want to use
     https://firebase.google.com/docs/web/setup#available-libraries -->
<script src="https://www.gstatic.com/firebasejs/7.2.3/firebase-analytics.js"></script>

<script>
  // Your web app's Firebase configuration
  var firebaseConfig = {
    apiKey: "XXXXXXXXXXXXXXXXXXXXXXXXXXXXXXXXXXXXXXXX",
    authDomain: "hogehoge.firebaseapp.com",
    databaseURL: "https://hogehoge.firebaseio.com",
    projectId: "hogehoge",
    storageBucket: "hogehoge.appspot.com",
    messagingSenderId: "999999999999",
    appId: "XXXXXXXXXXXXXXXXXXXXXXXXXXXXXXXXXXXXXXXX",
    measurementId: "G-XXXXXXXXXXX"
  };
  // Initialize Firebase
  firebase.initializeApp(firebaseConfig);
  firebase.analytics();
</script>
表示されたスクリプトからvar firebaseConfig = { .... };の部分をコピーしておきます
アプリを作成する
シンプルなアプリを作成してみる。Googleアカウントでサインインしてからユーザー名を取得し、ボタンをクリックするとユーザー名を挨拶メッセージに変えるアプリをつくります。せっかくなので挨拶ボタンは別コンポーネントにしてみます
firebase-auth-example/src/App.tsxを以下のように変更します
import React from 'react';
import * as firebase from 'firebase/app';
import "firebase/auth";
import "firebase/analytics";
import { createStyles, makeStyles, Theme } from '@material-ui/core/styles';
import AppBar from '@material-ui/core/AppBar';
import Toolbar from '@material-ui/core/Toolbar';
import Typography from '@material-ui/core/Typography';
import IconButton from '@material-ui/core/IconButton';
import MenuIcon from '@material-ui/icons/Menu';
import Container from '@material-ui/core/Container';
import Button from '@material-ui/core/Button';
import GreetButton from './GreetButton';

// Your web app's Firebase configuration
const firebaseConfig = {
    apiKey: "XXXXXXXXXXXXXXXXXXXXXXXXXXXXXXXXXXXXXXXX",
    authDomain: "hogehoge.firebaseapp.com",
    databaseURL: "https://hogehoge.firebaseio.com",
    projectId: "hogehoge",
    storageBucket: "hogehoge.appspot.com",
    messagingSenderId: "999999999999",
    appId: "XXXXXXXXXXXXXXXXXXXXXXXXXXXXXXXXXXXXXXXX",
    measurementId: "G-XXXXXXXXXXX"
};
// Initialize Firebase
firebase.initializeApp(firebaseConfig);
firebase.analytics();

const useStyles = makeStyles((theme: Theme) =>
  createStyles({
    root: {
      flexGrow: 1,
    },
    menuButton: {
      marginRight: theme.spacing(2),
    },
    title: {
      flexGrow: 1,
    },
    account: {
      padding: '3vh',
      color: '#555'
    },
  }),
);

const signIn = async () => {
  try {
    await firebase.auth().setPersistence(firebase.auth.Auth.Persistence.LOCAL);
    const provider = new firebase.auth.GoogleAuthProvider();
    firebase.auth().signInWithRedirect(provider);
  } catch (e) {
    throw new Error(e);
  }
};

const signOut = async () => {
  try {
    await firebase.auth().signOut();
  } catch (e) {
    throw new Error(e);
  }
};

const App: React.FC = () => {

  const [name, setName] = React.useState<string|null>(null);

  const handleSignIn = async () => {
    await signIn();
  };

  const handleSignOut = async () => {
    await signOut();
    setName(null);
  };

  // componentDidMount
  React.useEffect(() => {
    firebase.auth().onAuthStateChanged(async (user) => {
      console.log('User', user);
      if (user && user.displayName) {
        setName(user.displayName);
      }
    });
  },[]);

  const classes = useStyles();
  return (
    <div className="App">
      <AppBar position="static">
        <Toolbar>
          <IconButton edge="start" className={classes.menuButton} color="inherit" aria-label="menu">
            <MenuIcon />
          </IconButton>
          <Typography variant="h6" className={classes.title}>
           Auth Example
          </Typography>
          { name ? (
            <Button color="inherit" onClick={handleSignOut}>Logout</Button>
          ) : (
            <Button color="inherit" onClick={handleSignIn}>Login</Button>
          )}
        </Toolbar>
      </AppBar>
      <React.Fragment>
        <Container maxWidth="sm">
          <Typography component="div" className={classes.account} align="center">
           <h3>{name}</h3>
          </Typography>
        </Container>
      </React.Fragment>
      <React.Fragment>
        <GreetButton name={name} setName={setName}></GreetButton>
      </React.Fragment>
    </div>
  );
}

export default App;
const firebaseConfig = { .... }はコピーしておいたfirebaseConfigに置き換えます
firebase-auth-example/src/GreetButton.tsxを新規作成して以下のようにします
import React from 'react';

import Typography from '@material-ui/core/Typography';
import Container from '@material-ui/core/Container';
import Button from '@material-ui/core/Button';

type ContentProps = {
  name: string|null;
  setName: React.Dispatch<React.SetStateAction<string|null>>;
}

const GreetButton: React.FC<ContentProps> = (props) => {

  const [disable, setDisable] = React.useState<boolean>(false);

  /* componentDidUpdate */
  React.useEffect(() => {
    if (props.name) {
      setDisable(false);
    } else {
      setDisable(true);
    }
  },[props.name]);

  const handleGreet = async () => {
    props.setName(`Hello ${props.name}!`);
    setDisable(true);
  };

  return(
    <Container maxWidth="sm">
      <Typography component="div" align="center">
        <Button variant="contained" color="primary" size="large" onClick={handleGreet} disabled={disable}>Greet!</Button>
      </Typography>
    </Container>
  );
};

export default GreetButton;
アプリを実行する
yarn start
ブラウザで以下のようなアプリが表示されたら成功です

LOGINボタンをクリックするとGoogleアカウント認証後、アプリにユーザ名が表示されます
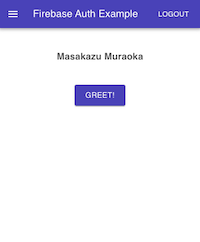
GREET!ボタンをクリックすると挨拶メッセージが表示されます

何度もボタンをクリックするとHelloが連続してしまうのはこのアプリの仕様ですw
感想
create-react-app + TypeScript + Material UI が以前より気持ちよく書けるようになった感じがしました。React Hooksのおかげか。Firebase autorizationもasync/awaitで見通しやすく書けるのでいいです。Firebaseを試すためにやってみましたが、いいかんじに実用的なテンプレートができた気がしてます