はじめに
先日、**GiteaとJenkinsを利用したCI/CD環境を構築**しました。
この環境を利用して、テストとデプロイを自動化するサンプルを動かして、いわゆるCI/CDに入門してみようと思います。
対象はPHPとPythonとPerlで作成したHTMLを生成するだけのアプリです。
できるだけ簡素なサンプルとしたかったので、フレームワークは利用していません。
簡単なサンプルで一連の流れが自動化できた(と思ってる)ので、これを「ひな型」として拡張していけたらいいかな、と思います。
これをやります

user01というひとが、nginxが動作している開発サーバ(web-dev)上でsampleというアプリを作成していると仮定します。
① user01 が作成したアプリをリポジトリにgit pushすると、、、
② GiteaからSlackおよびJenkinsのwebhookをたたく(この時点でSlackにはuser01/sampleにpushされたよ、という通知が飛ぶ)
③ Jenkinsではuser01/sampleにpushがあったという通知をGiteaプラグインが受ける
④ pushされたuser01/sampleにJenkinsfileがあるかチェックする
⑤ Jenkinsfileがあればそれをもとにpipeline処理を開始する
⑥ test stageでは、開発サーバにremoterというユーザでSSHログインして各テストを実施
⑦ test stageをパスした場合のみ、開発サーバでAnsibleのデプロイ用Playbookを実行
⑦' Playbookでは、公開サーバ(web-pub)にSSHログインしてpushされたリポジトリをcloneする
⑧ pipelineの結果をJenkins内部で通知して
⑨ Slackのwebhookをたたいてpipelineのサマリを通知する
対象機器および環境
検証環境
- CentOS8 (8.2.2004)
- Gitea (1.13.0+dev)
- Jenkins (2.251)
- PHP / PHP-FPM ( 7.2.24 )
- Python ( 3.8.0 )
- Perl ( 5.26.3 )
サーバ
今回の検証で利用するサーバは以下の2種類とします。
Gitea+Jenkinsは前回作成したものをそのまま利用します。
webサーバは手抜きしてしまったので、1台を開発/公開で兼用し、別FQDNで別ディレクトリを参照させるようにします。
別サーバにする場合は、後述するremoterユーザを双方に準備しておく必要があります。
また、各スクリプトをCGIとして動作するようにしておきます。
アプリケーションのディレクトリ構造
今回は sample というアプリを作成します。これがそのままリポジトリ名です。
ディレクトリ構造は以下の通りです。
http://[公開サーバ]/sample/ へのアクセスを sample/src とすることで、公開コンテンツ以外にはアクセスさせないようにします。
./sample/
|-- Jenkinsfile <----------------- Jenkinsの自動ビルド処理
|-- deploy <---------------------- webサーバにデプロイするためのAnsible
|   |-- ansible.cfg
|   |-- hosts
|   `-- playbook_deploy-web.yml
|-- src <------------------------- アプリケーションディレクトリ(ここをwebで公開する)
|   |-- index.html
|   |-- index.php
|   |-- index.pl
|   |-- index.py
|   `-- lib <--------------------- アプリケーションで利用するライブラリ群
|       |-- math_modules.php
|       |-- math_modules.pm
|       `-- math_modules.py
`-- test <------------------------ 単体テスト用のテストコード
    |-- perltest.t
    |-- phptest.php
    `-- pythontest.py
作業内容
webサーバでスクリプトをCGIとして動作させる
nginxでスクリプトをCGIとして動作させるための設定をしておきます。
CentOS8の初期状態から nginx で php python perl ruby を動かすまで
コンテンツ置き場のディレクトリを作成し、権限を付与しておきます。
mkdir /usr/share/nginx/html-{dev,pub}
chmod 777 /usr/share/nginx/html-{dev,pub}
web-dev.prosper2.net へのアクセスを開発サーバとし、ドキュメントルートを /usr/share/nginx/html-dev/ にしておきます。
また sample へのアクセスは sample/src へ向けるようにしておきます。
server {
    listen 80;
    server_name web-dev.prosper2.net;

    root   /usr/share/nginx/html-dev/;
    index  index.html;

    location  ~ ^/sample/ {

        location ~ ^/sample/src/(.*) {
            internal;

            location ~ \.(php|phar)$ {
                include        fastcgi_params;
                fastcgi_param  SCRIPT_FILENAME  $document_root$fastcgi_script_name;
                fastcgi_pass   unix:/run/php-fpm/www.sock;
            }

            location ~ \.(py|pl|rb)$ {
                include        fastcgi_params;
                fastcgi_param  SCRIPT_FILENAME  $document_root$fastcgi_script_name;
                fastcgi_pass   unix:/var/run/spawn-fcgi.socket;
            }

        }

        rewrite  ^/sample/(.*) /sample/src/$1 last;

    }
}
web-pub.prosper2.net へのアクセスを公開サーバとし、ドキュメントルートを /usr/share/nginx/html-pub/ にしておきます。
先ほどと同様に sample へのアクセスは sample/src へ向けるようにしておきます。
server {
    listen 80;
    server_name web-pub.prosper2.net;

    root   /usr/share/nginx/html-pub/;
    index  index.html;

    location  ~ ^/sample/ {

        location ~ ^/sample/src/(.*) {
            internal;

            location ~ \.(php|phar)$ {
                include        fastcgi_params;
                fastcgi_param  SCRIPT_FILENAME  $document_root$fastcgi_script_name;
                fastcgi_pass   unix:/run/php-fpm/www.sock;
            }

            location ~ \.(py|pl|rb)$ {
                include        fastcgi_params;
                fastcgi_param  SCRIPT_FILENAME  $document_root$fastcgi_script_name;
                fastcgi_pass   unix:/var/run/spawn-fcgi.socket;
            }

        }

        rewrite  ^/sample/(.*) /sample/src/$1 last;

    }
}
systemctl reload nginx
PHPUnit(PHPのテストツール)を導入する。
PHPのバージョンで利用できるPHPUnitのバージョンが変わるため、以下から適切なものをダウンロードします。
対応表:https://phpunit.de/supported-versions.html
入手先:https://phar.phpunit.de/
何も考えずにCentOS8にPHPをインストールすると、7.2が入るので、PHPUnitは8系を導入します。
curl -L https://phar.phpunit.de/phpunit-8.5.8.phar -o phpunit
chmod +x phpunit
cp phpunit /usr/local/bin
Test::More(Perlのテストモジュール)を導入する。
Perlでテストを行うために必要なものは prove コマンドと Test::More モジュールです。
dnf install -y perl-Test-Simple perl-Test-Harness
リポジトリの準備
アプリケーションのためのリポジトリを準備します。
Giteaでリポジトリの作成と設定
今回は新たなユーザ user01 を作成し、その中に sample というリポジトリを作成します。
リポジトリを作成したら、このリポジトリに対してJenkinsとSlackのwebhookを設定しておきます。
これで、リポジトリへのpushのタイミングで、Slackへの通知と、Jenkinsでパイプライン処理の実行ができるようになります。
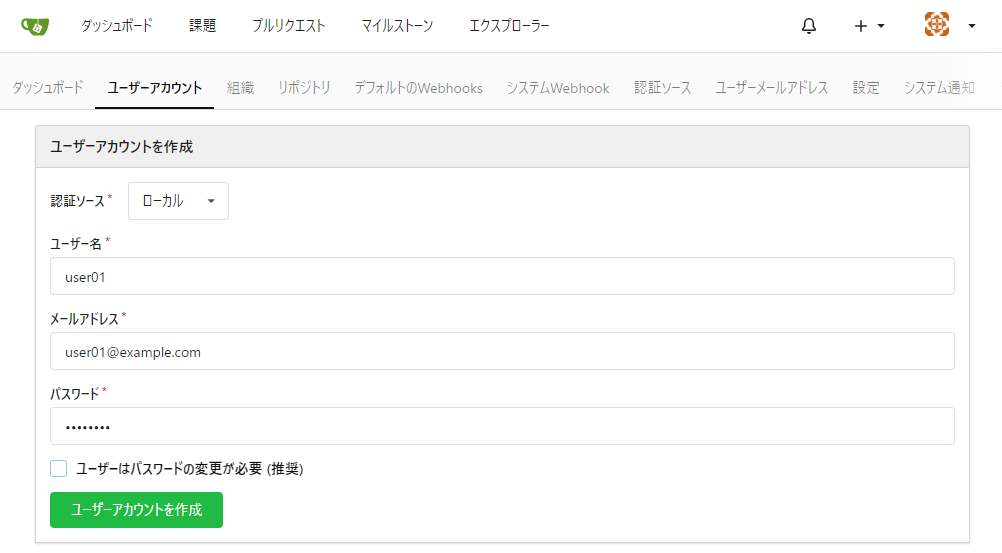
ユーザの作成
メニューの「サイト管理」→「ユーザーアカウント」から「ユーザーアカウントを作成」をクリック

適当に情報をいれてユーザを作成
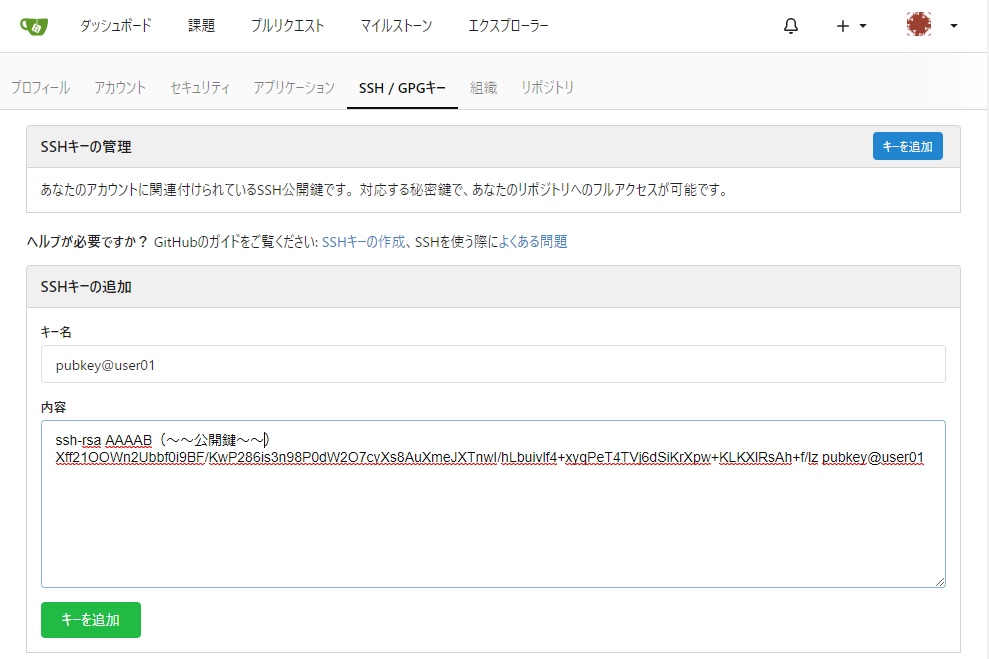
user01でログインしなおして公開鍵を登録しておく
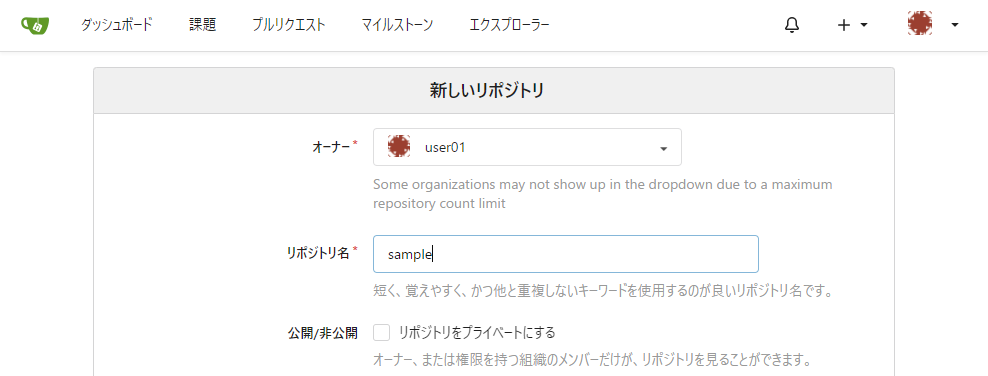
リポジトリの作成
上部メニューから「新しいリポジトリ」をクリック

オーナーは自分、リポジトリ名を sample としておきます。
(公開・非公開はどちらでもOKです)
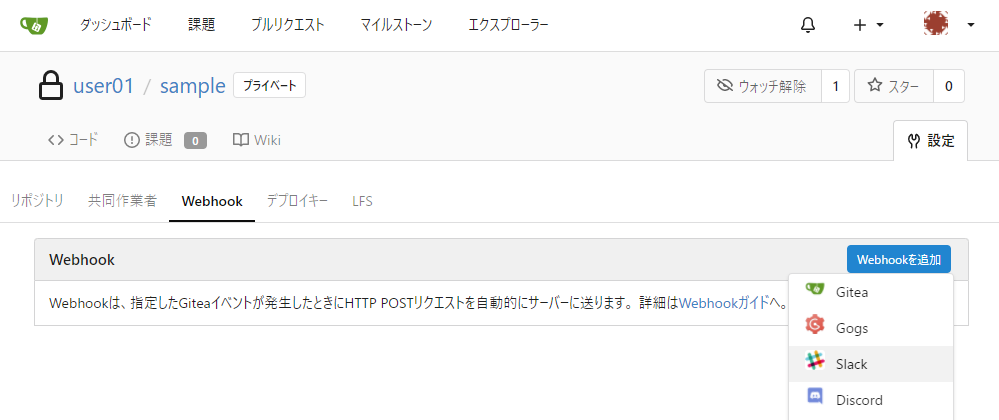
リポジトリにSlackとJenkinsのwebhookを設定
リポジトリへのpushを検知し、Slackへの通知と、Jenkinsのビルドトリガを行うため、webhookを設定します。
リポジトリの設定メニュからWebhookのSlackを選択
必要な情報を入力します。
(Slackアプリが未作成の場合は ここ のとおり設定しておく)
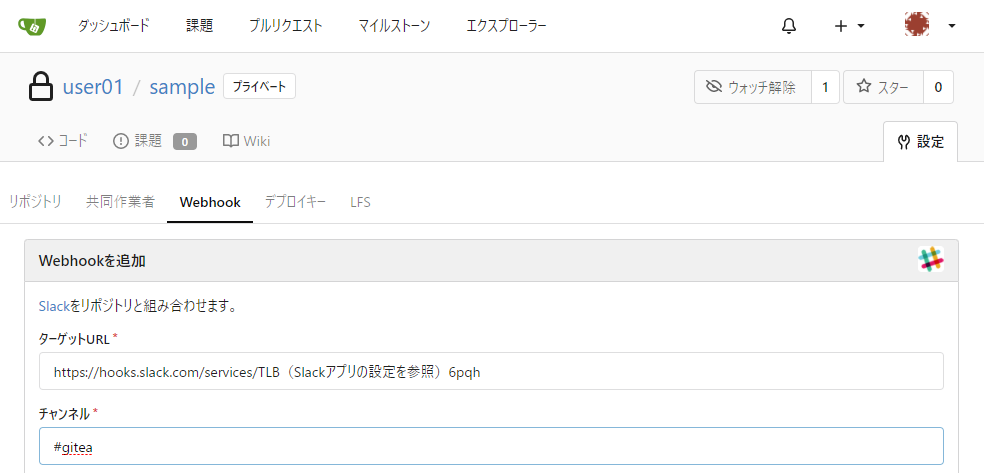
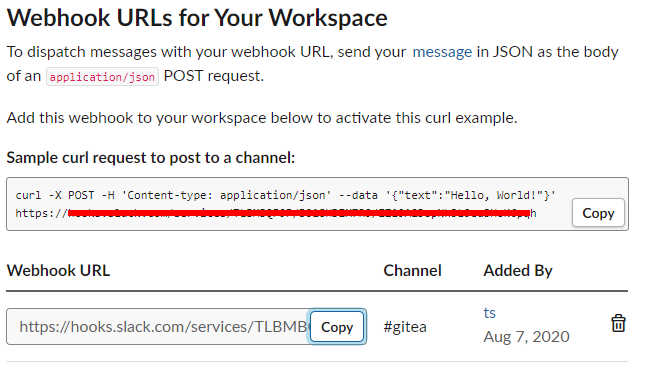
ターゲットURLはSlackアプリ設定のページの以下の場所のやつです
同様にリポジトリの設定メニュからWebhookのGiteaを選択し、JenkinsのWebhook情報を入力します。

リポジトリへのpush
このサーバで初めてgitを利用する場合は、自身の設定をしておきます。
git config --global user.name "user01"
git config --global user.email user01@example.com
ためにし、開発用のディレクトリに移動して、このリポジトリへpushしてみます。
mkdir /usr/share/nginx/html-dev/sample
cd /usr/share/nginx/html-dev/sample
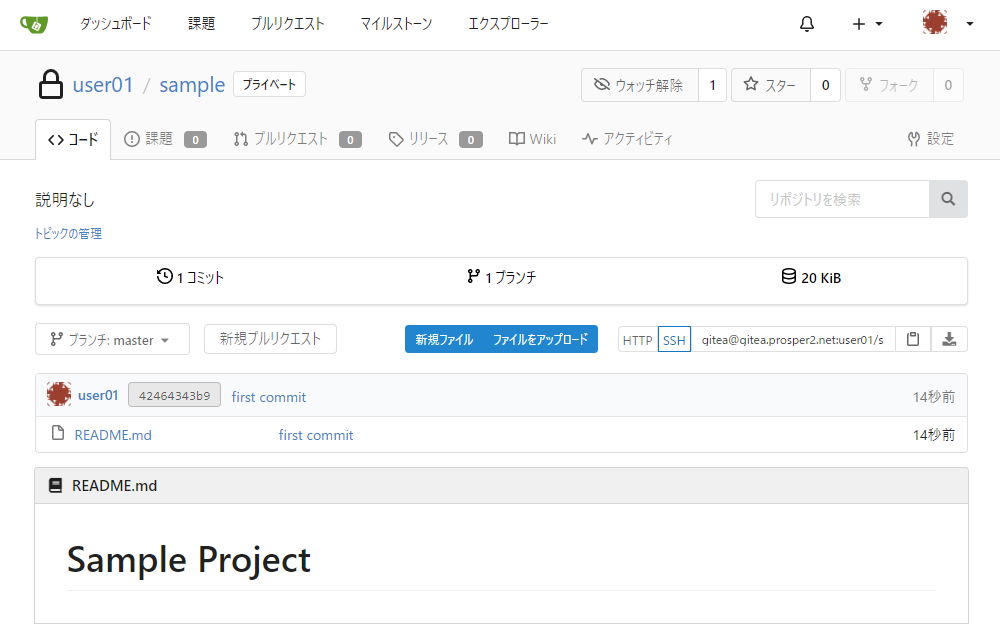
echo '# Sample Project' > README.md
git init
git add README.md
git commit -m "first commit"
git remote add origin gitea@gitea.prosper2.net:user01/sample.git
git push -u origin master
Giteaにpushされました
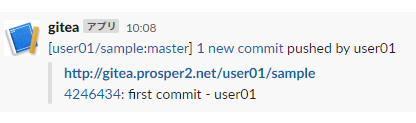
Slackにも通知がきました
リポジトリにJenkinsからアクセスできるようにトークンを発行
Jenkinsへpushを通知した際に、JenkinsのGiteaプラグインからアクセスできるようにするため、アクセストークンを発行します。
「設定」→「アプリケーション」からアクセストークンを発行しておきます。
(トークンは作成直後に1度だけ表示されるので、控えておきます)

Jenkinsでsampleアプリ用のプロジェクトを作成
前回構築手順では、組織に対してプロジェクトを作成しましたが、今回は個別ユーザのリポジトリですので、個別ユーザのプロジェクトを作成します。
サイドメニュの「新規ジョブ作成」を選択し、「Gitea Organization」でジョブを作成します。
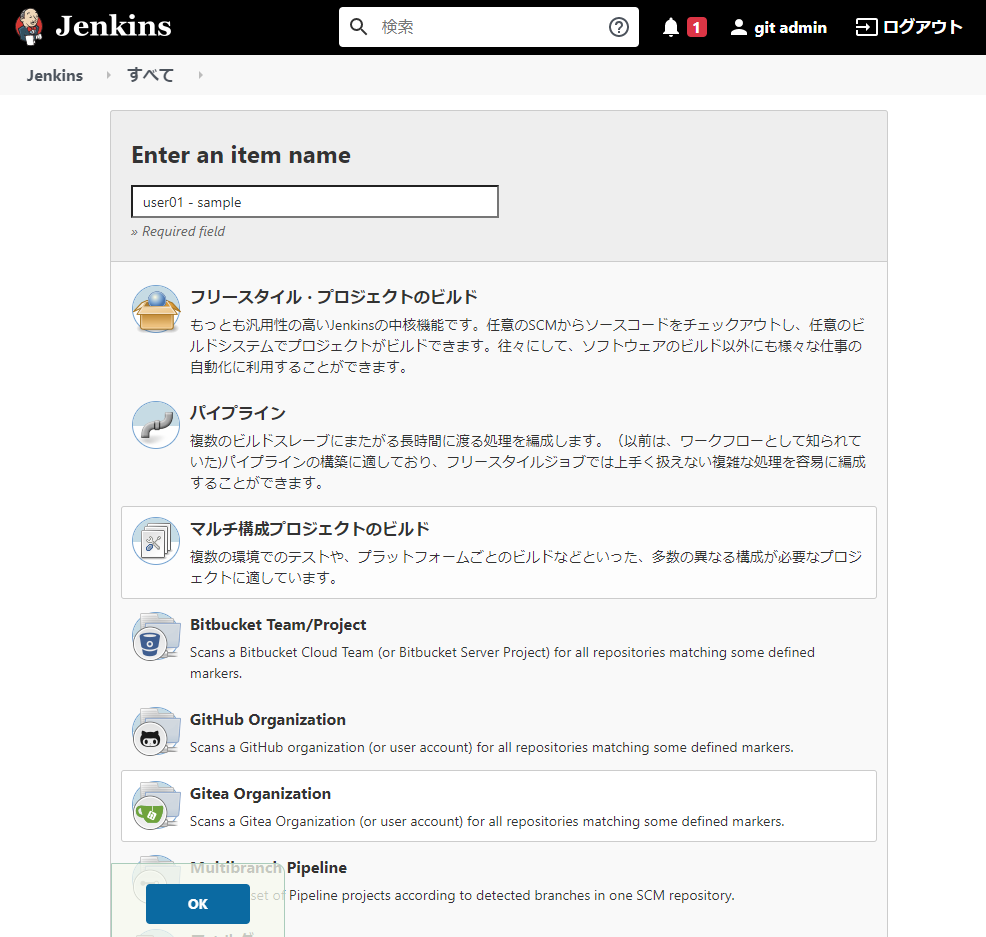
「Credentials」→「追加」として、作成したジョブ名称(今回は user01 - sample としました)を選択します。

「種類」を Gitea Personal Access Token とし、さきほど作成しておいたGiteaのアクセストークンを入力して「追加」します。
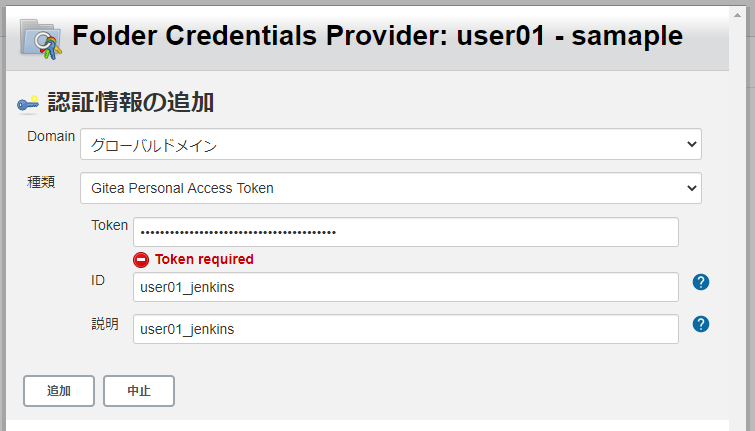
もどった画面で「Credentials」にいま作成したアクセストークンを選択、「Owner」にはGiteaのユーザ名(今回は user01 )を入力します。
そのほかはデフォルトのままでOKなので、「保存」します。

ジョブ作成直後に設定に従って、 user01 が所有するリポジトリを走査します。
画面では sample というリポジトリが検出されましたが、Jenkinsfileがない、と言われています。(現時点では作成していないのでこれでOKです)
今後の手順でJenkinsfileにpipelineの記述をして、自動的にテストやデプロイを行わせるようにします。

アプリケーションの作成
ここでは、 sample という名称のアプリケーションを作成していきます。
同時にテストコードも作成しておきます。
まず、今後必要となるディレクトリを作成しておきます。
mkdir /usr/share/nginx/html-dev/sample/{src,test,deploy}
mkdir /usr/share/nginx/html-dev/sample/src/lib
各スクリプトへのインデックスファイル
動作確認のため、各スクリプトへのインデックスを準備します。
<html>
<body>

<h2>PHP script</h2>
<a href=/sample/index.php>index.php</a><BR>

<h2>Perl script</h2>
<a href=/sample/index.pl>index.pl</a><BR>

<h2>Python script</h2>
<a href=/sample/index.py>index.py</a><BR>

</body>
</html>
PHPアプリケーション
アプリケーション本体
<?php

include('./lib/math_modules.php');

print "<html><body>\n";
print "Hello PHP Script!<BR>\n";

for ($xx=1; $xx<10; $xx++) {
    for ($yy=1; $yy<10; $yy++) {
        printf("%4d",$xx*$yy);
    }
    print "<BR>\n";
}

print "NEW FUNCTIONS<BR>\n";
print "factorial(4) = ".math_modules::factorial(4)."<BR>\n";
print "</body></html>\n";
モジュール
<?php

class math_modules {

  public function factorial($n) {
    if ($n > 0) {
      return $n * math_modules::factorial($n - 1);
    } else {
      return 1;
    }
  }

}
テストコード
<?php

include('../src/lib/math_modules.php');

class math_modules_test extends \PHPUnit\Framework\TestCase {
    protected $object;

    protected function setUp(): void {
        $this->object = new math_modules();
    }

    public function testFactorial() {
        $this->assertEquals(24, $this->object->factorial(4));
        $this->assertEquals(1, $this->object->factorial(0));
    }

}
test ディレクトリで phpunit を実施
~test$ phpunit --cache-result-file=. ./phptest.php
PHPUnit 8.5.8 by Sebastian Bergmann and contributors.

.                                                                   1 / 1 (100%)

Time: 130 ms, Memory: 10.00 MB

OK (1 test, 2 assertions)
~test$
Pythonアプリケーション
アプリケーション本体
# !/usr/bin/python3

from lib import math_modules

if __name__ == "__main__":
    print("HTTP/1.0 200 OK")
    print("Content-type: text/html\n")
    print("<html><body>");
    print("Hello Python Script!<BR>")

    for xx in range(1,10):
        for yy in range(1,10):
            print('%4d' % (xx*yy) , end="")
        print("<BR>")

    print("NEW FUNCTIONS<BR>")
    print("factorial(4) = " + str(math_modules.factorial(4)) + "<BR>")
    print("</body></html>");
アプリケーション本体には実行権限を与えておきます
chmod 755 /usr/share/nginx/html-dev/sample/src/index.py
モジュール
def factorial(n):
    if n > 0:
        return n * factorial(n - 1)

    else:
        return 1
テストコード
import unittest
import sys
sys.path.append('../')
from src.lib import math_modules

class factorialTest(unittest.TestCase):
    def setUp(self):
        pass

    def tearDown(self):
        pass

    def test_first(self):
        self.assertEqual(24, math_modules.factorial(4))

    def test_second(self):
        self.assertEqual(1, math_modules.factorial(0))


if __name__ == "__main__":
    unittest.main()
test ディレクトリで テストコードを実行
~test$ python3 ./pythontest.py
..
----------------------------------------------------------------------
Ran 2 tests in 0.000s

OK
~test$
Perlアプリケーション
アプリケーション本体
# !/usr/bin/perl

use strict;
use warnings;

use lib qw(./lib/);
use math_modules;

my ($xx,$yy);

print "Content-type: text/html \n\n";
print "<html><body>\n";

print "Hello Perl Script!<BR>\n";

for ($xx=1; $xx<10; $xx++) {
    for ($yy=1; $yy<10; $yy++) {
        printf("%4d",$xx*$yy);
    }
    print "<BR>\n";
}

print "NEW FUNCTIONS<BR>\n";
print "factorial(4) = ".math_modules::factorial(4)."<BR>\n";
print "</body></html>\n";

exit;
アプリケーション本体には実行権限を与えておきます
chmod 755 /usr/share/nginx/html-dev/sample/src/index.pl
モジュール
package math_modules;

use strict;
use warnings;

sub factorial {
  my $n = shift;
  if ($n > 0) {
    return $n * factorial($n - 1);
  } else {
    return 1;
  }
}

1;
テストコード
use strict;
use warnings;

use lib qw(../src/lib);

use Test::More;
use math_modules;

{
  ok(math_modules::factorial(4) == 24, 'factorial');
  ok(math_modules::factorial(0) == 1, 'factorial');
}

done_testing;
test ディレクトリで prove を実施
~test$ prove ./
./perltest.t .. ok
All tests successful.
Files=1, Tests=2,  0 wallclock secs ( 0.03 usr  0.00 sys +  0.06 cusr  0.02 csys =  0.11 CPU)
Result: PASS
~test$
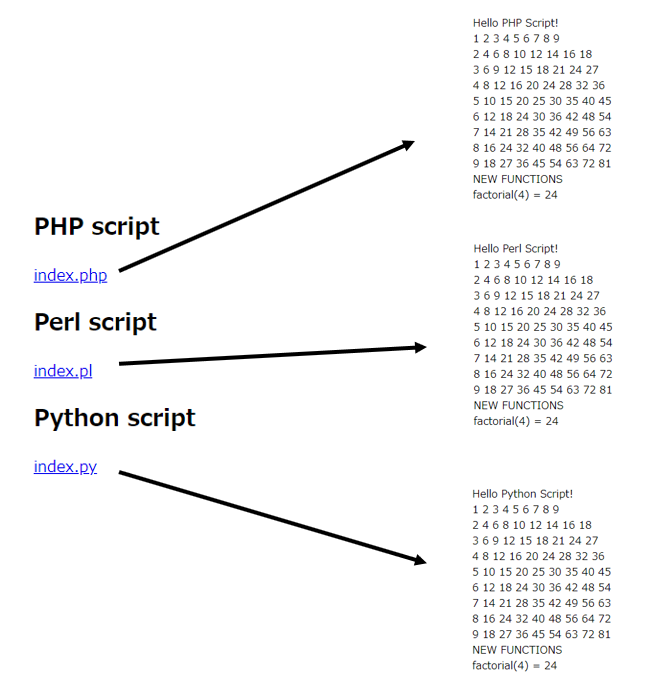
ブラウザから動作確認
http://web-dev.prosper2.net/sample/index.html へアクセス後、各スクリプトが動作するか確認する。
Jenkinsによるテストの自動化
Jenkinsfileを準備し、一連のテストを連続で実施するパイプラインを作成ます。
リポジトリへのpushをGiteaが検知し、Jenkinsへのwebhookを叩きパイプラインを実行させるようにしてみます。
ノードの準備
Jenkinsのパイプライン処理を行うサーバのことを「ノード」といい、デフォルトでJenkinsサーバそのものが master として存在しています。
今回は、アプリ開発をしているwebサーバをノードとして定義し、リポジトリへのpushを検知してテスト実施用のユーザが自動的にログインしてパイプライン処理を実施するように設定します。
webサーバ上でテストを自動的に実施するためのユーザを作成し、公開鍵認証でログインできるようにしておきます。
今回はこのユーザを remoter として作業対象のノードに作成しておきます。
鍵ペア作成時には秘密鍵のパスフレーズも設定しておきます。
秘密鍵は一度表示させて、どこかに控えておいたら、サーバ上からは削除しておきます。
useradd remoter
su remoter
ssh-keygen -t rsa -b 4096
mv ~/.ssh/id_rsa.pub ~/.ssh/authorized_keys
chmod 600 ~/.ssh/authorized_keys
cat ~/.ssh/id_rsa
rm ~/.ssh/id_rsa
また、Jenkinsノードとするために、ノード側にもjavaの導入が必要です。
dnf install -y java-11-openjdk-devel java-11-openjdk
「Jenkinsの管理」→「ノードの管理」→「新規ノード作成」をクリックし、作成するノード名を入力して「OK」します

リモートFSルート:このノードのワークスペースディレクトリを選択します。(今回はホームディレクトリそのまま)
用途:今回はアプリのテストで利用するので、特定ジョブ専用にします。
起動方法:JenkinsからSSHでwebサーバにログインするので、これにします。
ホスト:対象ホストのFQDNを入力します。
Host Key Verification Strategy:known_hostsのチェックですが、今回は無視するため、 Non verifying~ とします。
認証情報に先ほど作成した remoter の秘密鍵を登録するため、「追加」→「Jenkins」を選択します。

先ほど作成した秘密鍵とパスフレーズを登録します。
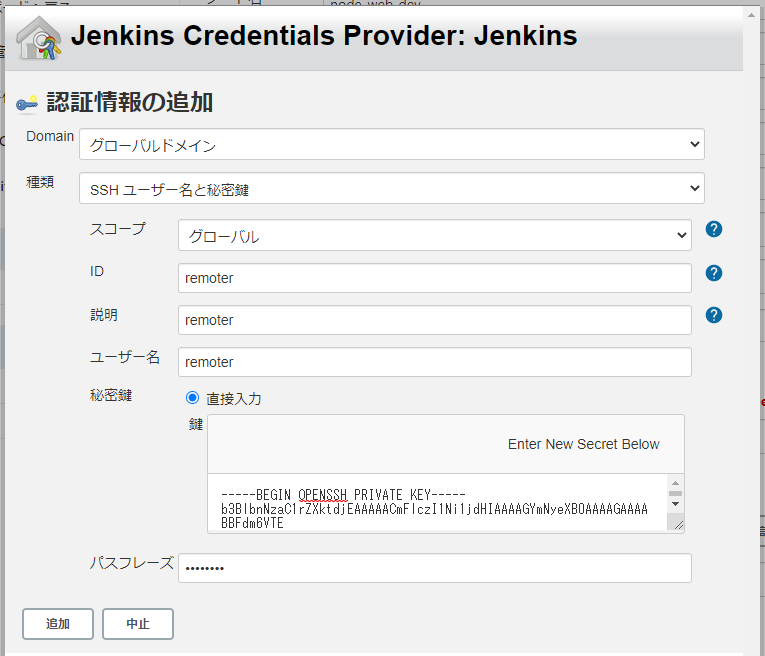
もとの画面に戻ったら、認証情報に登録した情報(今回は remoter )を選択し、「保存」します。
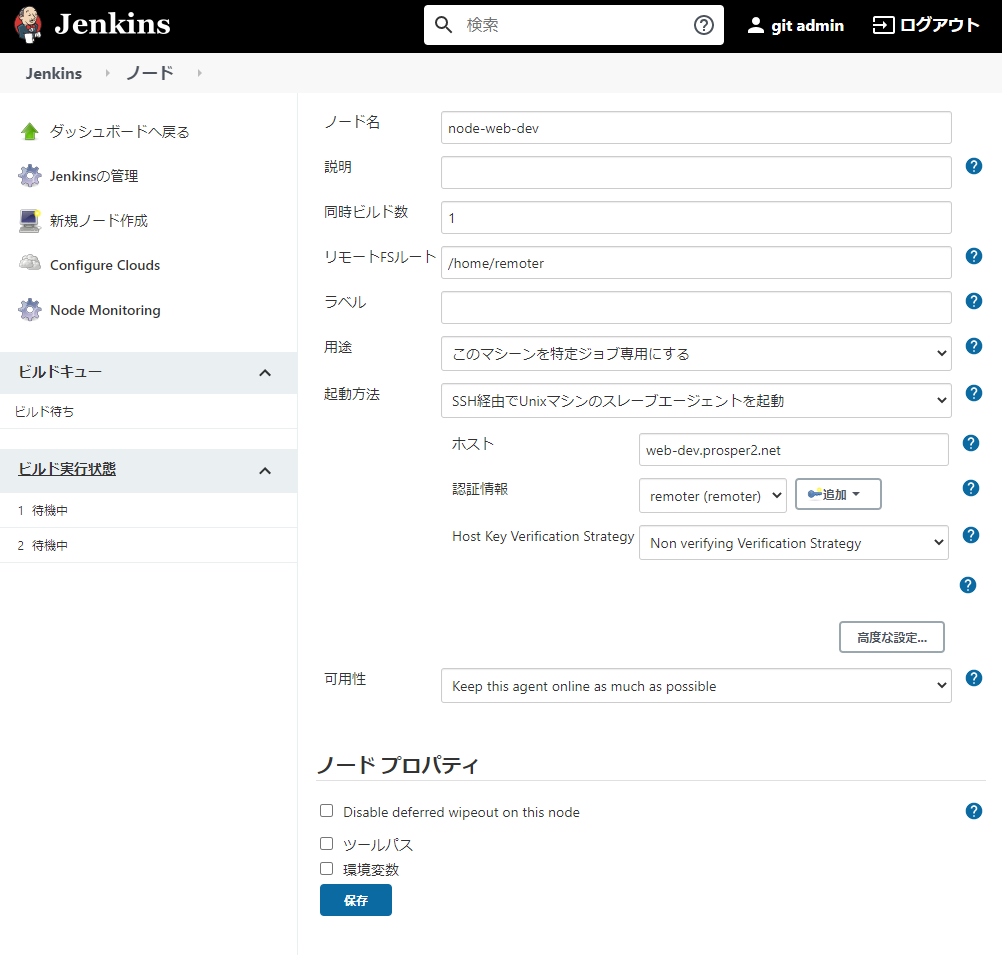
作成したノードのチェックが行われ、問題なければ、下記のように取得した情報で更新されます。
更新されない場合は、画面上の「ステータス更新」をクリックします。

remoterの認証情報は groovy スクリプトでも作成できます。
import jenkins.model.*
import com.cloudbees.plugins.credentials.*
import com.cloudbees.plugins.credentials.common.*
import com.cloudbees.plugins.credentials.domains.*
import com.cloudbees.jenkins.plugins.sshcredentials.impl.*
import hudson.plugins.sshslaves.*;

def domain = Domain.global()
def store = Jenkins.instance.getExtensionList('com.cloudbees.plugins.credentials.SystemCredentialsProvider')[0].getStore()
def keyFileContents = new File("/path/to/privkey.pem").text

def privateKey = new BasicSSHUserPrivateKey(
  CredentialsScope.GLOBAL,
  'remoter-privkey',
  'remoter',
  new BasicSSHUserPrivateKey.DirectEntryPrivateKeySource(keyFileContents),
  '',
  'remoter ssh private key'
)

store.addCredentials(domain, privateKey)
Jenkinsfileの準備
パイプライン処理でテストを実施させるために、Jenkinsfileを準備します。
PHP、Python、Perlの各テストコードの戻り値は成功すると0、失敗すると0以外、となるので、これでステージの成否を判断します。
各ステージはテストのみなので、テストのステージを並列処理するか、各ステージで失敗しても次の処理に遷移できるようにしておきます。
今回は各ステージを直列につないで、エラー発生しても中断しないように catchError しています。
pipeline {

  // 作成したエージェントを選択する
  agent { node { label 'node-web-dev' } }

  stages {

    // 省略可:ホントにノードにログインできてるか確認しておく
    stage('Check environment') {
      steps {
        sh "cat /etc/redhat-release ; id ; hostname ; pwd ; ls"
      }
    }

    // PHPアプリのテストを行うステージ
    stage('Test PHP applications : PHPunit') {
      steps {

        // 変数に代入するのでscriptで処理させる必要がある
        script {

          // shをreturnStatus:trueにしてテスト結果を取得してRESULTに代入する
          RESULT = sh(returnStatus: true, script: 'cd test && phpunit --cache-result-file=. ./phptest.php')

          // 戻り値が0以外なら失敗とみなして強制的にエラーにさせるが、
          // 処理を中断させない(=次のステージのテストは継続実施させる)ようにcatchErrorしておく
          if ( RESULT ){
            catchError(buildResult: 'FAILURE', stageResult: 'FAILURE') {
              error message: "TEST FAIL"
            }
          }
        }
      }
    }


    // Pythonアプリのテストを行うステージ
    stage('Test Python applications : unittest') {
      steps {
        script {
          RESULT = sh(returnStatus: true, script: 'cd test && python3 ./pythontest.py')
          if ( RESULT ){
            catchError(buildResult: 'FAILURE', stageResult: 'FAILURE') {
              error message: "TEST FAIL"
            }
          }
        }
      }
    }


    // Perlアプリのテストを行うステージ
    stage('Test Perl applications : Test::More') {
      steps {
        script {
          RESULT = sh(returnStatus: true, script: 'cd test && prove ./perltest.t')
          if ( RESULT ){
            catchError(buildResult: 'FAILURE', stageResult: 'FAILURE') {
              error message: "TEST FAIL"
            }
          }
        }
      }
    }


  }

  // パイプライン処理終了後に行う処理
  post {
    // ビルドの成否にかかわらず、cleanWsでワークスペースを掃除する
    always {
      cleanWs()
    }
  }

}
リポジトリへpushする
Jenkinsファイルが作成できたら、これまでに作成したアプリケーションも含めてリポジトリへpushします。
cd /usr/share/nginx/html-dev/sample
git add -A
git commit -m "pipeline job : Jenkinsfile"
git push origin master
これで、Giteaでpushを検知してJenkinsのwebhookを叩いて、JenkinsのGiteaプラグインがsampleにあるリポジトリを走査します。
検出されたリポジトリにJenkinsfileが存在すれば、ビルドが走ります。
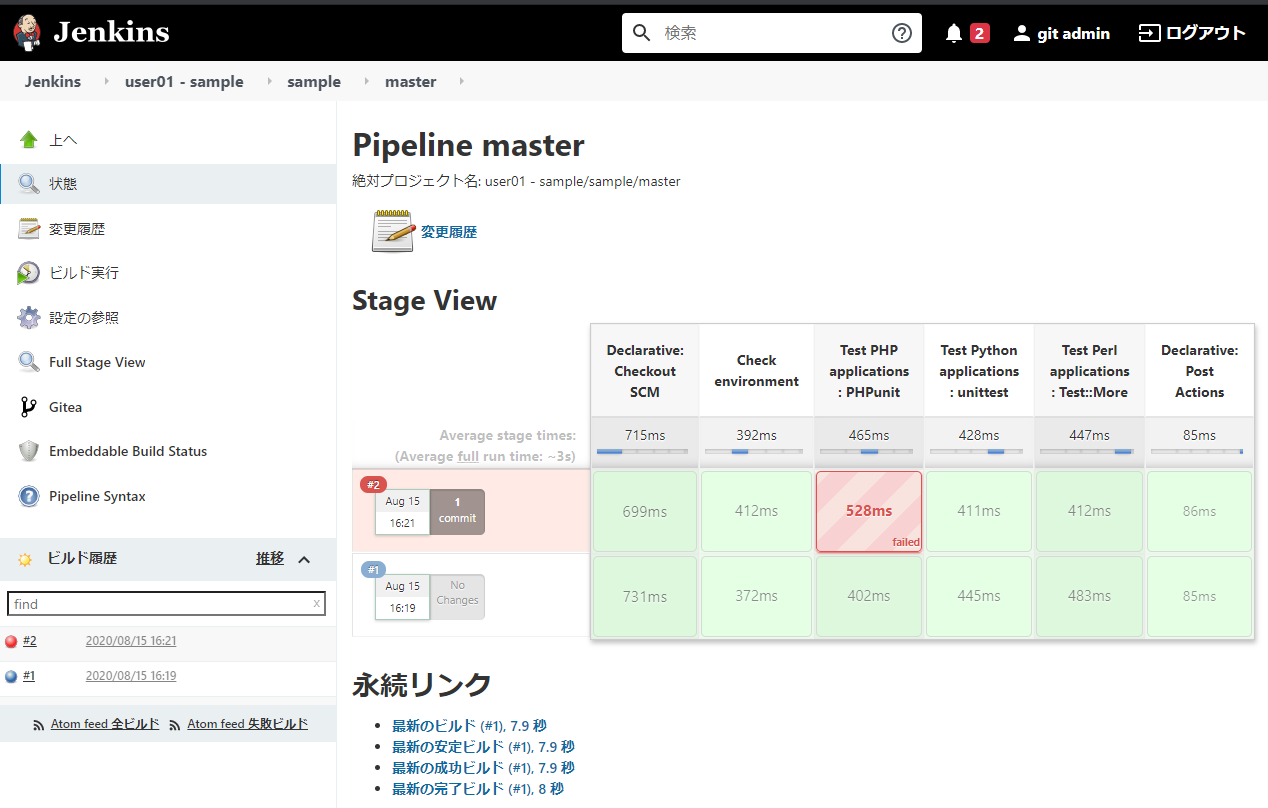
Jenkinsでのビルド結果はこんな感じで、すべてPassしているのがわかります。

Slack通知は、GiteaにPushされたものと、Jenkinsビルド結果、の2通が通知されてきています。

わざとエラーになるようにモジュールを修正してリポジトリへpushする
PHPアプリのモジュールの一部を変更してテストが失敗するようにして、再度pushしてみます。
sed -i 's/return 1/return 2/'  ./src/lib/math_modules.php
git add ./src/lib/math_modules.php
git commit -m "create bug : math_modules.php"
git push origin master
ステージ途中でエラーになっても中断しないようにJenkinsfileを作成しているので、PHPの部分はfailedですが、後続のテストが行われています。
ビルド全体はfailとなっています。
同じくSlackでも通知がきています。こちらもビルド結果はfailとなっています。

Jenkinsによるデプロイの自動化
さきほどのJenkinsfileを修正し、テストが全部Passしたら、公開サーバにこのリポジトリのmasterブランチをcloneしてみます。
cloneはAnsibleで準備し、Jenkinsから自動でデプロイでも、手動でデプロイでも実施できるようにしておきます。
Jenkinsのpipeline処理で開発サーバにSSHログインした状態でPlaybookを実行するようにします。
Ansibleのインストール
開発サーバ上でPlaybookを実行するため、Ansibleが導入されていない場合は、pipでインストールしておきます。
pip3 install pip -U
pip3 install ansible
AnsibleのPlaybookを作成
開発サーバ上でPlaybookを作成します。
[defaults]
inventory = ./hosts

[ssh_connection]
ssh_args = -o UserKnownHostsFile=/dev/null -o StrictHostKeyChecking=no -o ForwardAgent=yes
[web_pub]
web-pub.prosper2.net
- hosts: web_pub
  tasks:

    - name: Git clone sample application
      git:
        repo: "gitea@gitea.prosper2.net:user01/sample.git"
        dest: "/usr/share/nginx/html-pub/sample"
        version: "master"
        accept_hostkey: yes
自分の公開鍵がwebサーバ上にない場合は作成しておきます。
これは開発サーバ→公開サーバへSSHログイン(今回の場合は同一ホストですが。。。)するため、公開サーバに公開鍵を置く、ということです。
vi ~/.ssh/authorized_keys
chmod 600 ~/.ssh/authorized_keys
手動で実行して本番サーバへログインしてリポジトリのクローンができるか確認しておきます。
$ ansible-playbook playbook_deploy-web.yml

PLAY [web_pub] ***************************************************************************

TASK [Gathering Facts] *******************************************************************
ok: [web-pub.prosper2.net]

TASK [Git clone sample application] ******************************************************
changed: [web-pub.prosper2.net]

PLAY RECAP *******************************************************************************
web-pub.prosper2.net       : ok=2    changed=1    unreachable=0    failed=0    skipped=0    rescued=0    ignored=0
無事にクローンできていることが確認できたら、削除しておきます。
$ ls /usr/share/nginx/html-pub/sample/
Jenkinsfile  README.md  src  test

$ rm -rf /usr/share/nginx/html-pub/sample/
Giteaにremoterのユーザを追加して権限付与する
Jenkinsからpipelineを実行するユーザの remoter がGiteaのリポジトリにアクセスしてcloneしてくるので、Giteaにユーザ登録しておきます。
gitadmin(他に管理者権限のアカウントがあればそれでもOK)でログインし、ユーザを作成します。
「サイト管理」→「ユーザーアカウント」からユーザアカウントを作成
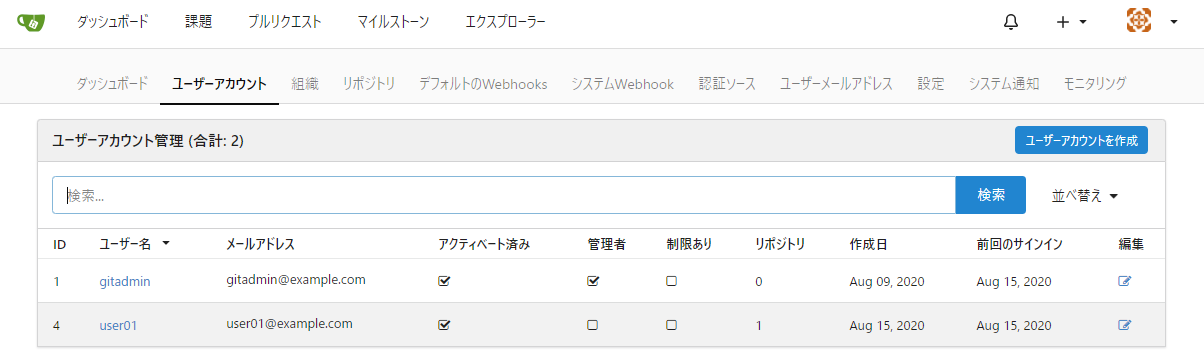
ユーザ名を remoter として作成します。

公開鍵登録のため、ログアウトしてremoterでログインします。
「設定」→「SSHキーの追加」で先ほど作成した公開鍵(/home/remoter/.ssh/authorized_keys)を登録します。

こんな感じで登録されたら、ログアウトしてgitadminでログインしなおす。

「サイト管理」→「ユーザーアカウント」からremoterを選択し、「サインイン無効」「管理者」にチェックをいれて更新する。
これでWebUIは利用できないが、管理権限を持つremoterがGitea上に作成された。
(「管理者」でない場合、リポジトリをプライベートで作成した場合に remoter からアクセスできず clone が失敗します)

ユーザ作成と公開鍵登録は以下のようにコマンドでも実施できます。
sudo -u gitea ./gitea admin create-user \
 --username remoter \
 --password PASSWORD \
 --email remoter@localhost \
 --admin \
 --must-change-password=false \
 --access-token
こうすると、APIトークンが出力される。
これを利用してGiteaAPIで鍵を登録する。
curl -X POST "https://www.prosper2.net/gitea/api/v1/user/keys" \
    -H "accept: application/json" \
    -H "Authorization: token ユーザ作成で表示されたAPIトークンを入れる" \
    -H "Content-Type: application/json" -d \
       "{\"key\": \"`ssh-keygen -y -f /path/to/privkey.pem|tr -d '\n'`\", \"read_only\": true, \"title\": \"remoter pubkey\"}" -i
JenkinsにSSH Agentプラグインを導入
テストを行うステージでは、remoterが開発サーバにログインしてから、ローカルのテストコマンドを発行しました。
デプロイのステージでは、remoterが開発サーバにログインしてから、Ansibleを叩きますが、その際に対象サーバにSSHログインが行われます。
このとき、 remoter の秘密鍵は開発サーバ上にないため、Jenkinsから開発サーバへログインしたときの鍵をそのまま流用する必要があります。
そのために、SSH Agentプラグインの導入が必要になります。
「Jenkinsの管理」→「プラグインの管理」からSSH Agentをインストールします。

Jenkinsfileの準備
テストを実行するJenkinsfileに、「それまでのステージのビルド結果がSUCCESSであれば、AnsibleのPlaybookを実行する」という処理をくわえます。
加えたあとのjenkinsfileは以下のとおり。
pipeline {

  agent { node { label 'node-web-dev' } }

  stages {

    // ホントにノードにログインできてるか確認しておく
    stage('Check environment') {
      steps {
        sh "cat /etc/redhat-release ; id ; hostname ; pwd ; ls"
      }
    }

    // PHPアプリのテストを行うステージ
    stage('Test PHP applications : PHPunit') {
      steps {

        // 変数に代入するのでscriptで処理させる必要がある
        script {

          // shをreturnStatus:trueにしてテスト結果を取得してRESULTに代入する
          RESULT = sh(returnStatus: true, script: 'cd test && phpunit --cache-result-file=. ./phptest.php')

          // 戻り値が0以外なら失敗とみなして強制的にエラーにさせるが、
          // ビルドは成功したとみなして次のステージへ進めるようにする。
          if ( RESULT ){
            catchError(buildResult: 'FAILURE', stageResult: 'FAILURE') {
              error message: "TEST FAIL"
            }
          }
        }
      }
    }


    // Pythonアプリのテストを行うステージ
    stage('Test Python applications : unittest') {
      steps {
        script {
          RESULT = sh(returnStatus: true, script: 'cd test && python3 ./pythontest.py')
          if ( RESULT ){
            catchError(buildResult: 'FAILURE', stageResult: 'FAILURE') {
              error message: "TEST FAIL"
            }
          }
        }
      }
    }


    // Perlアプリのテストを行うステージ
    stage('Test Perl applications : Test::More') {
      steps {
        script {
          RESULT = sh(returnStatus: true, script: 'cd test && prove ./perltest.t')
          if ( RESULT ){
            catchError(buildResult: 'FAILURE', stageResult: 'FAILURE') {
              error message: "TEST FAIL"
            }
          }
        }
      }
    }


    // デプロイ用のPlaybookを実行
    stage('Deploy Application') {
      // ここまでのビルド結果がSUCCESS(=テストをすべてPASS)になっていたら、このステージを実行します。
      when {
        expression {currentBuild.currentResult == 'SUCCESS'}
      }
      steps {
        // Jenkinsから開発サーバにログインしたときの鍵を流用するため
        // sshagent で remoter の クレデンシャルを指定しておきます。
        sshagent(['remoter']) {
          sh "cd deploy && ansible-playbook ./playbook_deploy-web.yml"
        }
      }
    }


  }

  // パイプライン処理終了後に行う処理
  post {
    // ビルドの成否にかかわらず、cleanWsでワークスペースを掃除する
    always {
      cleanWs()
    }
  }

}
開発しているディレクトリに戻って、先ほど作成したAnsibleのPlaybookと、修正したJenkinsfileをリポジトリへpushします。
cd /usr/share/nginx/html-dev/sample
git add -A
git commit -m "Ansible deploy : Jenkinsfile , deploy/"
git push origin master
さきほどの手順で、PHPアプリケーションをわざと間違えるようにしていたため、デプロイ部分がスキップされていることがわかります。

通知もfailedになっています。

PHPアプリケーションの間違い部分をもとにもどします。
sed -i 's/return 2/return 1/'  ./src/lib/math_modules.php
git add ./src/lib/math_modules.php
git commit -m "bug fix : math_modules.php"
git push origin master
テストがすべてPassし、デプロイされていることがわかります。

通知も正常になりました。

公開サーバのディレクトリを確認すると、Jenkinsから実行したユーザである remoter で git clone できたように見えます。
$ ll /usr/share/nginx/html-pub/sample/
合計 8
-rw-rw-r-- 1 remoter remoter 2411  8月 15 18:59 Jenkinsfile
-rw-rw-r-- 1 remoter remoter   17  8月 15 18:59 README.md
drwxrwxr-x 2 remoter remoter   69  8月 15 18:59 deploy
drwxrwxr-x 3 remoter remoter   84  8月 15 18:59 src
drwxrwxr-x 2 remoter remoter   93  8月 15 18:59 test
ブラウザから http://web-pub.prosper2.net/sample/index.html を閲覧し、各スクリプトが動作することを確認します。
これでリポジトリへのpushを契機に、テストを実施、テストをパスしたらデプロイ、まで自動化できました。
さいごに
GiteaのwebhookとJenkinsのGiteaプラグインの設定をチューニングしていけば、「公開サーバにデプロイするのは、masterブランチへのpushだけ」とか「stagingブランチにマージされた場合は、テスト後にステージングwebサーバにデプロイ」とか「stagingで一定期間が経過したら勝手にmasterへマージ&デプロイ」とかできそうなのですが、私はお仕事でプログラムを書くひとではなく、趣味レベルの開発しか経験がないので、どんな使われ方をするのか、よくわかってないのが正直なところです。「テストコード」というものを書いたのも今回が初めての経験でして。。。
あと、remoter が個人に紐づかない無人ユーザなので、秘密鍵の保管ってどうすればいいんでしょか。権限とかシェルの制限とか。共有アカウントみたいな扱いだから、自由にシェルつかえる状態だと、不正に利用された場合に証跡がわからん。とか。なんかめんどくさそう。
remoter じゃなくて個人ユーザにしたほうがよかったのかな。でもJenkins上に秘密鍵置きたくないな。やっぱデプロイはトリガーで無人じゃなくて、有人でボタンぽちー、なのかな。じゃあテストのステージもおんなじじゃねーか。アプリケーションのトークンとかも似た話なんだよな。自動化と権限の話はやっぱめんどくさいや。とかとか。
いろいろ考えることがありそうですが、個人利用でローカル環境だし全然おっけーっしょ。でいろいろとすっ飛ばしてしまいました。すみません。
参考&出典
http://nginx.org/en/docs/http/ngx_http_core_module.html#location
https://phpunit.de/supported-versions.html
https://phpunit.readthedocs.io/ja/latest/installation.html
https://www.jenkins.io/doc/book/pipeline/jenkinsfile/
https://www.jenkins.io/doc/pipeline/steps/ssh-agent/
https://plugins.jenkins.io/ssh-agent/
https://qiita.com/phorizon20/items/acb929772aaae4f52101
https://qiita.com/stoneBK7/items/fcc898f38ee161b38ef4