海で昆布作ってきました
昆布(Conv)というライブラリを作りました
先日、茅ヶ崎の海で行われたSwift愛好会で新しくライブラリを作ったのでこの記事はそれの紹介になります
Conv: https://github.com/bannzai/conv
About
Conv は UI Co llectio nV iewのデータの構造をViewの見た目と同じように表現するライブラリです。
下のような構文でUICollectionViewについてのDataSource・Delegateを定義できます。
collectionView
    .conv() // ※1
    .create(for: elements) { (sectionType, section) in // ※2
        section.create(.header, headerOrFooter: { (header: SectionHeaderFooter<SectionHeaderReusableView>) in
            header.reusableIdentifier = "SectionHeaderReusableView"
            header.size = CGSize(width: UIScreen.main.bounds.width, height: 50)
            header.configureView { view, _ in
                view.nameLabel.text = "Section: \(sectionType.rawValue)"
                view.backgroundColor = sectionType.backgroundColor
            }
        })
        section.create(for: viewModels(section: sectionType)) { (viewModel, item: Item<ListCollectionViewCell>) in // ※3
            item.reusableIdentifier = "ListCollectionViewCell"
            item.sizeFor({ _ -> CGSize in
                let gridCount: CGFloat = 3
                let edge = floor((UIScreen.main.bounds.width - (gridCount - 1)) / gridCount)
                let size = CGSize(width: edge, height: edge)
                return size
            })
            item.configureCell { (cell, info) in
                cell.configure(with: viewModel)
            }
            item.didSelect { [weak self] (_) in
                let viewController = DetailViewController(imageName: viewModel.imageName)
                self?.navigationController?.pushViewController(viewController, animated: true)
            }
        }
}
これはIndexPathのSectionおよびItemの関係を階層構造としてく表現されています。
これで実行した結果は下のようになります
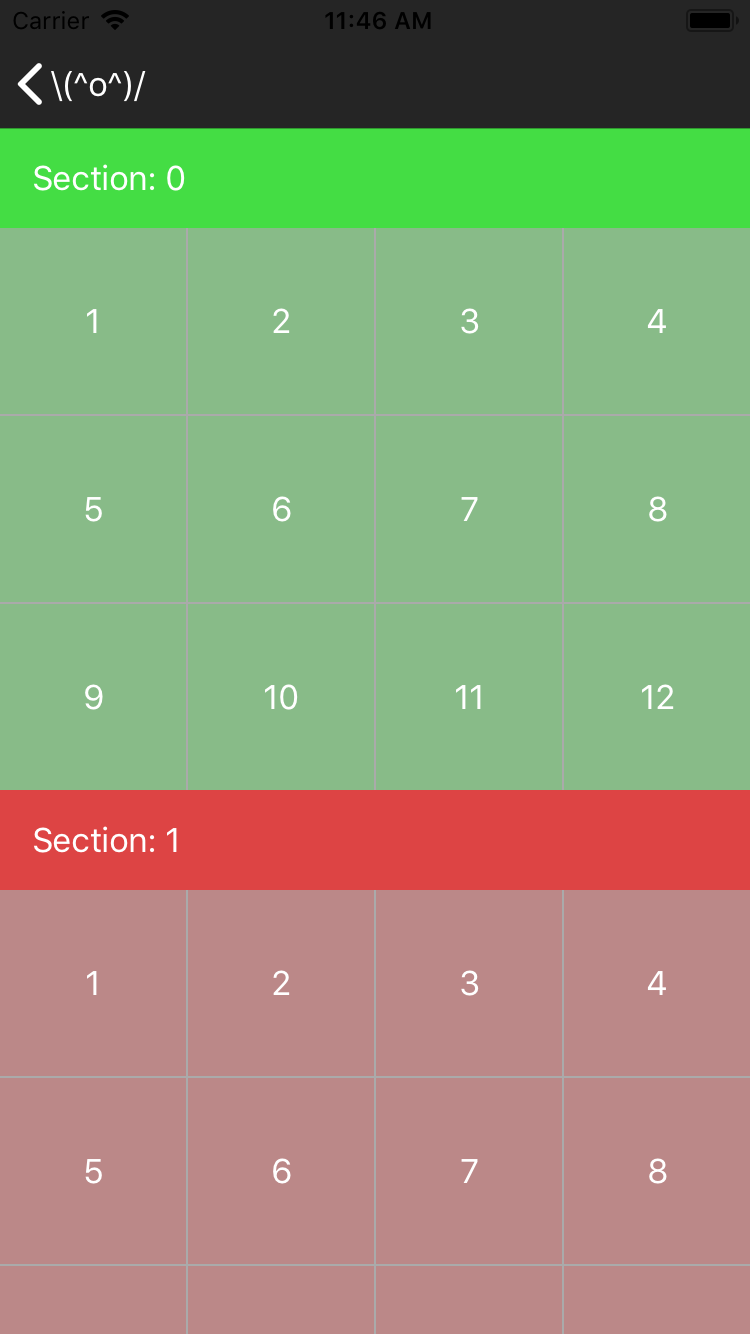
ここでいう階層構造というのは一つのSectionはItemを複数持っている関係にあることを指しています。
緑色のSection: 0 は Itemを 12個持っている。といった具合です。
コードの方にそれぞれコメントで※印をつけました。どういう役割か続いて記載して行こうと思います。
collectionView.conv()
このメソッドからConvの定義が始まります。
内部的にはConvというUICollectionViewDataSource & UICollectionViewDelegate(FlowLayout) に準拠したインスタンスが作られ、それをObjective-C runtime APIである objc_setAssociatedObjectを使ってUICollectionViewが保持しています。これによって UICollectionView.reloadData() 等が実行された時はこのConv が UICollectionViewDataSource と UICollectionViewDelegate(FlowLayout) のイベントを全て処理する形になります。
また、ConvではPaul Heckel's algorithmベースのアルゴリズムを導入して差分更新を実現しています。 UICollectionView.reload() といったExtensionが定義してあってこのメソッドを呼び出した場合は差分更新でCollectionViewが更新されるようになります。後ほどこのreload()メソッドについてはもう少し補足します。
.create(for: elements) { (sectionType, section) in ... }
#2の説明です。このメソッドは上述したConvインスタンスのメソッドです。先ほどのcollectionView.conv()はConvのインスタンスを作って返します。このメソッドの役割はいくつSectionを作るか、Sectionにはどのような情報を定義して行くか。といったことを定義のための始まりのメソッドとなります。もっと詳細にこのメソッドを解説するにはメソッドの宣言をまず確認しましょう。
public func create<E>(for elements: [E], sections closure: (E, Section) -> Void) -> Conv
上記のものは実際のものよりも簡略化したものとなります。正確なものはGitHubの方を見てみて下さい。
Conv.create(for:sections)では、第一引数に配列を渡します。渡した配列の数だけSectionを作る機能を持っています。具体的にはこの配列の数をnumberOfSections(in:)の結果として使うことになります。
そして、第二引数のclosureの部分はこの配列の要素を一つとSectionというクラスのインスタンスのペアが渡ってきます。SectionはIndexPath.sectionの単位の情報を定義する役割を持っています。例を一つあげるとcollectionView(_:numberOfItemsInSection:)があげられます。これはSectionが何個Itemを持っているかを教えるメソッドとなります。上記のコードではSectionごとのheaderを定義してあげたりもしています。
次にSectionの実質子要素であるItemの定義の話をしていきます。
headerについては次に説明するItemについての説明と被るので割愛します。
section.create(for: viewModels(section: sectionType)) { (viewModel, item: Item) in ... }
前のSectionを作るメソッドにシグネチャが似ていますが、役割としても同じようなものです。
このメソッドSection.create(for:items)では渡した配列の数だけItemを作ります。そして、それが配列の要素一つとItem<T: UICollectionViewCell>のペアを引数として受け取るclosureに渡ってきます。
ここで第二引数のクロージャーで囲まれている範囲の全容を見てみましょう。
   section.create(for: viewModels(section: sectionType)) { (viewModel, item: Item<ListCollectionViewCell>) in // ※3
            item.reusableIdentifier = "ListCollectionViewCell"
            item.sizeFor({ _ -> CGSize in
                let gridCount: CGFloat = 3
                let edge = floor((UIScreen.main.bounds.width - (gridCount - 1)) / gridCount)
                let size = CGSize(width: edge, height: edge)
                return size
            })
            item.configureCell { (cell, info) in
                cell.configure(with: viewModel)
            }
            item.didSelect { [weak self] (_) in
                let viewController = DetailViewController(imageName: viewModel.imageName)
                self?.navigationController?.pushViewController(viewController, animated: true)
            }
}
Item についてプロパティの設定とメソッドの呼び出しを行なっています。上から順に
- item.reusableIdentifier
- reuseIdentifierの設定
- item.sizeFor
- Cellのサイズの決定
- collectionView(_:layout:sizeForItemAt:)のラッパー
- item.configureCell
- セルのコンテンツを決定
- collectionView(_:cellForItemAt:)のラッパー
- item.didSelect
- セルがタップされた時
- collectionView(_:didSelectItemAt:)のラッパー
となっています。
ここでitem.configureCell の部分に着目しましょう。このメソッドは第一引数にUICollectionViewCellが渡ってくるclosureの中身を書いていくメソッドになります。上記のコードではこの部分ですね。
cell.configure(with: viewModel)
このcell.configure(with:)は正確にはListCollectionViewCellに生えているものです。 item.configureCell(_:) で渡ってくるcellはItem<ListCollectionViewCell>でジェネリクスで宣言されているListCollectionViewCellにキャストされて渡ってきます。ほとんどの場合でcollectionView(_:cellForItemAt:)のタイミングではdequeueしたCellをキャストして使用すると思いますが、それを事前に行った状態でこのメソッドに渡ってくることになります。この機構により他にもcellをキャストした状態で渡ってくるメソッドがあります。例えばcollectionView(_:willDisplay:forItemAt:)ですね。各Delegateメソッドでキャストをするといった処理が不要になります。
Convではこのような形で各DataSource & Delegateメソッドをラップしています。
なぜ作ったのか
さて、Convの大まかな機能はわかってもらえたと思うのでこのライブラリのいいところをあげていこうと思います。既存のUICollectionViewの問題と一緒に紹介していきます
単純な例ですがよくあるコードを下に書いています。
このコードではcollectionView(_:numberOfItemsInSection:)とcollectionView(_:cellForItemAt:)が使われています。
public func collectionView(_ collectionView: UICollectionView, numberOfItemsInSection section: Int) -> Int {
	switch section {
	case 0:
	  return users.count
	case 1:
	  return hobbies.count
	case 2:
	  return teams.count
	default:
	  fatalError()
	}
}

public func collectionView(_ collectionView: UICollectionView, cellForItemAt indexPath: IndexPath) -> UICollectionViewCell {
	switch (indexPath.section, indexPath.item) {
	case (0, _):
      let cell = collectionView.dequeueReusableCell(withReuseIdentifier: "ACell", for: indexPath) as! UserCell
	  cell.configure(with: users[indexPath.item])
	  ...
	  return cell
	case (1, _):
	  let cell = collectionView.dequeueReusableCell(withReuseIdentifier: "BCell", for: indexPath) as! HobbyCell
	  cell.configure(with: hobbies[indexPath.item])
	  ...
	  return cell
	case (2, _):
	  let cell = collectionView.dequeueReusableCell(withReuseIdentifier: "CCell", for: indexPath) as! TeamCell
	  cell.configure(with: teams[indexPath.item])
	  ...
	  return cell
	default:
	   fatalError()
	}
}
section == 0 の処理に焦点を当てると、このUICollectionViewでは、
section == 0の場合はusersの数だけACellのKeyを使ってUserCellにキャストしてセルのコンテンツの中身を決定する動作になります。しかし、各メソッドごとに定義する内容が違うためにこの関係性が弱くなってしまいます。
上述したコードは正しく動作します。が、例えば section == 0 が users の数だけ itemを作ると言う書き方をせずにteamsの数だけ item を作る。といった書き方ができてしまいます。これの結果はきっと期待した動作にならない可能性が大きいでしょう cell.setup(with: users[indexPath.item])で out of bounds を起こすかもしれませんね。
Conv ではこの関係性を短いスコープとしてクロージャと記述することで関係性を限定的にしています。
さらに Section と Item が実質親子関係と見ることができます。この階層構造をコードで表現しています。
Conv でこれを書き直してみましょう。違いは SectionType と言う Enum を用意したくらいです。
余計なfatalErrorも消えてスッキリしましたね
collectionView
		.conv()
		.create(for: SectionType.elements) { (sectionType, section) in // ※2
				switch sectionType {
				case .users:
						section.create(for: users) { user, item: Item<UserCell> in
							item.reusableIdentifier = "ACell"
							item.size = ...
							item.configureCell({ cell, _ in
								cell.configure(with: user)
						})
				}
				case .hobbies:
					section.create(for: hobbies) { hobby, item: Item<ItemCell> in
							item.reusableIdentifier = "BCell"
							item.size = ...
							item.configureCell({ cell, _ in
								cell.configure(with: hobby)
						})
				}
				case .teams:
					section.create(for: teams) { team, item: Item<ItemCell> in
							item.reusableIdentifier = "CCell"
							item.size = ...
							item.configureCell({ cell, _ in
								cell.configure(with: team)
							})
				}
		}
}
差分更新について
Conv が便利なシンタックスを提供していることは紹介しました。ここでは少し差分更新について触れていきましょう。Paul Heckel's algorithmをベースにして実装していきました。その他にも多数のOSSライブラリを参考にして作っていきました。
差分更新を実現するために実装の準備が必要です。上記でも紹介したConv.create(...), Section.create(...)のSectionおよびItemを作るメソッドでは第一引数に配列を渡していきました。この配列のElementは下記のProtocolに準拠している必要があります。
この Differenciable は differenceIdentifier というプロパティを持っている必要があります。差分更新ではこのdifferenceIdentfier が同値だったら変化がないものと見なしてセルの更新をしない。違うものの場合は適切な更新処理をかけてあげる。といった実装になっています。これにより必要のないセルにreloadData が走らなくなり更新の際のパフォーマンスがよくなるようにしています。
ConvのリポジトリにあるExampleで、差分更新を確認できるものがあります。ぜひ動かしてみてください
| Insert and Delete | Move item and section |
|---|---|
 |
 |
終わりに
このライブラリを作る上で大きく影響を受けたライブラリにShoyuというものがあります。言うなればConvはShoyuのCollectionView版ですね。Viewの見た目に寄せてコードを書いていく発想がとても良くて真似してしまいました。
また、このライブラリ作る上で 昆布 を描いてくれたnoainoueにも感謝です。OSSにロゴ載せてみたい夢が叶いました。
最後にみなさんこのライブラリがいいと思ったらQiitaのいいねも欲しいけど GitHubの方に
スターください
おしまい \(^o^)/