はじめに
センサデータの収集と可視化のため、AWSのIoTサービス(Greengrass + IoT SiteWise)の利用検証をしていました。要件としては、センサデータをGreengrassに収集して、Greengrass内でデータの加工をして、IoT SiteWiseにデータを転送して、IoT SiteWise Monitorで可視化や、IoT Eventsと連携させて通知を行うというものです。
ネットに事例はいっぱいあったので、アーキテクチャを考えることは簡単だったのですが、実際に構築する方法が書かれたサイトが全くありませんでした。。
まあ、Greengrass V2が出てまだ間もないので仕方がないのかもしれませんが、
AWS公式のハンズオンと、AWS公式資料を必死に読み解き、頑張って構築したので、それらをまとめておきます。
アーキテクチャ
全体アーキテクチャ
- センサデータをJson形式でGreengrassをインストールしたサーバに転送する
- MQTT Brokerでデータを受信し、コンポーネントに転送する。
データを加工し、Stream Manager経由でIoT SiteWiseにデータを転送する
コンポーネントを作成する。 - IoT SiteWiseでデータを収集。その後いろいろする。
(参考:IoT開発検証 ~センサデータ収集監視と閾値超過通知~)

検証用アーキテクチャ
実際にセンサやサーバを用意するわけにはいかないので、手順1,2をEC2で代用する

検証開始
以下手順で検証していきます。
- Greengrassの準備
- クライアント(センサデータ転送)サーバの準備
- クライアント⇔Greengrassの疎通設定
- クライアント⇔Greengrassの疎通確認
- データ加工&転送用コンポーネント作成
- クライアント→Greengrass→IoT SiteWiseへのデータ転送確認
1.Greengrassの準備
Greengrassのインストール
「IoT Core」→「Greengrass」からGreengrassのセットアップをします。
Greengrassのインストール方法が記載されていますので、手順通りにGreengrassをインストールします。

必要なコンポーネントのデプロイ
Greengrassのインストールが完了したら、以下コンポーネントをデプロイしましょう。
それぞれのコンポーネントについてはこちらを参照してください。

2.クライアント(センサデータ転送)サーバの準備
必要なライブラリの準備
次のコマンドを入力して必要なソフトウェアとライブラリをインストールします。
sudo apt-get -y install build-essential libssl-dev cmake unzip git python3-pip
次のコマンドを入力してAWS CLIをインストールします。
curl "https://awscli.amazonaws.com/awscli-exe-linux-x86_64.zip" -o "awscliv2.zip"
unzip awscliv2.zip
sudo ./aws/install
次のコマンドを入力してAWS認証情報を設定します。
aws configure
AWS Access Key ID: your Access Key ID
AWS Secret Access Key: your Secret Access Key
Default region name: your AWS リージョン code
Default output format: json
Amazonルート認証局の証明書のコピーをダウンロード
次のコマンドを入力して/certs配下にAmazonルート認証局の証明書のコピーをダウンロードします。
mkdir ~/certs
curl -o ~/certs/AmazonRootCA1.pem https://www.amazontrust.com/repository/AmazonRootCA1.pem
chmod 745 ~
chmod 700 ~/certs
chmod 644 ~/certs/AmazonRootCA1.pem
AWS IoT Device Clientのインストール
次のコマンドを入力してAWS IoT Device Clientをインストールします。
git clone https://github.com/awslabs/aws-iot-device-client aws-iot-device-client
mkdir ~/aws-iot-device-client/build && cd ~/aws-iot-device-client/build
cmake ../
cmake --build . --target aws-iot-device-client
デバイス証明書ファイルの作成
次のコマンドを入力してデバイス証明書を作成します。
aws iot create-keys-and-certificate --set-as-active --certificate-pem-outfile "~/certs/device.pem.crt" --public-key-outfile "~/certs/public.pem.key" --private-key-outfile "~/certs/private.pem.key"
IoTポリシーの作成
以下内容のjsonファイルを作成します。
{
    "Version": "2012-10-17",
    "Statement": [
        {
            "Effect": "Allow",
            "Action": [
                "iot:Publish",
                "iot:Subscribe",
                "iot:Receive",
                "iot:Connect"
            ],
            "Resource": [
                "*"
            ]
        }
    ]
}
次のコマンドを入力してIoTポリシーを作成します。
aws iot create-policy --policy-name {ポリシー名} --policy-document {jsonファイル名}
次のコマンドを入力してポリシーをデバイス証明書にアタッチします。
aws iot attach-policy --policy-name {ポリシー名} --target {デバイス証明書のArn}
IoTモノの登録
次のコマンドを入力してIoTモノを作成します。
aws iot create-thing --thing-name {IoTモノの名前}
次のコマンドを入力してデバイス証明書をIoTモノにアタッチします
aws iot attach-thing-principal --thing-name {IoTモノの名前} --principal {デバイス証明書のArn}
3.クライアント⇔Greengrassの疎通設定
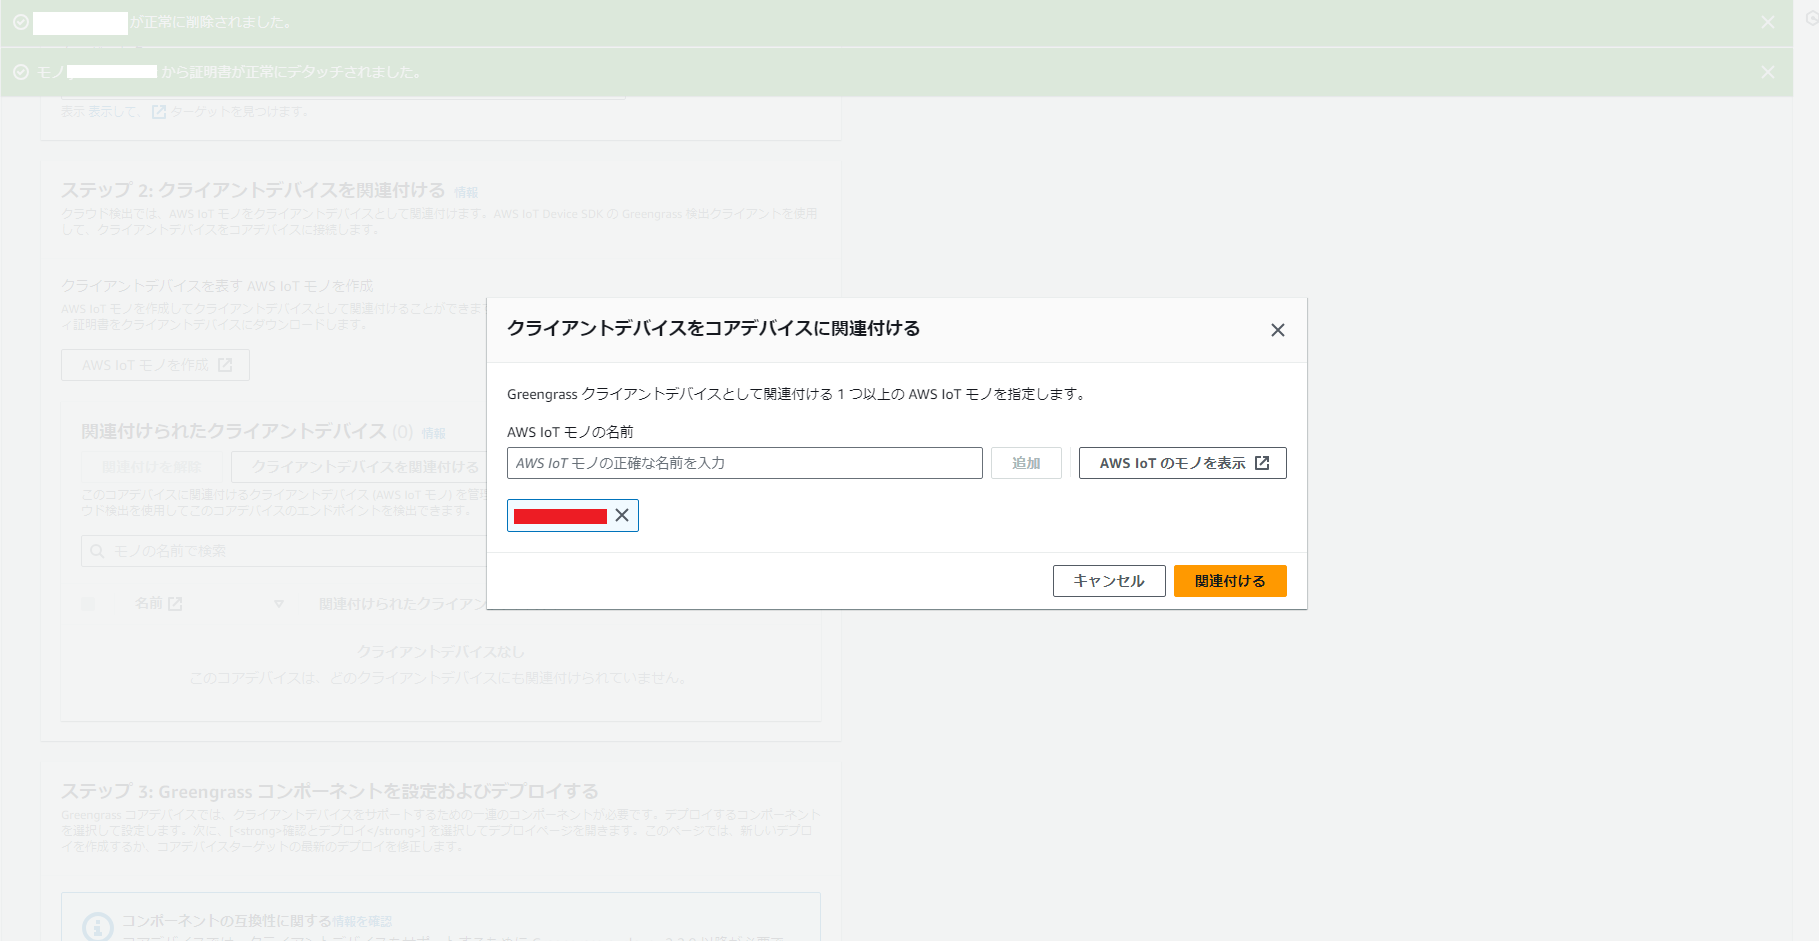
クライアントデバイスの関連付け
「コアデバイス」→「クライアント」デバイスから、2.で作成したIoTモノを関連付けます。
aws.greengrass.clientdevices.Auth設定
aws.greengrass.clientdevices.Authに以下設定をマージします。
{
  "deviceGroups": {
    "formatVersion": "2021-03-05",
    "definitions": {
      "MyDeviceGroup": {
        "selectionRule": "thingName: MyClientDevice* OR thingName: MyOtherClientDevice*",
        "policyName": "MyClientDevicePolicy"
      }
    },
    "policies": {
      "MyClientDevicePolicy": {
        "AllowConnect": {
          "statementDescription": "Allow client devices to connect.",
          "operations": [
            "mqtt:connect"
          ],
          "resources": [
            "*"
          ]
        },
        "AllowPublish": {
          "statementDescription": "Allow client devices to publish to all topics.",
          "operations": [
            "mqtt:publish"
          ],
          "resources": [
            "*"
          ]
        },
        "AllowSubscribe": {
          "statementDescription": "Allow client devices to subscribe to all topics.",
          "operations": [
            "mqtt:subscribe"
          ],
          "resources": [
            "*"
          ]
        }
      }
    }
  }
}
aws.greengrass.clientdevices.mqtt.Bridge設定
aws.greengrass.clientdevices.mqtt.Bridgeに次の設定をマージします。
{
  "mqttTopicMapping": {
    "PubsubMapping": {
      "topic": "clients/+/hello/world",
      "source": "LocalMqtt",
      "target": "Pubsub"
    }
  }
}
4.クライアント⇔Greengrassの疎通確認
クライアントデバイスでAWS IoT Device SDKを使用してGreengrassへ通信を行います。
AWS IoT Device SDKのインストール
次のコマンドを入力してAWS IoT Device SDKをインストールします。
git clone https://github.com/aws/aws-iot-device-sdk-python-v2.git
python3 -m pip install --user ./aws-iot-device-sdk-python-v2
/sampleフォルダに移動し、次のコマンドを入力してGreengrassとの通信を行います。
cd ~/aws-iot-device-sdk-python-v2/samples
python3 basic_discovery.py --thing_name {IoTモノの名前} --topic {トピック名} --message 'Hello World!' --ca_file ~/certs/AmazonRootCA1.pem --cert ~/certs/device.pem.crt --key ~/certs/private.pem.key --region ap-northeast-1 --verbosity Warn
通信が成功すると以下のようなメッセージが表示されます。
Connected!
Published topic clients/MyClientDevice1/hello/world: {"message": "Hello World!", "sequence": 0}

Publish received on topic clients/MyClientDevice1/hello/world
b'{"message": "Hello World!", "sequence": 0}'
Published topic clients/MyClientDevice1/hello/world: {"message": "Hello World!", "sequence": 1}

Publish received on topic clients/MyClientDevice1/hello/world
b'{"message": "Hello World!", "sequence": 1}'

...

Published topic clients/MyClientDevice1/hello/world: {"message": "Hello World!", "sequence": 9}

Publish received on topic clients/MyClientDevice1/hello/world
b'{"message": "Hello World!", "sequence": 9}'
これで設定したTOPICでメッセージがGreengrassに送信されます。
長くなってきたので手順5,6は次回記載します。
→こちら
終わりに
GreengrassとIoTモノの設定から、通信の疎通までを検証してみました。
AWS公式以外にあまり資料が無いので良ければご参考に、質問等あればぜひご連絡ください。
参考にした資料
AWS IoT Greengrass V2 入門ハンズオン
チュートリアル: AWS IoT Device Client 用のデバイスの準備
チュートリアル: MQTT 経由でローカル IoT デバイスとやり取りする
StreamManagerClient を使用してストリームを操作する
全てAWSの公式資料ですね。