自分のポートフォリサイトやブログを作成する時、はてブやQiita、WordPressがありますが今回は静的サイトジェネレーターHugoでWebサイトを作成し、テーマを適用する方法を書いていきます

環境
- macOS Sierra 10.12.6
- Hugo:
v0.29 - git:
2.14.1 - Homebrew:
1.3.4
Hugo・Gitのインストール
Hugo・GitはHomebrewでインストールします
~はホームディレクトリという意味です
~$ brew update
~$ brew install hugo
~$ brew install git
HugoでWebサイトを立ち上げる
hugo new site サイト名でHugoプロジェクトを作成します
作成するディレクトリはお好みの場所で
~$ hugo new site hugo_my_site
実行後以下のような結果が返ってきたらOKです
Congratulations! Your new Hugo site is created in /Users/ユーザー名/hugo_my_site.

Just a few more steps and you're ready to go:

1. Download a theme into the same-named folder.
   Choose a theme from https://themes.gohugo.io/, or
   create your own with the "hugo new theme <THEMENAME>" command.
2. Perhaps you want to add some content. You can add single files
   with "hugo new <SECTIONNAME>/<FILENAME>.<FORMAT>".
3. Start the built-in live server via "hugo server".

Visit https://gohugo.io/ for quickstart guide and full documentation.
Gitリポジトリを作成
~$ cd hugo_my_site
hugo_my_site$ git init
この時点で一旦コミットしておきましょう
hugo_my_site$ git add --all
hugo_my_site$ git commit -m "initial commit"
除外ファイルを指定
今のうちに除外ファイルを指定して不要なファイルがコミットされないようにしましょう
hugo_my_site$ touch .gitignore
.gitignoreを開き以下のように編集します
publicはhugoコマンドでビルドした時に作られるフォルダです。
+ .DS_Store
+ /public
.gitignoreをコミットしておきましょう
hugo_my_site$ git add .gitignore
hugo_my_site$ git commit -m "add .gitignore"
テーマを利用する
自分でテーマを作成するのもアリですが、今回は既存のテーマを利用しようと思います
テーマのページはこちら
https://themes.gohugo.io/
※テーマを選ぶ時の注意点
テーマの詳細ページに移動するとLicense(ライセンス)という項目があるので
ライセンスの範囲内での利用をするようにしましょう
また、実際のテーマが置いてあるGithubのリポジトリのREADMEもチェックして置く
とさらにGoodです
ライセンスの種類については各々調べてみてください
今回はUnlicense Licenseというライセンスの下記のテーマを利用します
https://themes.gohugo.io/artists/
https://github.com/digitalcraftsman/hugo-artists-theme
テーマを利用する
テーマをダウンロードする
テーマをダウンロードします。この時大抵はgit cloneコマンドをしますが、
このプロジェクト自体のgitリポジトリを作成しているため、git cloneコマンドをすると、
テーマの方のgitリポジトリも作成されるため結果的に2重管理となります。
そのため、テーマの方はサブモジュールとして扱うgit submodule addコマンドを使います
hugo_my_site$ git submodule add https://github.com/digitalcraftsman/hugo-artists-theme themes/hugo-artists-theme
以下のような結果が返ってきたらOKです
Cloning into '/Users/ユーザー名/hugo_my_site/themes/hugo-artists-theme'...
remote: Counting objects: 331, done.
remote: Total 331 (delta 0), reused 0 (delta 0), pack-reused 331
Receiving objects: 100% (331/331), 7.90 MiB | 1.13 MiB/s, done.
Resolving deltas: 100% (136/136), done.
テーマの方で更新があった場合はgit submodule updateをすると更新内容を反映することが出来ます
テーマの追加ができたのでここらへんでコミットしておきましょう
hugo_my_site$ git add --all
hugo_my_site$ git commit -m "add theme"
テーマを適用する
これで、テーマをダウンロードできました。
ここから、ダウンロードしたテーマを利用して自分のWebサイトを作成していきます
ここで注意するポイントとして、テーマをカスタマイズする時は
基本的にthemesディレクトリのファイルを直接編集しない方法で進めます。
そのため、プロジェクト(hugo_my_site)直下にあるthemesディレクトリ
以外のディレクトリのファイルを編集します
どうゆうこと?? って思うかもしれませんが、
とりあえずダウンロードしたテーマを使えるようにします
exampleSiteディレクトリのコンテンツをコピー
themesディレクトリにあるexampleSiteディレクトリのコンテンツをプロジェクト直下のディレクトリへ上書きコピーします
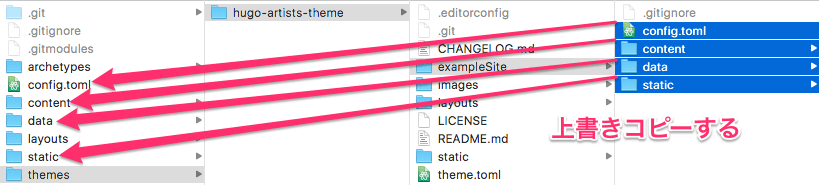
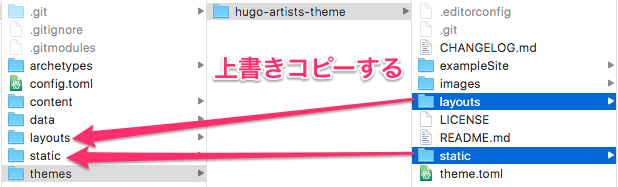
hugo-artists-themeのコンテンツをコピー
hugo-artists-themeのlayoutsとstaticをプロジェクト直下のディレクトリへ上書きコピーします
ここでHugoを立ち上げます
hugo_my_site$ hugo server
こんな具合の結果が返ってきたらOKです
Started building sites ...

Built site for language en:
0 draft content
0 future content
0 expired content
8 regular pages created
8 other pages created
0 non-page files copied
0 paginator pages created
0 tags created
0 categories created
total in 29 ms
Watching for changes in /Users/ユーザー名/hugo_my_site/{data,content,layouts,static,themes}
Serving pages from memory
Web Server is available at http://localhost:1313/ (bind address 127.0.0.1)
Press Ctrl+C to stop
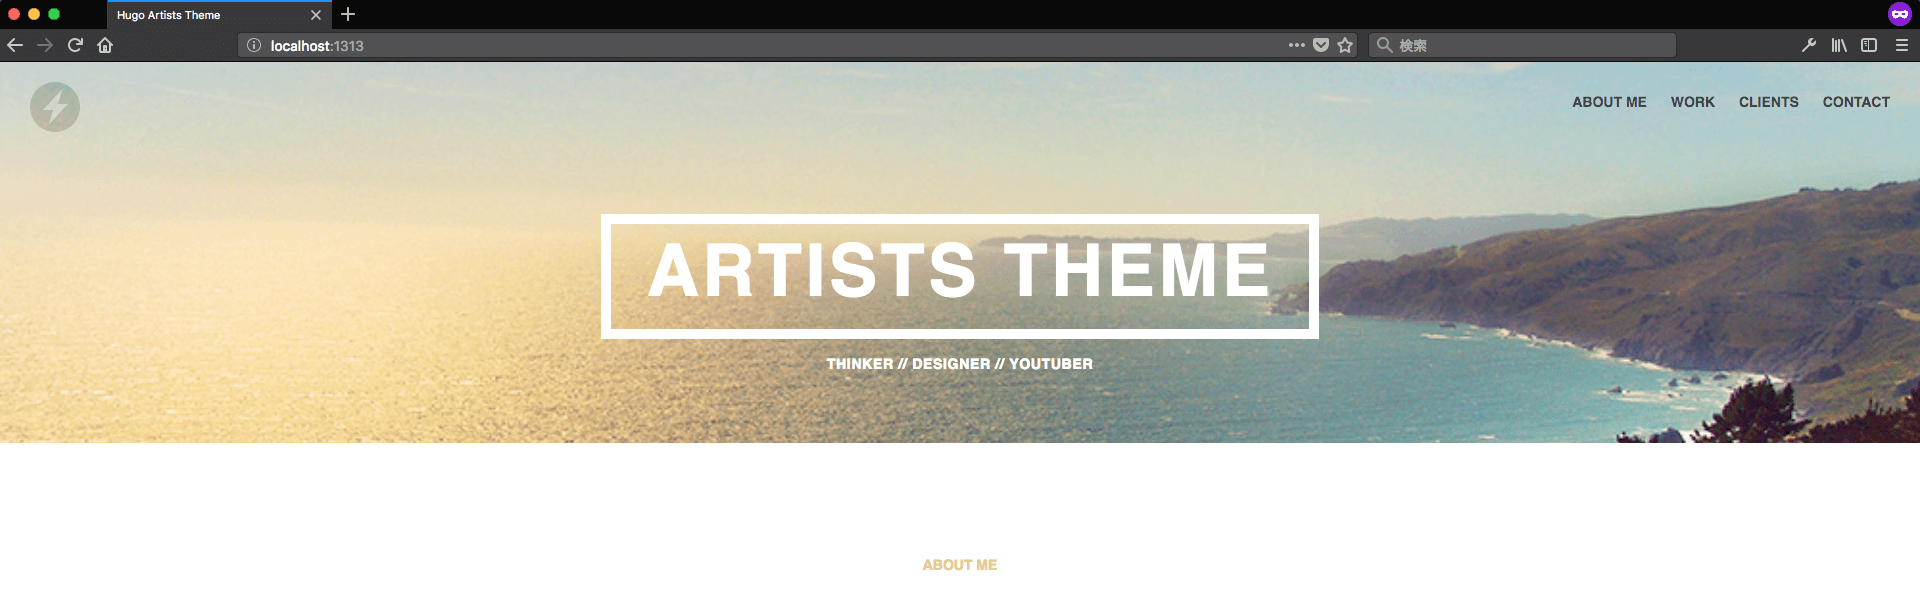
Web Server is available at http://localhost:1313/ と表示してあるので
ブラウザでhttp://localhost:1313/へアクセスし表示を確認してみましょう
以下のように表示が確認できればOKです
ガチャガチャ動かしてみる
ここまででテーマの適用ができました。ここで終わっても良いのですが
アイコンやテキストを変更してみようと思います
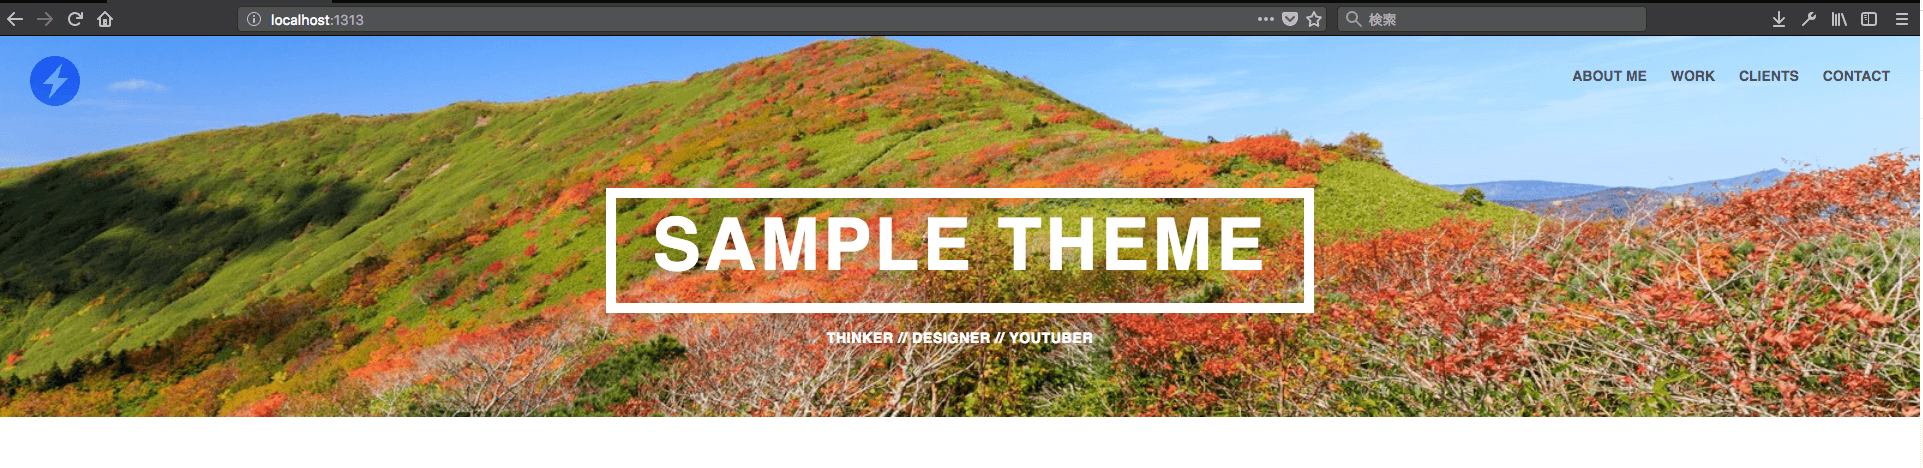
テキストを変えてみる
Artists Theme という文字列を変えてみましょう。
この場合は、プロジェクト直下にあるconfig.tomlという設定ファイルを編集します
	# Header an navigation
	#
	# To change the header background the 'hero-bg-jpg' at 'static/img'.
	# Do the same with the logo ('logo.svg').
	# But keep the original filename!
	[params.header]
-		title = "Artists Theme"
+		title = "Sample Theme"
		shortBio = "Thinker // Designer // YouTuber"
すると、以下のように変更されます

大文字で表示されているのはCSSのtext-transform: uppercase;が当たっているためだと思います。
hugo serverを立ち上げた状態で変更すると文字列はリアルタイムで反映されるようです。
画像を変更してみる
背景画像を変更してみましょう。
画像はstaticフォルダのimage置いてあります。
どうやら画像名は今回の場合、hero-bg.jpgであるようなので、
フリーの背景画像をhero-bg.jpgにリネームして上書きしてみます
リロードすると以下のようになりました
ちなみに、お借りした画像はこちら
https://www.pakutaso.com/20171116320post-14060.html
変更内容が反映されない場合
以下を試してみてください
-
hugo serverを落として(Ctrl+c)再度hugo serverで立ち上げてみる - ブラウザのシークレットモードを起動して確認する(もしくは、ウィンドウやブラウザ自体を再起動する)
-
hugo serverを落として(Ctrl+c)、hugoコマンドでビルドをし、ビルドエラーがある場合は原因箇所を修正する
これで以上となります
あとは、自分好みで画像やテキストを変更したり新しいページを加えたりしてみましょう
ドキュメントはこちら
https://gohugo.io/documentation/