はじめに
Railsで個人アプリを作成後、AWSでデプロイする際に、やり方をいつも忘れてしまうので、ここに書き記しておきたい。
前提
- Rails 5.2以上を想定
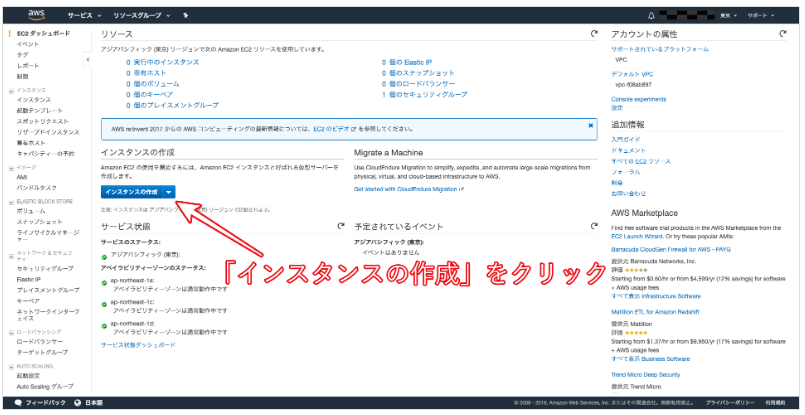
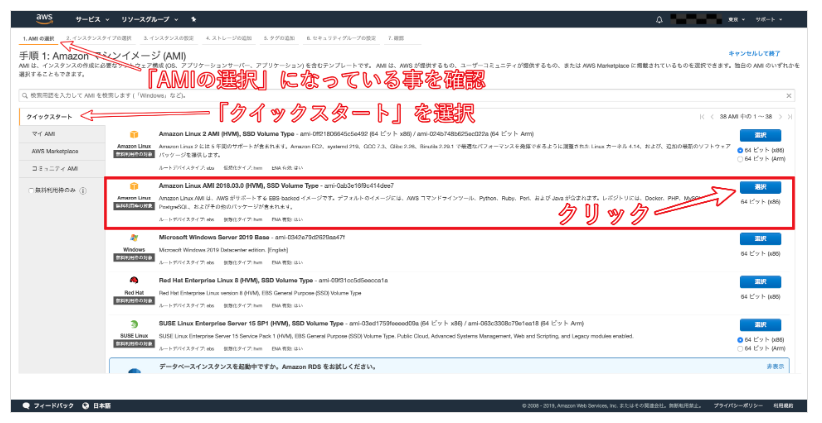
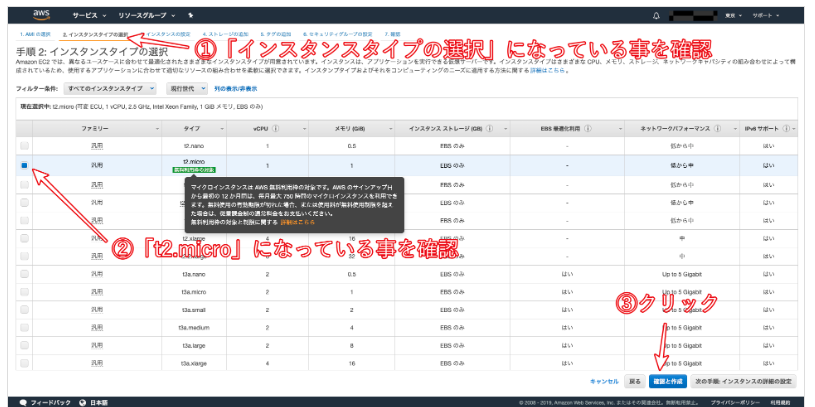
1. EC2インスタンス作成・キーペア作成
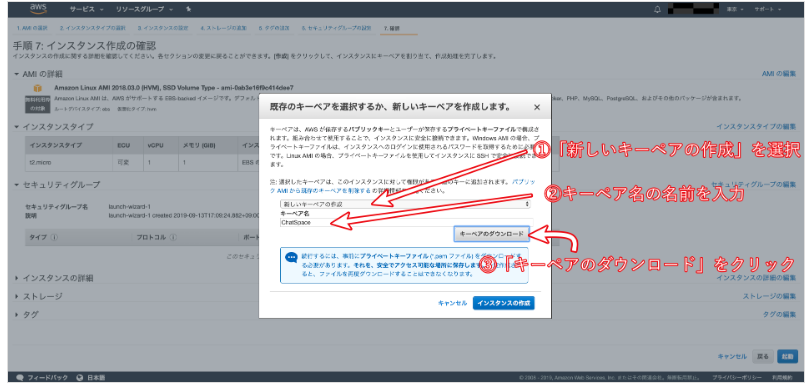
キーペアは新規作成でも、既存のキーペアでもOK。
キーペアはスペースを含んではいけない。
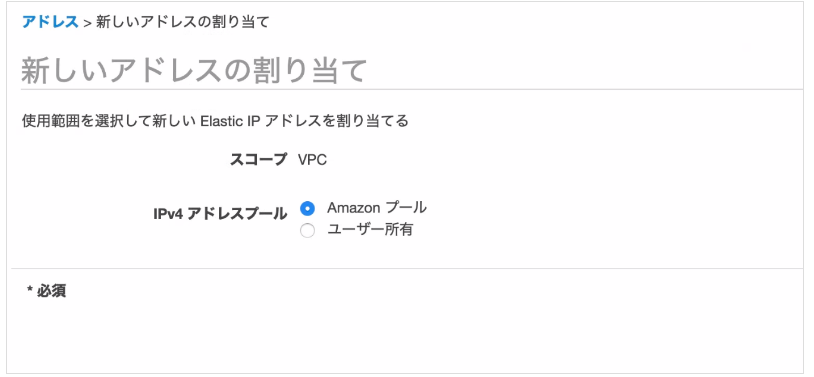
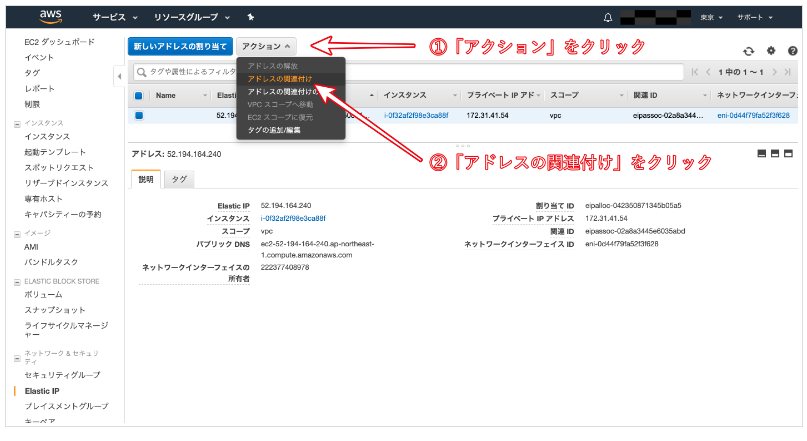
2. Elastic IPとの紐付け


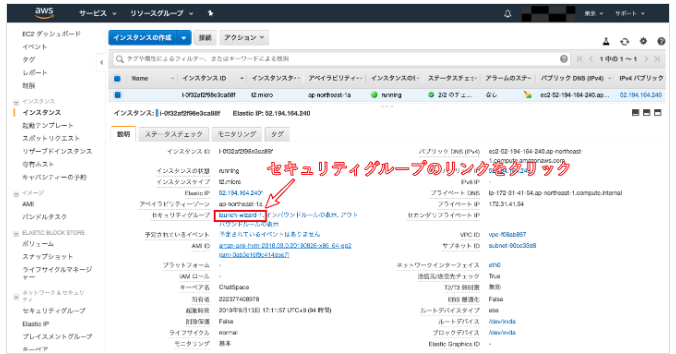
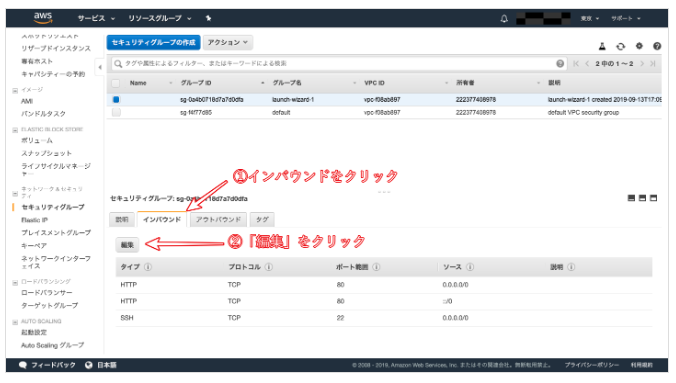
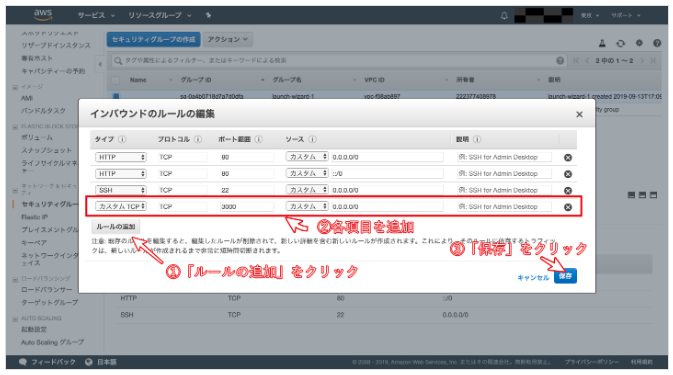
3. ポートを開く
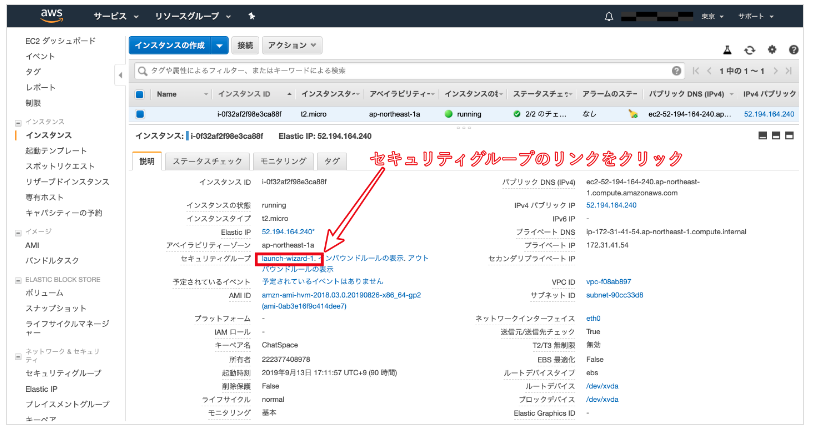
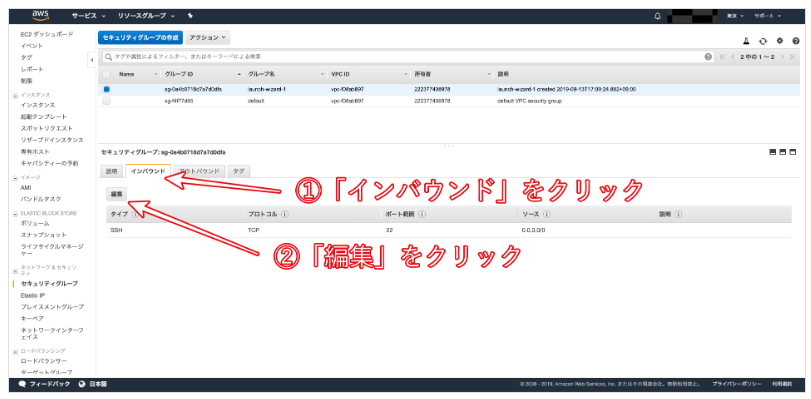
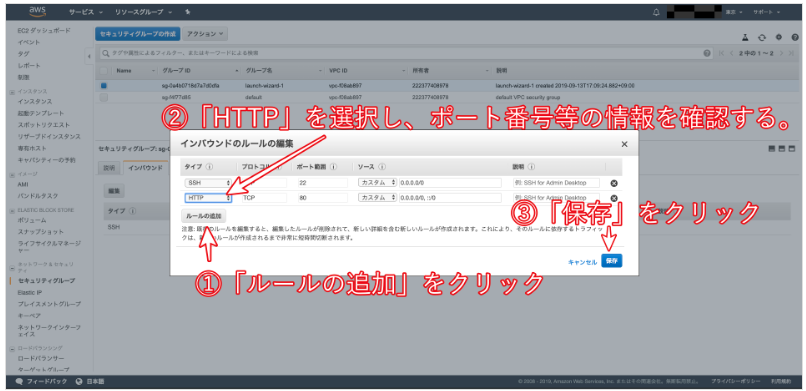
タイプを「HTTP」、プロトコルを「TCP」、ポート範囲を「80」、送信元を「カスタム / 0.0.0.0/0, ::/0」に設定します。
HTTP接続できるように下記も解放
4. EC2-userでログイン
ローカル
$ cd ~

$ mkdir ~/.ssh
# .sshというディレクトリを作成
# File existsとエラーが表示されたとしても、.sshディレクトリは存在しているということなので、そのまま進みましょう。

$ mv Downloads/ダウンロードした鍵の名前.pem .ssh/
# mvコマンドで、ダウンロードしたpemファイルを、ダウンロードディレクトリから、.sshディレクトリに移動します。

$ cd .ssh/

$ ls
# pemファイルが存在するか確認しましょう

$ chmod 600 ダウンロードした鍵の名前.pem

$ ssh -i ダウンロードした鍵の名前.pem ec2-user@作成したEC2インスタンスと紐付けたElastic IP
#(例えばElastic IPが123.456.789であれば、ssh -i ダウンロードした鍵の名前.pem ec2-user@123.456.789 というコマンドになります)
#(ダウンロードした鍵を用いて、ec2-userとしてログイン)
5. 必要なパッケージ・Rubyのインストール
サーバー
[ec2-user@ip-172-31-25-189 ~]$ sudo yum -y update
[ec2-user@ip-172-31-25-189 ~]$ sudo yum -y install git make gcc-c++ patch libyaml-devel libffi-devel libicu-devel zlib-devel readline-devel libxml2-devel libxslt-devel ImageMagick ImageMagick-devel openssl-devel libcurl libcurl-devel curl
[ec2-user@ip-172-31-25-189 ~]$ sudo curl -sL https://rpm.nodesource.com/setup_6.x | sudo bash -
[ec2-user@ip-172-31-25-189 ~]$ sudo yum -y install nodejs
[ec2-user@ip-172-31-25-189 ~]$ git clone https://github.com/sstephenson/rbenv.git ~/.rbenv
#パスを通す
[ec2-user@ip-172-31-25-189 ~]$ echo 'export PATH="$HOME/.rbenv/bin:$PATH"' >> ~/.bash_profile
#rbenvを呼び出すための記述
[ec2-user@ip-172-31-25-189 ~]$ echo 'eval "$(rbenv init -)"' >> ~/.bash_profile
#.bash_profileの読み込み
[ec2-user@ip-172-31-25-189 ~]$ source .bash_profile
#ruby-buildのインストール
[ec2-user@ip-172-31-25-189 ~]$ git clone https://github.com/sstephenson/ruby-build.git ~/.rbenv/plugins/ruby-build
#rehashを行う
[ec2-user@ip-172-31-25-189 ~]$ rbenv rehash
[ec2-user@ip-172-31-25-189 ~]$ rbenv install 2.5.1
[ec2-user@ip-172-31-25-189 ~]$ rbenv global 2.5.1
[ec2-user@ip-172-31-25-189 ~]$ rbenv rehash  #rehashを行う
[ec2-user@ip-172-31-25-189 ~]$ ruby -v # バージョンを確認

# MySQLのインストール
[ec2-user@ip-172-31-25-189 ~]$ sudo yum -y install mysql56-server mysql56-devel mysql56
[ec2-user@ip-172-31-25-189 ~]$ sudo service mysqld start
[ec2-user@ip-172-31-25-189 ~]$ sudo /usr/libexec/mysql56/mysqladmin -u root password 'ここを設定したいパスワード'

# MySQLに設定したPWで入れるか確認
[ec2-user@ip-172-31-25-189 ~]$ mysql -u root -p
6. GithubにSSH keyを登録
EC2サーバ
[ec2-user@ip-172-31-23-189 ~]$ ssh-keygen -t rsa -b 4096
途中で passphrase など3段階ほど入力を求められることがありますが、全て何も入力せずにEnterキーで進んでください。
EC2サーバ
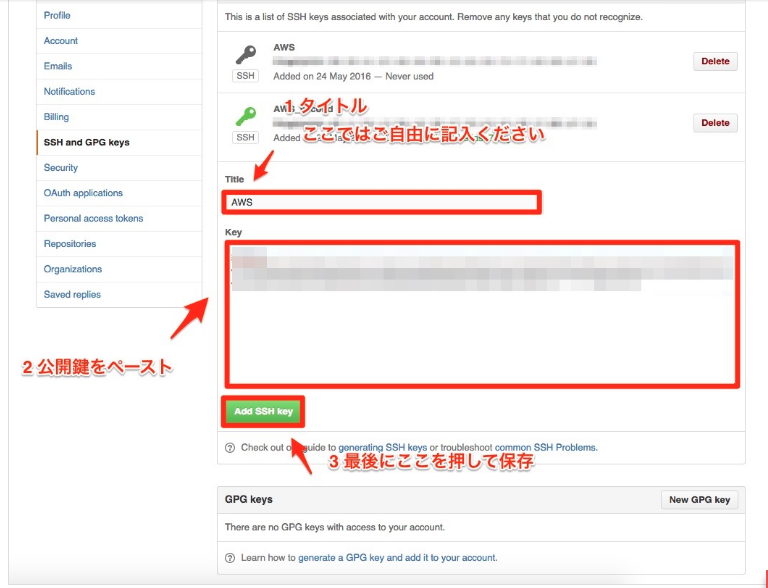
[ec2-user@ip-172-31-23-189 ~]$ cat ~/.ssh/id_rsa.pub
catで表示させた公開鍵を、Githubにアクセスして登録していきます
https://github.com/settings/keys
Githubに鍵を登録できたら、SSH接続できるか以下のコマンドで確認
EC2サーバ
[ec2-user@ip-172-31-23-189 ~]$ ssh -T git@github.com
7. Capistrano準備
Gemfile
group :development, :test do
  gem 'capistrano'
  gem 'capistrano-rbenv'
  gem 'capistrano-bundler'
  gem 'capistrano-rails'
  gem 'capistrano3-unicorn'
end
ローカル
$ bundle install
$ bundle exec cap install
Capfile編集
require "capistrano/setup"
require "capistrano/deploy"
require 'capistrano/rbenv'
require 'capistrano/bundler'
require 'capistrano/rails/assets'
require 'capistrano/rails/migrations'
require 'capistrano3/unicorn'

Dir.glob("lib/capistrano/tasks/*.rake").each { |r| import r }
config/deploy/production.rb
server '<用意したElastic IP>', user: 'ec2-user', roles: %w{app db web}
config/deploy.rb
# config valid only for current version of Capistrano
# capistranoのバージョンを記載。固定のバージョンを利用し続け、バージョン変更によるトラブルを防止する
lock '<Capistranoのバージョン>'

# Capistranoのログの表示に利用する
set :application, '<自身のアプリケーション名>'

# どのリポジトリからアプリをpullするかを指定する
set :repo_url,  'git@github.com:<Githubのユーザー名>/<レポジトリ名>.git'

# バージョンが変わっても共通で参照するディレクトリを指定
set :linked_dirs, fetch(:linked_dirs, []).push('log', 'tmp/pids', 'tmp/cache', 'tmp/sockets', 'vendor/bundle', 'public/system', 'public/uploads')

set :rbenv_type, :user
set :rbenv_ruby, '<このアプリで使用しているrubyのバージョン>'

# どの公開鍵を利用してデプロイするか
set :ssh_options, auth_methods: ['publickey'],
                  keys: ['<ローカルPCのEC2インスタンスのSSH鍵(pem)へのパス(例:~/.ssh/key_pem.pem)>']

# プロセス番号を記載したファイルの場所
set :unicorn_pid, -> { "#{shared_path}/tmp/pids/unicorn.pid" }

# Unicornの設定ファイルの場所
set :unicorn_config_path, -> { "#{current_path}/config/unicorn.rb" }
set :keep_releases, 5

set :linked_files, %w{ config/master.key }

after 'deploy:publishing', 'deploy:restart'
namespace :deploy do
  task :restart do
    invoke 'unicorn:stop'
    invoke 'unicorn:start'
  end

  desc 'upload master.key'
  task :upload do
    on roles(:app) do |host|
      if test "[ ! -d #{shared_path}/config ]"
        execute "mkdir -p #{shared_path}/config"
      end
      upload!('config/master.key', "#{shared_path}/config/master.key")
    end
  end
  before :starting, 'deploy:upload'
  after :finishing, 'deploy:cleanup'
end
config/database.yml
production:
  <<: *default
  database: application_name_production
  username: root
  password: <%= ENV['DATABASE_PASSWORD'] %>
  socket: /var/lib/mysql/mysql.sock
8.アプリケーションサーバー(unicorn)設定
Gemfile
group :production do
  gem 'unicorn', '5.4.1'
end
ローカル
bundle install
config/unicorn.rb
app_path = File.expand_path('../../../', __FILE__)

worker_processes 1
# currentを指定
working_directory "#{app_path}/current"

# それぞれ、sharedの中を参照するよう変更
listen "#{app_path}/shared/tmp/sockets/unicorn.sock"
pid "#{app_path}/shared/tmp/pids/unicorn.pid"
stderr_path "#{app_path}/shared/log/unicorn.stderr.log"
stdout_path "#{app_path}/shared/log/unicorn.stdout.log"

timeout 60

#以下は応用的な設定なので説明は割愛

preload_app true
GC.respond_to?(:copy_on_write_friendly=) && GC.copy_on_write_friendly = true

check_client_connection false

run_once = true

before_fork do |server, worker|
  defined?(ActiveRecord::Base) &&
    ActiveRecord::Base.connection.disconnect!

  if run_once
    run_once = false # prevent from firing again
  end

  old_pid = "#{server.config[:pid]}.oldbin"
  if File.exist?(old_pid) && server.pid != old_pid
    begin
      sig = (worker.nr + 1) >= server.worker_processes ? :QUIT : :TTOU
      Process.kill(sig, File.read(old_pid).to_i)
    rescue Errno::ENOENT, Errno::ESRCH => e
      logger.error e
    end
  end
end

after_fork do |_server, _worker|
  defined?(ActiveRecord::Base) && ActiveRecord::Base.establish_connection
end
config/environments/production.rb(修正後)
# config.assets.js_compressor = :uglifier
9. Githubからコードをクローン
まずはGitHub Desktopからコミットしてプッシュしましょう。この時必ず、masterブランチで行うようにしてください。
ec2サーバ
#mkdirコマンドで新たにディレクトリを作成
[ec2-user@ip-172-31-23-189 ~]$ sudo mkdir /var/www/
#作成したwwwディレクトリの権限をec2-userに変更
[ec2-user@ip-172-31-23-189 ~]$ sudo chown ec2-user /var/www/
ec2サーバ
[ec2-user@ip-172-31-23-189 ~]$ cd /var/www/
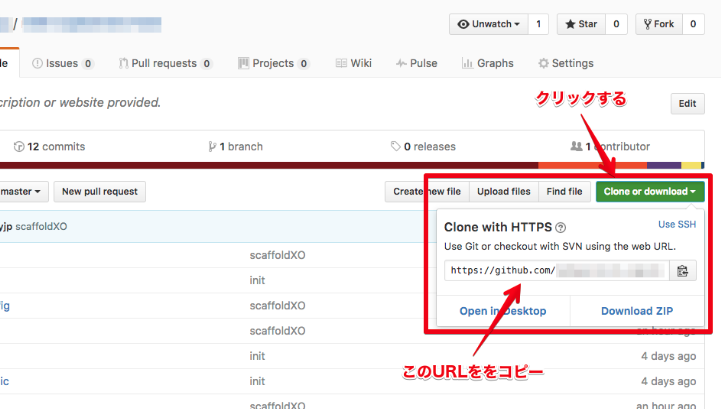
[ec2-user@ip-172-31-23-189 www]$ git clone https://github.com/<ユーザー名>/<リポジトリ名>.git
10. Nginx設定
ec2サーバ
# インストール
[ec2-user@ip-172-31-25-189 ~]$ sudo yum -y install nginx

# 設定ファイル起動
[ec2-user@ip-172-31-25-189 ~]$ sudo vim /etc/nginx/conf.d/rails.conf
rails.conf
upstream app_server {
  # sharedの中を参照するよう変更
  server unix:/var/www/<アプリケーション名>/shared/tmp/sockets/unicorn.sock;
}

server {
  listen 80;
  server_name <Elastic IPを記入>;

# クライアントからアップロードされてくるファイルの容量の上限を2ギガに設定。デフォルトは1メガなので大きめにしておく
  client_max_body_size 2g;

  # currentの中を参照するよう変更
  root /var/www/<アプリケーション名>/current/public;

  location ^~ /assets/ {
    gzip_static on;
    expires max;
    add_header Cache-Control public;
    # currentの中を参照するよう変更
    root   /var/www/<アプリケーション名>/current/public;
  }

  try_files $uri/index.html $uri @unicorn;

  location @unicorn {
    proxy_set_header X-Forwarded-For $proxy_add_x_forwarded_for;
    proxy_set_header Host $http_host;
    proxy_redirect off;
    proxy_pass http://app_server;
  }

  error_page 500 502 503 504 /500.html;
}
ec2サーバ
# nginxの権限を変更
[ec2-user@ip-172-31-25-189 ~]$ cd /var/lib
[ec2-user@ip-172-31-25-189 lib]$ sudo chmod -R 775 nginx
[ec2-user@ip-172-31-25-189 lib]$ cd ~
[ec2-user@ip-172-31-25-189 ~]$ sudo service nginx restart
# nginx再起動
[ec2-user@ip-172-31-25-189 ~]$ sudo service nginx reload
[ec2-user@ip-172-31-25-189 ~]$ sudo service nginx restart
11. EC2の能力拡張/bundler install
ec2サーバ
[ec2-user@ip-172-31-25-189 ~]$ cd
[ec2-user@ip-172-31-25-189 ~]$ sudo dd if=/dev/zero of=/swapfile1 bs=1M count=512
[ec2-user@ip-172-31-25-189 ~]$ sudo chmod 600 /swapfile1
[ec2-user@ip-172-31-25-189 ~]$ sudo mkswap /swapfile1
[ec2-user@ip-172-31-25-189 ~]$ sudo swapon /swapfile1
[ec2-user@ip-172-31-25-189 ~]$ sudo sh -c 'echo "/swapfile1  none        swap    sw              0   0" >> /etc/fstab'

[ec2-user@ip-172-31-23-189 <リポジトリ名>]$ gem install bundler -v x.x.x
# ローカルで確認したbundlerのバージョンを導入する
[ec2-user@ip-172-31-23-189 <リポジトリ名>]$ bundle install
# 上記コマンドは、数分以上かかる場合もあります。
12. 環境変数の設定
ec2サーバ
[ec2-user@ip-172-31-23-189 <リポジトリ名>]$ rake secret
69619d9a75b78f2e1c87ec5e07541b42f23efeb6a54e97da3723de06fe74af29d5718adff77d2b04b2805d3a1e143fa61baacfbf4ca2c6fcc608cff8d5a28e8d
# 文字列をコピー
ec2サーバ
[ec2-user@ip-172-31-23-189 ~]$ sudo vim /etc/environment
/etc/environment
DATABASE_PASSWORD='MySQLのrootユーザーのパスワード'
SECRET_KEY_BASE='先程コピーしたsecret_key_base'
書き込みができたら esc(エスケープキー)を押下後、:wqと入力して内容を保存します。保存できたら環境変数を適用するために一旦ログアウトします。
ローカル
$ ssh -i [ダウンロードした鍵の名前].pem ec2-user@[作成したEC2インスタンスと紐付けたElastic IP]
(ダウンロードした鍵を用いて、ec2-userとしてログイン)
ec2サーバ
[ec2-user@ip-172-31-23-189 ~]$ env | grep SECRET_KEY_BASE
SECRET_KEY_BASE='secret_key_base'

[ec2-user@ip-172-31-23-189 ~]$ env | grep DATABASE_PASSWORD
DATABASE_PASSWORD='MySQLのrootユーザーのパスワード'
ec2サーバ
# 本番環境データベース作成
[ec2-user@ip-172-31-23-189 <リポジトリ名>]$ cd /var/www/アプリ名/releases
[ec2-user@ip-172-31-23-189 <リポジトリ名>]$ ll
# 日付を表す数字の名前のフォルダが表示される 例:20200218063515
cd 一番下の数字 #=> 例 cd 20200218063515
[ec2-user@ip-172-31-23-189 <リポジトリ名>]$ rails db:create RAILS_ENV=production
# => Created database '<データベース名>'
[ec2-user@ip-172-31-23-189 <リポジトリ名>]$ rails db:migrate RAILS_ENV=production
13. 自動デプロイ
ローカルでの変更を全てmasterにpush
ローカル
# アプリケーションのディレクトリで実行する
$ bundle exec cap production deploy
エラーログの確認方法
サーバー側で
/var/www/<レポジトリ名>/current/log/unicorn.stderr.logをlessまたはcatコマンドで確認しエラーが出ていないか確認する(下に行くほど最新のログです。時刻表記がUTCであることに注意してください)