つくったもの
実装内容
画面全体
画面自体はScreenという単位でScaffoldで囲って作っています。そのScaffoldにtopBarを設定していることで上のTopAppBarが表示されています。
TopAppBarにはnavigationIconとtitle用のComposableを設定できて、これらを設定していることで戻るボタンやタイトルのテキストが表示されています。
    Scaffold(
        topBar = {
            val title = stringResource(id = R.string.home_instagram_home_section_title)
            TopAppBar(
                navigationIcon = {
                    IconButton(onClick = { navController.popBackStack() }) {
                        Icon(
                            painter = painterResource(id = R.drawable.ic_baseline_arrow_back),
                            contentDescription = null
                        )
                    }
                },
                title = {
                    Text(text = title)
                }
            )
        },
    )
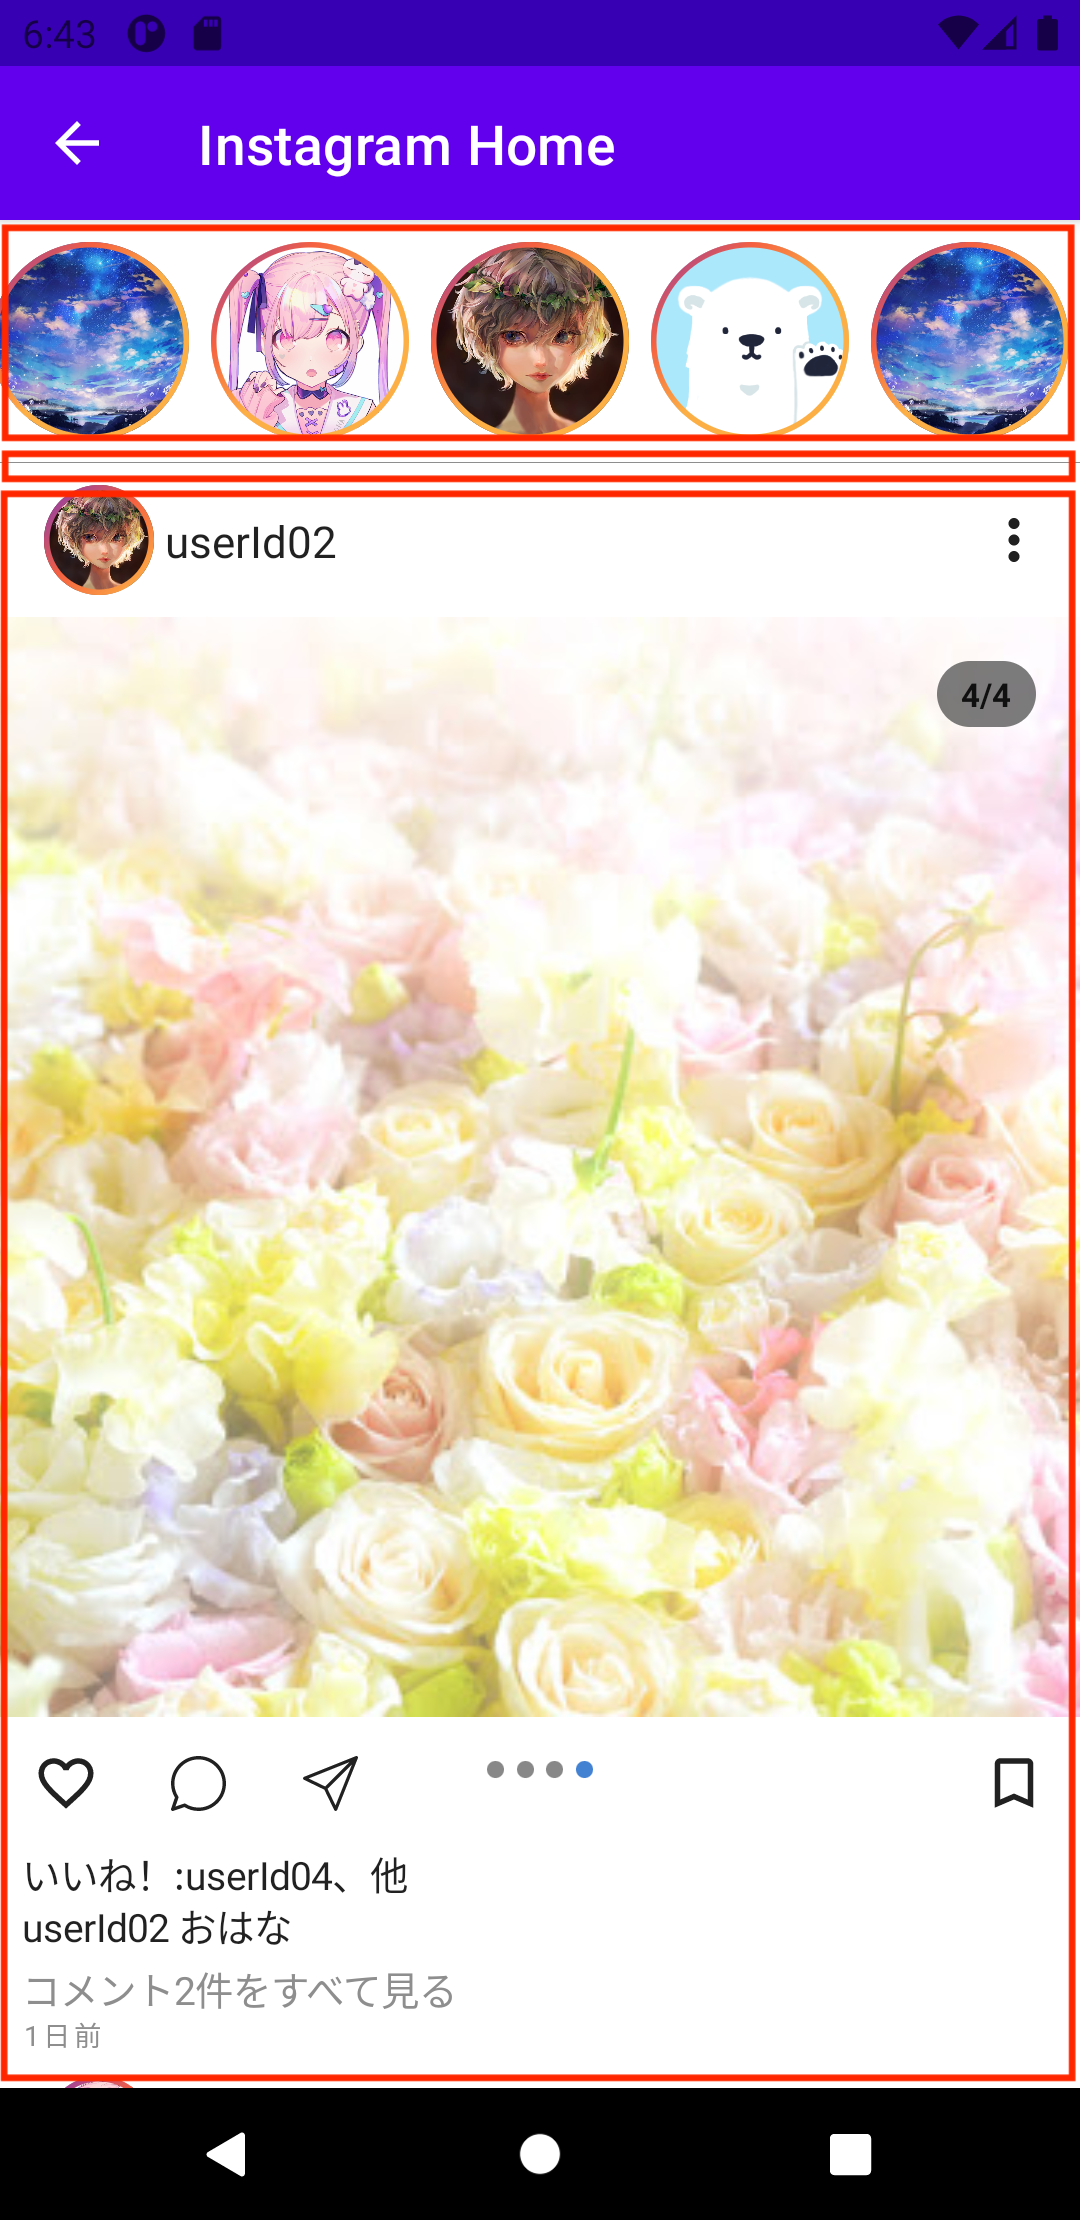
作り方は色々あると思いますが、Screenのcontentの部分は下の画像の赤枠でくくられたように大きく3つのComposableからできています。

全体はLazyColumnというComposableで囲って縦スクロールができるようにしていて、上から順番にStory部分のInstagramHomeStorySection、その下の横線であるDivider、投稿の内容が見れるようにInstagramHomePostItemを表示するようにしています。
        LazyColumn {
            item {
                InstagramHomeStorySection(stories = stories)
            }
            item {
                Divider(
                    color = colorResource(id = R.color.lightGrey),
                    thickness = 0.5.dp
                )
            }
            items(posts) { post ->
                InstagramHomePostItem(post = post)
            }
        }
InstagramHomeStorySection
Story部分は、Carouselによる横スクロールを実現するためにLazyRowというComposableで全体を囲って実装しています。これによってこの中に書いているitemsの中のComposableは横スクロールされるように表示されます。
@Composable
fun InstagramHomeStorySection(stories: List<Post>) {
    LazyRow(Modifier.padding(vertical = 8.dp)) {
        items(stories) {
            Box(modifier = Modifier.padding(horizontal = 4.dp)) {
                Image(
                    painter = painterResource(id = it.accountIconImageResourceId),
                    contentDescription = null,
                    contentScale = ContentScale.Crop,
                    modifier = Modifier
                        .size(72.dp)
                        .clip(CircleShape)
                        .border(
                            shape = CircleShape,
                            border = BorderStroke(
                                width = 2.dp,
                                brush = Brush.linearGradient(
                                    colors = instagramGradient,
                                    start = Offset(
                                        0f,
                                        0f
                                    ),
                                    end = Offset(
                                        100f,
                                        100f
                                    )
                                )
                            )
                        )
                )
            }
        }
    }
}
今回は、Imageのmodifierに.clip(CircleShape)で画像を丸くして.borderを設定することでStoryを投稿したときのグラデーションの枠を表示しています。
InstagramHomePostItem
投稿の1つ1つのItemは大きく4つのSectionをColumnを使って縦に上から順に組み合わせて作っています。上からAccountInfoSection、ImageSliderSection、ButtonsSection、ContentBody(名前は適当)みたいな感じである程度の意味のある単位でコンポーネントとしてComposableメソッドに分割して実装しています。

AccountInfoSection
一番上のAccountInfoSectionは一番簡単で、アイコン画像、ユーザID、ボタンを左から順番に横方向に表示したいのでRowを使っています。ポイントはユーザIDを表示しているTextのすぐ隣にIconButtonがこないようにTextのmodifierに.weight(1f)を設定して一番右端のIconButtonまでの領域をすべてTextで埋めてどんな端末サイズでも一番右端にIconButtonが寄るようにしています。
@Composable
private fun AccountInfoSection(post: Post) {
    Row(
        modifier = Modifier
            .fillMaxWidth()
            .height(56.dp)
            .padding(start = 16.dp, top = 8.dp, bottom = 8.dp),
        verticalAlignment = Alignment.CenterVertically
    ) {
        Image(
            painter = painterResource(id = post.accountIconImageResourceId),
            contentDescription = null,
            contentScale = ContentScale.Crop,
            modifier = Modifier
                .size(40.dp)
                .clip(CircleShape)
                .border(
                    shape = CircleShape,
                    border = BorderStroke(
                        width = 2.dp,
                        brush = Brush.linearGradient(
                            colors = instagramGradient,
                            start = Offset(
                                0f,
                                0f
                            ),
                            end = Offset(
                                100f,
                                100f
                            )
                        )
                    )
                )
        )
        Text(
            text = post.accountId,
            style = typography.body1,
            modifier = Modifier
                .padding(start = 4.dp)
                .weight(1f),
        )
        IconButton(onClick = { /*TODO*/ }) {
            Icon(
                painter = painterResource(id = R.drawable.ic_baseline_more_vert),
                contentDescription = null,
            )
        }
    }
}
ImageSliderSection
投稿画像を表示している部分です。
1枚のときは画像が1枚表示されるだけですが、複数枚投稿されている場合は横方向にスライドできて指を離すと必ず画面いっぱいに画像が1枚表示されるような挙動を作る必要があります。
これはGoogleが作っている、まだJetpack Composeにはない便利Composableがまとめらているaccompanistというライブラリの中に含まれているPagerを使って実現しています。これは既存のViewPagerと同じような挙動をするものです。
private fun ImageSliderSection(pagerState: PagerState, postImageResourceIds: List<Int>) {
    Box {
        HorizontalPager(state = pagerState) {
            Image(
                modifier = Modifier
                    .height(400.dp)
                    .fillMaxWidth(),
                painter = painterResource(id = postImageResourceIds[it]),
                contentDescription = null,
                contentScale = ContentScale.Crop,
            )
        }
        if (postImageResourceIds.size > 1)
            ImageCountBadge(
                current = pagerState.currentPage + 1,
                maxCount = pagerState.pageCount
            )
    }
}
HorizontalPagerでPagerを作って中身にImageを入れるようにするだけで作れます。今回はローカルのアセットをロードして表示しているのでImageを使っています。
HorizontalPagerにはstateを渡せて、こんなふうにPagerStateをインスタンス化させて使います。
val pagerState = rememberPagerState(pageCount = post.imageResourceIds.size)
このpagerStateをHorizontalPagerにセットすることで現在何ページ目を見てるのかや、全体でページは何枚あるのかがわかるようになります。
複数枚画像が含まれている投稿には画像の右上に 現在の画像が何枚目か/全体の画像の枚数のような表示をさせる必要があるため、現在のページ番号と全体のページカウントを ImageCountBadgeというComposableを作ってそこに渡すことで表示させています。

ButtonSection
ImageSliderSectionの下のいいねボタンやリプライボタンなどが並んでる部分です。
ここは、Rowで作っているくらいです。
あとは、複数枚画像が含まれている場合は下に画像の枚数だけインジケーターを描画して、現在表示している枚数目のインジケーターに色をつけるComposableを置いています。その部分はIndicatorsという名前で切り出して作りました。
@Composable
private fun Indicators(currentPosition: Int, contentCount: Int) {
    Row(
        modifier = Modifier.width((12 * contentCount).dp),
        horizontalArrangement = Arrangement.SpaceEvenly,
    ) {
        repeat(contentCount) {
            Box(
                modifier = Modifier
                    .size(6.dp)
                    .clip(shape = CircleShape)
                    .background(color = if (currentPosition == it) Color(0xFF4382D3) else Color.Gray),
            )
        }
    }
}
この部分は画像の枚数分だけRowで横並びに丸いBoxを描画してpagerState.currentPageをcurrentPositionとして渡すことでPager内の画像がスワイプされるたびに何枚目を見ているかの値が流れてきてrepeatしたときのindexとcurrentPositionが同じだった場合に再描画をかけてインジケーターに色をつけています。
おわり
だいたいこんな感じでComposeでUIを作れます。
accompanistがあれば自作するのが地味にめんどくさいComposableが用意されているので使うことも多いと思います。他にもCoilやGlideのComposeバージョンがあったり、Swipe To refreshがあったりするので触ってみてください。
見にくいところに置いていて恐縮ですが、今回実装したものはここにあります。
https://github.com/b4tchkn/AndroidPlayground/tree/master/composepractice/app/src/main/java/com/batch/compose_practice/ui/instagram_home
