通知(Notification)
参考1: 通知
参考2: 通知チャネル
参考3: 研修10日目
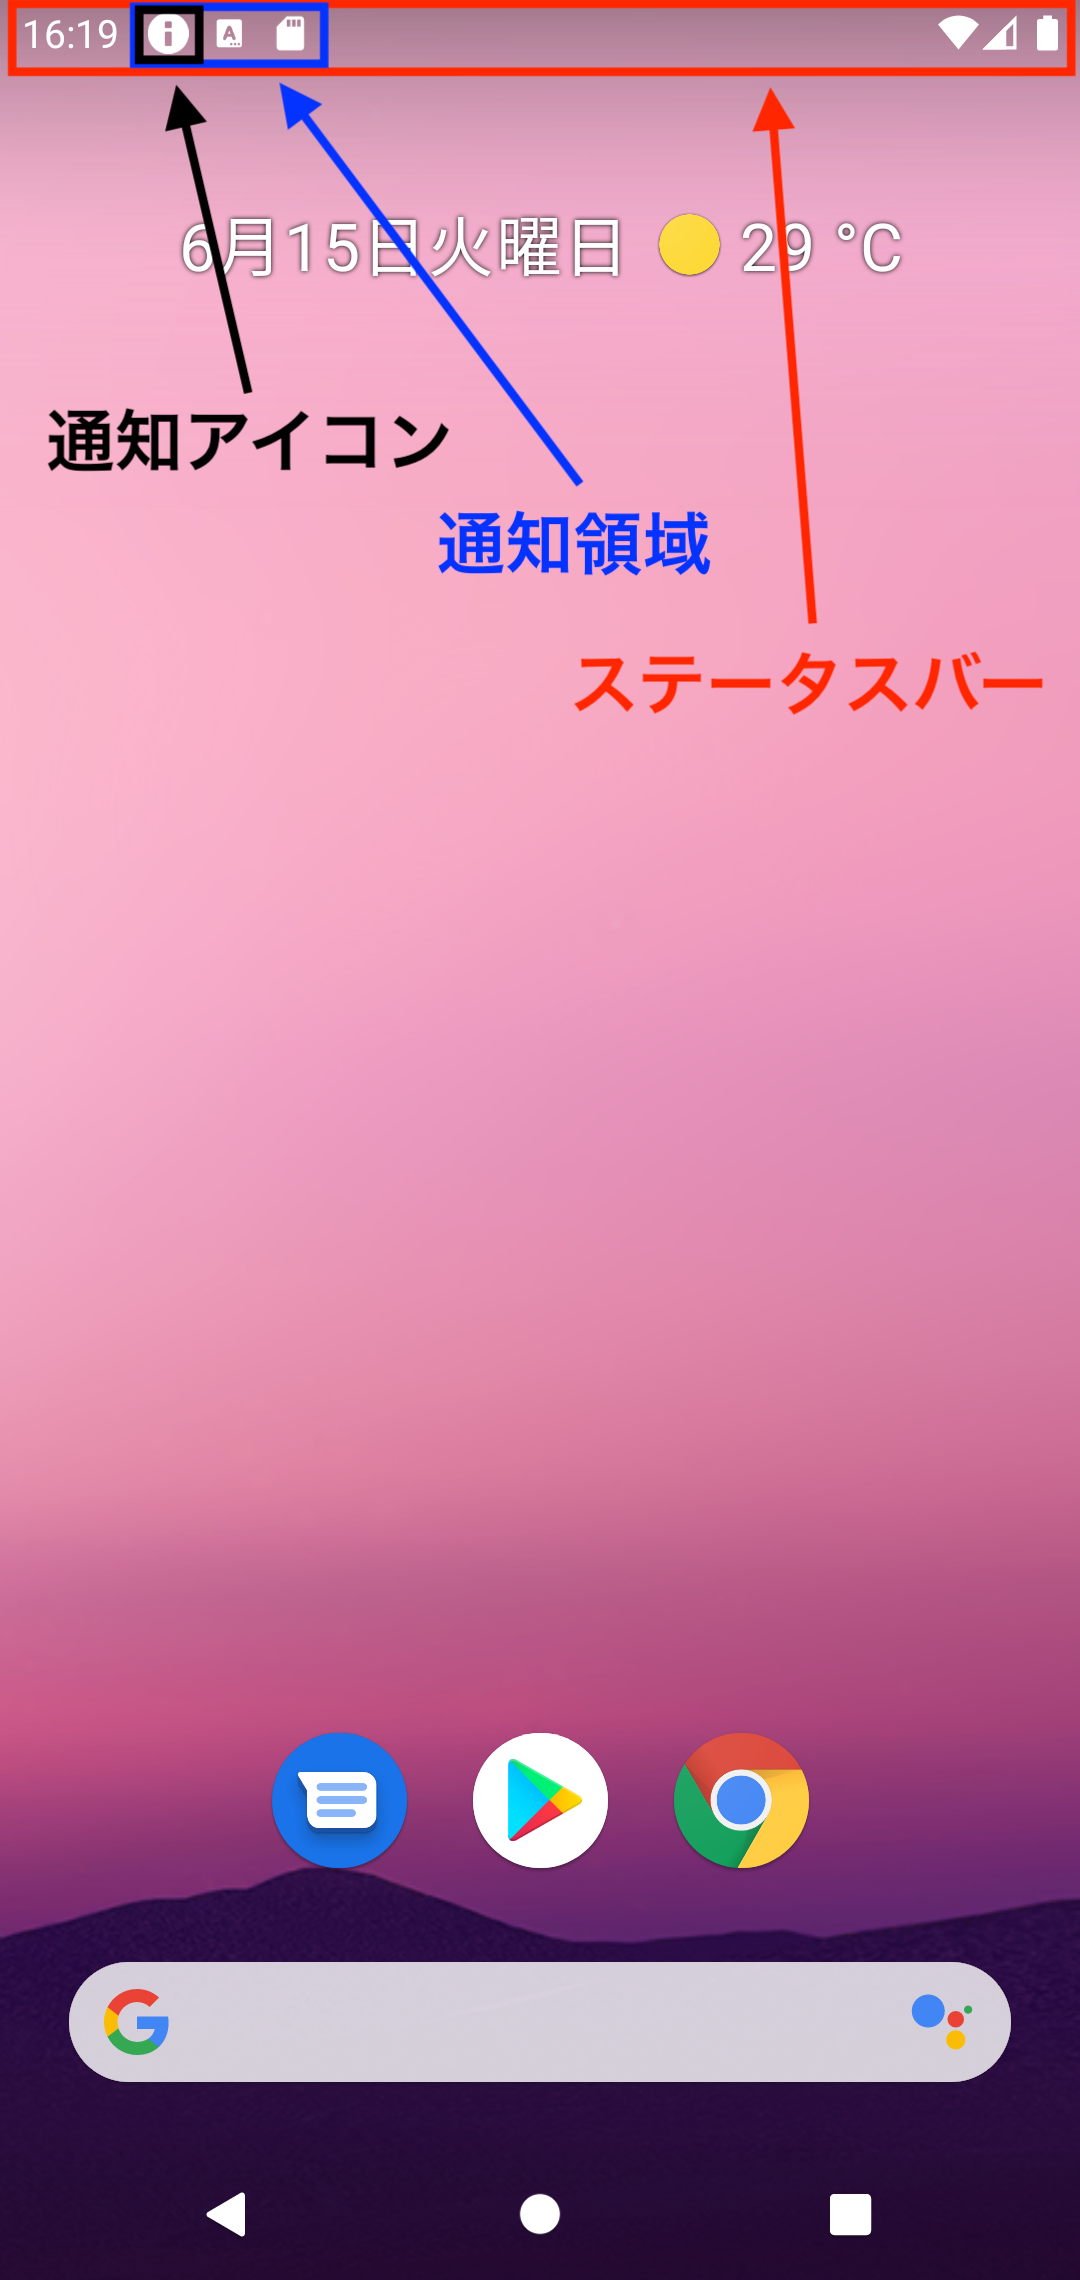
ホーム画面の通知領域に通知アイコンを表示したり、通知ドロワーに通知メッセージを表示したりできる機能。
通知はバックグラウンド処理で実行されるため、バックグラウンド処理を行うサービスクラス(=Serviceクラスを継承するクラス)で管理する。
通知情報に関するデータはNotificationCompat.Builderを通じてNotificationオブジェクトによって管理され、
通知方法に関するデータは通知チャネル(=NotificationChannelオブジェクト)に格納され、通知チャネルはNotificationManagerによって管理される。
また、通知(=Notificationオブジェクト)はNotificationManagerCompatオブジェクトによって実行される。
通知領域と通知アイコン
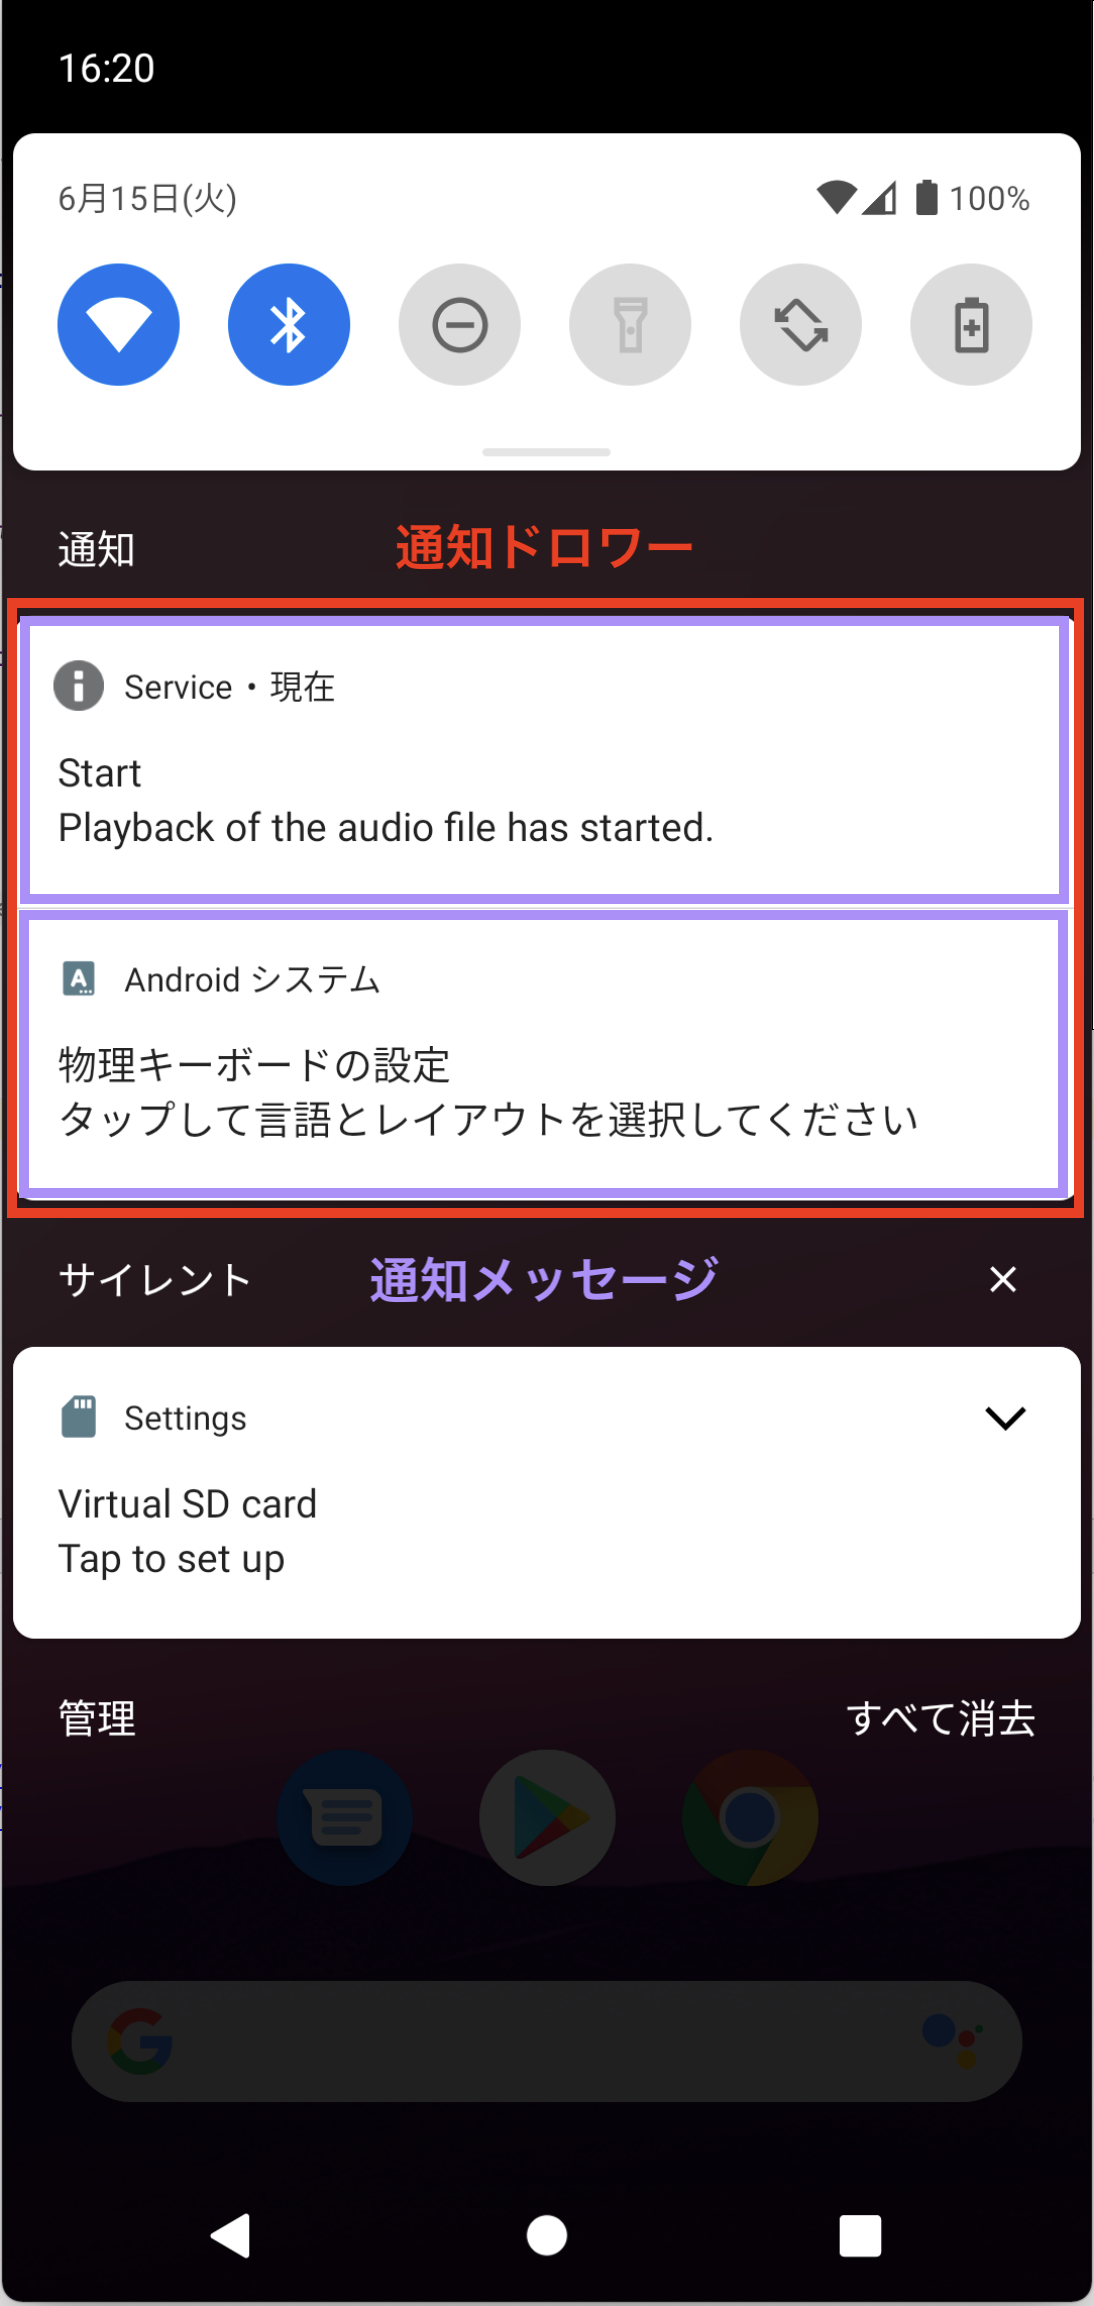
通知ドロワーと通知メッセージ
NotificationCompat.Builder
Notificationオブジェクトのファクトリクラスであり、
NotificationCompatクラス内で定義されたクラス(=ネストクラス)。
Notification
通知のアイコン・タイトル・メッセージなど、通知情報に関するデータを格納するクラス。
通知チャネル(NotificationChannel)
通知の重要度・通知音・バイブレーションパターンなど、通知方法に関するデータを、チャネル毎にまとめて管理できる機能。
NotificationManager
通知方法に関する各種データを格納した通知チャネル(=NotificationChannelオブジェクト)と、
通知情報に関するデータを格納したNotificationオブジェクトを管理するクラス。
NotificationManagerCompat
通知を実行するメソッドを定義するクラス。
NotificationManagerCompatオブジェクトは、独自に再定義したNotificationManagerオブジェクトを保持するサービスクラスで管理される。
通知の実装
参考1: 通知
参考2: 通知の作成
通知機能を実装する手順は、以下の通り。
通知チャネル(=NotificationChannelオブジェクト)の生成NotificationManagerオブジェクトの取得、通知チャネルのセットNotificationCompat.Builderオブジェクトの生成、通知情報の定義Notificationオブジェクトの生成NotificationManagerCompatオブジェクトを用いて通知を表示
通知チャネルの生成
通知方法に関するデータをまとめる通知チャネルは、サービスの初期化時に実行されるonCreate()ブロック内で生成する。
なお、サービスクラスでは、親であるServiceクラスで定義されたメソッドのオーバーライド時に、親メソッドを呼び出す必要がない。
また、チャネルIDはサービスクラスで不変であるため、クラス定数としてcompanion objectブロックで定義する。
定義
// 通知チャネルの生成
NotificationChannel(
    id: String!,
    name: CharSequence!,
    importance: Int
)
// パラメータ
// id: パッケージ内で一意の、通知チャネルの識別ID(String型)
// name: ユーザに表示される通知チャネル名
// importance: 通知チャネルの重要度
// -> NotificationManagerクラス定数を利用
通知チャネルの重要度を表すNotificationManagerクラス定数
| 重要度 | 定数名 | 内容 |
|---|---|---|
| 高 | IMPORTANCE_HIGH |
通知音とポップアップ 値: 4
|
| ↑ | IMPORTANCE_DEFAULT |
通知音のみ 値: 3
|
IMPORTANCE_LOW |
スリープ画面最上部への通知メッセージ ※通知アイコンあり 値: 2
|
|
| ↓ | IMPORTANCE_MIN |
スリープ画面下部への通知メッセージ ※通知アイコンなし 値: 1
|
| 低 | IMPORTANCE_NONE |
非通知 値: 0
|
サンプルコード
class SoundManageService : Service() {

    // クラス定数
    companion object {
        private const val CHANNEL_ID = "soundmanagerservice_notification_channel"
    }
    ...
    // サービスの初期化時に実行する処理
    // <- 親クラスのonCreate()メソッドの呼び出しは不要
    override fun onCreate() {
        ...
        // 通知チャネル名
        val name = getString(R.string.notification_channel_name)

        // 通知チャネルの重要度
        // -> NotificationManagerのクラス定数を利用
        val importance = NotificationManager.IMPORTANCE_DEFAULT

        // 通知チャネル
        val channel = NotificationChannel(CHANNEL_ID, name, importance)
        ...
    }
    ...
}
NotificationManagerオブジェクトの取得・通知チャネルのセット
NotificationManagerはOSレベル(システムレベル)で既に提供されているサービスオブジェクトであるため、Context.getSystemService()メソッドを用いて取得する。
また、独自に作成した通知チャネルをNotificationManagerに管理させるには、NotificationManager内で通知チャネルを再生成する必要がある。
定義
// サービスオブジェクトの取得
fun <T: Any!> Context.getSystemService(serviceClass: Class<T>): T
// パラメータ
// serviceClass: OSレベル(システムレベル)で提供されるサービスオブジェクトのJavaクラス名
//               または
//               Contextクラス定数(後述)

// NotificationManagerに通知チャネルをセット
NotificationManager.createNotificationChannel(
    channel: NotificationChannel
): Unit
// channel: 通知チャネルオブジェクト
サービスオブジェクトを表すContextクラス定数
Javaクラス名が使用できるサービスオブジェクトは限られているため、その場合はContextクラスのクラス定数を利用する。
サンプルコード
class SoundManageService : Service() {
    ...
    // サービスの初期化時に実行する処理
    // <- 親クラスのonCreate()メソッドの呼び出しは不要
    override fun onCreate() {
        ...
        // 通知チャネル
        val channel = NotificationChannel(CHANNEL_ID, name, importance)

        // NotificationManagerオブジェクトの取得
        val manager = getSystemService(NotificationManager::class.java)

        // 通知チャネルをセット
        manager.createNotificationChannel(channel)
    }
    ...
}
通知情報の定義
参考: NotificationCompat.Builder
通知情報に関するデータは、NotificationオブジェクトのファクトリクラスであるNotificationCompat.Builderに格納(=セット)する。
Notificationオブジェクトに格納されるデータは「Notificationオブジェクトが生成された時点でNotificationCompat.Builderオブジェクトが持っているデータ」であるため、
Notificationオブジェクトを生成する前に通知情報に関するデータをNotificationCompat.Builderオブジェクトに格納しておく必要がある。
定義
// NotificationCompat.Builderオブジェクトの生成
NotificationCompat.Builder(
    @NonNull context: Context,
    @NonNull channelId: String
)
// context: NotificationCompat.Builderオブジェクトを生成する
//          サービスクラスオブジェクト(=コンテキスト)
// channelId: Notificationオブジェクトを連携させる通知チャネルID

// 通知エリアに表示するアイコンの格納
@NonNull
NotificationCompat.Builder.setSmallIcon(
    icon: Int
): NotificationCompat.Builder
// パラメータ
// icon: アイコンのID(R値)

// 通知ドロワーに表示するタイトル
@NonNull
NotificationCompat.Builder.setContentTitle(
   @Nullable title: CharSequence?
): NotificationCompat.Builder
// パラメータ
// title: タイトルを表すCharSequence型文字列
// -> CharSequence: String型やStringBuilder型で実装されるインタフェース
// => String型やStringBuilder型の文字列が利用可能

// 通知ドロワーに表示するメッセージ
@NonNull
NotificationCompat.Builder.setContentText(
   @Nullable text: CharSequence?
): NotificationCompat.Builder
// パラメータ
// text: メッセージを表すCharSequence型文字列
サンプルコード
// クラス定数
companion object {
    private const val CHANNEL_ID = "soundmanagerservice_notification_channel"
}

// Notificationオブジェクトを生成するBuilderオブジェクト
val builder = NotificationCompat.Builder(this@SoundManageService, CHANNEL_ID)

// 通知エリアに表示するアイコン
builder.setSmallIcon(android.R.drawable.ic_dialog_info)

// 通知ドロワーに表示するタイトル
// -> Context.getString(resId:)メソッドを用いてCharSequence型文字列を取得
builder.setContentTitle(getString(R.string.msg_notification_title_finish))

// 通知ドロワーに表示するメッセージ
builder.setContentText(getString(R.string.msg_notification_text_finish))
Notificationオブジェクトの生成
Notificationオブジェクトは、そのファクトリクラスであるNotificationCompat.Builderクラスのbuild()メソッドを用いて生成する。
定義
@NonNull
NotificationCompat.Builder.build(): Notification
サンプルコード
// Notificationオブジェクトを生成するBuilderオブジェクト
val builder = NotificationCompat.Builder(this@SoundManageService, SoundManageService.CHANNEL_ID)

...   // 通知情報に関するデータの格納

// Notificationオブジェクト
val notification = builder.build()
NotificationManagerCompatによる通知の実行
通知はNotificationManagerCompatのnotify()メソッドを用いて実行する。
なお、NotificationManagerCompatオブジェクトは、独自に再定義したNotificationManagerオブジェクトを管理するサービスクラスで管理されるため、
NotificationManagerCompatクラスのfrom()メソッドを用いてサービスクラスから取得する必要がある。
定義
// サービスクラスがもつNotificationManagerCompatオブジェクトの取得
@NonNull
NotificationManagerCompat.from(
    @NonNull context: Context
): NotificationManagerCompat
// パラメータ
// context: NotificationManagerを管理するサービスクラスオブジェクト(=コンテキスト)

// 通知の実行
NotificationManagerCompat.notify(
    id: Int,
    @NonNull notification: Notification
): Unit
// パラメータ
// id: アプリ内で一意となる、Notificationオブジェクトの識別ID
// notification: Notificationオブジェクト
サンプルコード
// Notificationオブジェクトを生成するBuilderオブジェクト
val builder = NotificationCompat.Builder(this@SoundManageService, CHANNEL_ID)

...   // NotificationCompat.Builderに通知情報に関するデータをセット

// Notificationオブジェクトの生成
val notification = builder.build()

// サービスクラスからNotificationManagerCompatオブジェクトを取得
val manager = NotificationManagerCompat.from(this@SoundManageService)

// 通知を実行
manager.notify(100, notification)
アクティビティを起動する通知の実装
参考1: 通知からアクティビティを起動する
参考2: 研修3日目
アクティビティ間の画面遷移を実現するインテントを利用したPendingIntentを用いて、通知ドロワーからアクティビティを起動することができる。
通知ドロワーからアクティビティを起動する手順は、以下の通り。
- 起動先
アクティビティの情報を保持するIntentオブジェクトの生成- 起動先
アクティビティに値を渡す必要があれば、Intentオブジェクトにデータを格納Intentオブジェクトを保持するPendingIntentオブジェクトの生成NotificationCompat.BuilderオブジェクトにPendingIntentオブジェクトを格納(=セット)マニフェストファイル(=AndroidManifest.xml)にフォアグラウンドサービスのパーミッションを記述Notificationオブジェクトを生成し、サービスをフォアグラウンドで実行
インテント(Intent)
アクティビティ・フラグメント・サービス間の橋渡し役を担うクラス。
遷移元と遷移先の情報をもつ。
PendingIntent
サービスオブジェクトなどの外部アプリケーションに対して、インテントの実行権限(=トークン)を与えるメソッドを定義するクラス。
PendingIntentはあくまで通知(=Notificationオブジェクト)などからインテントを実行できる権限に過ぎず、ユーザ操作によって実行しない(=保留する)ことも選択できるため、PendingIntentと命名された。
IntentとPendingIntent
Intentはアクティビティ・フラグメント・サービスの起動を行うオブジェクトであり、
PendingIntentは外部アプリケーションに対するインテントの実行権限(=トークン)を指す。
Intentオブジェクトの生成
PendingIntentは外部アプリケーションに対するアクティビティ・サービスの起動権限を指すが、
起動先アクティビティ・サービスの情報はIntentオブジェクトが保持するため、Intentオブジェクトを作成する。
定義
Intent(packageContext: Context!, cls: Class<*>!)
// パラメータ
// packageContext: 起動元コンテキスト
// cls: Javaクラス化した起動先コンテキスト
// -> KotlinのクラスをJavaに変換する場合は、"<Kotlinクラス名>::class.java"と記述
サンプルコード
// 起動先アクティビティを指定するIntentオブジェクトの生成
val intent = Intent(this@SoundManageService, MainActivity::class.java)
Intentオブジェクトとのデータのやり取り
参考: 研修6日目(Bundle)
起動先に対して起動元から値を渡す場合は、IntentクラスのputExtra()メソッドを用いてデータを格納する。
また、渡す値がキーと値をもつMap型のデータ構造(=Bundleオブジェクト)である場合は、putExtras()メソッドを用いてIntentオブジェクトにデータを格納する。
起動先で値を受け取る際は、引数nameにキーを指定したget<T>Extra(name:defaultValue:)メソッドを用いて値を取得する。
定義
// -- データの格納 --

// Intentオブジェクトへのデータ格納(起動元, Bundle型以外)
Intent.putExtra(name: String!, value: <T>): Intent
// パラメータ
// name: データ取得時に必要となるキー
// value: 起動先アクティビティ・サービスに渡す値

// Intentオブジェクトへのデータ格納(起動元, Bundle型)
Intent.putExtras(extras: Bundle): Intent
// パラメータ
// extras: 起動先アクティビティ・サービスに渡すBundleオブジェクト

// -- データの取得 --

// Intentオブジェクトからのデータ取得(起動先, Bundle型・配列以外)
Intent.get<T>Extra(name: String!, defaultValue: <T>): <T>
// パラメータ
// name: 取得する値のキー
// defaultValue: 対象のデータが存在しない場合に返される値

// Intentオブジェクトからのデータ取得(起動先, 配列)
Intent.get<T>ArrayExtra(name: String!): <T>Array?
// パラメータ
// name: 取得する配列データのキー

// Intentオブジェクトからのデータ取得(起動先, Bundle型)
Intent.getExtras(): Bundle?
サンプルコード
// 起動先アクティビティを指定するIntentオブジェクトの生成
val intent = Intent(this@SoundManageService, MainActivity::class.java)

// Intentオブジェクトにデータを格納
intent.putExtra("fromNotification", true)
// Intentオブジェクトからデータを取得
// <- アクティビティクラスはIntentオブジェクトをintentプロパティとして保持
val fromNotification = intent.getBooleanExtra("fromNotification", false)
PendingIntentオブジェクトの生成
PendingIntentオブジェクトを生成するメソッドは、起動先オブジェクトによって異なる。
起動先オブジェクトがアクティビティである場合はgetActivity()メソッドを、
サービスである場合はgetService()メソッドを用いる。
定義
// 起動先オブジェクトがアクティビティである場合
PendingIntent.getActivity(
    context: Context!,
    requestCode: Int,
    intent: Intent!,
    flags: Int
): PendingIntent!
// パラメータ
// context: 起動元コンテキスト
// requestCode: コンポーネントの識別番号
// <- 複数のコンポーネントからPendingIntentを利用する場合に利用
// intent: Intentオブジェクト
// flags: OS内にPendingIntentオブジェクトが残っている場合の処理フラグ
// -> PendingIntentクラス定数を利用
PendingIntentオブジェクトが重複した場合の処理を表すPendingIntentクラス定数
| 定数名 | 内容 |
|---|---|
FLAG_ONE_SHOT |
既存オブジェクトの破棄 新しいオブジェクトの生成 |
FLAG_NO_CREATE |
既存オブジェクトの再利用 ※既存オブジェクトが存在しない場合は null
|
FLAG_CANCEL_CURRENT |
最初に生成されたオブジェクトの利用 |
FLAG_UPDATE_CURRENT |
既存オブジェクトの再利用extraデータのみ置換 |
サンプルコード
// アクティビティを起動するPendingIntentオブジェクト
val stopServiceIntent = PendingIntent.getActivity(
    this@SoundManageService,
    0,
    intent,
    PendingIntent.FLAG_CANCEL_CURRENT
)
PendingIntentオブジェクトのセット
PendingIntentオブジェクトを起動するのはNotificationオブジェクトであるが、
Notificationオブジェクトを生成するのはNotificationCompat.Builderオブジェクトであるため、
NotificationCompat.BuilderオブジェクトにPendingIntentオブジェクトをセットする。
なお、タップされた通知を自動的に消去する場合はNotificationCompat.BuilderのsetAutoCancel()メソッドの引数にtrueを指定する。
定義
// PendingIntentオブジェクトのセット
@NonNull
NotificationCompat.Builder.setContentIntent(
    @Nullable intent: PendingIntent?
): NotificationCompat.Builder
//パラメータ
// intent: 最終的にNotificationオブジェクトにセットする
//         PendingIntentオブジェクト

// 通知タップ時の通知ドロワーへの非表示フラグの変更
@NonNull
NotificationCompat.Builder.setAutoCancel(
    autoCancel: Boolean
): NotificationCompat.Builder
// パラメータ
// autoCancel: 通知がタップされた場合の通知ドロワーへの非表示フラグ
// -> true: タップ時に通知ドロワーから削除
//    false: タップ時に通知ドロワーに残置
サンプルコード
// Notificationオブジェクトを作成するBuilderオブジェクト
val builder = NotificationCompat.Builder(this@SoundManageService, CHANNEL_ID)

// 起動先アクティビティを指定するIntentオブジェクトの生成
val intent = Intent(this@SoundManageService, MainActivity::class.java)

// アクティビティを起動するPendingIntentオブジェクト
val stopServiceIntent = PendingIntent.getActivity(
    this@SoundManageService,
    0,
    intent,
    PendingIntent.FLAG_CANCEL_CURRENT
)

// BuilderにPendingIntentオブジェクトをセット
builder.setContentIntent(stopServiceIntent)

// タップされた通知メッセージを自動的に消去
builder.setAutoCancel(true)
マニフェストファイルへのパーミッションの追記
参考: 研修10日目(バックグラウンド処理)
通知を含むサービスは本来バックグラウンド処理で動作するが、PendingIntentを用いてユーザ操作を受け付ける場合はフォアグラウンド処理で動作させる必要がある。
ここで、サービスをフォアグラウンド処理で動作させる場合は、マニフェストファイル(=AndroidManifest.xml)にパーミッションを追記する必要がある。
フォアグラウンド処理
アクティビティから独立したサービスによってメインスレッド上で実行される、ユーザから直接認識され、ユーザによって操作を受ける処理。
サンプルコード
<?xml version="1.0" encoding="utf-8"?>
<manifest ...>
    <uses-permission android:name="android.permission.FOREGROUND_SERVICE"/>
    ...
</manifest>
サービスをフォアグラウンドで起動
アクティビティの起動をユーザ操作によって行うため、アクティビティを起動する通知を実行するサービスクラスは、ServiceクラスのstartForeground()メソッドを用いて起動する。
定義
Service.startForeground(
    id: Int,
    notification: Notification!
): Unit
// パラメータ
// id: アプリ内で一意となる、Notificationオブジェクトの識別番号
// notification: 通知するNotificationオブジェクト
サンプルコード
// Notificationオブジェクトの生成
val notification = builder.build()

// サービスのフォアグラウンド実行
startForeground(200, notification)