24時間稼働の Dify サーバーの構築に向け、今回は Docker をインストールします。
全体構成図(構想)
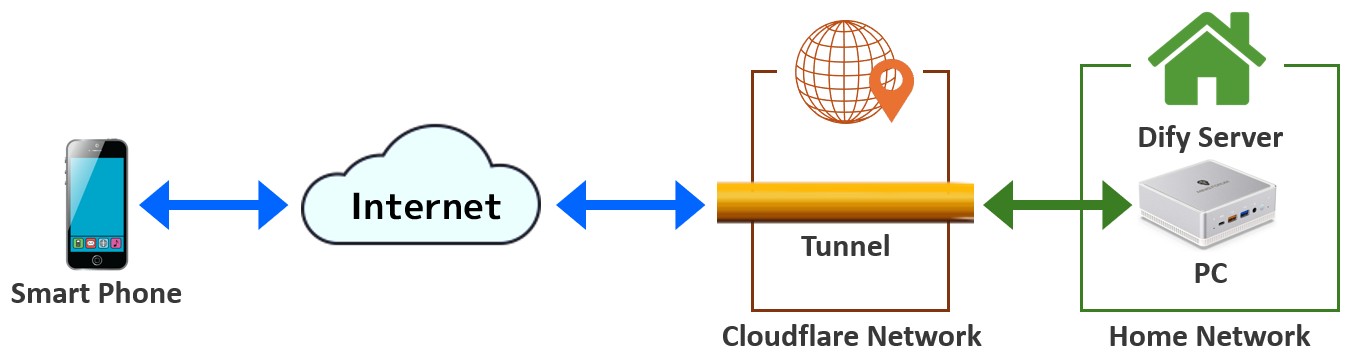
自宅の Dify 上で自分専用のチャットボットやエージェントを作成し、外出先から24時間いつでも利用できる環境を作成していく予定です。
(レンタルサーバーだと結構な金額になってしまいますので)
今回は一番右側、「Home Network」での作業となります。
Docker のインストール
下表のパッケージをインストールします。
| 名称 | パッケージ | 概要 |
|---|---|---|
| Docker Engine CE | docker-ce docker-ce-cli containerd.io | 無償で利用できる Docker の標準エディション |
| Docker Compose | docker-compose-plugin | マルチコンテナ管理ツール |
| Docker Buildx | docker-buildx-plugin | 複数アーキテクチャのイメージ ビルドツール |
Docker 公式のインストール手順は下記サイトに記載されています。
Install Docker Engine on Ubuntu
Install the Docker Compose plugin
① 旧パッケージのアンインストール
Ubuntu に含まれるパッケージが、Docker 提供の公式パッケージと競合する可能性があるようです。
公式サイトどおりにコマンドを実行しましたが、該当するパッケージはインストールされていませんでした。
for pkg in docker.io docker-doc docker-compose docker-compose-v2 podman-docker containerd runc; do sudo apt-get remove $pkg; done
② 依存パッケージのインストール
Docker の依存パッケージをインストールします。
sudo apt update
sudo apt install -y \
    apt-transport-https \
    ca-certificates \
    curl \
    gnupg \
    lsb-release \
    software-properties-common
③ Docker の 公式GPGキー をインポート
sudo install -m 0755 -d /etc/apt/keyrings
sudo curl -fsSL https://download.docker.com/linux/ubuntu/gpg -o /etc/apt/keyrings/docker.asc
sudo chmod a+r /etc/apt/keyrings/docker.asc
④ Docker リポジトリを追加
echo \
  "deb [arch=$(dpkg --print-architecture) signed-by=/etc/apt/keyrings/docker.asc] https://download.docker.com/linux/ubuntu \
  $(. /etc/os-release && echo "${UBUNTU_CODENAME:-$VERSION_CODENAME}") stable" | \
  sudo tee /etc/apt/sources.list.d/docker.list > /dev/null
⑤ Docker (Engine, Compose) のインストール
sudo apt-get update
sudo apt-get install docker-ce docker-ce-cli containerd.io docker-buildx-plugin docker-compose-plugin
⑥ インストール確認
次のコマンドを実行します。
(テストイメージをダウンロードし、コンテナーを実行します)
sudo docker run hello-world
以下のように表示されれば、インストールは成功しています。
$ sudo docker run hello-world

Unable to find image 'hello-world:latest' locally
latest: Pulling from library/hello-world
e6590344b1a5: Pull complete
Digest: sha256:7e1a4e2d11e2ac7a8c3f768d4166c2defeb09d2a750b010412b6ea13de1efb19
Status: Downloaded newer image for hello-world:latest

Hello from Docker!
This message shows that your installation appears to be working correctly.

To generate this message, Docker took the following steps:
 1. The Docker client contacted the Docker daemon.
 2. The Docker daemon pulled the "hello-world" image from the Docker Hub.
    (amd64)
 3. The Docker daemon created a new container from that image which runs the
    executable that produces the output you are currently reading.
 4. The Docker daemon streamed that output to the Docker client, which sent it
    to your terminal.

To try something more ambitious, you can run an Ubuntu container with:
 $ docker run -it ubuntu bash

Share images, automate workflows, and more with a free Docker ID:
 https://hub.docker.com/

For more examples and ideas, visit:
 https://docs.docker.com/get-started/
Docker インストール後の追加設定
下記を参照して、追加設定を実施します。
Linux post-installation steps for Docker Engine
permission denied エラーへの対応
Dockerデーモンは root ユーザーが所有する Unixソケット へバインドします。
そのため、sudo なしで docker コマンドを実行すると、「permission denied エラー」が発生します。
現在のユーザーをグループ「docker」へ追加し、sudo なしでも docker コマンドを実行できるようにします。
① 現在のユーザーをグループ「docker」へ追加
sudo groupadd docker
sudo usermod -aG docker $USER
"「docker」というグループが存在する" というエラーが表示された場合、そのエラーは無視して構いません。
② グループの変更を適用
一度 ログオフしてから再ログインします。
または、次のコマンドを実行します。
newgrp docker
③ sudo なしで docker コマンドを実行
docker run hello-world
前述のように、「Hello from Docker!」メッセージが表示されれば OK です。
OS 起動時に Docker が起動するように設定
Ubuntu では、最初から起動するように設定されています。
下記の2コマンドを実行して「enabled」と表示されれば、OS 起動と共に Docker デーモンが起動するように設定されています。
sudo systemctl is-enabled docker.service
sudo systemctl is-enabled containerd.service
もしも「disabled」と表示されたら、次の2コマンドを実行します。
sudo systemctl enable docker.service
sudo systemctl enable containerd.service
最終確認
各パッケージのバージョン番号を確認します。
$ docker --version
Docker version 28.0.4, build b8034c0
$ docker compose version
Docker Compose version v2.34.0
$ docker buildx version
github.com/docker/buildx v0.22.0 18ccba0
確認テストで取得したベースイメージを表示します。
$ docker images
REPOSITORY    TAG       IMAGE ID       CREATED        SIZE
hello-world   latest    74cc54e27dc4   2 months ago   10.1kB
2回 作成&実行した、テストコンテナを表示します。
$ docker ps -a
CONTAINER ID   IMAGE         COMMAND    CREATED          STATUS                      PORTS     NAMES
cd9eaa0f3998   hello-world   "/hello"   17 minutes ago   Exited (0) 17 minutes ago             hungry_einstein
70087ef70bad   hello-world   "/hello"   39 minutes ago   Exited (0) 39 minutes ago             kind_chatterjee
終わりに
公式のインストールガイドが かなり親切なので、手順どおりに問題なく進めることができました。
(OS のインストールでハマったことが嘘の様です)
次回は、いよいよ Dify サーバーのインストールです。