この記事について
Mastering the FreeRTOS Real Time Kernel-A Hands-On Tutorial Guildの日本語訳
重要と思われるポイント
リソース排他制御方法
- Basic Critical Section : taskENTER_CRITICAL, taskEXIT_CRITICAマクロで囲まれたセクション。割り込みをdisable(タスク、割り込み両方止める)にするので、応答性に悪影響がある。ネストに対応している。
- Suspending the Scheduler : vTaskSuspendAllでスケジューラを止める。タスクは止まるが割り込みはenable
- Mutex : 優先度継承、再帰的mutexをサポートしている
- Gate Keeper Task : 1つの窓口タスクだけがリソースにアクセスするようにする
Chapter 7 リソース管理
7.1 イントロダクションとスコープ
マルチタスクシステムでは、あるタスクがリソースにアクセスするとエラーが発生する可能性がある。しかし、Running状態外に遷移する前のアクセスでは競合しない。
もしタスクがリソースが不整合状態で抜けると、他のタスクまたは割り込みからの同じリソースへのアクセスは破壊される。
次の例を見ます
1.ペリフェラルへのアクセス。2つのタスクがLCDにアクセスする次のシナリオを考える。
- Task Aは"Hello world"をLCDに書き出そうとする
- Task AはTask Bによって"Hello w"の時点でpre-emptされる
- Task BはBlocked状態に入る前に"Abort, Retry, Fail?"を出力する。
- Task Aはpre-emptされたところから残りの文字列"orld"を出力する
LCDは"Hello wAbort, Retry, Fail?orld"と出力することになる。
2.Read/Modify/Write処理
Listing111ではCのコードが典型的にどのようにアセンブリに変換されるかを見せる。PORTAの値をメモリから呼んでレジスタに設定する。レジスタ内でmodifyして、メモリに書き戻す。これをRead, Modify, Write operationと呼ぶ
    /* The C code being compiled. */
    PORTA |= 0x01;

    /* The assembly code produced when the C code is compiled. */
    LOAD   R1,[#PORTA] ; Read a value from PORTA into R1
    MOVE   R2,#0x01    ; Move the absolute constant 1 into R2
    OR     R1,R2       ; Bitwise OR R1 (PORTA) with R2 (constant 1)
    STORE  R1,[#PORTA] ; Store the new value back to PORTA
これを、non-atomicな処理と呼ぶ。完了するまで1つ以上の命令で割り込み可能だからである。2つのタスクがPORTAと呼ばれるレジスタにマップされたメモリをアップデートするシナリオを考えてみる
- Task AはPORTAの値をロードしてレジスタに設定する。処理のread部分にあたる。
- Task Aは同じ処理のmodify, writeを終える前にTask Bによってpre-emputされる。
- Task BはPORTAをアップデートして、Blocked状態に入る
- Task Aはpre-emptされたところから処理を再開する。PORTAがアップデートされる前にレジスタに保持したPORTAの値をmodifyする
このシナリオではTask Aは無効なPORTAの値をmodify, writeすることになる。Task BはTask Aがコピーした後に、Task Aがmodify writeする前にmodifyする。
Task AがPORTAをwriteするときには、すでにTask Bによってmodifyされた値を上書きする。
この例はペリフェラルレジスタを使うが、同じ原則が、read, modify, writeするときに適用される
3.変数へのNon-atomicアクセス
アーキテクチャが扱うword sizeより大きい(たとえば16bitマシーンで32bitを扱う)複数のメンバを持つ構造体のアップデート、または変数のアップデートは、non-atomic処理となる。
割り込まれた場合には、データをロスしたり破壊する結果となる
4.関数のリエントラント性
関数がリエントラント(reentrant)とは、複数のタスク、割り込みから呼ばれても安全な関数である。リエントラントな関数はスレッドセーフとも呼ばれる。1つ以上のスレッドから呼ばれてもデータや命令の破壊なしに実行できるからである。
各タスクは、それぞれのスタックやレジスタ値を維持する。もし関数がスタックやレジスタ以外にアクセスしなければスレッドセーフになる。Listing112はリエントラントな関数の例。Listing113は離縁トランではない関数の例となる
/* A parameter is passed into the function.  This will either be passed on the stack,
or in a processor register.  Either way is safe as each task or interrupt that calls
the function maintains its own stack and its own set of register values, so each task
or interrupt that calls the function will have its own copy of lVar1. */
long lAddOneHundred( long lVar1 )
{
/* This function scope variable will also be allocated to the stack or a register,
depending on the compiler and optimization level.  Each task or interrupt that calls
this function will have its own copy of lVar2. */
long lVar2;

    lVar2 = lVar1 + 100;
    return lVar2;
}
/* In this case lVar1 is a global variable, so every task that calls
lNonsenseFunction will access the same single copy of the variable. */
long lVar1;

long lNonsenseFunction( void )
{
/* lState is static, so is not allocated on the stack.  Each task that calls this
function will access the same single copy of the variable. */
static long lState = 0;
long lReturn;

    switch( lState )
    {
        case 0 : lReturn = lVar1 + 10;
                 lState = 1;
                 break;

        case 1 : lReturn = lVar1 + 20;
                 lState = 0;
                 break;
    }
}
排他制御(Mutual exclusion)
タスク間またはタスク、割り込み間のリソースへのアクセスの一貫性を保証するには、mutual exclusion(排他制御)を使う必要がある。
目的は、いったんタスクがリエントラント、スレッドセーフでない共有リソースにアクセスし始めたら、一貫性のある状態になるまで排他的なアクセスを持つことである。
FreeRTOSは排他制御実装が可能ないくつかの機能を持っている。しかし、最善の排他制御は、リソースが共有されないような設計をすることである。
スコープ
このチャプターのスコープは、以下の理解となる
- いつ、なぜ、排他制御が必要になるか?
- クリティカルセクションとはなにか?
- 排他制御の意味
- スケジューラーのsuspendとは
- mutexの使い方
- gatekeeperタスクの生成方法
- 優先順位の逆転(priority inversion)とは? 優先度継承(priority inheritance)がどのようにその影響を低減するのか?
7.2 クリティカルセクションとスケジューラーのサスペンド
ベーシッククリティカルセクション
ベーシッククリティカルセクションとはtaskENTER_CRITICAL, taskEXIT_CRITICALで囲まれたコードのことである。
クリティカルセクションはクリティカルリージョンとしても知られている。
taskENTER_CRITICAL, taskEXIT_CRITICALはパラメータをとらず、戻り値もない。Listing 114に実装を示す。
/* Ensure access to the PORTA register cannot be interrupted by placing it within a
critical section.  Enter the critical section. */
taskENTER_CRITICAL();

/* A switch to another task cannot occur between the call to taskENTER_CRITICAL() and
the call to taskEXIT_CRITICAL().  Interrupts may still execute on FreeRTOS ports that
allow interrupt nesting, but only interrupts whose logical priority is above the
value assigned to the configMAX_SYSCALL_INTERRUPT_PRIORITY constant – and those
interrupts are not permitted to call FreeRTOS API functions. */
PORTA |= 0x01;

/* Access to PORTA has finished, so it is safe to exit the critical section. */
taskEXIT_CRITICAL();
プロジェクトの例では、vPrintStringを標準出力として使う。これはFreeRTOS Windowsポートを使う時のターミナルとなる。
vPrintStringは多くの異なるタスクから呼ばれる。そのため、理論的には、その実装はクリティカルセクションを使って標準出力へのアクセスをプロテクトしている。
Listing115に示す。
void vPrintString( const char *pcString )
{
    /* Write the string to stdout, using a critical section as a crude method of
    mutual exclusion. */
    taskENTER_CRITICAL();
    {
        printf( "%s", pcString );
        fflush( stdout );
    }
    taskEXIT_CRITICAL();
}
この方法によるクリティカルセクションの実装は、おおざっぱな排他制御である。これは割り込みを全てdisableとするか、 configMAX_SYSCALL_INTERRUPT_PRIORITYの定義に基づいてdisableとする。pre-emptiveコンテキストスイッチは割り込み内からのみ発生する。割り込みがdisableにされている限りは、taskENTER_CRITICALを呼んだタスクはクリティカルセクションが終わるまではRunning状態でいることが保証される。
ベーシッククリティカルセクションは短くすべきで、さもなくば割り込みの応答性に悪影響を与える。すべてのtaskENTER_CRITICALは近くでtaskEXIT_CRITICALとペアで使用する必要がある。この理由から標準出力はListing115のようなクリティカルセクションを使うべきではない。ターミナルに出力する処理は比較的長くなるためである。
このチャプタの例では、代替ソリューションを検討していく。
ネストする場合もクリティカルセクションは安全となる。カーネルはネストの深さを保持しているからである。クリティカルセクションはネストの深さが0になって、taskEXIT_CRITICALを呼んだ時にだけ終える。
taskENTER_CRITICAL, taskEXIT_CRITICALは、FreeRTOSが動作しているプロセッサ上での割り込みをenable状態を変更する唯一の正規の方法である。
他の方法で割り込みのenable状態を変えると、マクロがカウントしているネスト数は無効となる。
taskENTER_CRITICAL, taskEXIT_CRITICALは、"FromISR"では終わらない。そのためISRからよ9んではならない。
taskENTER_CRITICAL_FROM_ISR, taskEXIT_CRITICAL_FROM_ISR が割り込みセーフバージョンとなる。
この割り込みセーフバージョンは割り込みのネストを許可しているポートがサポートしている。割り込みのネストを許可しないポートでは使われない。
taskENTER_CRITICAL_FROM_ISR()はtaskEXIT_CRITICAL_FROM_ISR()に設定すべき値がreturnされる。デモをListing116に示す。
void vAnInterruptServiceRoutine( void )
{
/* Declare a variable in which the return value from taskENTER_CRITICAL_FROM_ISR()
will be saved. */
UBaseType_t uxSavedInterruptStatus;

   /* This part of the ISR can be interrupted by any higher priority interrupt. */

   /* Use taskENTER_CRITICAL_FROM_ISR() to protect a region of this ISR.  Save the
   value returned from taskENTER_CRITICAL_FROM_ISR() so it can be passed into the
   matching call to taskEXIT_CRITICAL_FROM_ISR(). */
   uxSavedInterruptStatus = taskENTER_CRITICAL_FROM_ISR();


   /* This part of the ISR is between the call to taskENTER_CRITICAL_FROM_ISR() and
   taskEXIT_CRITICAL_FROM_ISR(), so can only be interrupted by interrupts that have
   a priority above that set by the configMAX_SYSCALL_INTERRUPT_PRIORITY constant. */


   /* Exit the critical section again by calling taskEXIT_CRITICAL_FROM_ISR(),
   passing in the value returned by the matching call to
   taskENTER_CRITICAL_FROM_ISR(). */
   taskEXIT_CRITICAL_FROM_ISR( uxSavedInterruptStatus );

   /* This part of the ISR can be interrupted by any higher priority interrupt. */
}
このコードの実行時間は、実際のクリティカルセクション内で守られているコードを実行するよりも、無駄に時間を消費する。
ベーシッククリティカルセクションは、早く入って、早く終わる、いつも決定的で、プロテクトされているコードがとても短い。
Suspending (or Locking) the Scheduler
クリティカルセクションはスケジューラーをsuspendすることによって、生成できる。
suspendingはlockingと表現されることもある。
ベーシッククリティカルセクションはタスクや割り込みからのアクセスからコードを守ることができる。
スケジューラーをサスペンドすることによって実装されるクリティカルセクションは、他のタスクから守ることだけができる。割り込みは依然として有効である。
クリティカルセクションは単に割り込みを無効にすることによる実装では長すぎるので、代わりにスケジューラをサスペンドすることによって実装する。
しかし、スケジューラがサスペンドされている間の割り込み動作は、スケジューラーのレジューム(サスペンド解除)を比較的長い動作にするので、各ケースでどれがベストの方法かを考慮することが必要となる。
vTaskSuspendAll API Function
void vTaskSuspendAll( void );
スケジューラーはvTaskSuspendAllを呼ぶことでサスペンドされる。スケジューラーをサスペンドするとコンテキストスイッチは発生しなくなるが、割り込みはenableのままである。
スケジューラーがサスペンド中に割り込みがコンテキストスイッチを要求すると、そのリクエストはペンディングされる。そして、スケジューラーがレジュームしたときに実行されれる。
FreeRTOS APIはスケジューラーがサスペンドされている間に呼ばれてはならない。
BaseType_t xTaskResumeAll( void );
スケジューラーはxTaskTesumeAllでレジュームされる。
- 戻り値
スケジューラーがサスペンドされている間のコンテキストスイッチは、ペンディングされ、スケジューラーがレジュームしたときに実行される。
xTaskResumeAllによってペンディングされたコンテキストスイッチが実行された場合はpdTRUEが返る。そのほかはpdFALSEが返る。
vTaskSuspendAll, xTaskResumeAllはネストして呼んでも安全である。カーネルはネストの深さを数えているから。
スケジューラーはネストしたカウントが0になったときにレジュームをする。
Listing119にvPrintStringの実装を占め鵜s。ターミナルへの出力を保護するためにスケジューラーをサスペンドしている。
void vPrintString( const char *pcString )
{
    /* Write the string to stdout, suspending the scheduler as a method of mutual
    exclusion. */
    vTaskSuspendScheduler();
    {
        printf( "%s", pcString );
        fflush( stdout );
    }
    xTaskResumeScheduler();
}
7.3 mutex(と、binary semaphores)
Mutexは、複数のタスクからのリソースアクセスを制御するために使われるbinary semaphoreの特殊な型である。
MUTEXは、MUTual EXclusionから名付けられている。
mutexを使うには、FreeRTOSConfig.hのconfigUSE_MUTEXESを1にする。
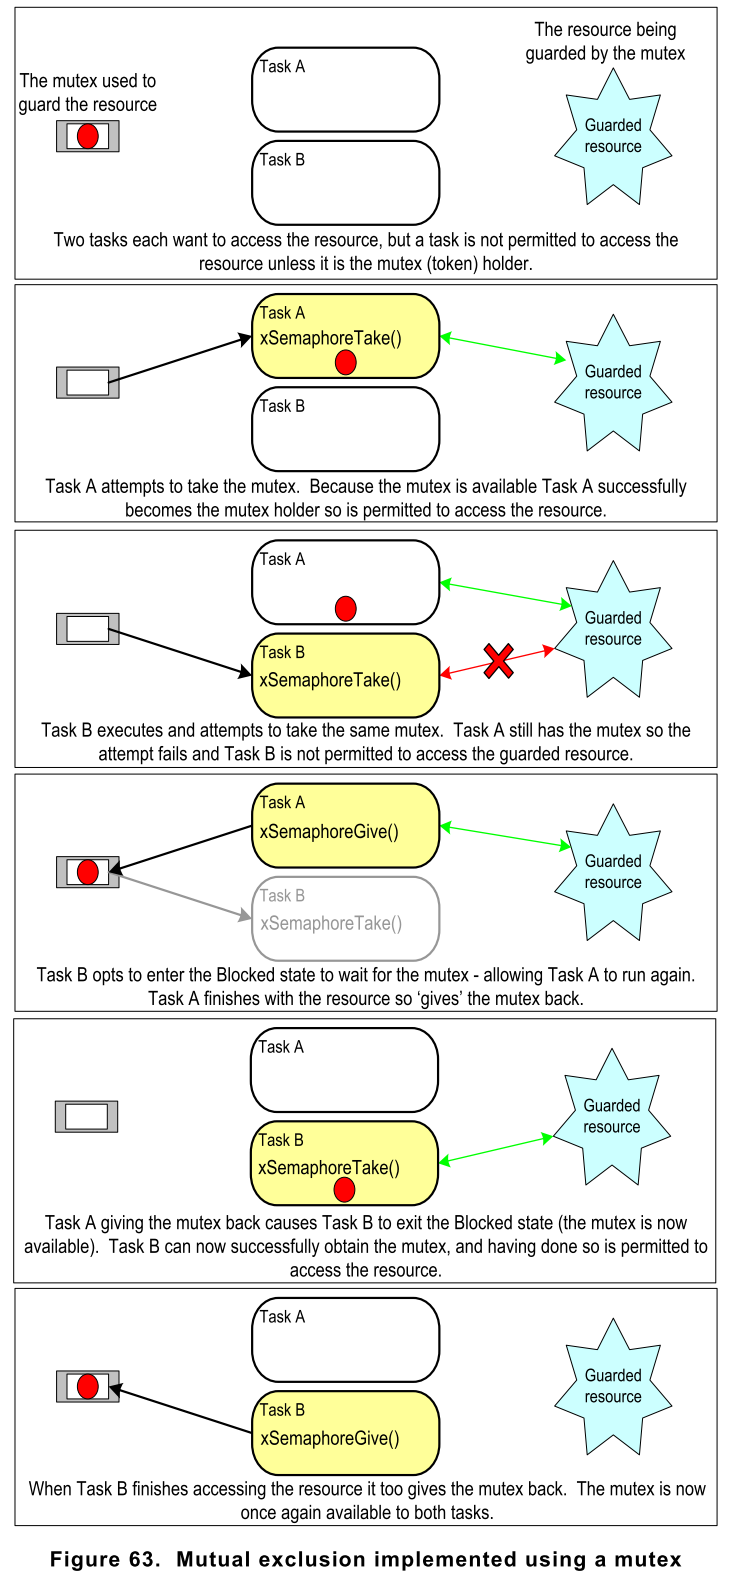
排他制御の市はリオでは、mutexはリソースが共有されていることのトークンとして使用される。あるタスクが正当にリソースにアクセスするためには、初めにそのトークンをtakeする必要がある。トークンはリソースを使い終わったときにreturnされる。これはトークンをgiveすることになる。トークンをgiveしたときのみ、他のタスクはtakeできる。トークンを持っていない場合には、リソースにアクセスすることはできない。このメカニズムはFigure63に示す。
mutexとbinary semaphoreは多くの特徴がある。これをFigure63(mutexが排他に使われる)に示すが、Figure53(binary semaphoreが同期に使われる)場合とは完全に異なる。
一番の地ギアは、獲得した後にsemaphoreに発生することである。
- 排他制御に使われるsemaphoreは常にリターンする必要がある
- 同期に使われたsemaphoreは通常は破棄される。またはreturnされない。
この仕組みは、アプリケーション開発者による規約によって動作する。あるタスクがリソースにアクセスできない時がある理由はどこにもない。あるとすると、mutex所有者にならないかぎりは、各タスクがそうしないように合意したときである。
xSemaphoreCreateMutex API Function
FreeRTOS v9.0.0ではxSemaphoreCreateMutexStatic関数があり、金春時に生成することができる。
mutexはsemaphoreの1つとなる。semaphore型のhandleはSemaphoreHandle_tとなる。
mutexは使う前に生成する必要がある。生成するにはxSemaphoreCreateMutexを使う。
SemaphoreHandle_t xSemaphoreCreateMutex( void );
- 戻り値
NULLはFreeRTOSヒープ枯渇で生成に失敗したことを示す。
NULLでない場合は、生成に成功したことを支援す。return値はmutex生成したhandleとなる。
Example 20. セマフォを使ってvPrintStringを書き直す
この例はvPrintStringをprvNewPrintStringで書き直し、複数のタスクから呼び出す。prvNewPrintStringはvPrintStringと同一の機能だが、スケジューリングをロックするのではなくmutexを使ってアクセス制御する。prvNewPrintStringの実装をListing121に示す。
static void prvNewPrintString( const char *pcString )
{
    /* The mutex is created before the scheduler is started, so already exists by the
    time this task executes.

    Attempt to take the mutex, blocking indefinitely to wait for the mutex if it is
    not available straight away.  The call to xSemaphoreTake() will only return when
    the mutex has been successfully obtained, so there is no need to check the
    function return value.  If any other delay period was used then the code must
    check that xSemaphoreTake() returns pdTRUE before accessing the shared resource
    (which in this case is standard out).  As noted earlier in this book, indefinite
    time outs are not recommended for production code. */
    xSemaphoreTake( xMutex, portMAX_DELAY );
    {
        /* The following line will only execute once the mutex has been successfully
        obtained.  Standard out can be accessed freely now as only one task can have
        the mutex at any one time. */
        printf( "%s", pcString );
        fflush( stdout );

        /* The mutex MUST be given back! */
    }
    xSemaphoreGive( xMutex );
}
prvNewPrintStringはprvPrintTaskによって実装されたタスクの2つのインスタンスから、繰り返し呼ばれる。
タスクのパラメータは、ユニークな文字列を各タスクに渡すために使われる。prvPrintTaskの実装をListing122に示す。
static void prvPrintTask( void *pvParameters )
{
char *pcStringToPrint;
const TickType_t xMaxBlockTimeTicks = 0x20;

    /* Two instances of this task are created.  The string printed by the task is
    passed into the task using the task’s parameter.  The parameter is cast to the
    required type. */
    pcStringToPrint = ( char * ) pvParameters;

    for( ;; )
    {
        /* Print out the string using the newly defined function. */
        prvNewPrintString( pcStringToPrint );

        /* Wait a pseudo random time.  Note that rand() is not necessarily reentrant,
        but in this case it does not really matter as the code does not care what
        value is returned.  In a more secure application a version of rand() that is
        known to be reentrant should be used - or calls to rand() should be protected
        using a critical section. */
        vTaskDelay( ( rand() % xMaxBlockTimeTicks ) );
    }
}
通常、main()は単純に、task, mutexを生成してスケジューラーをスタートする。実装をListing123に示す。
prvPrintTaskの2つのインスタンスは、異なる優先度で生成される。そのため優先度の低いタスクはpre-emptされるときがある。
mutexはターミナルへの排他的アクセスを保証するので、pre-emptが発生するときには、出力文字列は正しく、破壊されていない必要がある。
pre-emptionの周期は、xMaxBlockTimeTicksによって設定される、タスクがblocked状態でいる最大時間を減らすことによって増える。
FreeRTOS WindowsポートのExample20の特徴
- printfをcallするとWindowsのシステムコールを呼ぶ。システムコールはFreeRTOSのコントロール外となるので、不安定性を招く
- widowsシステムコールを呼ぶと、mutexを使っていないに、たまに文字列が壊れる
int main( void )
{
    /* Before a semaphore is used it must be explicitly created.  In this example a
    mutex type semaphore is created. */
    xMutex = xSemaphoreCreateMutex();

    /* Check the semaphore was created successfully before creating the tasks. */
    if( xMutex != NULL )
    {
        /* Create two instances of the tasks that write to stdout.  The string they
        write is passed in to the task as the task’s parameter.  The tasks are
        created at different priorities so some pre-emption will occur. */
        xTaskCreate( prvPrintTask, "Print1", 1000,
                     "Task 1 ***************************************\r\n", 1, NULL );

        xTaskCreate( prvPrintTask, "Print2", 1000,
                     "Task 2 ---------------------------------------\r\n", 2, NULL );

        /* Start the scheduler so the created tasks start executing. */
        vTaskStartScheduler();
    }

    /* If all is well then main() will never reach here as the scheduler will now be
    running the tasks.  If main() does reach here then it is likely that there was
    insufficient heap memory available for the idle task to be created.  Chapter 2
    provides more information on heap memory management. */
    for( ;; );
}
出力結果をFigure64に示す。
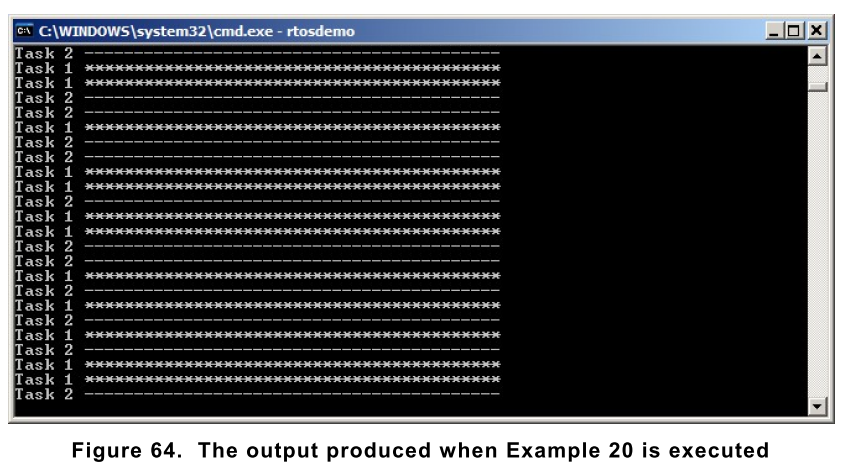
Figure64は、期待したとおりに、出力された文字列が壊れていない。ランダムなdelay periodによって、ランダムは並びになっている。
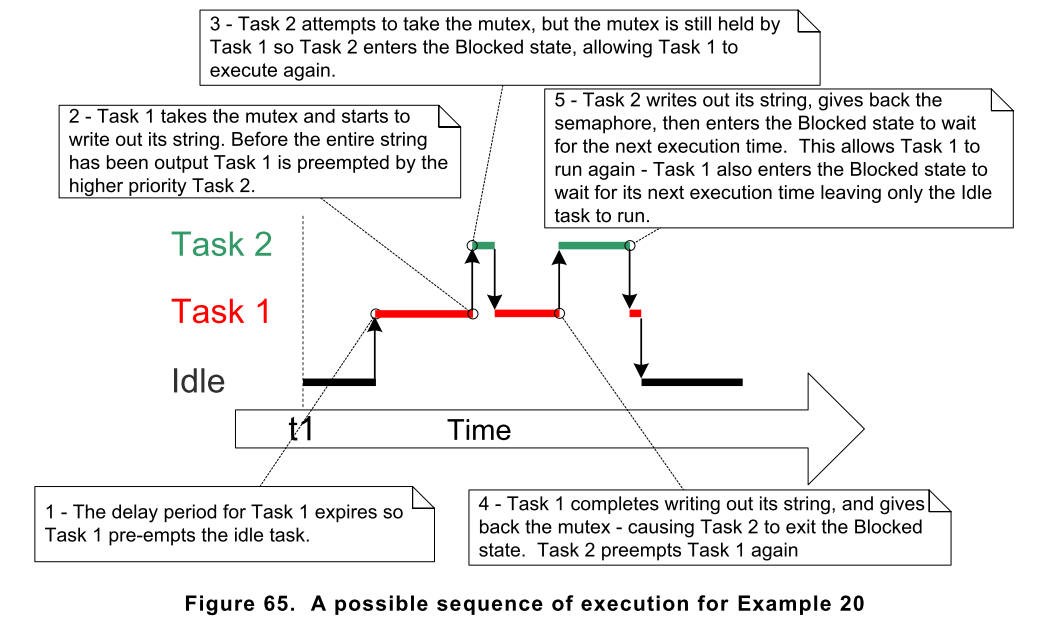
優先度逆転(Priority Inversion)
Figure 65はmutexで排他制御をするときの落とし穴の1つを示す。高い優先度を持つTask2が、低い優先度を持つTask1がmutexをgiveするのを待っている。
高い優先度のタスクが、低い優先度のタスクによって待たされることを、優先度逆転(priority inversion)と呼ばれる。
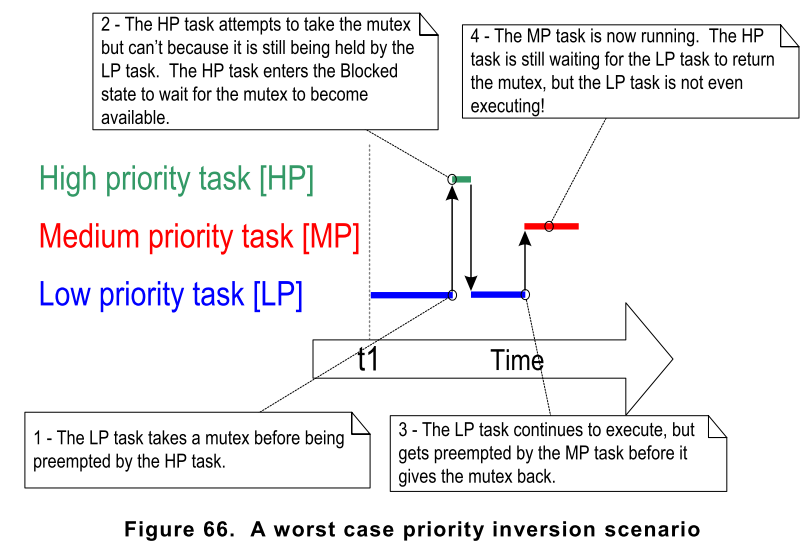
この望まれない振る舞いは、もし中間優先度のタスクが高優先度のタスクがセマフォを待っている時に動き出すと、問題が大きくなる。
これは、高い優先度のタスクがが低い優先度のタスクを待つことになる。低い優先度のタスクが実行されることもないのに。
このワーストケースのシナリオをFigure66に示す。
(図では、もはやLPは動いてもいないのに、HPが待たされていることになる)
優先度継承(Priority Inheritance)
FreeRTOS mutexとbinary semaphoreはとても似ているが、mutexは基本的な優先度継承の仕組みを持っている。一方、binary semaphoreは持っていない。
優先度継承は優先度逆転の悪影響を最小化するためのスキームである。優先度逆転を「直す」わけではないが、優先度逆転の時間を制限することで影響を軽くすることができる。
しかし、優先度継承はシステムのタイミングを複雑化するので、正しいシステム操作用として依存するのは、良い実践方法とはいえない。
優先度継承は、高い優先度のタスクが低い優先度のタスクが持っているmutexを取ろうとしているときに、低いタスクの優先順を一時的に上げる働きをする。
mutexを持っている低い優先度のタスクは、mutexを待っているタスクの優先度を「継承」する。
Figure67に動作を示す。mutexを返したときには、もともとの優先順位に自動的にリセットされる。
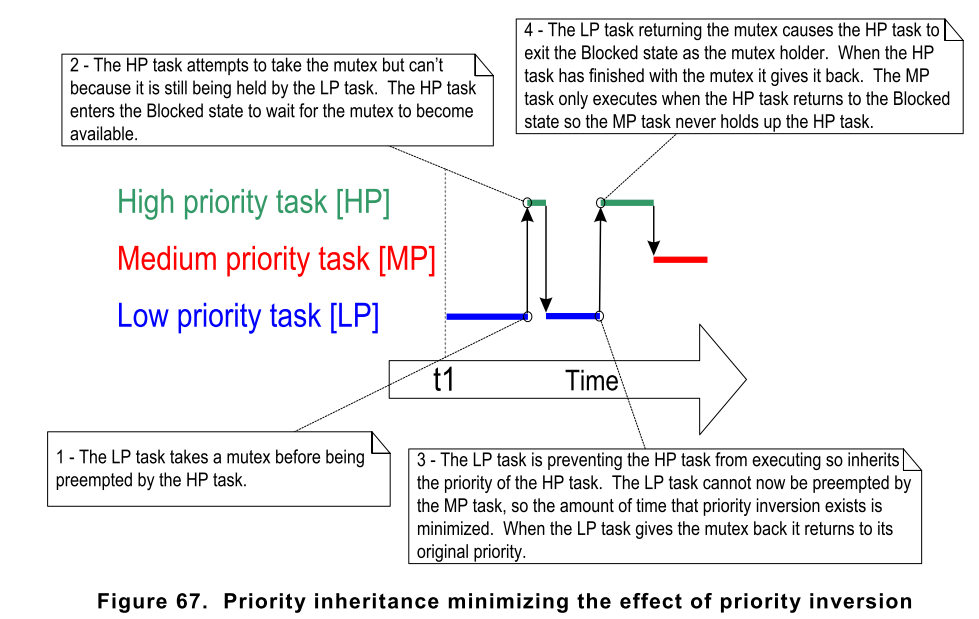
ここで見られるように、継承機能は、mutexを使っているタスクの優先度に影響を与える。
この理由から、mutexはISRから使われてはならない。
デッドロック
デッドロックは、mutexで排他制御する際の、もう1つの落とし穴である。デッドロックは、deadly embraceと呼ぶこともある。
デッドロックは、2つのタスクが互いに保持しているリソースを、互いに待つことによって発生する。たとえば、Task A, Task Bがmutex X, Yを必要とする以下のシナリオを考える。
- Task Aがmutex Xをtakeする
- Task AはTask Bによってpre-emptされる。
- Task Bはmutex Xをtakeしようとするまえに、mutex Yをtakeする。Task Bはmutex XをtakeするためにBlocked状態となる
- Task Aが処理を続ける。Task Aはmutex Yをtakeしようとするが、mutex YはTask Bによってtakeされているので使えない。Task AはTask Bがmutex Yをgiveするまで、Blocked状態となる
このシナリオの結果として、TaskA, TaskBは互いにmutexを待ってblocked状態になるので処理が進まなくなるので、デッドロックとなる。
優先度逆転と同じように、デッドロックを避けるベストな方法は、設計時にある。設計としてデッドロックが起こりえないようにする。
特にこの本の前の説明では、タイムアウトなしでmutexを無限に待つ悪い実践をしていた。代わりに、mutexを待つ最大時間を設定してタイムアウトさせて、デッドロックになりえた現象をmutex獲得失敗を設計エラーとする。
実際には、デッドロックは小さい組み込みシステムでは大きな問題にならない。システム設計者が全体をよく理解していて、発生しそうな場所を除去できるからだ。
再帰的mutex(Recursive Mutexes)
タスク自身でデッドロックすることもある。これは、あるタスクが同じmutexをgiveすることなく再度takeしようとしたときに発生する。次のシナリオを考える。
- あるタスクがmutexを取得する
- mutexを保持したまま、ライブラリ関数を呼ぶ
- ライブラリの実装が同じmutexを獲得することになっているので、blocked状態に入る
このシナリオの結果、タスクはmutexがreturnされるまでBlocked状態となるが、タスクはすでにmutex保持者となっている。自分自身を待つことによってデッドロック状態となる。
このタイプのデッドロックは、標準mutexの代わりにrecursive mutexを使うことで回避できる。recursive mutexは、同じタスクによる複数のtakeを受けることができる。
全てのtakeした各処理にに対して、giveすることdで、mutexはreturnされる。
標準mutex, recursive mutexは似た方法で生成できる。
- 標準mutexはxSemaphoreCreateMutexで生成できる。再帰的mutexはxSemaphoreCreateRecursiveMutexによって生成できる。2つのAPIは同じプロトタイプとなる
- 標準mutexはxSemaphoreTakeでtakeされ、recursive mutexはxSemaphoreTakeRecursiveでtakeされる。2つのAPIは同じプロトタイプとなる
- 標準mutexはxSemaphoreGiveでgiveされ、recursive mutexはxSemaphoreGiveRecursiveでgiveされる。2つのAPIは同じプロトタイプとなる
Listing124にrecursive mutexの使い方を示す
/* Recursive mutexes are variables of type SemaphoreHandle_t. */
SemaphoreHandle_t xRecursiveMutex;

/* The implementation of a task that creates and uses a recursive mutex. */
void vTaskFunction( void *pvParameters )
{
const TickType_t xMaxBlock20ms = pdMS_TO_TICKS( 20 );

   /* Before a recursive mutex is used it must be explicitly created. */
   xRecursiveMutex = xSemaphoreCreateRecursiveMutex();

   /* Check the semaphore was created successfully.  configASSERT() is described in
   section 11.2. */
   configASSERT( xRecursiveMutex );

   /* As per most tasks, this task is implemented as an infinite loop. */
   for( ;; )
   {
       /* ... */

       /* Take the recursive mutex. */
       if( xSemaphoreTakeRecursive( xRecursiveMutex, xMaxBlock20ms ) == pdPASS )
       {
          /* The recursive mutex was successfully obtained.  The task can now access
          the resource the mutex is protecting.  At this point the recursive call
          count (which is the number of nested calls to xSemaphoreTakeRecursive())
          is 1, as the recursive mutex has only been taken once. */

          /* While it already holds the recursive mutex, the task takes the mutex
          again.  In a real application, this is only likely to occur inside a sub-
          function called by this task, as there is no practical reason to knowingly
          take the same mutex more than once.  The calling task is already the mutex
          holder, so the second call to xSemaphoreTakeRecursive() does nothing more
          than increment the recursive call count to 2. */
          xSemaphoreTakeRecursive( xRecursiveMutex, xMaxBlock20ms );

          /* ... */

          /* The task returns the mutex after it has finished accessing the resource
          the mutex is protecting. At this point the recursive call count is 2, so
          the first call to xSemaphoreGiveRecursive() does not return the mutex.
          Instead, it simply decrements the recursive call count back to 1. */
          xSemaphoreGiveRecursive( xRecursiveMutex );

          /* The next call to xSemaphoreGiveRecursive() decrements the recursive call
          count to 0, so this time the recursive mutex is returned.*/
          xSemaphoreGiveRecursive( xRecursiveMutex );

          /* Now one call to xSemaphoreGiveRecursive() has been executed for every
          proceeding call to xSemaphoreTakeRecursive(), so the task is no longer the
          mutex holder.
      }
   }
}
mutexとタスクスケジューリング
優先度の異なる2つのタスクが同じmutexを使うと、FreeRTOSのスケジューリングポリシーは、タスクが実行される順番を明確にする。
動作可能な最も優先度の高いタスクは、Running状態に入るタスクとして選択される。例えば、もし低い優先度のタスクがtakeしてるmutexを、高い優先度のタスクがBlocked状態でまっているときには、低い優先度のタスクがmutexをgiveしたらすぐに、低い優先度のタスクはpre-emptされ、高い優先度のタスクはmutexを保持する。このシナリオはすでに、Figure67で示している。
しかし、同じ優先度のタスクがどの順番で実行されるかについては、誤解されることが多い。
Task 1, Task 2 が同じ優先度で、Task1がTask2で持っているmutexを待っているとする。Task1はTask2がmutexをgiveしたときには、Task2をpre-emputしない。代わりに、Task2がRunning状態を続ける。Task1は単にRunnnigからReady状態に遷移する。このシナリオをFigure68に示す。垂直の破線はtickを示す。
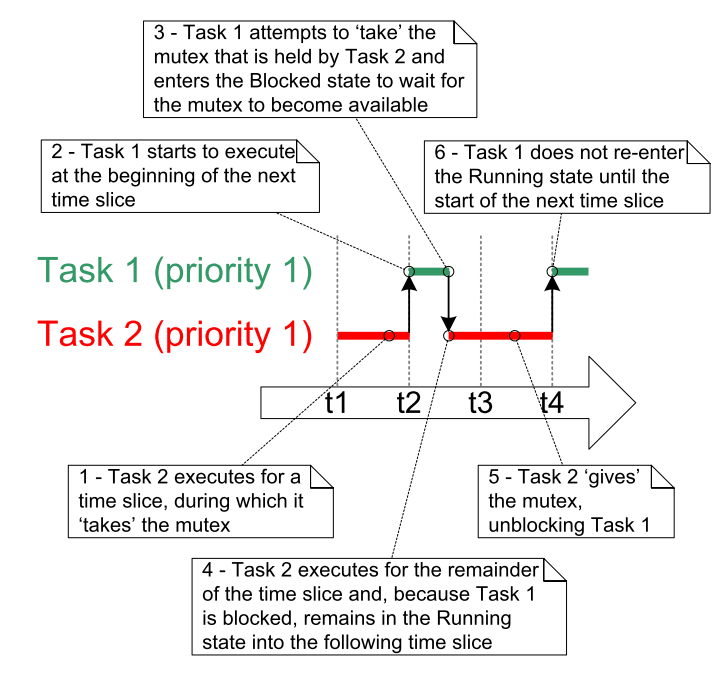
Figure68のシナリオでは、FreeRTOSスケジューラーは、mutexが利用可能になってもTask 1をすぐにRunning状態にしない。
- Task1, Task2は同じ優先度を持っているので、Task2がBlocked状態にならない限り、Task1へのスイッチは次のtickまで(configUSE_TIME_SLICING が1前提)発生しない。
- タスクの中でmutexがloopで何度も使われている場合、mutexをgiveするたびにコンテキストスイッチが発生する。その結果短い時間しかRunnning状態を維持できない。2つのタスクが同じ優先度で、同じmutexをループで使うと、スイッチングに処理時間を消費してしまう。
mutexが1つ以上のタスクからタイトなループで使われ、そのタスクたちが同じ優先度を持つ場合、各タスクがどれくらいの実行時間総量を使えるのかを注意する必要がある。その理由として、各タスクの処理時間はFigure69で示した時間にはならない。Figure69はListing125によって生成された同じ優先度の2つのインスタンスによって実現される。
/* The implementation of a task that uses a mutex in a tight loop.  The task creates
a text string in a local buffer, then writes the string to a display.  Access to the
display is protected by a mutex. */
void vATask( void *pvParameter )
{
extern SemaphoreHandle_t xMutex;
char cTextBuffer[ 128 ];

    for( ;; )
    {
        /* Generate the text string – this is a fast operation. */
        vGenerateTextInALocalBuffer( cTextBuffer );

        /* Obtain the mutex that is protecting access to the display. */
        xSemaphoreTake( xMutex, portMAX_DELAY );

        /* Write the generated text to the display – this is a slow operation. */
        vCopyTextToFrameBuffer( cTextBuffer );

        /* The text has been written to the display, so return the mutex. */
        xSemaphoreGive( xMutex );
    }
}
Listng125のコメントは、文字列生成は速い処理で、ディスプレイへの表示は遅い処理を記載している。
そのため、ディスプレイが更新されている間にmutexが保持されているので、タスクがmutexを保持する時間が支配的になる。
Figure69の垂直破線はtick割り込みを示す。
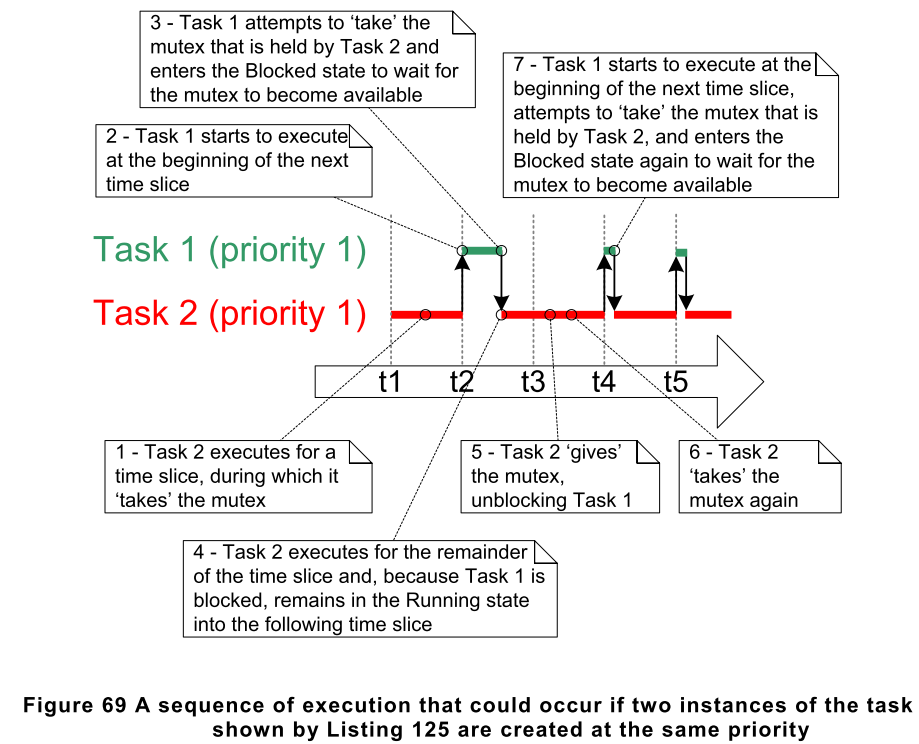
Figure69のstep7では、Task1は再度Blocked状態に入る。xSemaphoreTakeの結果として。
Figure69では、Task1はTask2がmutexを保持していないかつ、タイムスライスのタイミングがくるまで、mutexをtakeできない。
Figure69のシナリオはxSemaphoreGiveのあとにtaskYIELDを呼ぶことで回避できる。これをListing126で示す。もし、taskがmutexを保持している間にtick countが変化したら、taskYIELDが呼ばれる。
void vFunction( void *pvParameter )
{
extern SemaphoreHandle_t xMutex;
char cTextBuffer[ 128 ];
TickType_t xTimeAtWhichMutexWasTaken;

    for( ;; )
    {
        /* Generate the text string – this is a fast operation. */
        vGenerateTextInALocalBuffer( cTextBuffer );

        /* Obtain the mutex that is protecting access to the display. */
        xSemaphoreTake( xMutex, portMAX_DELAY );

        /* Record the time at which the mutex was taken. */
        xTimeAtWhichMutexWasTaken = xTaskGetTickCount();

        /* Write the generated text to the display – this is a slow operation. */
        vCopyTextToFrameBuffer( cTextBuffer );

        /* The text has been written to the display, so return the mutex. */
        xSemaphoreGive( xMutex );

        /* If taskYIELD() was called on each iteration then this task would only ever
        remain in the Running state for a short period of time, and processing time
        would be wasted by rapidly switching between tasks.  Therefore, only call
        taskYIELD() if the tick count changed while the mutex was held. */
        if( xTaskGetTickCount() != xTimeAtWhichMutexWasTaken )
        {
            taskYIELD();
        }
    }
}
7.4 ゲートキーパータスク
ゲートキーパータスクは優先度逆転、デッドロックのリスクなしで、排他制御をクリーンに実装することを提供する。
ゲートキーパータスクは、リソースに対する唯一の所有権を持っている。リソースアクセスが必要な他のタスクは、ゲートキーパータスクを通してのみ実現できる。
Example 21. ゲートキーパータスクを使うvPrintString
Example 21 はvPrintStringの代替実装を示す。今回は、ゲートキーパータスクが標準出力へのアクセスを管理する。タスクが標準出力に書き込みたいときには、直接関数を呼び出すんもではなく、ゲートキーパータスクにメッセージを送信する。
ゲートキーパータスクは標準出力に対するアクセスをシリアライズするためにFreeRTOSのキューを使う。タスクの内部実装的には排他制御を意識しない。そのタスクだけが標準出力を許されているタスクだから。
ゲートキーパータスクはほとんどの時間をqueueのメッセージを待つBlocked状態で過ごす。メッセージが到着すると、ゲートキーパータスクは単純にメッセージを標準出力する。出力は再度Blocked状態になる前となる。実装はListing128に示す。
割り込みもqueueにメッセージを送信可能である。ISRもゲートキーパータスクを通して標準出力できる。この例ではtick hook functionが200tickごとにメッセージを出力する。
tick hook はtick割り込みごとにカーネルによって呼ばれる関数である。tick hook functionを使うためには
- FreeRTOSConfig.hでconfigUSE_TICK_HOOKを1にする
- Listing127のプロトタイプを使ったhook functionを実装する
void vApplicationTickHook( void );
Tick hook関数をtick割り込みのコンテキストで実行するので、関数はとても短くする必要がある。適切なStackサイズで、FromISRがないFreeRTOS APIを使ってはならない。
スケジューラーはtick hook関数直後に実行するため、割り込みセーフなAPIを呼ぶときにはpxHigherPriorityTaskWokenパラメータは不要である。NULLに設定すればよい。
static void prvStdioGatekeeperTask( void *pvParameters )
{
char *pcMessageToPrint;

    /* This is the only task that is allowed to write to standard out.  Any other
    task wanting to write a string to the output does not access standard out
    directly, but instead sends the string to this task.  As only this task accesses
    standard out there are no mutual exclusion or serialization issues to consider
    within the implementation of the task itself. */
    for( ;; )
    {
        /* Wait for a message to arrive.  An indefinite block time is specified so
        there is no need to check the return value – the function will only return
        when a message has been successfully received. */
        xQueueReceive( xPrintQueue, &pcMessageToPrint, portMAX_DELAY );

        /* Output the received string. */
        printf( "%s", pcMessageToPrint );
        fflush( stdout );

        /* Loop back to wait for the next message. */
    }
}
queueに書くタスクはListing129に示す。2つのタスクを生成して、タスクがqueueに書く文字列はタスクのパラメータとして渡される。
static void prvPrintTask( void *pvParameters )
{
int iIndexToString;
const TickType_t xMaxBlockTimeTicks = 0x20;

    /* Two instances of this task are created.  The task parameter is used to pass
    an index into an array of strings into the task.  Cast this to the required
    type. */
    iIndexToString = ( int ) pvParameters;

    for( ;; )
    {
        /* Print out the string, not directly, but instead by passing a pointer to
        the string to the gatekeeper task via a queue.  The queue is created before
        the scheduler is started so will already exist by the time this task executes
        for the first time.  A block time is not specified because there should
        always be space in the queue. */
        xQueueSendToBack( xPrintQueue, &( pcStringsToPrint[ iIndexToString ] ), 0 );

        /* Wait a pseudo random time.  Note that rand() is not necessarily reentrant,
        but in this case it does not really matter as the code does not care what
        value is returned.  In a more secure application a version of rand() that is
        known to be reentrant should be used - or calls to rand() should be protected
        using a critical section. */
        vTaskDelay( ( rand() % xMaxBlockTimeTicks ) );
    }
}
tick hook関数は何回呼ばれたのかをカウントする。200カウントごとにゲートキーパータスクにメッセージを送信する。
デモ用の目的として、tick hookはqueueのfrontに書いて、タスクはbackに書く。
tick hook関数の実装はListing 130に示す。
void vApplicationTickHook( void )
{
static int iCount = 0;

    /* Print out a message every 200 ticks.  The message is not written out directly,
    but sent to the gatekeeper task. */
    iCount++;
    if( iCount >= 200 )
    {
        /* As xQueueSendToFrontFromISR() is being called from the tick hook, it is
        not necessary to use the xHigherPriorityTaskWoken parameter (the third
        parameter), and the parameter is set to NULL. */
        xQueueSendToFrontFromISR( xPrintQueue,
                                  &( pcStringsToPrint[ 2 ] ),
                                  NULL );

        /* Reset the count ready to print out the string again in 200 ticks time. */
        iCount = 0;
    }
}
main()はexampleに必要なqueue, taskを生成してスケジューラーをスタートする。実装はListing131に示す。
/* Define the strings that the tasks and interrupt will print out via the
gatekeeper. */
static char *pcStringsToPrint[] =
{
    "Task 1 ****************************************************\r\n",
    "Task 2 ----------------------------------------------------\r\n",
    "Message printed from the tick hook interrupt ##############\r\n"
};

/*-----------------------------------------------------------*/

/* Declare a variable of type QueueHandle_t.  The queue is used to send messages
from the print tasks and the tick interrupt to the gatekeeper task. */
QueueHandle_t xPrintQueue;

/*-----------------------------------------------------------*/

int main( void )
{
    /* Before a queue is used it must be explicitly created.  The queue is created
    to hold a maximum of 5 character pointers. */
    xPrintQueue = xQueueCreate( 5, sizeof( char * ) );

    /* Check the queue was created successfully. */
    if( xPrintQueue != NULL )
    {
        /* Create two instances of the tasks that send messages to the gatekeeper.
        The index to the string the task uses is passed to the task via the task
        parameter (the 4th parameter to xTaskCreate()).  The tasks are created at
        different priorities so the higher priority task will occasionally preempt
        the lower priority task. */
        xTaskCreate( prvPrintTask, "Print1", 1000, ( void * ) 0, 1, NULL );
        xTaskCreate( prvPrintTask, "Print2", 1000, ( void * ) 1, 2, NULL );

        /* Create the gatekeeper task.  This is the only task that is permitted
        to directly access standard out. */
        xTaskCreate( prvStdioGatekeeperTask, "Gatekeeper", 1000, NULL, 0, NULL );

        /* Start the scheduler so the created tasks start executing. */
        vTaskStartScheduler();
    }

    /* If all is well then main() will never reach here as the scheduler will now be
    running the tasks.  If main() does reach here then it is likely that there was
    insufficient heap memory available for the idle task to be created.  Chapter 2
    provides more information on heap memory management. */
    for( ;; );
}
Example 21の出力結果をFigure70に示す。
タスクからの文字列、割り込みからの文字列が破壊されることなく出力されている。
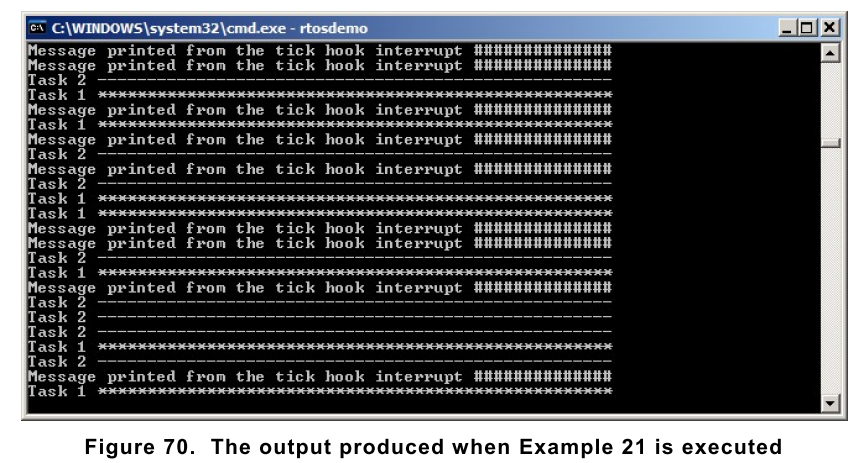
ゲートキーパータスクは、print taskより優先順位が低いので、ゲートキーパーから送られたqueueは、両方のprint taskがBlocked状態になるまで、残っている。
状況によってはゲートキーパータスクが高い優先度を持ち、すぐに処理するパターンをもある。
しかし、そうすrと、ゲートキーパがリソースへのアクセスを終えるまで、低い優先度のタスクは遅延してしまう。