この記事について
Mastering the FreeRTOS Real Time Kernel-A Hands-On Tutorial Guildの日本語訳
重要と思われるポイント
- ソフトウェアタイマを使うためにはFreeRTOSConfig.hのconfigUSE_TIMERSを1に設定する
- ソフトウェアタイマのコールバック関数は、デーモンタスクと同じコンテキストで実行されるのでBlocked状態に入る可能性のあるFreeRTOS APIを使用してはならない(ex. vTaskDelay)
- ソフトウェアタイマはone-shot(一度だけ実行), auto-reload(周期的に実行)の2種類
- デーモンタスクの優先度はconfigTIMER_TASK_PRIORITY
Chapter 5 ソフトウェアタイマ(Software Timer Management)
5.1 チャプターのイントロダクションとスコープ
ソフトウェアタイマは将来の時間や、周期的に実行する関数のスケジューリングに使われる。
ソフトウェアタイマによって実行される関数を、software timer's callback function と呼ぶ。
ソフトウェアタイマはFreeRTOSカーネルによって実装される。ハードウェアを必要とせず、ハードウェアタイマやカンタに関連しない。
FreeRTOSは効率重視のため、ソフトウェアタイマはコールバック関数を実際に実行するまで、どのプロセスも実行されない。
ソフトウェアタイマはオプションとなっている。使うためには
・FreeRTOS/Source/timers.cをビルドする
・FreeRTOSConfig.hのconfigUSE_TIMERSを1に設定する
このチャプターでは以下をスコープとする
- タスクとソフトウェアタイマの違い
- RTOSデーモンタスク
- timer command queue
- one shot timerとperiodic timerの違い
- ソフトウェアタイマの生成、リセット、period変更の方法
5.2 ソフトウェアタイマコールバック関数
ソフトウェアタイマコールバック関数はCの関数で実装される。returnはvoidで、ソフトウェアタイマのhandleをパラメータで設定する。
プロトタイプは以下となる
void ATimerCallback( TimerHandle_t xTimer );
ソフトウェアタイマコールバック関数は、通常と同じく最初から最後まで実行される。短くするべきで、Blocked状態に入ってはならない。
これまで見たようにコールバック関数はFreeRTOSが自動で作ったタスクのコンテキストで実行される。
そのため、コールバック関数は決してBlocked状態に入るFreeRTOS APIを呼んではならない。
xQueueReceiveをxTicksToWaitを0にして呼ぶのであればOKとなる。
vTaskDelayはBlockStatedに入るAPIなのでOKではない。
5.3 ソフトウェアタイマの性質と状態
ソフトウェアタイマのPeriod
periodはソフトウェアタイマがスタートしてから、コールバック関数が実行されるまでの時間
One-shot と Auto-reload タイマー
2つのタイプのタイマーがある
- One-shotタイマー
コールバック関数巻子が実行されるのは一度。マニュアルでリスタートできるが、自動ではしない - Auto-reloadタイマー
一度スタートすると、タイマー期限切れごとに自動でリスタートされる。結果としてコールバック関数が周期的に実行される。
Figure38にone-shotとauto-reloadタイマーの振る舞いの違いを示す。
破線の垂線はtick割り込みが発生した時間を示す。

-
Timer 1
Timer1はperiodが6のone-shotタイマーとなる。t1でスタートして6tick後のt7でコールバック関数が実行される。
one-shotなので実行は1回となる。 -
Timer 2
Timer2はperiodが5のauto-relaodタイマーとなる。t1でスタートして5tickごとにコールバック関数が実行される。
ソフトウェアタイマの状態
-
Dormant
Dormant状態ではhandleによって参照はできるが、実行はされていない。コールバック関数は実行されない -
Running
Running状態では、ソフトウェアタイマがRunning状態に入るまたは最後にリセットされてから経過した時間がperiodに等しいときに、コールバック関数が実行される
Figure39, 40にauto-reload, one-shotそれぞれのDormant, Running状態の遷移を示す。
異なるポイントはタイムアウトした後で、auto-reloadはRunning状態に再度遷移するが、one-shotはDormant状態に遷移する
xTimerDelete APIはいつでも事項できるので、タイマーはいつでもdeleteすることが可能。

5.4 ソフトウェアタイマのコンテキスト
ソフトウェアタイマのコールバック関数はFreeRTOSデーモンタスクと同じコンテキストで実行される。
デーモンタスクはFreeRTOS標準のタスクで、スケジューラーが起動したときに自動生成される。configTIMER_TASK_PRIORITY, configTIMER_TASK_STACK_DEPTHで優先順位とスタックサイズが決まる。
ソフトウェアタイマコールバック関数は、Blocked状態になるFreeRTOS APIを呼んではならない。デーモンタスクがblocked状態になってしまうので。
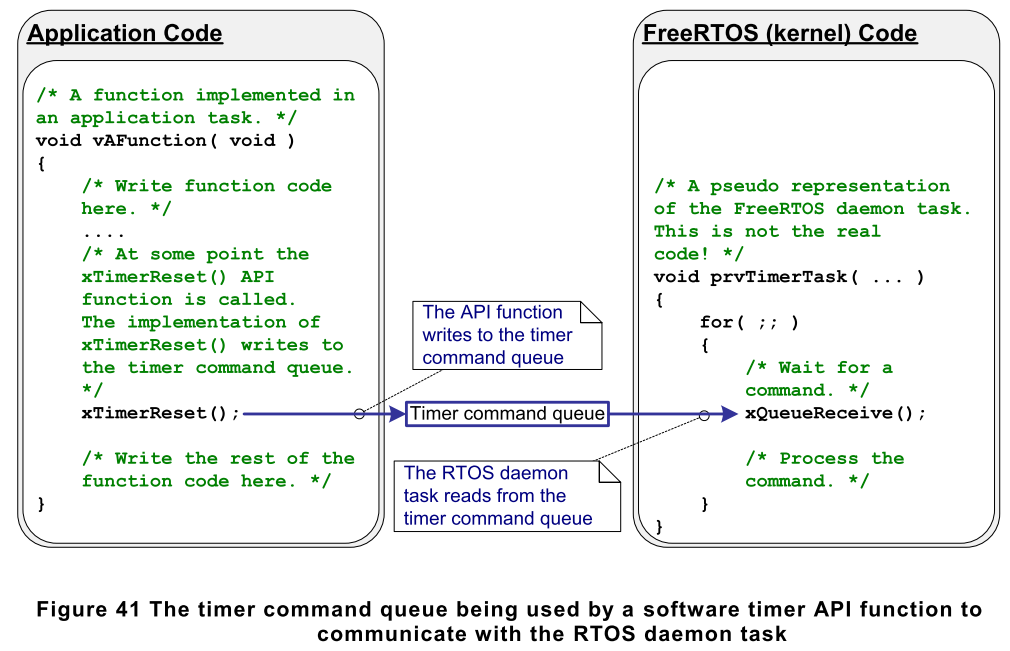
Timer Command Queue
ソフトウェアタイマAPIは、呼んだタスクからデーモンタスクへコマンドを送る。コマンドは timer command queue にキューされる。これをFgire41に示す。
start a timer, stop a timer, reset a timer の例となる。
タイマコマンドキューは、スケジューラーが起動したときに自動生成される。キューの長さはconfigTIMER_QUEUE_LENGTHでコンパイル時に決まる。
デーモンタスクのスケジューリング
デーモンタスクは他のFreeRTOSタスクのようにスケジューリングされる。単に、最も高い優先度になった時に、コマンドを実行し、コールバック関数を実行するだけ。
Figure42, 43に、どのようにconfigTIMER_TASK_PRIORITYが影響を与えるのかを示す。

Figure42では、Task1はデーモンタシクより優先度が高く、デーモンタスクはアイドルタスクより優先度が高い。
t1
Task1はRunning状態で、デーモンタスクはBlocked状態
デーモンタスクはtimer command queueにコマンドが送られて実行される、またはタイムアウトしてコールバック関数を実行するときに、Blocked状態を抜ける。
t2
Task1はxTimerStartを呼ぶ。
xTimerStartはtimer command queueにコマンドを送り、デーモンタスクはBlocked状態を抜ける。
Task1の優先度はデーモンタスクより高いため、デーモンタスクはTask1をpre-emptしない。
t3
Task1はxTimerStart APIの実行を終える。Task1はRunning状態を抜けずに、xTimerStartの最初から最後まで実行する。
t4
Task1は、あるAPIを呼んだ結果Blocked状態に入る。デーモンタスクはReady状態のなかで優先度が一番高いので、スケジューラはデーモンタスクをRunning状態とする。
デーモンタスクはTask1からqueueされたコマンドの実行を開始する。
どのソフトウェアタイマが開始してタイムアウトするかの時間は、start a timerコマンドがtimer command queuueへ送られた時間から計算される。
きれはstart a timerコマンドをtimer command queuueから受信した時間から計算するのではない。
t5
デーモンタスクはTask1からのコマンド処理を終えて、さらにtimer command queueからコマンドを受信しようとする。
timer command queueは空なので、デーモンタスクはBlocked状態に入る。
デーモンタスクはtimer command queueにコマンドが送信された、またはソフトウェアタイマがタイムアウトしたときに再度Blocked状態を抜ける
Figure43はFigure42と似たシナリオを示す。ただし、デーモンタスクの優先度はxTimerStartを呼ぶタスクより高い。

Figure43では、デーモンタスクの優先度はTask1よる高い。Task1の優先度はアイドルタスクより高い。
t1
Task1はRunning状態で、デーモンタスクはBlocked状態
t2
Task1はxTimerStartを呼ぶ。
xTimerStartはtimer command queueにコマンドを送り、デーモンタスクはBlocked状態を抜ける。
デーモンタスクの優先度はTask1より高いので、スケジューラはデーモンタスクをRunning状態とする。
Task1はxTimerStartを終える前に、デーモンタスクによってpre-emptされるため、Ready状態となる。
デーモンタスクはTask1が送ったコマンドの処理を始める
t3
デーモンタスクはTask1からのコマンドを終えて、さらにtimer command queueからメッセージを受信しようとする。
timer command queueは空なので、再度Blocked状態となる。
ここでTask1はReady状態の中で優先度が最も高くなるので、スケジューラによってRunning状態になる。
t4
Task1はxTimerStartを終える前にデーモンタスクによってpre-emptされたので、Running状態になった後にxTimerStartを終わらせる。
t5
Task1はBlocked状態になるAPIを呼ぶ。アイドルタスクがReady状態で最優先タスクとなるので、Running状態に入る。
Figure42のシナリオでは、Task1がtimer command queueにコマンドを送ってから、デーモンタスクがコマンドを受信して実行する間には、時間が経過する。
Figure43のシナリオでは、デーモンタスクは、Task1がコマンドを送った関数がreturnする前に、Task1からのコマンドを受け取って実行する。
timer command queueに送ったコマンドにはタイムスタンプがついている。タイムスタンプは、アプリケーションタスクがコマンドを送った時間から、そのコマンドをデーモンタスクが処理する時間経過を説明するのに使われる。例えば、start a timer コマンドが10ticksのperiodをもって送られたときには、タイムスタンプはコマンドが送られてから10ticks経過したところでタイムアウトすることを保証する。デーモンタスクが処理する10 ticks後ではない。
5.5 ソフトウェアタイマの生成
xTimerCreate API
FreeRTOS V9.0.0ではxTimerCreateStaticが使える。コンパイル時に静的にメモリを確保することができる。
ソフトウェアタイマは使用前に明示的に生成する必要がある。
ソフトウェアタイマはTimerHandle_tで参照する。xTimerCreateはソフトウェアタイマを生成して、TimerHandle_tを返す。
ソフトウェアタイマはDormant状態で生成される。
ソフトウェアタイマはスケジューラーが実行される前、または実行後にも生成することができる。
セクション 0 はデータタイプと、命名の慣習について説明する。
TimerHandle_t xTimerCreate( const char * const pcTimerName,
                            TickType_t xTimerPeriodInTicks,
                            UBaseType_t uxAutoReload,
                            void * pvTimerID,
                            TimerCallbackFunction_t pxCallbackFunction );
pcTimerName
タイマーの名前となる。これはFreeRTOS内ではまったく使われない。
純粋にデバッグ用途で、Handleより読みやすい。
xTimerPeriodInTicks
tickで表したタイマーperiod。pdMS_TO_TICKSマクロでmillisecondをtickに変換することができる。
uxAutoReload
pdTrueであればauto-reloadタイマー。pdFALSEであれば、one-shotタイマー。
pvTimerID
各ソフトウェアタイマのID。void*型でアプリケーション開発者が自由に使える。
このIDは同じコールバック関数を複数のソフトウェアタイマで呼び出すときに有用となる。タイマー固有のストレージなので。
使用例はこのチャプターで示す。
pxCallbackFunction
Listing72で示したただのCの関数。pxCallbackFunctionは生成されたソフトウェアタイマから呼ばれるための関数ポインタ。
Returned Value
NULLはヒープメモリ枯渇でソフトウェアタイマが生成できなかったことを示す。
non-NULLは生成に成功して、ソフトウェアタイマのハンドルが返る。
Chpater2ではヒープメモリに関する詳細な説明をしている。
xTimerStart API
xTimerStartはDormant状態にあるソフトウェアタイマをスタートするため、またRunning状態のタイマーをリセットするために使われる。
xTimerStopはRunning状態なるソフトウェアタイマをストップするために使われる。ソフトウェアタイマを止めることは、Dormant状態に遷移させることに等しい。
xTimerStartはスケジューラーがスタートする前に呼べるが、スケジューラーがスタートするまでは実際にはスタートしない。
xTimerStartをISRから呼ばないこと。xTimerStartFromISRを使うこと。
BaseType_t xTimerStart( TimerHandle_t xTimer, TickType_t xTicksToWait );
xTimer
スタートまたはリセットするソフトウェアタイマのhandle。handleはxTimerCreateで生成されたもの
xTicksToWait
xTimerStartはデーモンタスクのコマンドキューにstart a timerを送る。xTicksToWaitはqueueがfullの場合に、最大でどれだけBlocked状態で待ち続けるかを指示する。
xTimerStartはxTicksToWaitが0でqueueがfullの場合はすぐにreturnされる。
block時間はtick periodsで設定されるので、実際の時間はtick周波数に依存する。pdMS_TO_TICKSマクロを使うとmsをticksに変換できる。
FreeRTOSConfig.hでINCLUDE_vTaskSuspendが1に設定して、xTicksToWaitがportMAX_DELAYであれば、timer command queueが空くまで呼び出したタスクはタイムアウトなしでBlocked状態を維持する。
xTiemrStartがスケジューラーがスタートする前に呼ばれた場合、xTicksToWaitの値は無視される。XTimerStartはxTicksToWaitがゼロに設定されたように動作する。
戻り値
-
pdPASS
PdPASSはstart a timerコマンドがtimer command queueに送信できたときに返される。
デーモンタスクの優先度がxTimerStartを呼んだダスクより高い場合、スケジューラはxTimerStartがreturnする前にコマンドを実行することを保証する。
これはデーモンタスクはtimer command queueにデータがあるとすぐに、タスクをpre-emputするからである。
block timeが指定された場合(0以外)、タイムアウトする前にtimer command queueuへの書き込みが成功した場合を除いて
関数がreturnする前にBlocked状態でcommand queueが空くのを待つことが可能。 -
pdFALSE
pdFALSEはtimer command queueがfullでコマンドを積めなかったときに返る。
Example13 one-shot, auto-reloadタイマー
/* The periods assigned to the one-shot and auto-reload timers are 3.333 second and half a
second respectively. */
# define mainONE_SHOT_TIMER_PERIOD  pdMS_TO_TICKS( 3333 )
# define mainAUTO_RELOAD_TIMER_PERIOD  pdMS_TO_TICKS( 500 )

int main( void )
{
TimerHandle_t xAutoReloadTimer, xOneShotTimer;
BaseType_t xTimer1Started, xTimer2Started;

   /* Create the one shot timer, storing the handle to the created timer in xOneShotTimer. */
   xOneShotTimer = xTimerCreate(
                  /* Text name for the software timer - not used by FreeRTOS. */
                  "OneShot",
                  /* The software timer's period in ticks. */
                  mainONE_SHOT_TIMER_PERIOD,
                  /* Setting uxAutoRealod to pdFALSE creates a one-shot software timer. */
                  pdFALSE,
                  /* This example does not use the timer id. */
                  0,
                  /* The callback function to be used by the software timer being created. */
                  prvOneShotTimerCallback );

   /* Create the auto-reload timer, storing the handle to the created timer in xAutoReloadTimer. */
   xAutoReloadTimer = xTimerCreate(
                  /* Text name for the software timer - not used by FreeRTOS. */
                  "AutoReload",
                  /* The software timer's period in ticks. */
                  mainAUTO_RELOAD_TIMER_PERIOD,
                  /* Setting uxAutoRealod to pdTRUE creates an auto-reload timer. */
                  pdTRUE,
                  /* This example does not use the timer id. */
                  0,
                  /* The callback function to be used by the software timer being created. */
                  prvAutoReloadTimerCallback );

   /* Check the software timers were created. */
   if( ( xOneShotTimer != NULL ) && ( xAutoReloadTimer != NULL ) )
   {
       /* Start the software timers, using a block time of 0 (no block time).  The scheduler has
       not been started yet so any block time specified here would be ignored anyway. */
       xTimer1Started = xTimerStart( xOneShotTimer, 0 );
       xTimer2Started = xTimerStart( xAutoReloadTimer, 0 );

       /* The implementation of xTimerStart() uses the timer command queue, and xTimerStart()
       will fail if the timer command queue gets full.  The timer service task does not get
       created until the scheduler is started, so all commands sent to the command queue will
       stay in the queue until after the scheduler has been started.  Check both calls to
       xTimerStart() passed. */
       if( ( xTimer1Started == pdPASS ) && ( xTimer2Started == pdPASS ) )
       {
           /* Start the scheduler. */
           vTaskStartScheduler();
       }
   }

   /* As always, this line should not be reached. */
   for( ;; );
}
コールバック関数は、呼ばれるごとにメッセージをprintする。
one-shotタイマーの実装をListing76に示す。auto-relaodの実装をListing77に示す。
static void prvOneShotTimerCallback( TimerHandle_t xTimer )
{
TickType_t xTimeNow;

    /* Obtain the current tick count. */
    xTimeNow = xTaskGetTickCount();

    /* Output a string to show the time at which the callback was executed. */
    vPrintStringAndNumber( "One-shot timer callback executing", xTimeNow );

    /* File scope variable. */
    ulCallCount++;
}
static void prvAutoReloadTimerCallback( TimerHandle_t xTimer )
{
TickType_t xTimeNow;

    /* Obtain the current tick count. */
    xTimeNow = uxTaskGetTickCount();

    /* Output a string to show the time at which the callback was executed. */
    vPrintStringAndNumber( "Auto-reload timer callback executing", xTimeNow );

    ulCallCount++;
}
Figure44に実行プロセスを示す。Figure 44はaut-reload timerのコールバック関数が500tickごとに実行されている。one-shotタイマーのコールバック関数はtickが3333の時に一度だけ実行されている。

Timer ID
各ソフトウェアタイマはIDを持っている。その値はアプリケーション開発者はいろいろな目的で使うことができる
IDは(void *)のため、整数、オブジェクトへのポインタ、関数ポインタなどで使える。
初期値はソフトウェアタイマが生成されたときに決まる。vTimerSetTimerIDを使って更新することもできる。pvTimerGetTimerIDを使って、問い合わせも可能。
vTimerSetTimerID API Function
void vTimerSetTimerID( const TimerHandle_t xTimer, void *pvNewID );
xTimer
IDをアップデートしたいソフトウェアタイマのhandle。handleはxTimerCreateで作られたもの。
pvNewID
セットしたいID
pvTimerGetTimerID API Function
void *pvTimerGetTimerID( TimerHandle_t xTimer );
xTimer
問い合わせしたいIDのソフトウェアタイマのhandle。handleはxTimerCreateで作られたもの。
戻り値
問い合わせしたID
Example 14 コールバック関数パラメータと、ソフトウェアタイマID
同じコールバック関数が複数のソフトウェアタイマに割り当てることができる。その場合、コールバック関数のパラメータはどのソフトウェアタイマがタイムアウトしたのかを決めるために使われる。
Exapmle13では異なるコールバック関数を使った。1つはone-shotタイマー、他の1つはauto-reloadタイマー。
Examle14では似たような機能だが、1つのコールバック関数を両方のタイマーに割り当てる。
main関数は、Exaple13とほとんど同じになる。違いはソフトウェアタイマが生成される部分となる。
Listing80に差分を示す。prvTimerCallbackは両方のソフトウェアタイマーに使用される。
/* Create the one shot timer software timer, storing the handle in xOneShotTimer. */
xOneShotTimer = xTimerCreate( "OneShot",
                              mainONE_SHOT_TIMER_PERIOD,
                              pdFALSE,
                              /* The timer’s ID is initialized to 0. */
                              0,
                              /* prvTimerCallback() is used by both timers. */
                              prvTimerCallback );

/* Create the auto-reload software timer, storing the handle in xAutoReloadTimer */
xAutoReloadTimer = xTimerCreate( "AutoReload",
                                  mainAUTO_RELOAD_TIMER_PERIOD,
                                  pdTRUE,
                                  /* The timer’s ID is initialized to 0. */
                                  0,
                                  /* prvTimerCallback() is used by both timers. */
                                  prvTimerCallback );
prvTimerCallbackは各タイマーがタイムアウトしたときに実行される。prvTimerCallbackの実装は、one-shotまたはauto-reloadのどちから呼ばれたのかを決めるためのパラメータを使う。
prvTimerCallbackはどのようにソフトウェアタイマを使うのかをデモする。自身のIDでタイムアウトした回数を覚えておき、auto-reloadタイマーは5回呼び出されたら止める。
Listing79に実装を示す。
static void prvTimerCallback( TimerHandle_t xTimer )
{
TickType_t xTimeNow;
uint32_t ulExecutionCount;

    /* A count of the number of times this software timer has expired is stored in the timer's
    ID.  Obtain the ID, increment it, then save it as the new ID value.  The ID is a void
    pointer, so is cast to a uint32_t. */
    ulExecutionCount = ( uint32_t ) pvTimerGetTimerID( xTimer );
    ulExecutionCount++;
    vTimerSetTimerID( xTimer, ( void * ) ulExecutionCount );

    /* Obtain the current tick count. */
    xTimeNow = xTaskGetTickCount();

    /* The handle of the one-shot timer was stored in xOneShotTimer when the timer was created.
    Compare the handle passed into this function with xOneShotTimer to determine if it was the
    one-shot or auto-reload timer that expired, then output a string to show the time at which
    the callback was executed. */
    if( xTimer == xOneShotTimer )
    {
        vPrintStringAndNumber( "One-shot timer callback executing", xTimeNow );
    }
    else
    {
        /* xTimer did not equal xOneShotTimer, so it must have been the auto-reload timer that
        expired. */
        vPrintStringAndNumber( "Auto-reload timer callback executing", xTimeNow );

        if( ulExecutionCount == 5 )
        {
            /* Stop the auto-reload timer after it has executed 5 times.  This callback function
            executes in the context of the RTOS daemon task so must not call any functions that
            might place the daemon task into the Blocked state.  Therefore a block time of 0 is
            used. */
            xTimerStop( xTimer, 0 );
        }
    }
}
Exaple14の結果をFigure45に示す。auto-reloadは5回実行されている

タイマーのPeriod変更
全ての公式のFreeRTOSポートは1つかそれ以上のサンプルプロジェクトを提供している。ほとんどのプロジェクトはself-checkingをしている。LEDは視覚的なフィードバックを与える。もしself-checkが常にパスするときはLEDがゆっくりトグルする。失敗するときであればLEDは速くトグルしている。
いくつかのサンプルプロジェクトは、タスクでself-checkをしている。LEDのトグルをコントロールするためにvTaskDelayを使っている。
他の例ではソフトウェアタイマのコールバック関数を使っている。タイマーのperiodがLEDトグルをチェックする周期になる。
xTimerChangePeriod API Funtion
ソフトウェアタイマのperiodはxTimerChangePeriodで変更できる。
xTimerChangePeriodですでに動作しているタイマーのperiodを変更した場合、タイムアウト時間を新しいperiodで再計算する。再計算した時間はxTimerChangePeriodが呼ばれた時間に関係する。最初にスタートしたときではない。
xTimerChangePeriodがDormant状態のタイマーに使われた場合、タイムアウト時間を再計算して、Running状態に遷移する。
ISRからはxTimerChangePeriodではなくxTimerChangePeriodFromISRを使うこと。
BaseType_t xTimerChangePeriod( TimerHandle_t xTimer,
                               TickType_t xNewTimerPeriodInTicks,
                               TickType_t xTicksToWait );
-
xTimer
新しいperiodを設定したいソフトウェアタイマのhandle。xTimerCreateで生成されたもの。 -
xTimerPeriodTicks
新しいタイマーperiod。tickで指定するのでpdMS_TO_TICKSマクロを変換に使うと良い。 -
xTicksToWait
xTimerChangePeriodはchange periodをtimer command queueに送って、デーモンタスクに伝える。xTicksToWaitはqueueが空くまでどれくらいBlocked状態で待つのかを指定する。
xTimerChangePeriodはxTicksToWaitが0の場合は、timer command queueuがfullの場合、すぐにreturnする。
pdMS_TO_TICKSはmsをticksに変換できるマクロ。
FreeRTOSConfig.hでINCLUDE_vTaskSuspendが1の場合、xTicksToWaitがportMAX_DELAYに設定されるとtimer command queueが空くまでタイムアウトなしで待つ。
xTimerChangePeriodがスケジューラーがスタートする前に呼ばれた場合、xTicksToWaitは無視され、xTimerChangePeriodはxTicksToWait0であるかのように振る舞う。 -
戻り値
pdPASS
pdPASSはtimer command queueのデータセットが成功したときに返る。
xTicksToWaitが0でない場合は、タスクはreturnする前にtimer command queueが空くまでblocked状態で待つことができる。タイムアウトする前にtimer command queueへの設定が成功した場合を除く
pdFALSE
pdFALSEはtimer command queueがfullで設定できなかったときに返る。
xTicksToWaitが0でない場合は、タスクはデーモンタスクがqueueを空けるまでblocked状態で待つことができる。ただし明示されたblocked時間がタイムアウトする前。
Listing83はself-checking機能をソフトウェアタイマコールバック関数で実現している例で、xTimerChangePeirodを使ってLED toggleのself-check頻度を上げている。
self-checkをするソフトウェアタイマは、"check timer"として参照される。
/* The check timer is created with a period of 3000 milliseconds, resulting in the LED toggling
every 3 seconds.  If the self-checking functionality detects an unexpected state, then the check
timer’s period is changed to just 200 milliseconds, resulting in a much faster toggle rate. */
const TickType_t xHealthyTimerPeriod = pdMS_TO_TICKS( 3000 );
const TickType_t xErrorTimerPeriod = pdMS_TO_TICKS( 200 );

/* The callback function used by the check timer. */
static void prvCheckTimerCallbackFunction( TimerHandle_t xTimer )
{
static BaseType_t xErrorDetected = pdFALSE;

    if( xErrorDetected == pdFALSE )
    {
        /* No errors have yet been detected.  Run the self-checking function again.  The
        function asks each task created by the example to report its own status, and also checks
        that all the tasks are actually still running (and so able to report their status
        correctly). */
        if( CheckTasksAreRunningWithoutError() == pdFAIL )
        {
            /* One or more tasks reported an unexpected status.  An error might have occurred.
            Reduce the check timer’s period to increase the rate at which this callback function
            executes, and in so doing also increase the rate at which the LED is toggled.  This
            callback function is executing in the context of the RTOS daemon task, so a block
            time of 0 is used to ensure the Daemon task never enters the Blocked state. */
            xTimerChangePeriod( xTimer,            /* The timer being updated. */
                                xErrorTimerPeriod, /* The new period for the timer. */
                                0 );               /* Do not block when sending this command. */
        }

        /* Latch that an error has already been detected. */
        xErrorDetected = pdTRUE;
    }

    /* Toggle the LED.  The rate at which the LED toggles will depend on how often this function
    is called, which is determined by the period of the check timer. The timer’s period will
    have been reduced from 3000ms to just 200ms if CheckTasksAreRunningWithoutError() has ever
    returned pdFAIL. */
    ToggleLED();
}
5.8 ソフトウェアタイマのリセット
ソフトウェアタイマのリセットは、タイマーのリスタートを意味する。タイムアウト時間が、初期スタート時間ではなく、リセット時間から再計算される。
Figure46にデモを示す。period 6でタイマーがスタートして、タイムアウトする前に2回リセットされる。

- Timer1はt1でスタートする。period 6なので、スタートしてから6 tick後にコールバック関数が呼ばれる設定となっている
- Timer1はコールバック関数が呼ばれるt7に達する前にリセットされる。Timer1はt5でリセットされずにt7から6tick後のt11で再計算される。
- Timer1は再度、t11に達する前にリセットされる。t9でリセットされるので、6tick後のt15で再計算される。
- Timer1はここからはリセットされないので、t15でコールバック関数が呼ばれる
xTimerReset API Function
タイマーはxTimerResetを使ってリセットできる。
xTimerResetはDormant状態のタイマースタートすることにも使える。
ISRからはxTimerResetではなくxTimerResetFromISRを使うこと。
BaseType_t xTimerReset( TimerHandle_t xTimer, TickType_t xTicksToWait );
-
xTimer
xTimerCreateから作ったhandle -
xTicksToWait
-
戻り値
pdPASS
pdFALSE
Example 15. ソフトウェアタイマのリセット
この例は携帯電話のバックライトをシミュレートする。バックライトは
- キーが押されたときにONする
- 一定時間以内に他のキーが押されたることを維持する
- 言って時間経過すると自動的にOFFする
one-shotソフトウェアタイマが実装されている。
- バックライトはキーが押されたときにONされ、ソフトウェアタイマコールバック関数でOFFされる
- ソフトウェアタイマはキーが押されたときにリセットされる
- バックライトがOFFしないためには一定時間でキーを押さなければならない。その期間はソフトウェアタイマーのperiodに等しい。タイムアウトする前にキーが押されない場合は、コールバック関数が実行され、バックライトはOFFになる。
xSimulatedBacklightOnはバックライトの状態を保持する。xSimulatedBacklightOnはpdTRUEにセットされるとバックライトONを意味する。pdFALSEはOFFを意味する。
ソフトウェアタイマコールバック関数をListing85に示す。
static void prvBacklightTimerCallback( TimerHandle_t xTimer )
{
TickType_t xTimeNow = xTaskGetTickCount();

    /* The backlight timer expired, turn the backlight off. */
    xSimulatedBacklightOn = pdFALSE;

    /* Print the time at which the backlight was turned off. */
    vPrintStringAndNumber(
                      "Timer expired, turning backlight OFF at time\t\t", xTimeNow );
}
Example15はキーボードをポーリングするためのタスクを生成する。このタスクをListing86に示すが、理由は次のパラグラフで説明する。Listing86は最適な設計を意図したものではない。
FreeRTOSはイベントドリブン動作ができる。イベントドリブン設計は時間を効率的に使える。イベントが発生したときにしか処理をしないためだ。
ポーリングするための処理時間が無駄にはならない。
Example15では、FreeRTOS Windowsポートを使っている時にはキーボードの割り込みを使ったイベントドリブンは実践的ではないので、イベントドリブンは使わない。
そのため効率的な方法ではない。Listing86はISRで、xTimerRsetFromISRでxTimerResetを置き換えている。
static void vKeyHitTask( void *pvParameters )
{
const TickType_t xShortDelay = pdMS_TO_TICKS( 50 );
TickType_t xTimeNow;

    vPrintString( "Press a key to turn the backlight on.\r\n" );

    /* Ideally an application would be event driven, and use an interrupt to process key
    presses.  It is not practical to use keyboard interrupts when using the FreeRTOS Windows
    port, so this task is used to poll for a key press. */
    for( ;; )
    {
        /* Has a key been pressed? */
        if( _kbhit() != 0 )
        {
            /* A key has been pressed.  Record the time. */
            xTimeNow = xTaskGetTickCount();

            if( xSimulatedBacklightOn == pdFALSE )
            {
                /* The backlight was off, so turn it on and print the time at which it was
                turned on. */
                xSimulatedBacklightOn = pdTRUE;
                vPrintStringAndNumber(
                                "Key pressed, turning backlight ON at time\t\t", xTimeNow );
            }
            else
            {
                /* The backlight was already on, so print a message to say the timer is about to
                be reset and the time at which it was reset. */
                vPrintStringAndNumber(
                                "Key pressed, resetting software timer at time\t\t", xTimeNow );
            }

            /* Reset the software timer.  If the backlight was previously off, then this call
            will start the timer.  If the backlight was previously on, then this call will
            restart the timer.  A real application may read key presses in an interrupt.  If
            this function was an interrupt service routine then xTimerResetFromISR() must be
            used instead of xTimerReset(). */
            xTimerReset( xBacklightTimer, xShortDelay );

            /* Read and discard the key that was pressed – it is not required by this simple
            example. */
            ( void ) _getch();
        }
    }
}
Example15の出力をFigure47に示す。
- 最初のキーが押されたのはtickカウントが812のとき。バックライトがONになり、one-shotタイマーがスタートする。
- tickカウントが1813, 3114, 4015, 5016のときにさらにキーが押される。これらキーは、タイムアウトする前に、タイマーをリセットする
- tickカウントが10016でタイムアウトして、バックライトがOFFされる。

5000 tickのperiodを持つタイマーはFigure47で見れる。バックライトは5キーが押されてからちょうど5000 tickでOFFになる。