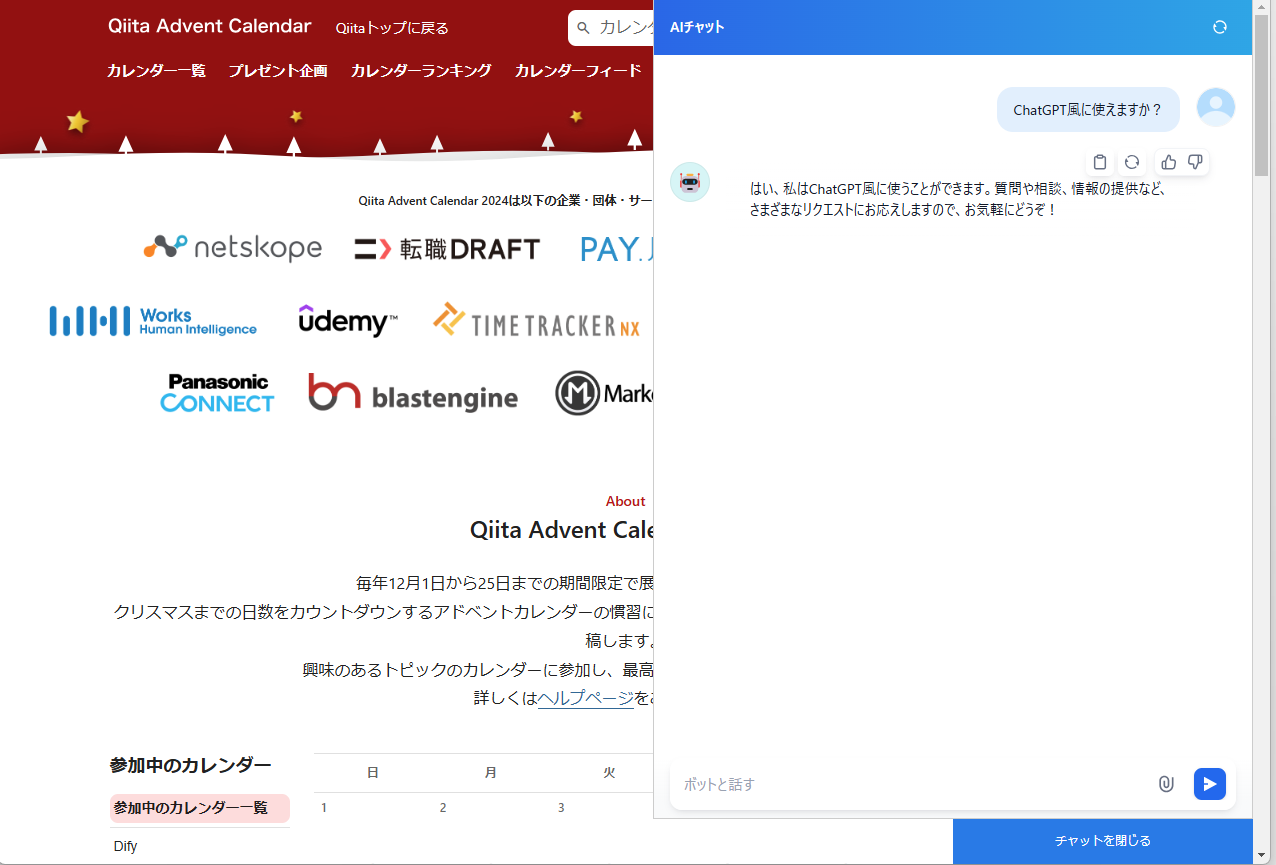
Difyを使うと、ChatGPTのようなチャットをお手軽に作成することができます。
だが、しかし。どうにも、利用するときにBookmarkから呼び出すのが面倒...
よし、面倒ならば作ってしまおう!と思い至り、ブラウザ右側に呼び出しボタンを作るChrome拡張を作ってみました。
ということで、この記事では、株式会社ディーネットの浅見が、Chrome拡張を使って、Difyのチャットを呼び出しやすくする方法を書いていきます。
Chrome拡張の仕様
下記画像の右端にある「AIチャット」「別タブで起動」の2つが今回の作成対象です。
「AIチャット」ボタン
「AIチャット」ボタンをクリックすると、次の仕様のチャットが利用可能です。
- 画面右側3分の1にチャット画面が出現
- 右下の「チャットを閉じる」ボタンを押すとチャットが閉じる
- ドメイン単位でチャットがオープン
- チャットの履歴は残らない
後から見返すことのない、フロー情報的な使い方をしたい場合におススメです。
「別タブで起動」ボタン
「別タブで起動」ボタンをクリックすると、別タブでDifyから払い出されるチャットが利用可能です。
比較しやすい仕様を列挙してみると。
- チャットの履歴を残すことが可能
というくらいでしょうか。Difyど標準の「アプリを実行」で開くものと同様のものがこちらです。ストック情報的な使い方をしたい場合はこちらがおススメです。
ChatGPTのようなチャットの作成方法
Difyの「エージェント」を新規作成して、さくっとChatGPT的なチャットを作成してみましょう。
ユーザーの要望に応えてください。
「調べて」と要望を受けた場合は、あなたのナレッジまたはWeb検索で可能な限り情報を収集したうえで回答してください。
というプロンプトを手順に入力し、「ツール」に
- webscraper
- dalle3
を入れておけば、いい感じにWeb検索をして、画像も生成できるチャットを作成できます。
Chrome拡張の作成方法
自作したChrome拡張は、下記2つのファイルを作成し、デベロッパーモードで読み込むことで、利用が可能です。
my-extension/
  ├─ manifest.json
  └─ content.js
Chrome拡張の作成
生成AIを使うことで、細かいことがわからなくてもChrome拡張を作成できてしまいます。今回わたしは、「ChatGTP 4o」を使って作成してみました。
// 2つのバナーを作成する処理
function createBanners() {
    // バナー1: iframeを表示する用
    if (!document.getElementById('banner-button-1')) {
        const banner1 = document.createElement('div');
        banner1.id = 'banner-button-1';
        banner1.textContent = 'AIチャット'; // バナー1のテキスト
        banner1.style.position = 'fixed'; // 画面に固定配置
        banner1.style.top = '40%'; // 画面の縦方向で45%の位置に配置
        banner1.style.right = '0'; // 画面右端に配置
        banner1.style.transform = 'translateY(-50%)'; // バナー自身の高さ分だけ上に移動し、中央揃え
        banner1.style.width = '40px'; // バナーの幅
        banner1.style.height = '150px'; // バナーの高さ
        banner1.style.backgroundColor = 'rgba(255, 255, 255, 0.7)'; // 半透明の白背景
        banner1.style.color = '#AA0008'; // テキストの色(赤色)
        banner1.style.display = 'flex'; // 子要素(テキスト)をフレックスボックスで配置
        banner1.style.alignItems = 'center'; // 垂直方向に中央揃え
        banner1.style.justifyContent = 'center'; // 水平方向に中央揃え
        banner1.style.borderRadius = '5px 0 0 5px'; // 左側の角を丸くする
        banner1.style.cursor = 'pointer'; // マウスホバー時にポインター表示
        banner1.style.zIndex = '10000'; // 他の要素より前面に表示
        banner1.style.writingMode = 'vertical-rl'; // テキストを縦書きに設定
        banner1.style.textOrientation = 'upright'; // 縦書きテキストの文字を正立させる
        banner1.style.fontSize = '16px'; // フォントサイズ
        banner1.style.fontWeight = 'bold'; // フォントを太字に設定
        document.body.appendChild(banner1); // バナー1をDOMに追加

        // クリック時にiframeを表示
        banner1.addEventListener('click', showIframe);
    }

    // バナー2: 別タブを開く用
    if (!document.getElementById('banner-button-2')) {
        const banner2 = document.createElement('div');
        banner2.id = 'banner-button-2';
        banner2.textContent = '別タブで起動'; // バナー2のテキスト
        banner2.style.position = 'fixed'; // 画面に固定配置
        banner2.style.top = 'calc(40% + 170px)'; // 画面の縦方向で55%の位置に配置
        banner2.style.right = '0'; // 画面右端に配置
        banner2.style.transform = 'translateY(-50%)'; // バナー自身の高さ分だけ上に移動し、中央揃え
        banner2.style.width = '40px'; // バナーの幅
        banner2.style.height = '150px'; // バナーの高さ
        banner2.style.backgroundColor = 'rgba(255, 255, 255, 0.7)'; // 半透明の白背景
        banner2.style.color = '#1E78EA'; // テキストの色(青色)
        banner2.style.display = 'flex'; // 子要素(テキスト)をフレックスボックスで配置
        banner2.style.alignItems = 'center'; // 垂直方向に中央揃え
        banner2.style.justifyContent = 'center'; // 水平方向に中央揃え
        banner2.style.borderRadius = '5px 0 0 5px'; // 左側の角を丸くする
        banner2.style.cursor = 'pointer'; // マウスホバー時にポインター表示
        banner2.style.zIndex = '10000'; // 他の要素より前面に表示
        banner2.style.writingMode = 'vertical-rl'; // テキストを縦書きに設定
        banner2.style.textOrientation = 'upright'; // 縦書きテキストの文字を正立させる
        banner2.style.fontSize = '16px'; // フォントサイズ
        banner2.style.fontWeight = 'bold'; // フォントを太字に設定
        document.body.appendChild(banner2); // バナー2をDOMに追加

        // クリック時に新しいタブを開く
        banner2.addEventListener('click', () => {
            window.open('https://${mydomain}/chatbot/yyyyyyyyyyyyyy', '_blank'); // 「アプリを実行」で開くURLをここにはる
        });
    }
}

// iframeを表示する処理
function showIframe() {
    // 既にiframeが存在する場合は表示しない
    if (document.getElementById('iframe-container')) return;

    // iframeの親コンテナを作成
    const container = document.createElement('div');
    container.id = 'iframe-container';
    container.style.position = 'fixed'; // 画面に固定配置
    container.style.top = '0'; // 画面上端に配置
    container.style.right = '0'; // 画面右端に配置
    container.style.width = '600px'; // コンテナの幅
    container.style.height = 'calc(100% - 45px)'; // コンテナの高さ
    container.style.zIndex = '10001'; // 他の要素より前面に表示
    container.style.backgroundColor = 'white'; // 背景色を白に設定
    container.style.border = '1px solid #ccc'; // 灰色の枠線を設定
    document.body.appendChild(container); // コンテナをDOMに追加

    // iframe本体を作成
    const iframe = document.createElement('iframe');
    iframe.src = 'https://${mydomain}/chatbot/xxxxxxxxxxxxxxxxxxx'; // 「サイトに埋め込む」で取得するURLをここに貼る
    iframe.style.width = '100%'; // iframeの幅をコンテナ全体に合わせる
    iframe.style.height = '100%'; // iframeの高さをコンテナ全体に合わせる
    iframe.style.border = 'none'; // iframeの枠線を無しに設定
    container.appendChild(iframe); // iframeをコンテナに追加

    // iframeを閉じるボタンを作成
    const closeButton = document.createElement('button');
    closeButton.textContent = 'チャットを閉じる'; // ボタンのテキスト
    closeButton.style.position = 'fixed'; // 画面に固定配置
    closeButton.style.bottom = '0'; // 画面下端に配置
    closeButton.style.right = '0'; // 画面右端に配置
    closeButton.style.width = '300px'; // ボタンの幅を300pxに設定
    closeButton.style.height = '45px'; // ボタンの高さ
    closeButton.style.backgroundColor = '#1E78EA'; // ボタンの背景色(青色)
    closeButton.style.color = 'white'; // テキストの色
    closeButton.style.border = 'none'; // ボタンの枠線を無しに設定
    closeButton.style.cursor = 'pointer'; // マウスホバー時にポインター表示
    closeButton.style.fontSize = '12px'; // フォントサイズ
    closeButton.style.textAlign = 'center'; // テキストを中央揃え
    closeButton.style.lineHeight = '45px'; // テキストをボタン中央に配置
    closeButton.style.zIndex = '10002'; // 他の要素より前面に表示

    // クリック時にiframeとボタンを削除
    closeButton.addEventListener('click', () => {
        container.remove();
        closeButton.remove();
    });
    document.body.appendChild(closeButton); // 閉じるボタンをDOMに追加
}

// バナーを初期化
createBanners();
{
  "manifest_version": 3,
  "name": "AIチャット",
  "version": "1.0",
  "description": "この拡張機能は、右端のバナーをクリックして社内向けチャットを利用できるツールです。",
  "permissions": ["activeTab", "storage"],
  "content_scripts": [
    {
      "matches": ["<all_urls>"],
      "js": ["content.js"]
    }
  ]
}
出力対象のWebページを限定させる場合は、「"matches": ["<all_urls>"]」部分を修正してあげることで実現可能です。
- 特定ドメイン:"matches": ["https://www.example.com/*"]
- 特定のページ:"matches": ["https://www.example.com/specific-page.html"]
- 複数ドメイン:"matches": [
"https://www.example.com/",
"https://another-example.com/"
] - 任意のサブドメイン:"matches": ["https://.example.com/"]
Chrome拡張の読み込み
下記手順で読み込みが可能です。
- 拡張機能を管理
- デベロッパーモードをON
- パッケージ化されていない拡張機能を読み込む
- 作成したChrome拡張フォルダを選択
- 別タブでどこかサイトを開いてみましょう。右端にボタンが二つ表示されるはずです
まとめ
ブラウザの右端に「AIチャット」ボタンは表示されましたか?
マウスカーソルが右端にいくと自動でチャットが出たり戻ったりするパターンなども試しましたが、クリックする無難なタイプが最も使い勝手が良い、との結論に達しました。
ぜひ、みなさん試してみてくださいね!


