はじめに
Web画面とかでよくあるトルツメ機能が欲しかったのですがUIKITなどにはもちろんなく、一から手作りしたので共有します。
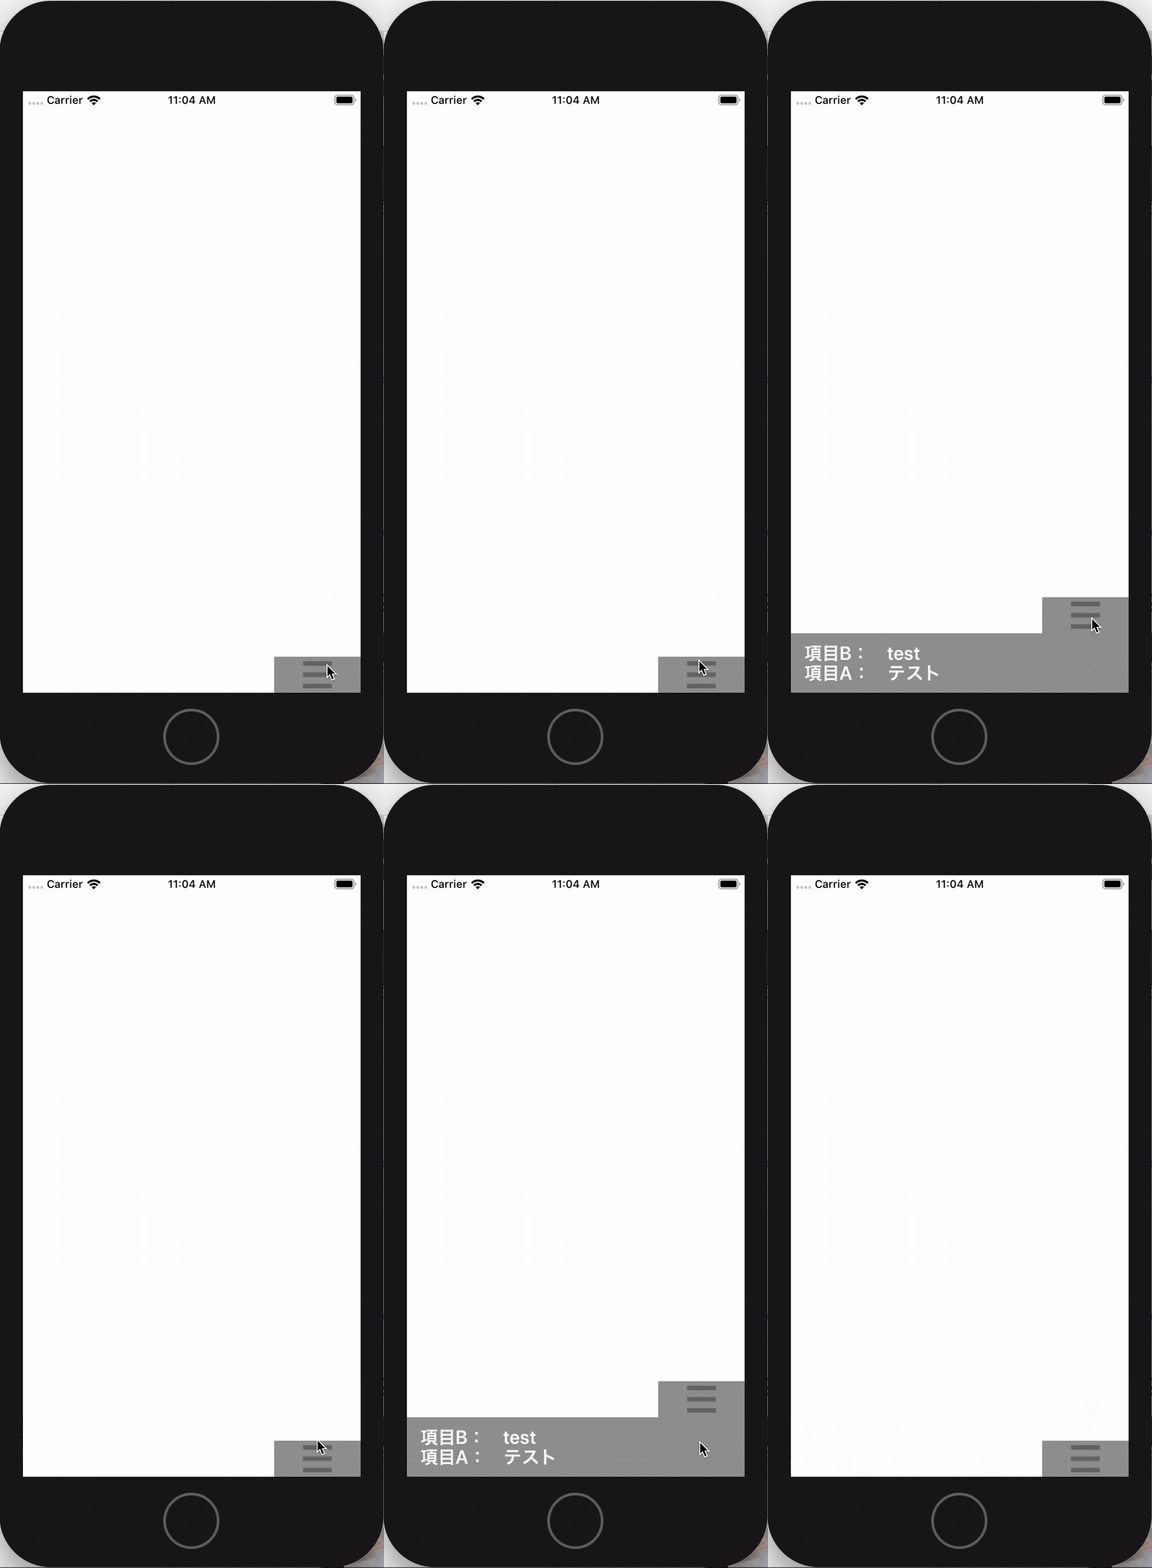
画面のイメージ
コード
ViewController.swift
import UIKit

class ViewController: UIViewController {

    // トルツメ設定
    let horizontalStackView:UIStackView = UIStackView()
    let verticalStackView:UIStackView = UIStackView()

    override func viewDidLoad() {
        super.viewDidLoad()
        // 画面の大きさを取得
        let screenWidth = Int( UIScreen.main.bounds.size.width);
        let screenHeight = Int( UIScreen.main.bounds.size.height);
        print("screenWidth=\(screenWidth)")
        print("screenHeight=\(screenHeight)")

        // 横用StackView
        view.addSubview(horizontalStackView)
        horizontalStackView.translatesAutoresizingMaskIntoConstraints = false
        // オートレイアウトオフ
        horizontalStackView.centerXAnchor.constraint(equalTo: view.centerXAnchor).isActive = true

        // 上のラベル 横並びにするためにダミーのViewも作成する
        let label = UIView()
        label.backgroundColor = UIColor.clear
        label.translatesAutoresizingMaskIntoConstraints = false
        label.widthAnchor.constraint(equalToConstant: CGFloat(screenWidth/4)).isActive = true
        label.heightAnchor.constraint(equalToConstant: 40).isActive = true

        let label2 = UIView()
        label2.backgroundColor = UIColor.clear
        label2.translatesAutoresizingMaskIntoConstraints = false
        label2.widthAnchor.constraint(equalToConstant: CGFloat(screenWidth/4)).isActive = true
        label2.heightAnchor.constraint(equalToConstant: 40).isActive = true

        let label3 = UIView()
        label3.backgroundColor = UIColor.clear
        label3.translatesAutoresizingMaskIntoConstraints = false
        label3.widthAnchor.constraint(equalToConstant: CGFloat(screenWidth/4)).isActive = true
        label3.heightAnchor.constraint(equalToConstant: 40).isActive = true

        let label4 = UIButton()
        label4.backgroundColor = UIColor.gray
        label4.translatesAutoresizingMaskIntoConstraints = false
        label4.widthAnchor.constraint(equalToConstant: CGFloat(screenWidth/4)).isActive = true
        label4.heightAnchor.constraint(equalToConstant: 40).isActive = true

        // 画像
        let image:UIImage = UIImage(named:"menu")!
        let imageView = UIImageView(image:image)
        label4.addSubview(imageView)            // addしてからじゃないと制約追加できないので注意
        imageView.translatesAutoresizingMaskIntoConstraints = false
        imageView.centerXAnchor.constraint(equalTo: label4.centerXAnchor).isActive = true
        imageView.centerYAnchor.constraint(equalTo: label4.centerYAnchor).isActive = true
        imageView.contentMode = UIView.ContentMode.scaleAspectFit

        // 縦用StackView
        view.addSubview(verticalStackView)
        verticalStackView.translatesAutoresizingMaskIntoConstraints = false
        verticalStackView.bottomAnchor.constraint(equalTo: view.bottomAnchor, constant: 0).isActive = true
        verticalStackView.axis = NSLayoutConstraint.Axis.vertical                                    // 縦並び
        verticalStackView.alpha = 0.8

        // メインView
        let mainView = UIView()
        mainView.backgroundColor = UIColor.gray
        mainView.translatesAutoresizingMaskIntoConstraints = false
        mainView.widthAnchor.constraint(equalToConstant: CGFloat(screenWidth)).isActive = true
        mainView.heightAnchor.constraint(equalToConstant: CGFloat(screenHeight/10)).isActive = true

        // 項目AのLabel
        let itemName = UILabel()
        itemName.textColor = .white
        itemName.text = "項目A: テスト"
        mainView.addSubview(itemName)
        itemName.translatesAutoresizingMaskIntoConstraints = false
        itemName.centerXAnchor.constraint(equalTo: mainView.centerXAnchor, constant: 15).isActive = true
        itemName.centerYAnchor.constraint(equalTo: mainView.centerYAnchor, constant: CGFloat(screenHeight/60)).isActive = true
        itemName.widthAnchor.constraint(equalToConstant: CGFloat(screenWidth)).isActive = true
        itemName.font = UIFont.boldSystemFont(ofSize: 21)

        // 項目BのLabel
        let torishoName = UILabel()
        torishoName.textColor = .white
        torishoName.text = "項目B: test"
        mainView.addSubview(torishoName)
        torishoName.translatesAutoresizingMaskIntoConstraints = false
        torishoName.centerXAnchor.constraint(equalTo: mainView.centerXAnchor, constant: 15).isActive = true
        torishoName.centerYAnchor.constraint(equalTo: mainView.centerYAnchor, constant: -CGFloat(screenHeight/60)).isActive = true
        torishoName.widthAnchor.constraint(equalToConstant: CGFloat(screenWidth)).isActive = true
        torishoName.font = UIFont.boldSystemFont(ofSize: 21)

        horizontalStackView.addArrangedSubview(label)
        horizontalStackView.addArrangedSubview(label2)
        horizontalStackView.addArrangedSubview(label3)
        horizontalStackView.addArrangedSubview(label4)

        verticalStackView.addArrangedSubview(horizontalStackView)
        verticalStackView.addArrangedSubview(mainView)

        // 表示時はhiddenとする
        verticalStackView.arrangedSubviews[1].isHidden = true

        // ボタンを押した時
        label4.addTarget(self, action: #selector(pushButton), for: .touchUpInside)
    }

    // ボタン押したとき
    @objc func pushButton(sender: UIButton){
        //ここにViewを隠したり表したりする処理を入れる
        verticalStackView.arrangedSubviews[1].isHidden.toggle()
        verticalStackView.layoutIfNeeded()
    }
}
StackViewを組み合わせて実現しました。
もっといい方法あるよ!などあったら教えてください。
