はじめに
- gpt-4を使って英文の添削をさせるアプリを作ったので、その内容と作成手順を記載します
- 英文添削結果はフォーマットを定義し、その通りに回答を返却させています
- AIからの回答はChat-gptと同じようにStreamレスポンスされます
本内容は、以下のイベントで登壇しました。
スライド
目次
- モチベーション
- 成果物
- 構成
- 作成手順
1.モチベーション
私は、英語の日記を毎日書きます。
ネイティブスピーカーの友人に添削してもらっていましたが、それには添削者の稼働が必要です。
一方で、添削者がいない場合は、文法の間違いやスペルミスをしていても気づけません。
なので、生成AIを活用して添削者を作ります。
これによって英語勉強のハードルを下げます。
2.成果物
アプリ概要
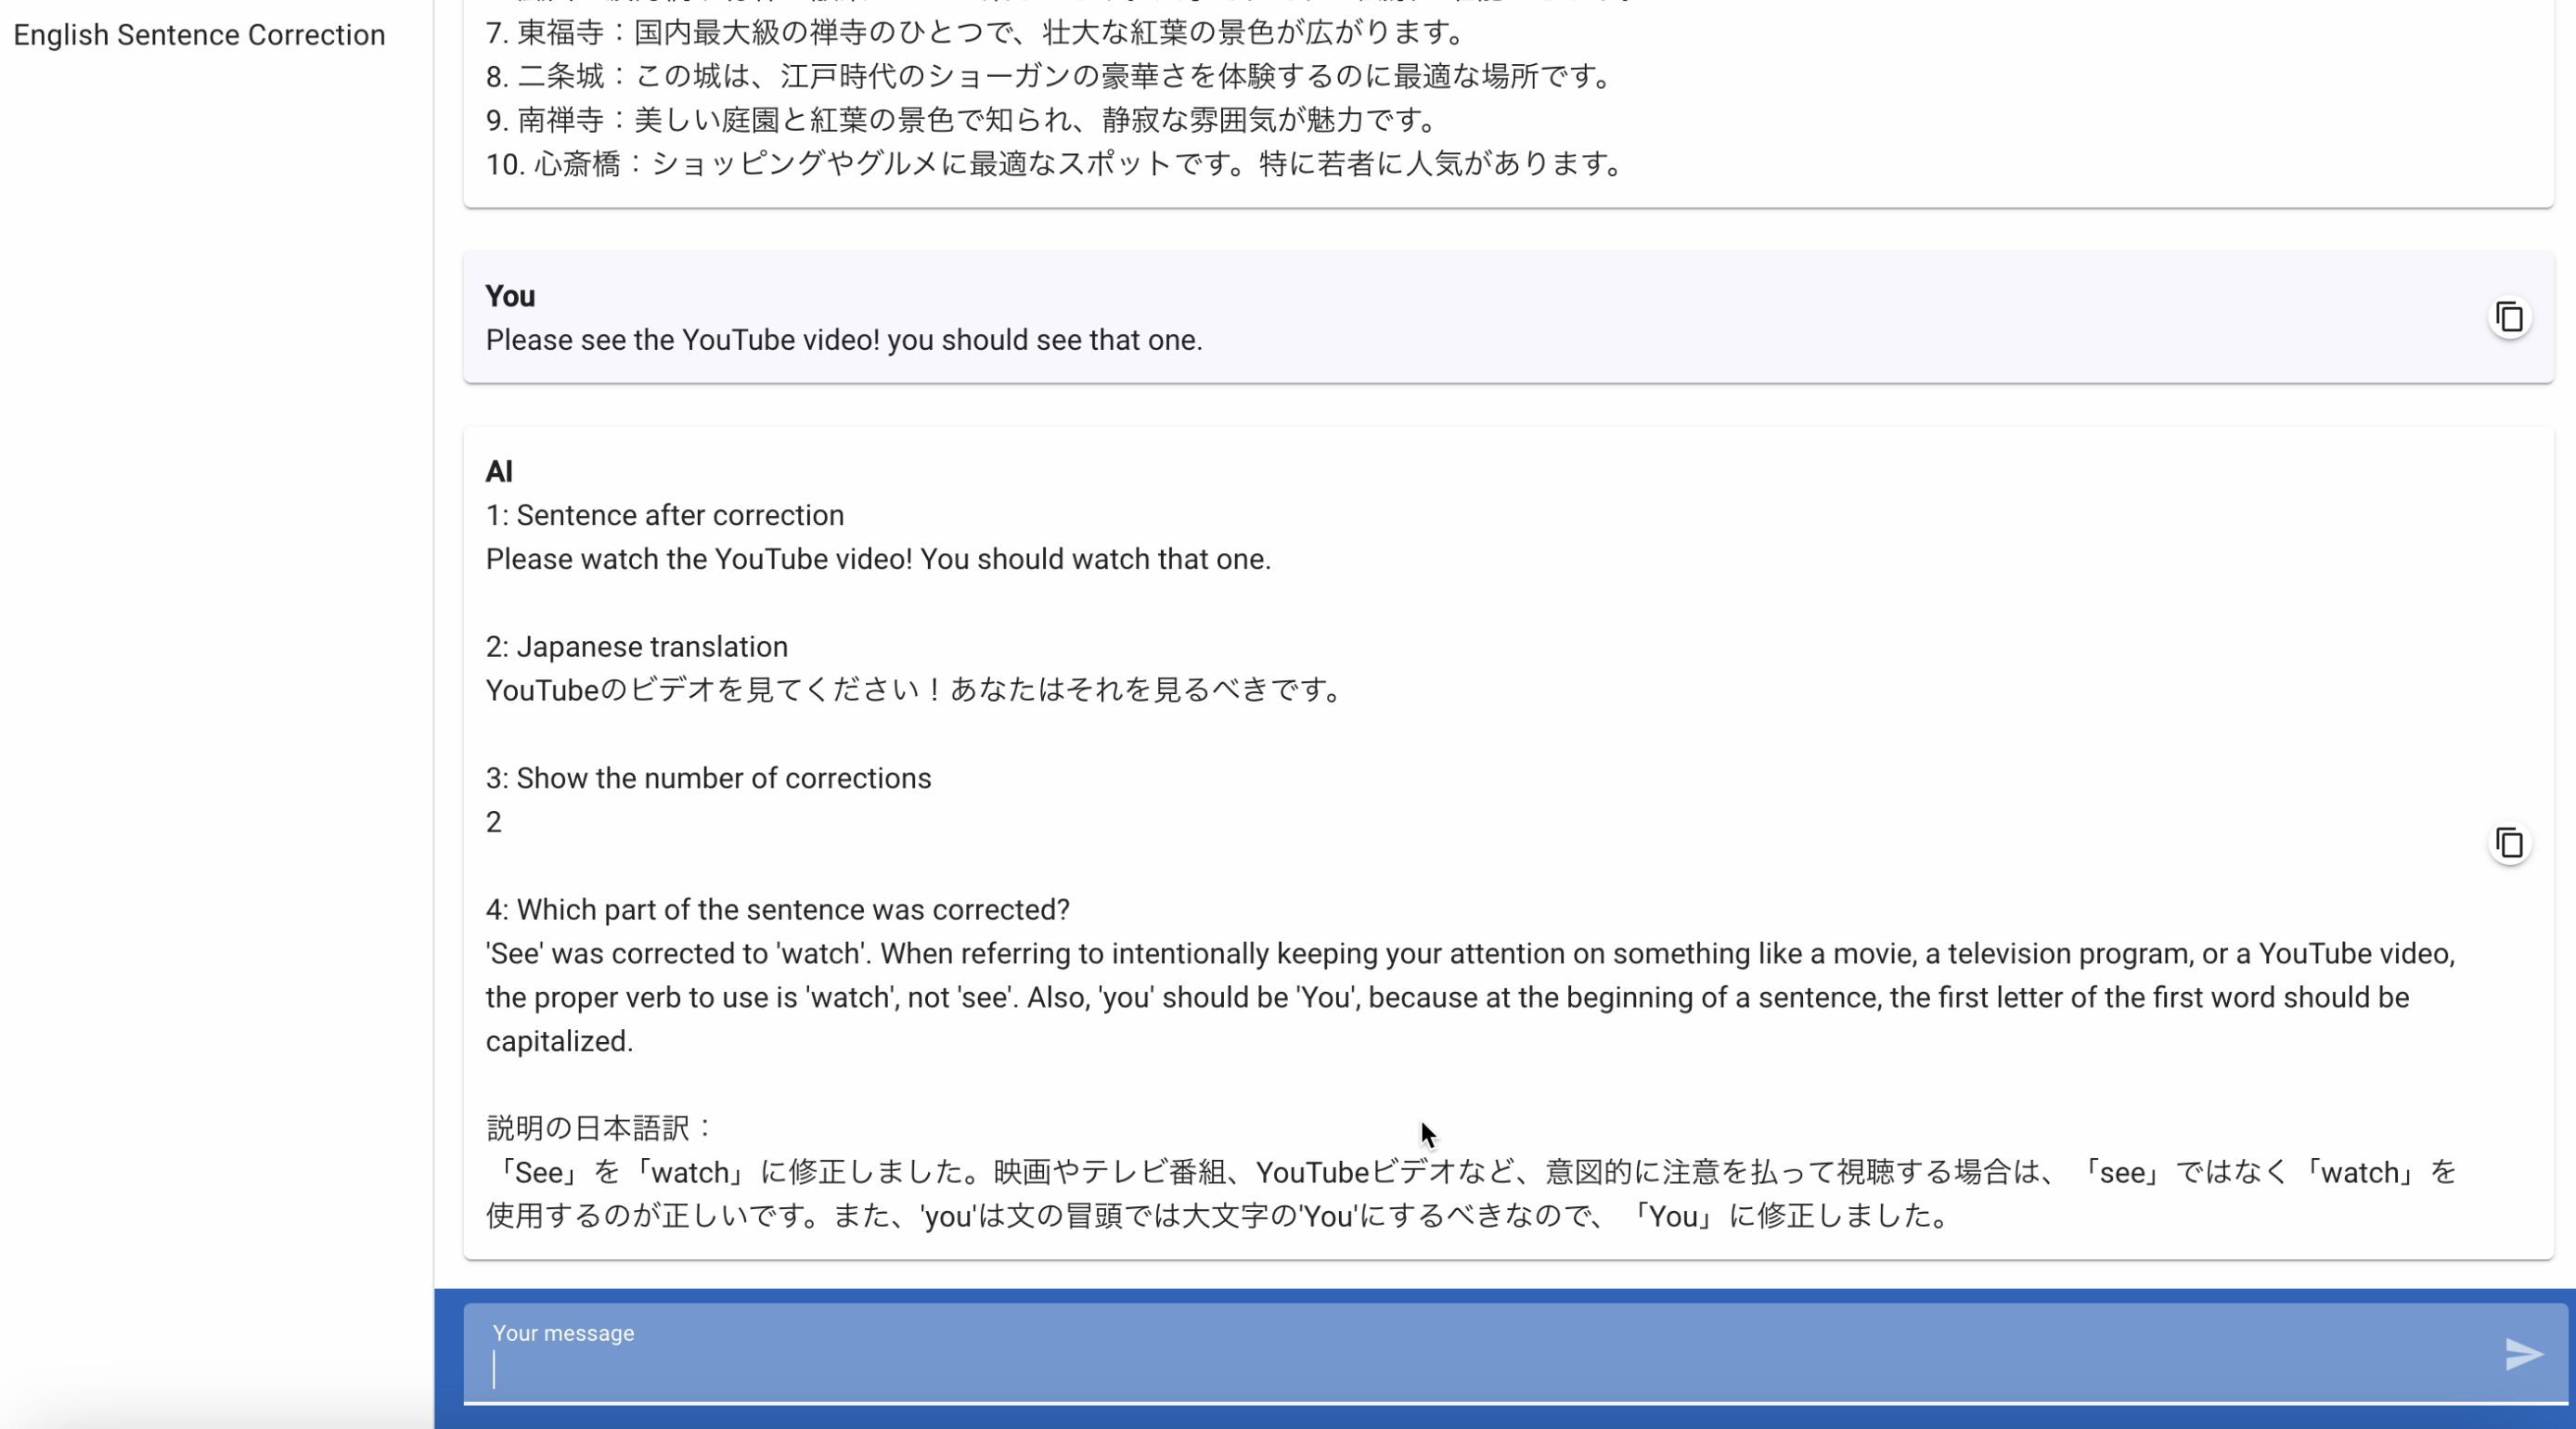
英語のセンテンスが入力された場合、英文の添削をしてくれます。
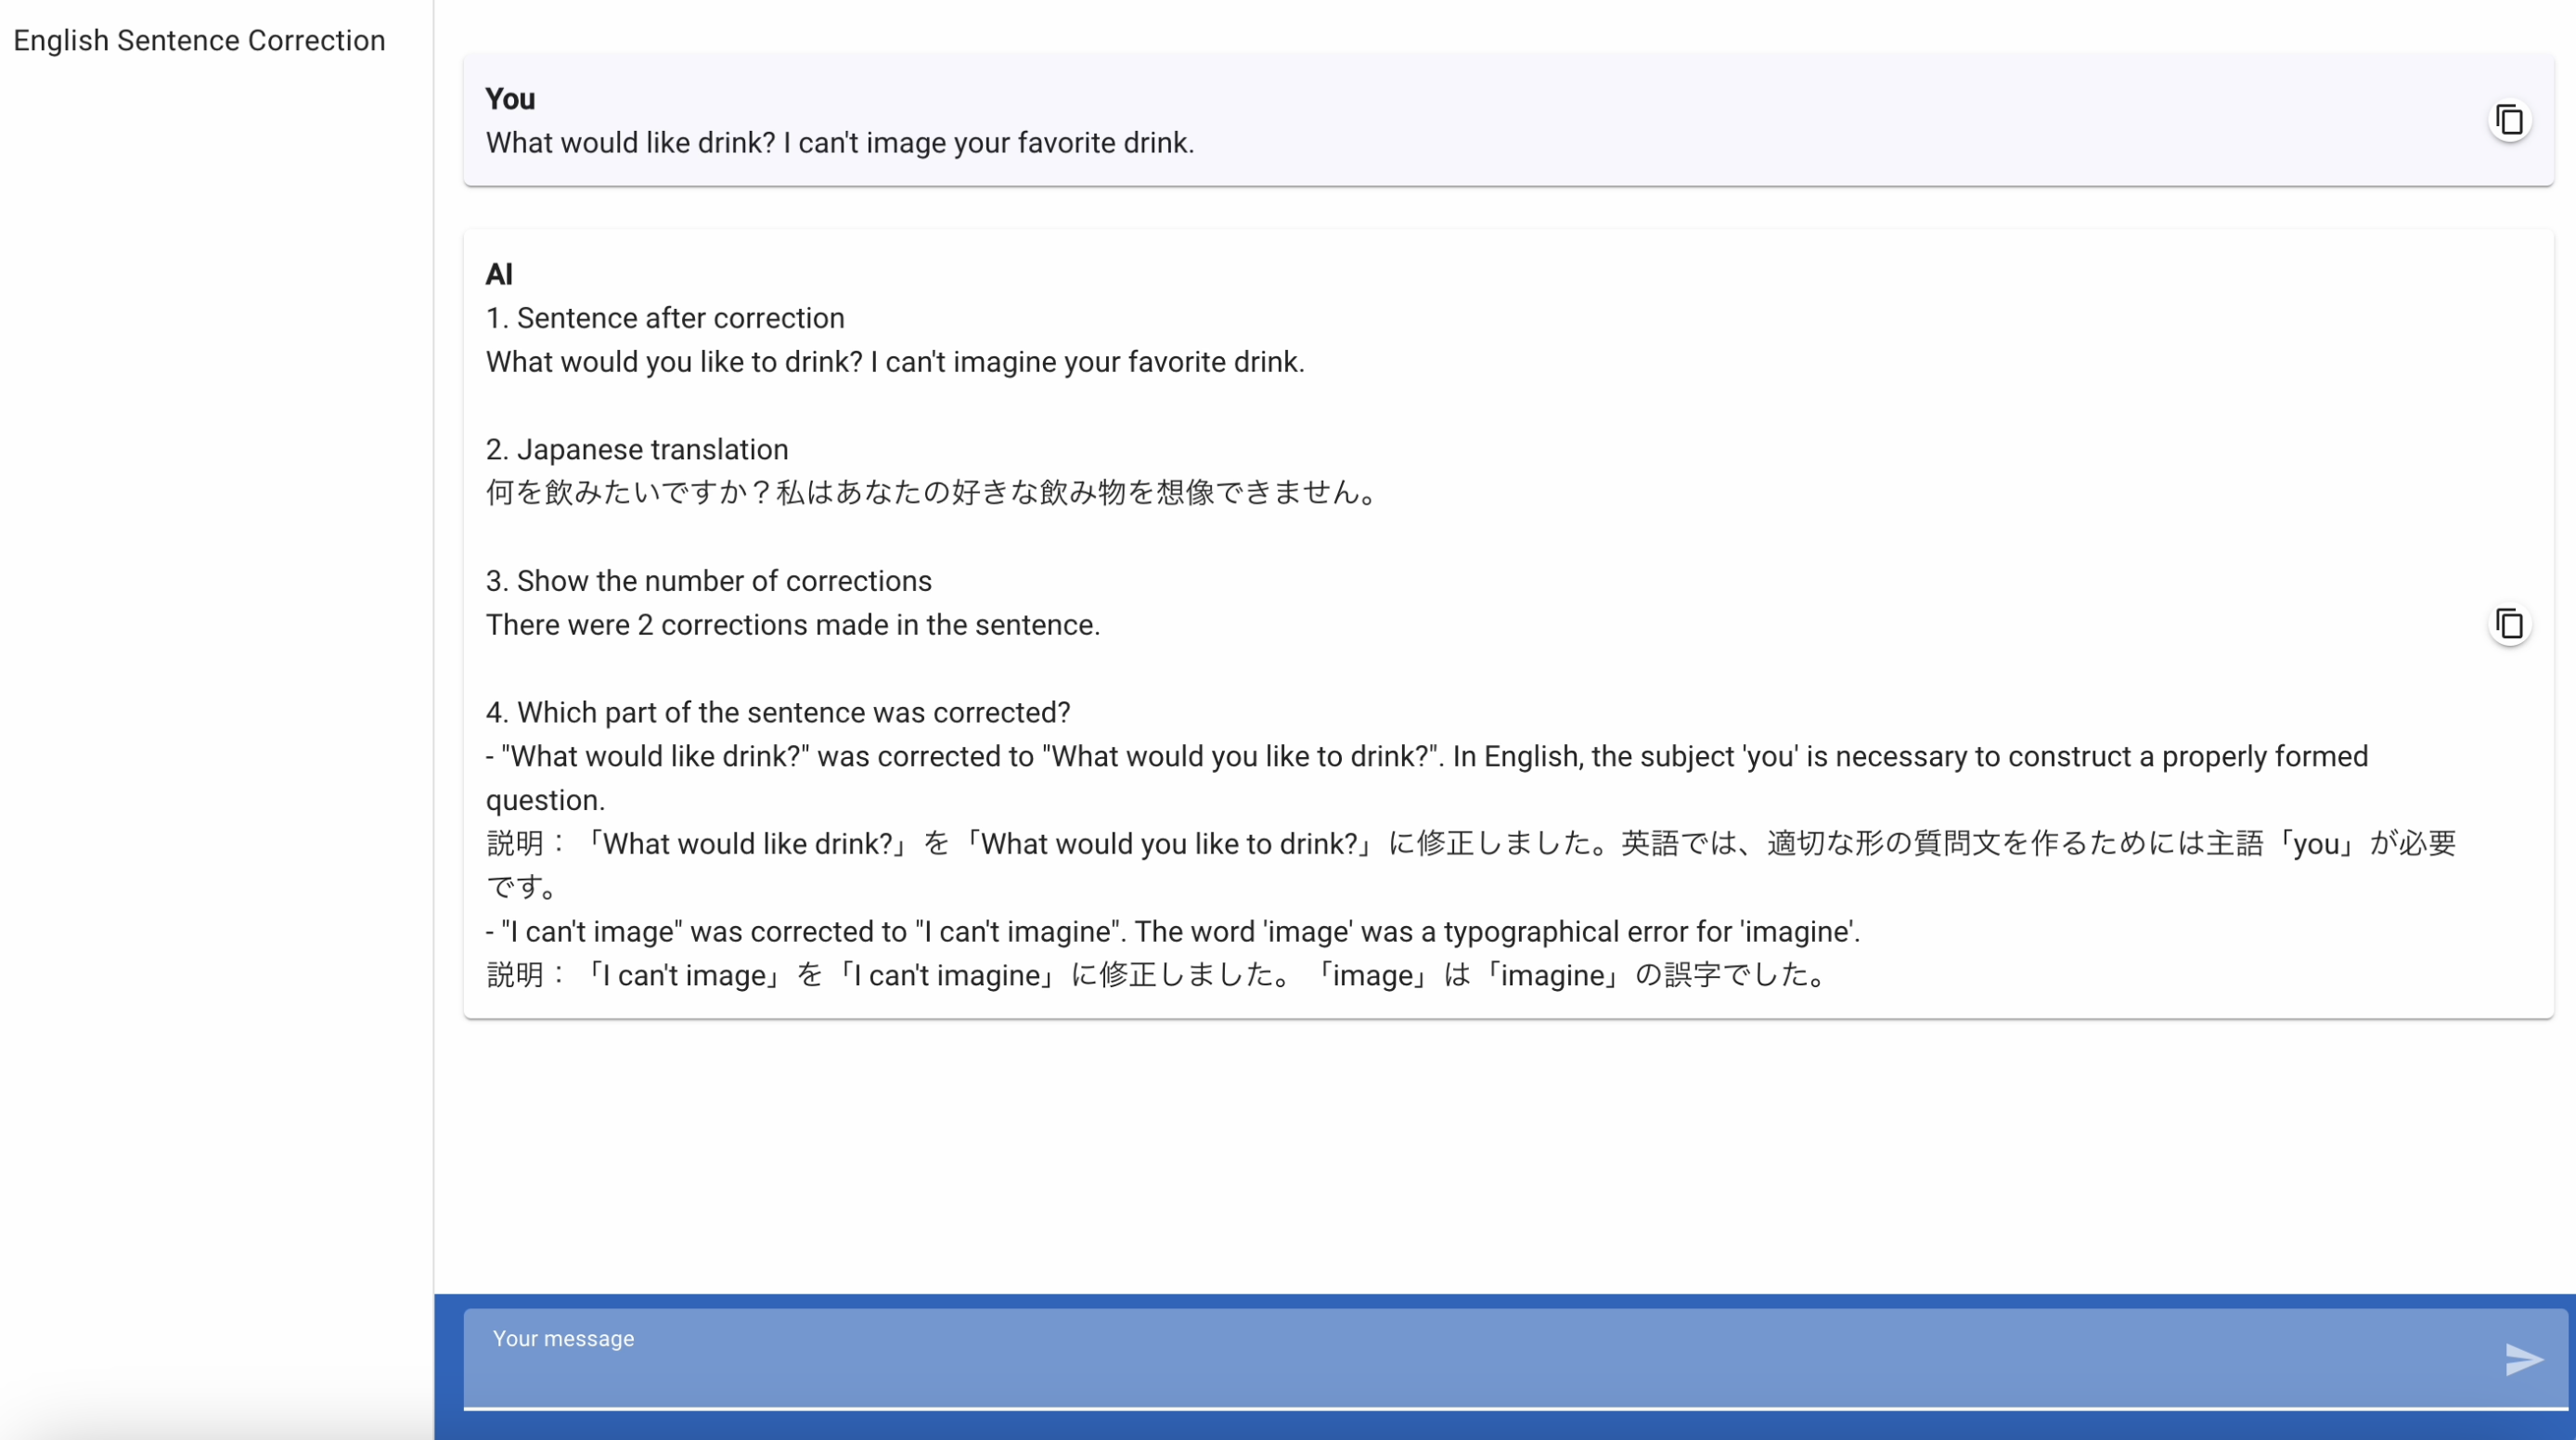
以下の通りに回答を生成してくれます。
1:訂正した英文
2:日本語訳
3:訂正箇所の数
4:訂正箇所の説明
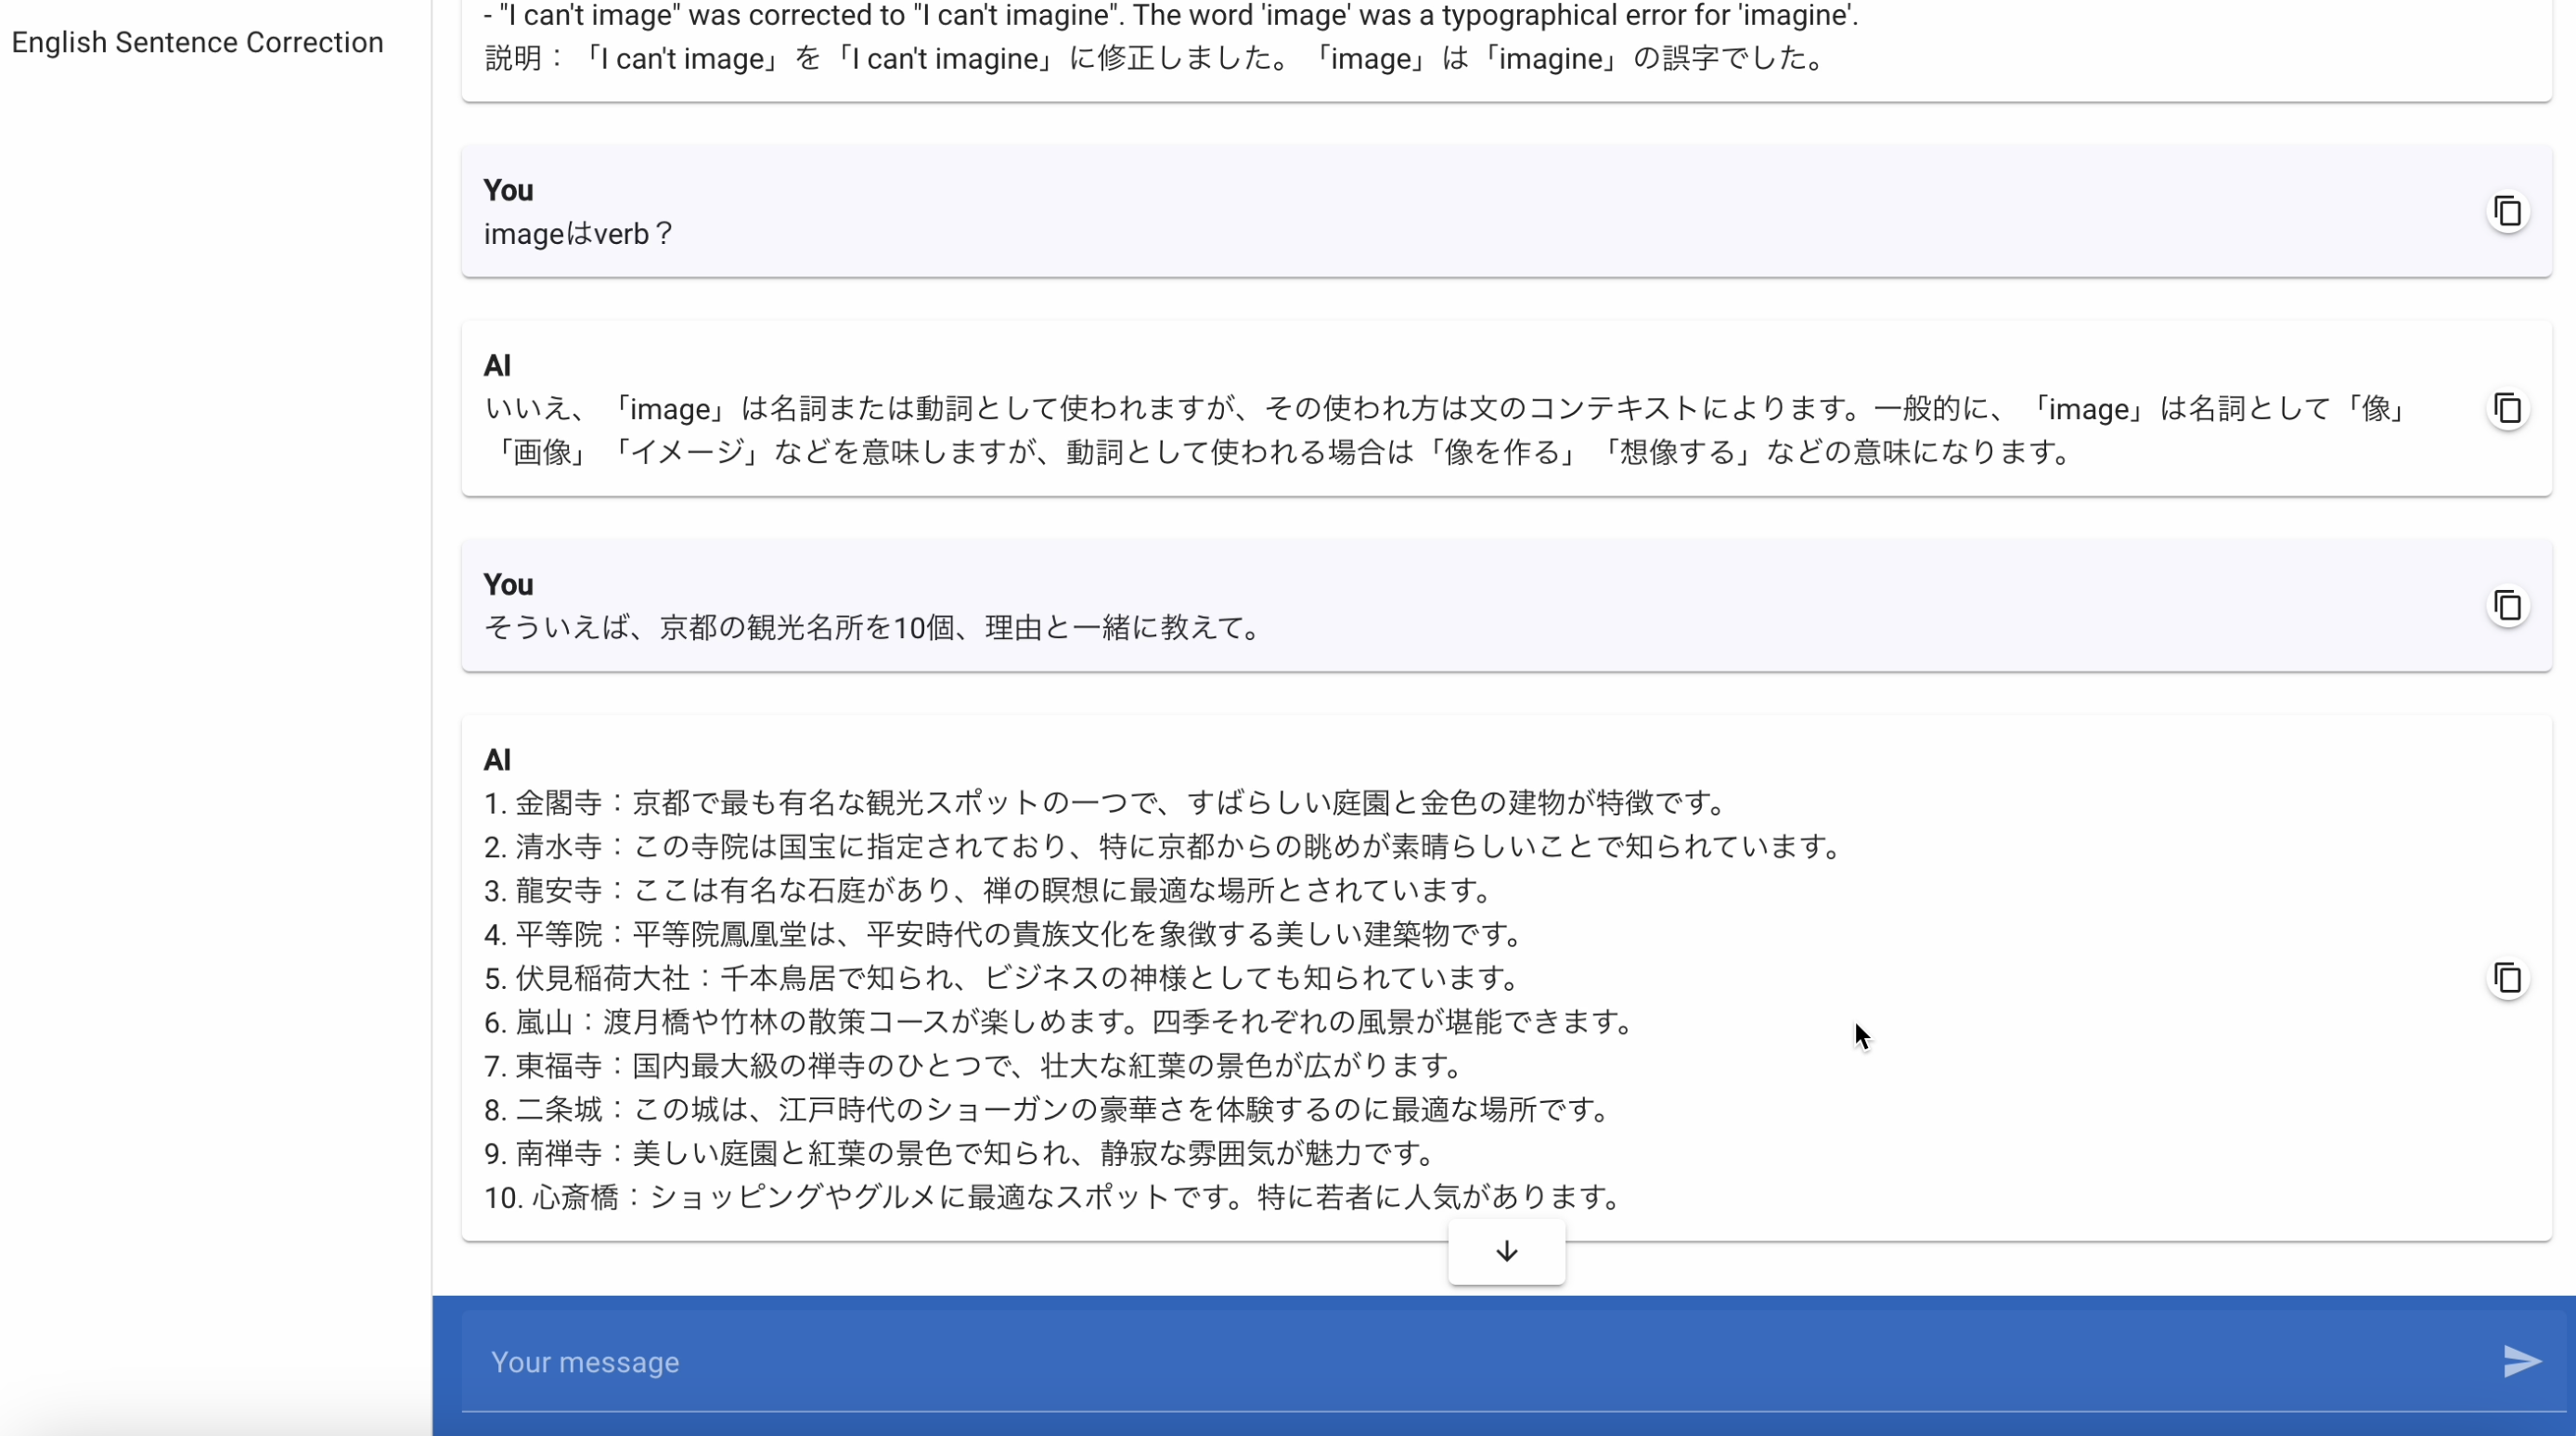
また、質問が英文ではなく、日本語の場合は、ただの質問として回答します。
英語+日本語の場合は、英語の解説もしつつ、質問内容に回答します。
作ったもの
英文の添削をしつつ、英文以外の質問にも回答します。
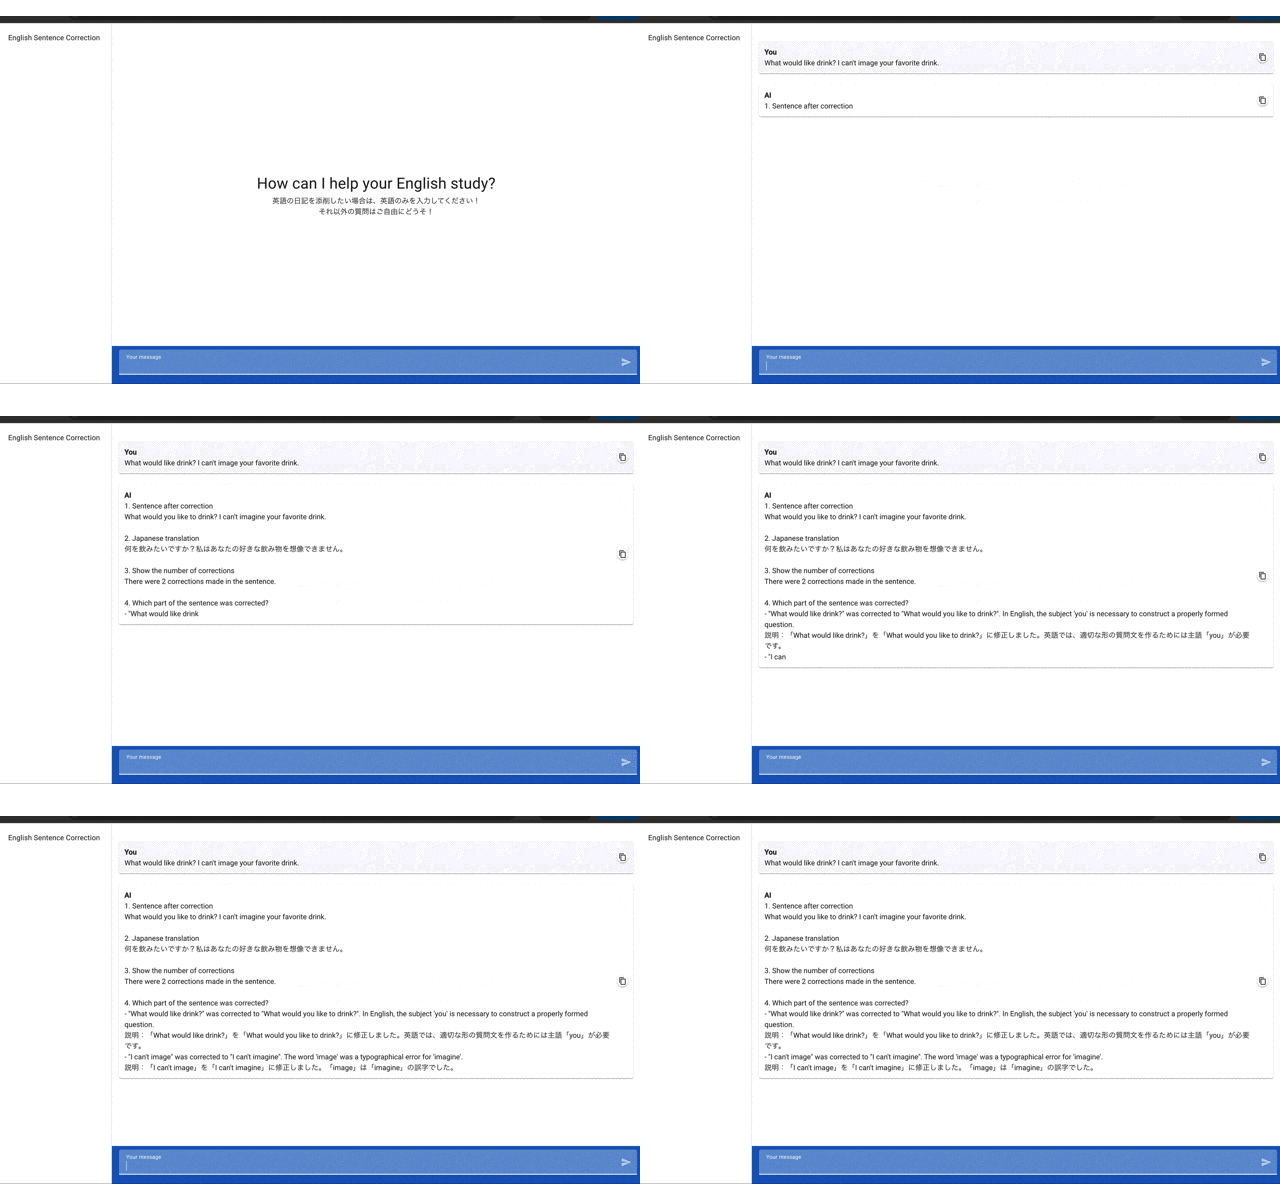
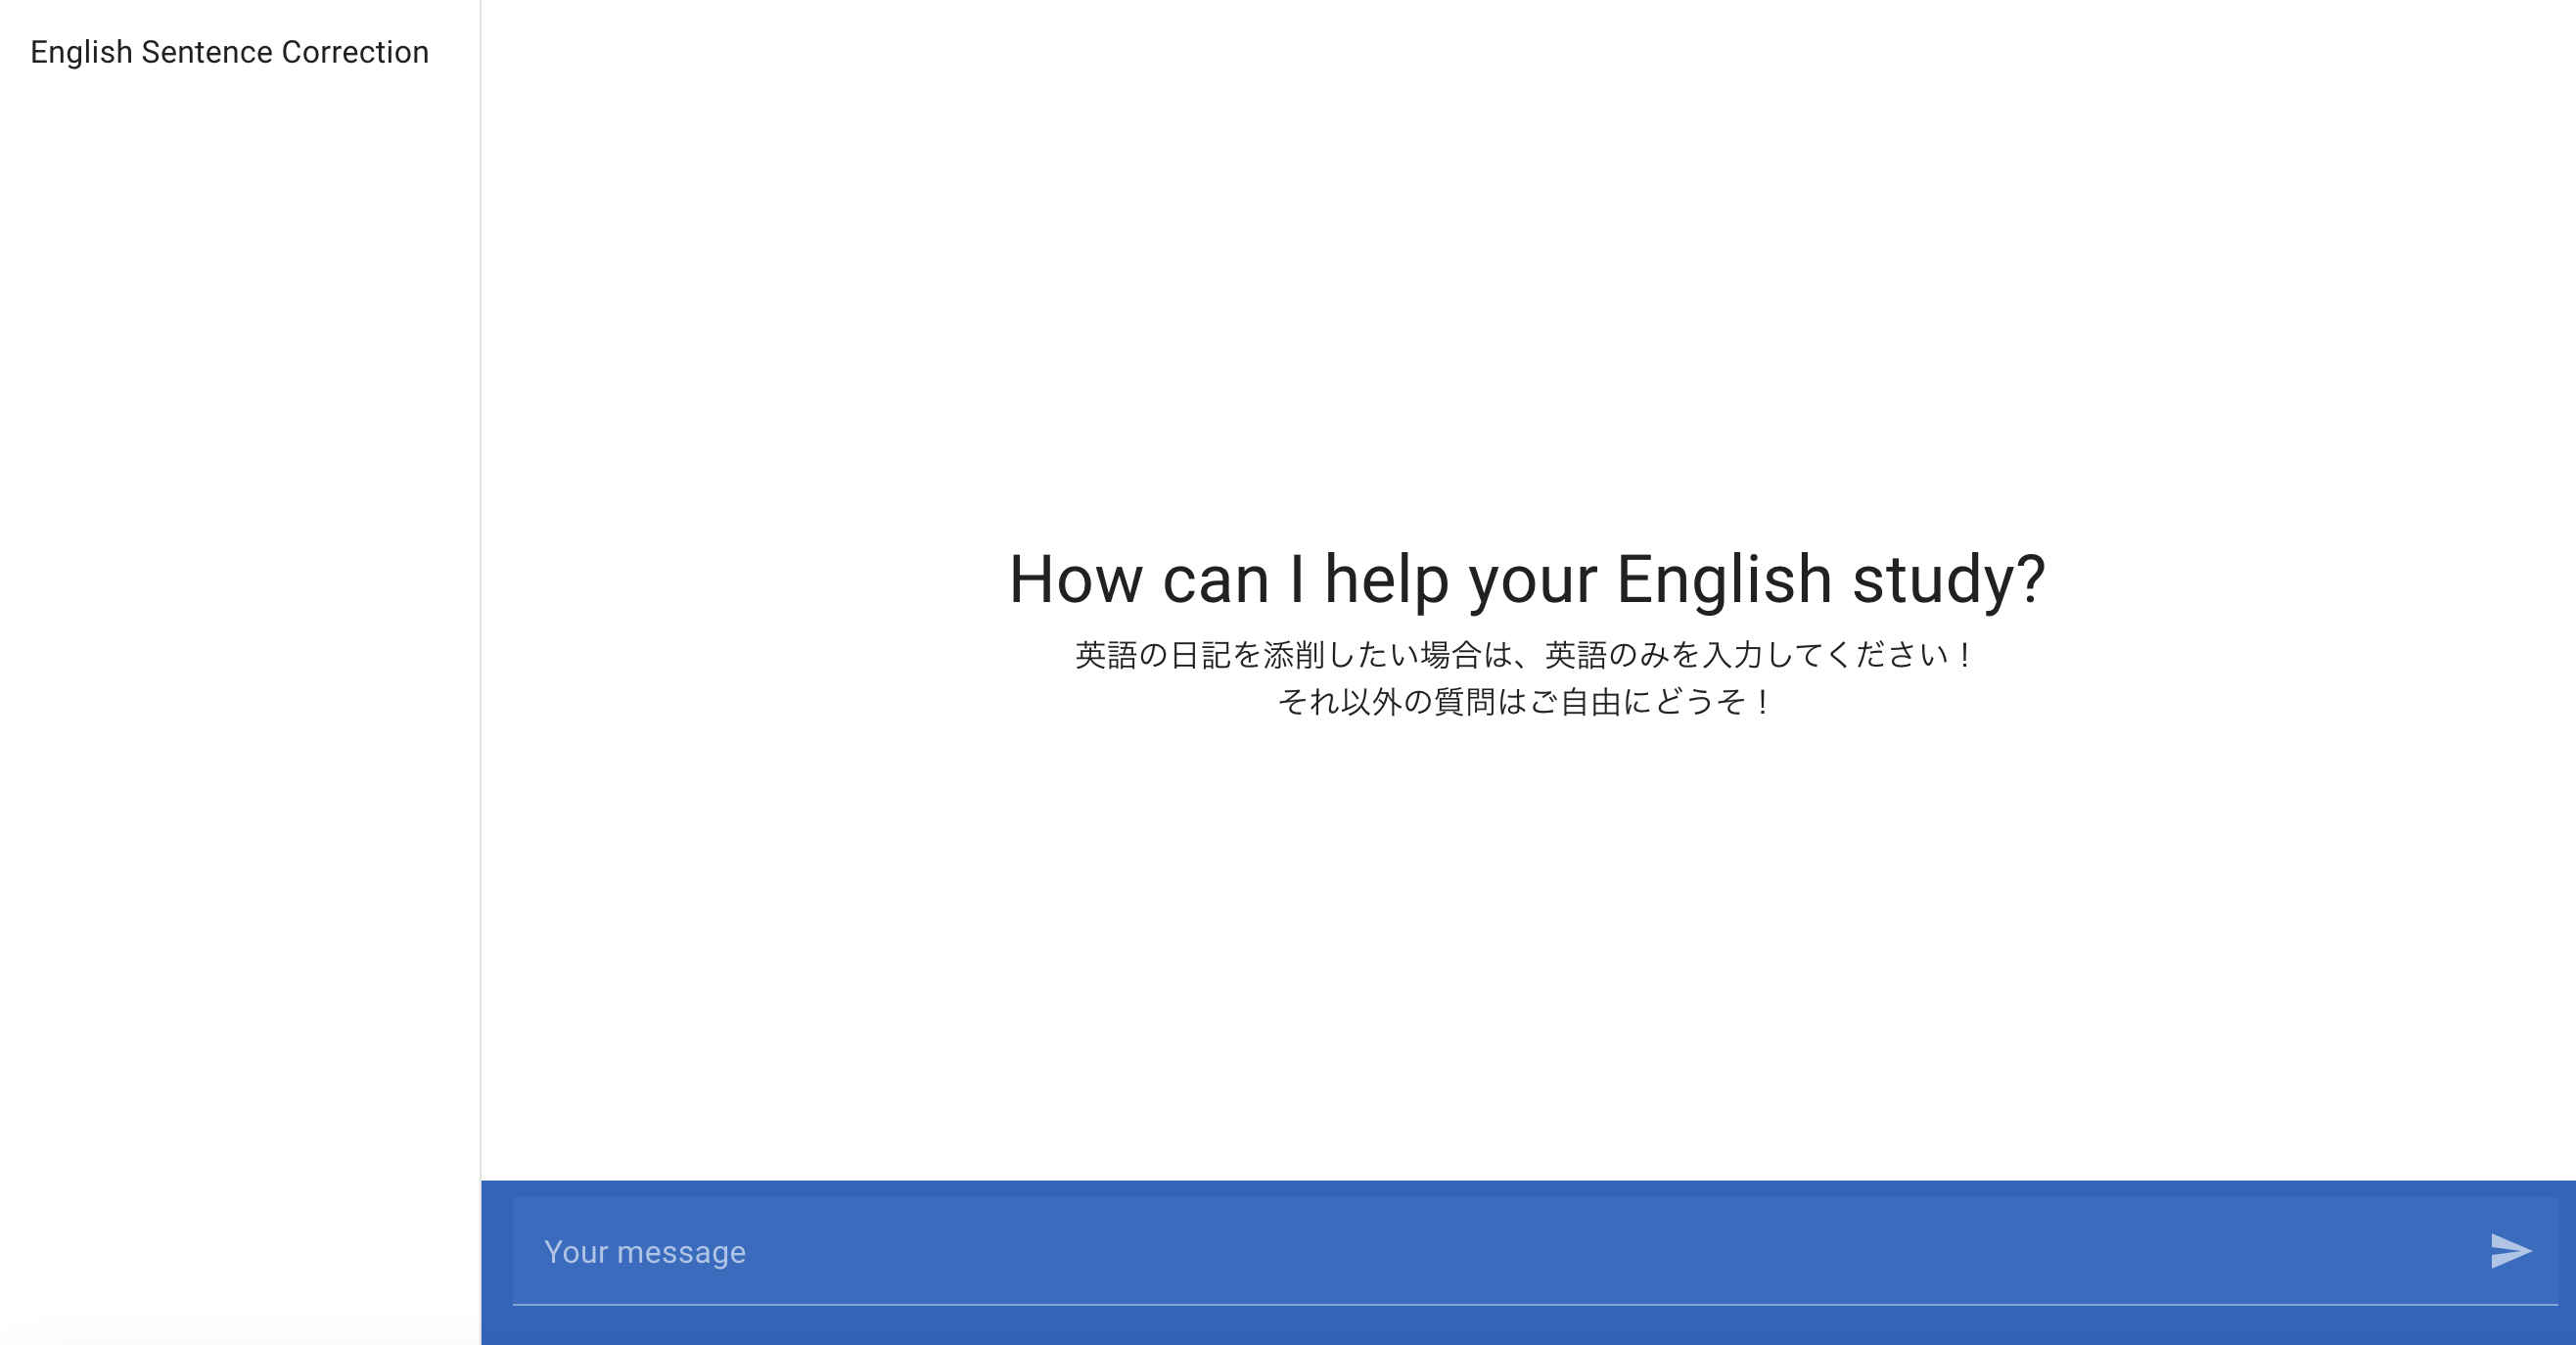
chat-gptのように、青色のフォームにセンテンスを打ち込む形式です。
改めて、外観はこんな感じ。
Chat-gptのように非常にシンプルなUIにしています。
ユーザからの問いかけに対するgpt4からの添削結果はこのようになっています。
文章タイプは、①英語のみ②英語+日本語③日本語のみ の3つがあると思っています。
このアプリは、それらの文章タイプにに対応します。英語のみの場合は、英語センテンスの添削として理解し返答を行います。英語以外の言語(日本語)が混じっている場合は、chat-gptへの質問と同じように、ただの質問として回答させます。
これらの使い分け、英語のみの場合における返答フォーマットの確立は、LambdaでOpenAIのAPIにmessageを投げる際に"system"ロールのcontentとして定義しています。
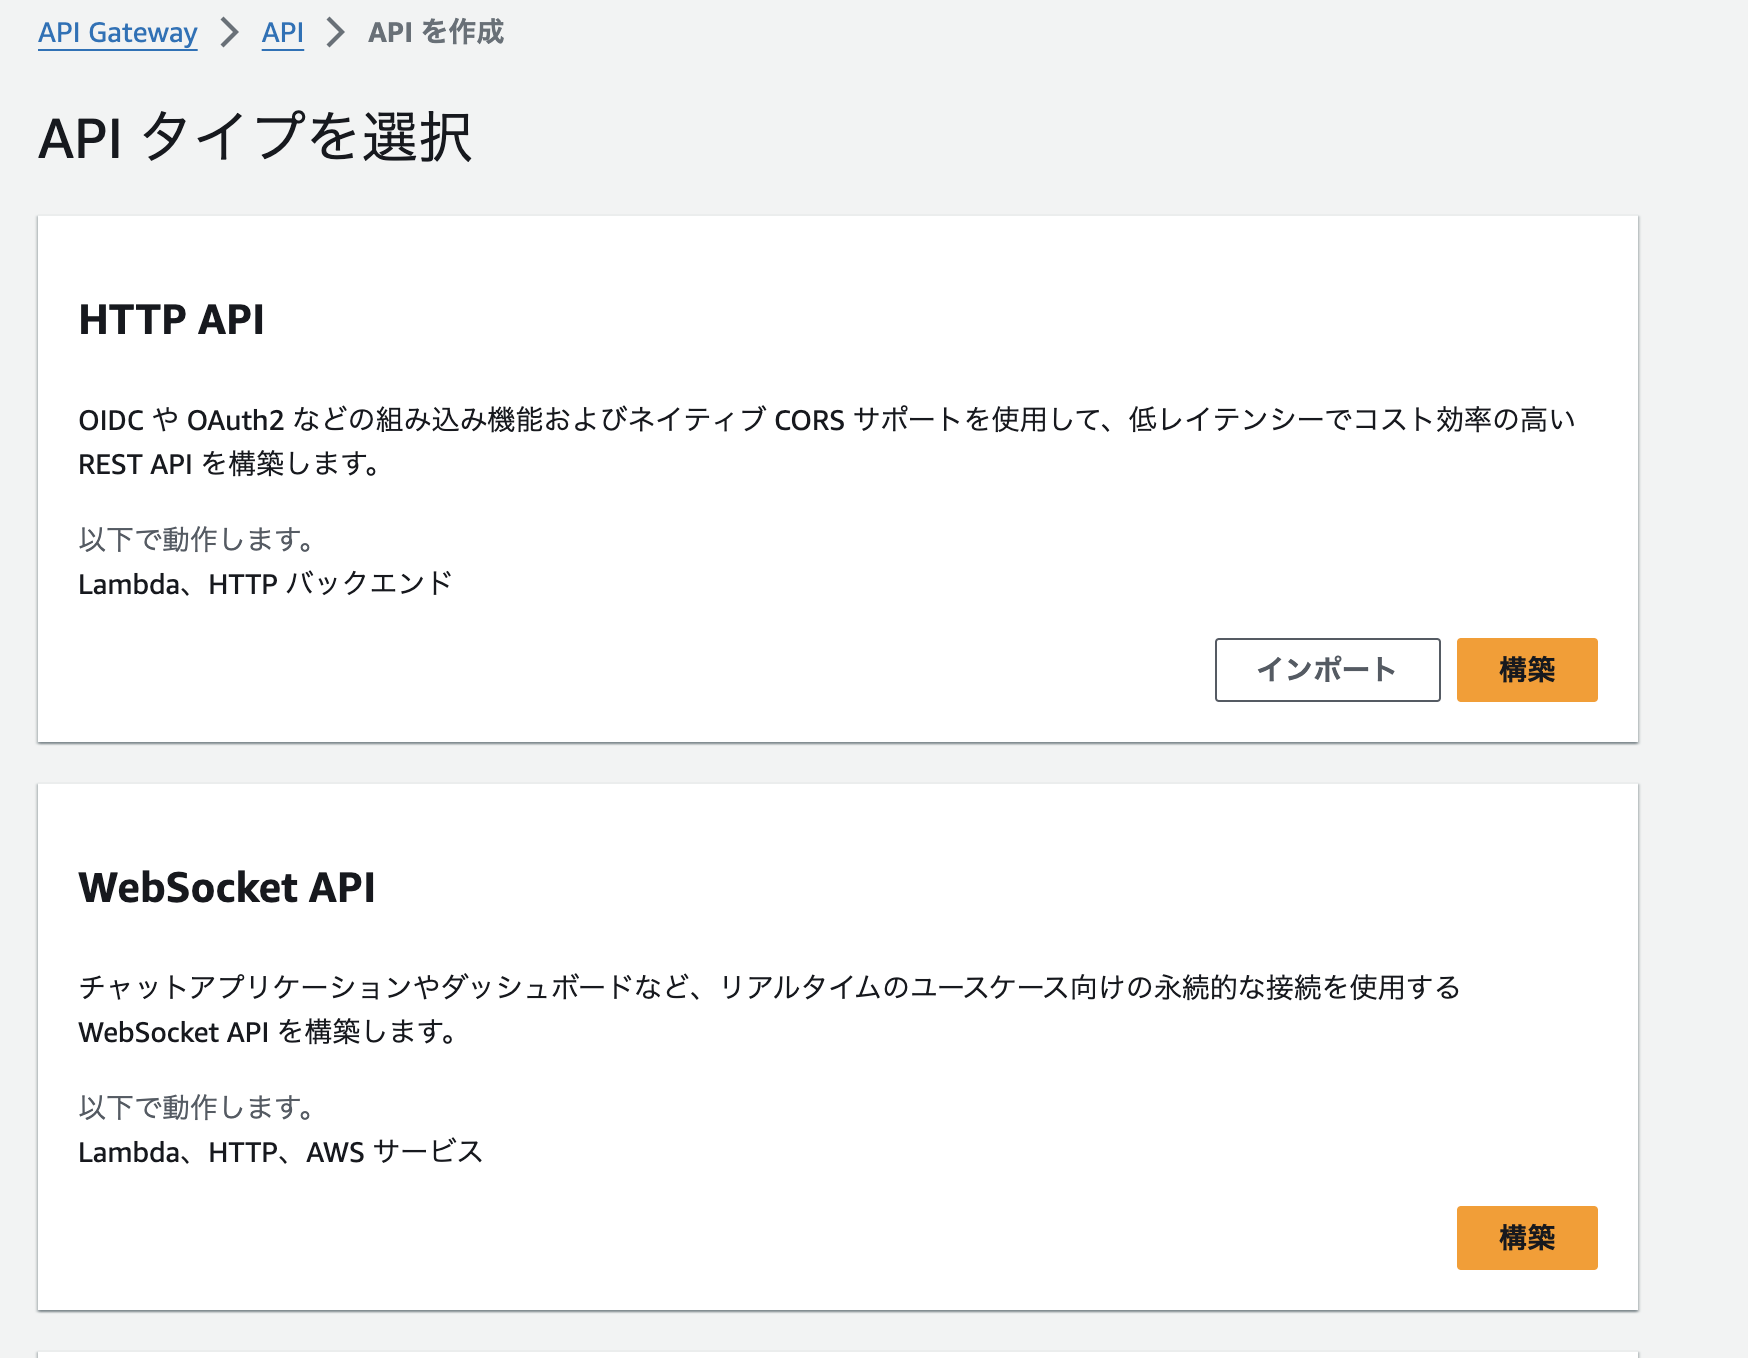
ユーザからの質問に対して、AIからの回答がStream的にレスポンスされます。StreamレスポンスにはRestAPIではなく、WebSocketを利用しています。
3.構成
- フロントエンド:Nuxt3(Vue,Typescript)
- バックエンド:Python(Lambda→ランタイムはpython3.11)
- CSS/UIフレームワーク:Vuetify3
- API管理:API Gateway
- 生成AIモデル:gpt-4
- API:Webhook API、OpenAI API
- WebSocketの試行:wscat
4.手順
流れ
作成手順を分解すると、こんな感じです。
私はUIも自分で作ってますが、chat-gptライクなuiの作成はどっかのリポジトリ(BetterChatGPTとか?)から取ってきても良いです。
- Nuxtプロジェクトの作成
- Vuetifyプラグインを入れる
- UIをChat-gptを参考に作る
- OpenAIのAPIキー作成
- Lambdaからgpt-4を使えるようにする
- システム側に持たせたいプロンプトを試行して意図した回答ができるようにする
- API GatewayでWebSocketのエンドポイントを作る
- LambdaをWebSocketに対応させる
- 画面からgpt4を使えるようにする
1,2のインストール手順には細かくフォーカスしませんが、参考にした記事を記載します。
コードについては、画面部分、APIとの通信部分、Lambdaは記載します。
作成手順
1.Nuxtプロジェクトの作成
公式ドキュメントに導入部分の記述があります。私はyarnを使っています。
2.Vuetifyプラグインを入れる
次に、Vuetifyのプラグインを入れます。例えば以下の記事などがとても有益で非常に参考になります。
3.画面をChat-gptを参考に作る
chat-gptを参考にして、レイアウトを整えます。コードは本章の最後に記述しています。
この段階では、apiの処理は書かなくて良いです。
ただし、私は以下のapiを用いてuseFetchの動作確認をしていました。例えば、画面のどこにAPIを叩いた結果を出力させるかなどです。チャット形式のアプリなので、自分の入力とAIからの返答を出力させる部分の実装は重要になります。
ちなみに、このAPIは叩くとランダムで犬の画像を返してくれます。
4.OpenAIのAPIキー作成
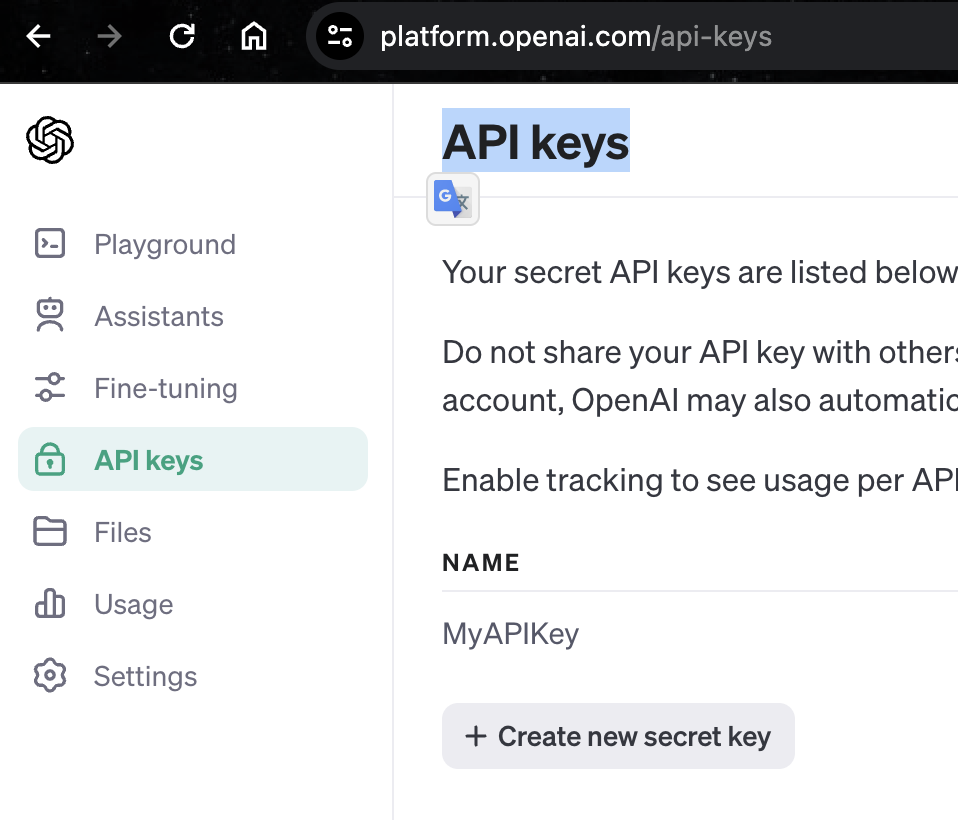
OpenAIのAPIキーは、以下ページからサインアップ後にAPI Keyのタブで作成できます。
5.Lambdaからgpt-4を使えるようにする
Lambda関数を作成して、gpt-4を使えるようにします。
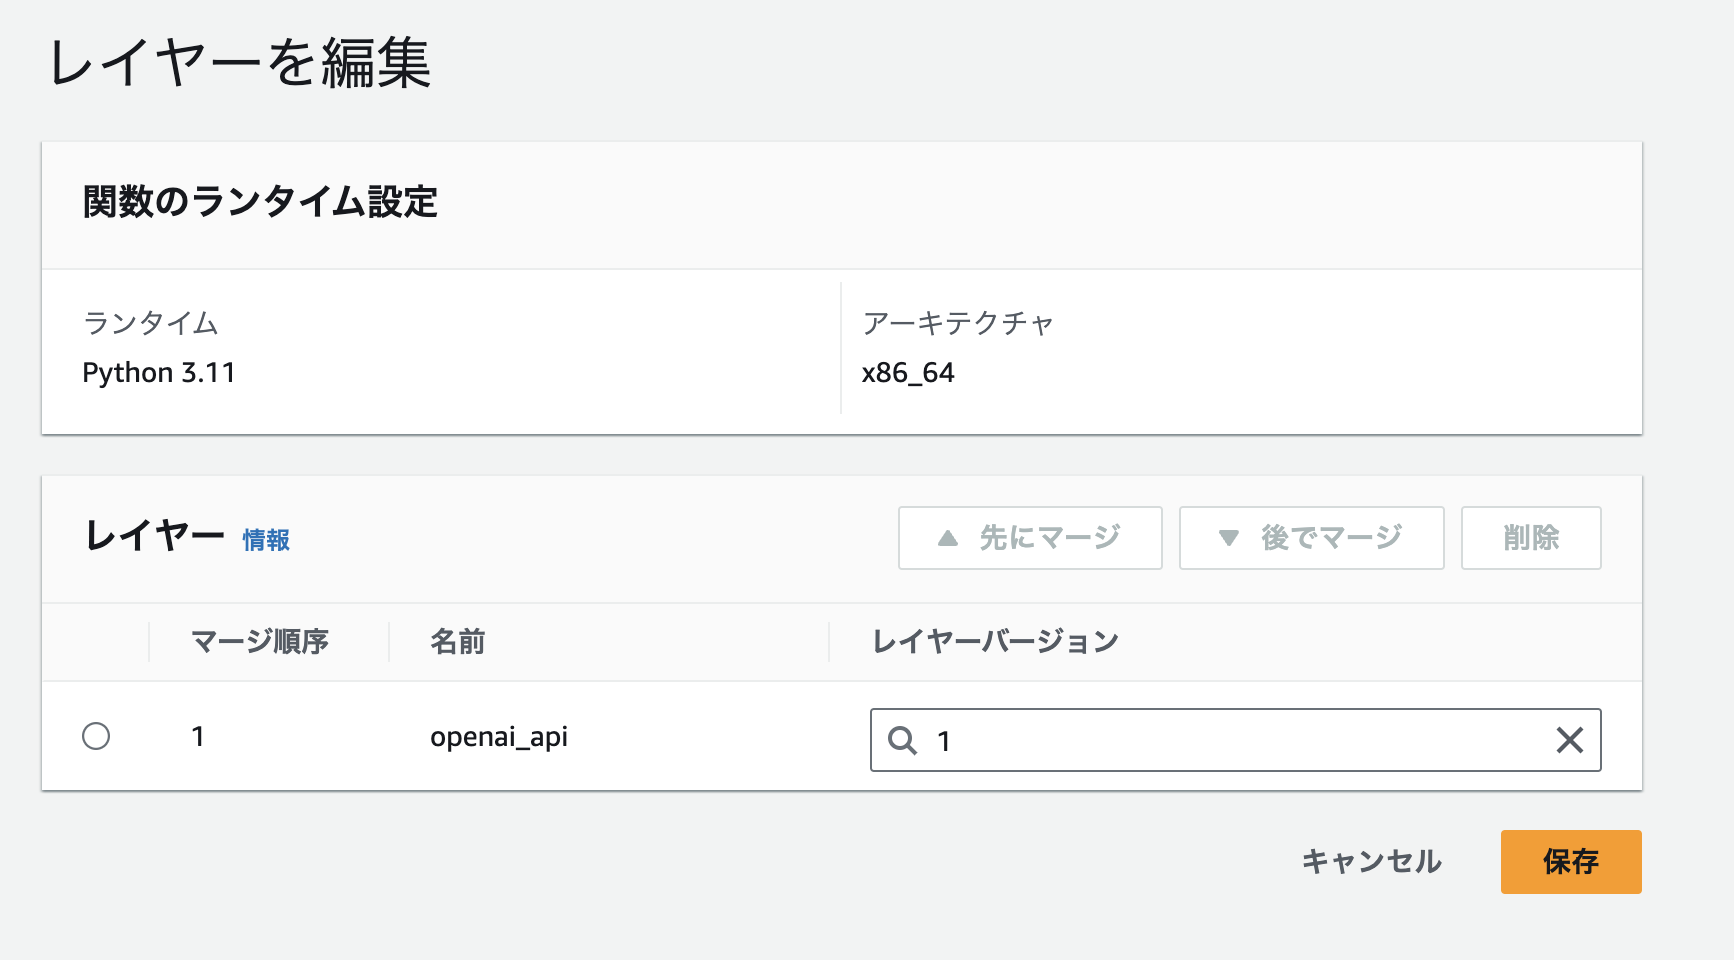
コードの記述、Layersのアップロード、環境変数の設定、タイムアウト時間の変更を行います。
ちなみに、このコードは2024/2/18時点のものです。
APIをたたく時のコード、例えばメソッドの使い方などは変化する可能性があるので留意ください。
コード
import json
import os
from openai import OpenAI #Layerを入れておくこと


def lambda_handler(event, context):

    client = OpenAI(api_key=os.environ["OPENAI_API_KEY"]) #環境変数にAPI Keyを設定しておくこと
    data = "日本の首相は誰ですか?"

    # OpenAI APIへのリクエスト(モデルはgpt-4を利用→他モデルを利用したい場合はOpenAIのサイトで確認
    response = client.chat.completions.create(
        model="gpt-4",
        messages=[{"role": "user", "content": data}],
    )

    print(response)

    return {
        "statusCode": 200,
        "body": json.dumps({
            "message": "クライアントへのデータ送信が完了",
        }),
    }
Layersのアップロード
まずは、アップロードするLayerを作成する。
以下のコマンドでopenaiをインストールしてzip化する。
$ mkdir python
$ python3 -m pip install -t ./python openai
$ zip -r openai.zip ./python
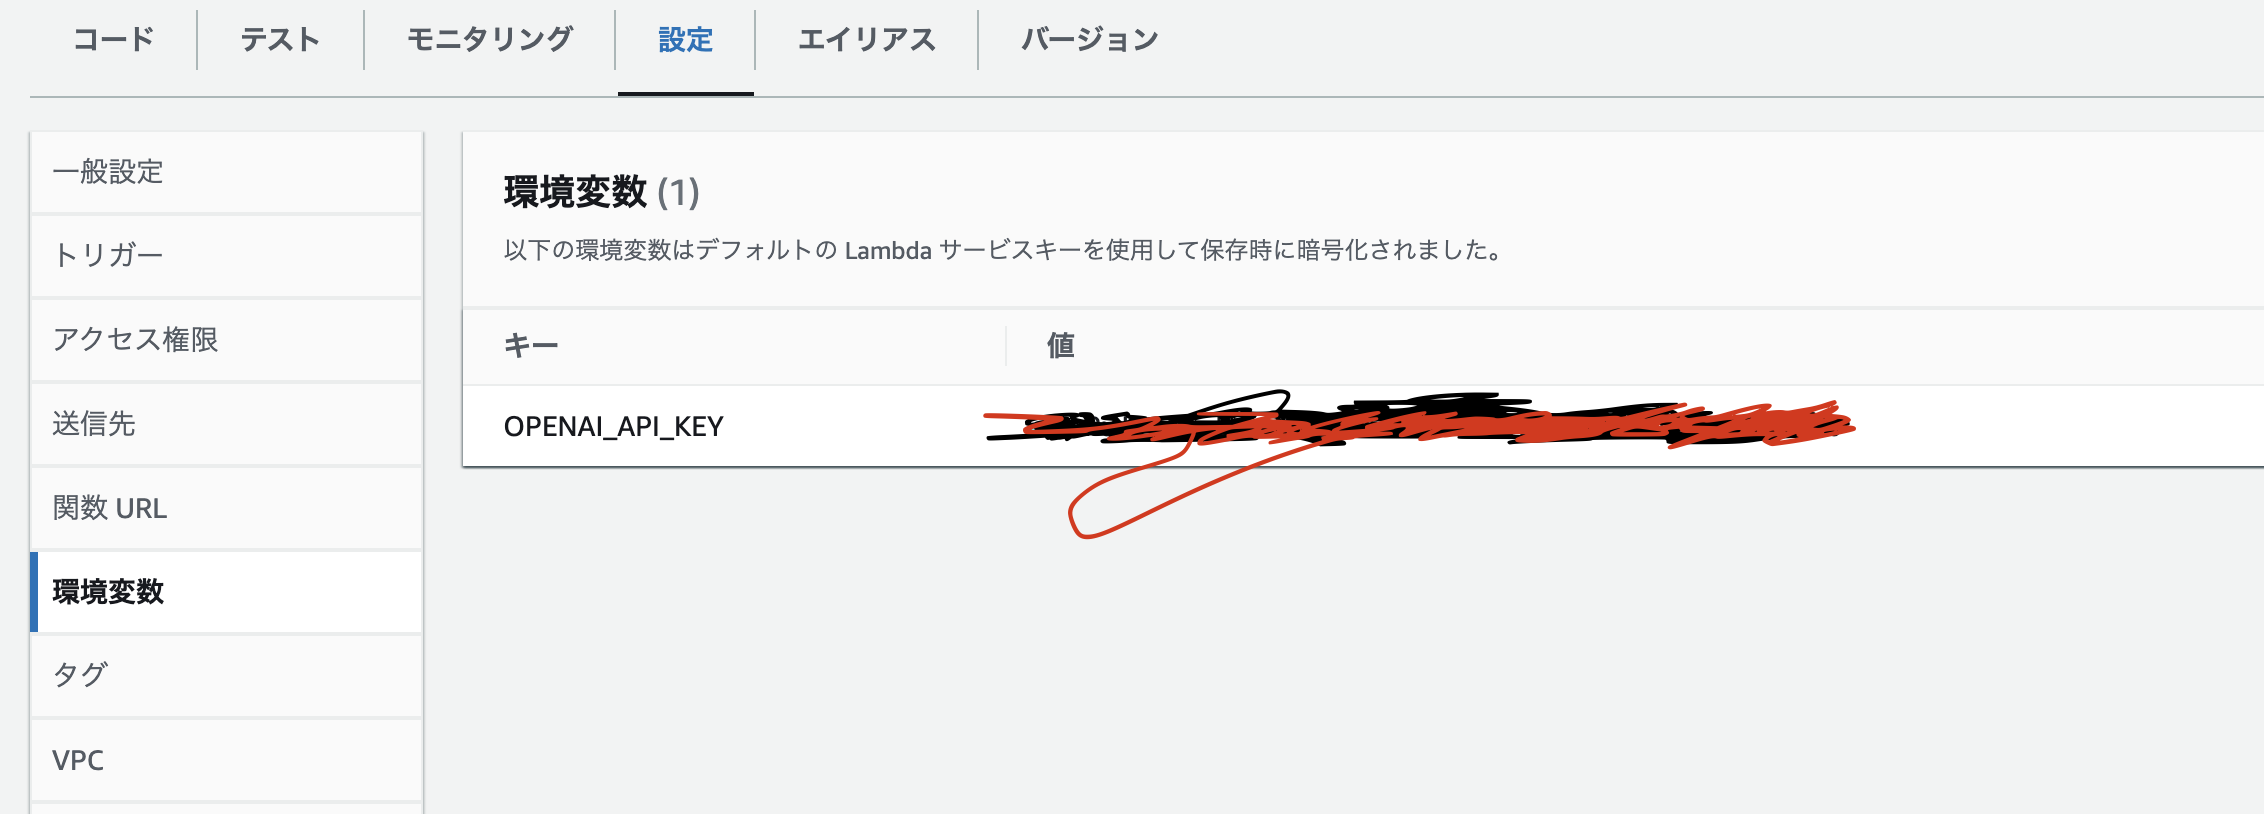
環境変数
当該Lambda関数の設定から、環境変数タブを開いて、取得したOpenAIのAPI Keyをセットする。環境変数へのAPI Keyのセットは、ハードコーディングを避けるため。
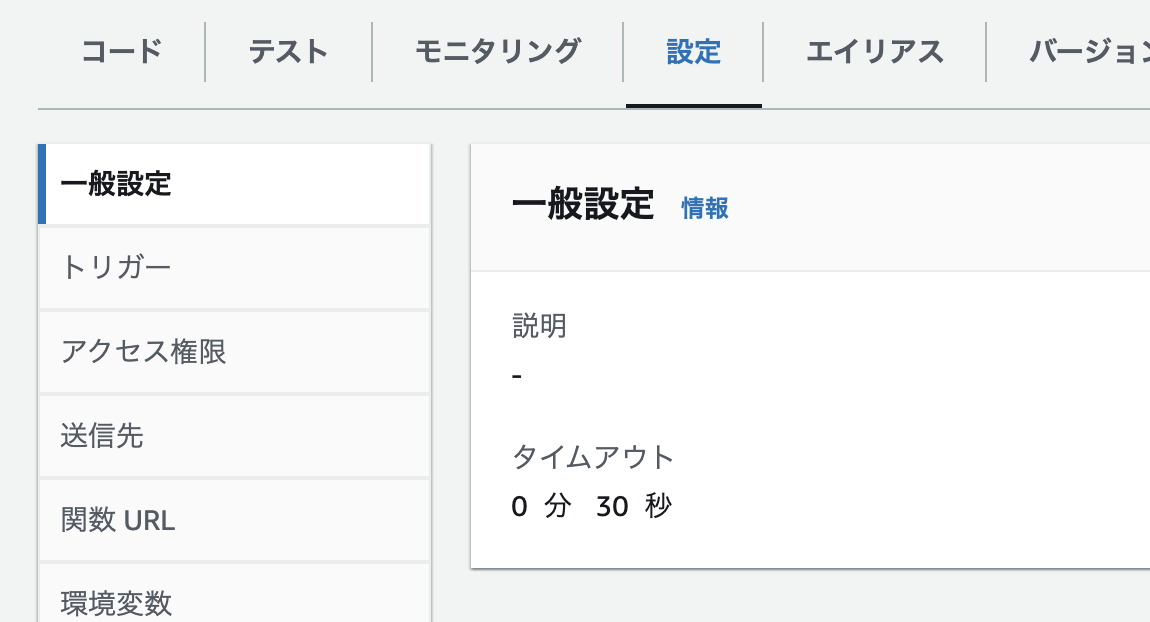
タイムアウトの時間を変更
Lambdaのタイムアウトになる時間を変更します。デフォルトは3秒になっているので、30秒に変更します。生成AIからの返答を待つことになるので、3秒だとエラーになります。
Lamdba関数のテストの実行
Lambdaをデプロイして、テストを実行してみます。
""日本の首相はだれか?""という問いに対する答えが返却されていれば成功です。
エラーが出た場合は、モニタリングのCloudWatch logsからログを確認して、足りていない箇所の修正を行ってください。
6.システム側に持たせたいプロンプトを試行して意図した回答をさせる
私は、英語のセンテンスが入力された場合は、定義したフォーマットに沿って回答させたかったので、プロンプトにsystemロールとしてcontentを定義しました。逆に、日本語の文字を検知した場合は、フォーマットを無視することを許可して、普通のchat-gptのように返信させるようにしています。
なかなか意図した通りに回答が返ってこなかったので、正直このプロンプトの改善プロセスがアプリの開発において一番苦労しましたが、とりあえず下記の定義だと意図通りに回答を生成してくれています。もちろん定義をみると、冗長な部分など多々あると思いますし、より良い回答を生成させるプロンプトを作れないか?といったことは絶賛模索中です。
ちなみに、英語で書いている理由は、トークン数を節約するためです。日本語だと、1文字1トークン消費するそうですが、英語だと1ワード1トークン消費なので、例えば"圧倒的に"という言葉を入れたければ、"overwhelmingly"としたほうがトークンの節約になるよねって理由です。
プロンプトも英語で作ったものを、chat-gptに添削してもらって文章は洗練させているつもりではいます。削りすぎると意図した回答を返してくれないので難しかったです。。。。
Please correct the English in the input following the specified format. Use Japanese for responses. Make sure to start each answer on a new line after the question. Follow the format strictly without additional acknowledgments like "I understand." Each response should include:

1. Please reply according to the below format
2. Ensure there is a line break between the question and your answer
3. If you receive a word other than an English sentence, respond with what is being asked in Japanese.

Format:You must adhere to this format unless rule 3 applies.
ーーー
Ex.
Number. [My question, ex. The corrected sentence]
[Your answer on a new line]
ーーー

1. The corrected sentence (labeled as '1: Sentence after correction'). Please place your answer directly below the question.
2. Its translation into Japanese (labeled as '2: Japanese translation'). Again, please start your answer on a new line below the question.
3. The number of corrections made (labeled as '3: Show the number of corrections'). Your response should follow directly after the question.
4. A detailed correction of each part of the sentence with grammatical explanations in both English and Japanese (labeled as '4: Which part of the sentence was corrected?'). Please ensure your explanation is given on a new line.

For example:
Ex. Before: "He watched the building" → After: "He saw the building"
Explanation: The correct verb for visually noticing without intent is 'see' rather than 'watch', which implies intention and focus. Please provide the explanation on a new line below the example.

説明の日本語訳:意図せずに視覚的に気づくことを表す動詞は、「watch」ではなく「see」です。

※For non-English correction queries, respond in Japanese directly related to the query.
※When asked the meaning of a word from japanese+English, reply the meaning and the etymology of the word for better understanding.
7.API GatewayでWebSocketのエンドポイントを作る
APIの管理にはAPI Gatewayを使ったのですが、RestAPIではなくWebSocketを使いました。理由は、生成AIからの返答をStreamレスポンスさせたかったからです。RestAPIだとLambdaからの返答をストリーム的に返すことができなかったのでリアルタイムな通信を可能にするWebSocketを選びました。つまり、生成AIに作成させた返答を、一気に返すか、チャンク単位で返すかという話です。チャンク単位で返すほうが、UX的に待ち時間が削減されるのと、もちろん回答も早く目を通し始めることができます。
ただ、全ての回答が返却しきる時間的には、チャンク単位でも一気に返す場合も同じではあります。
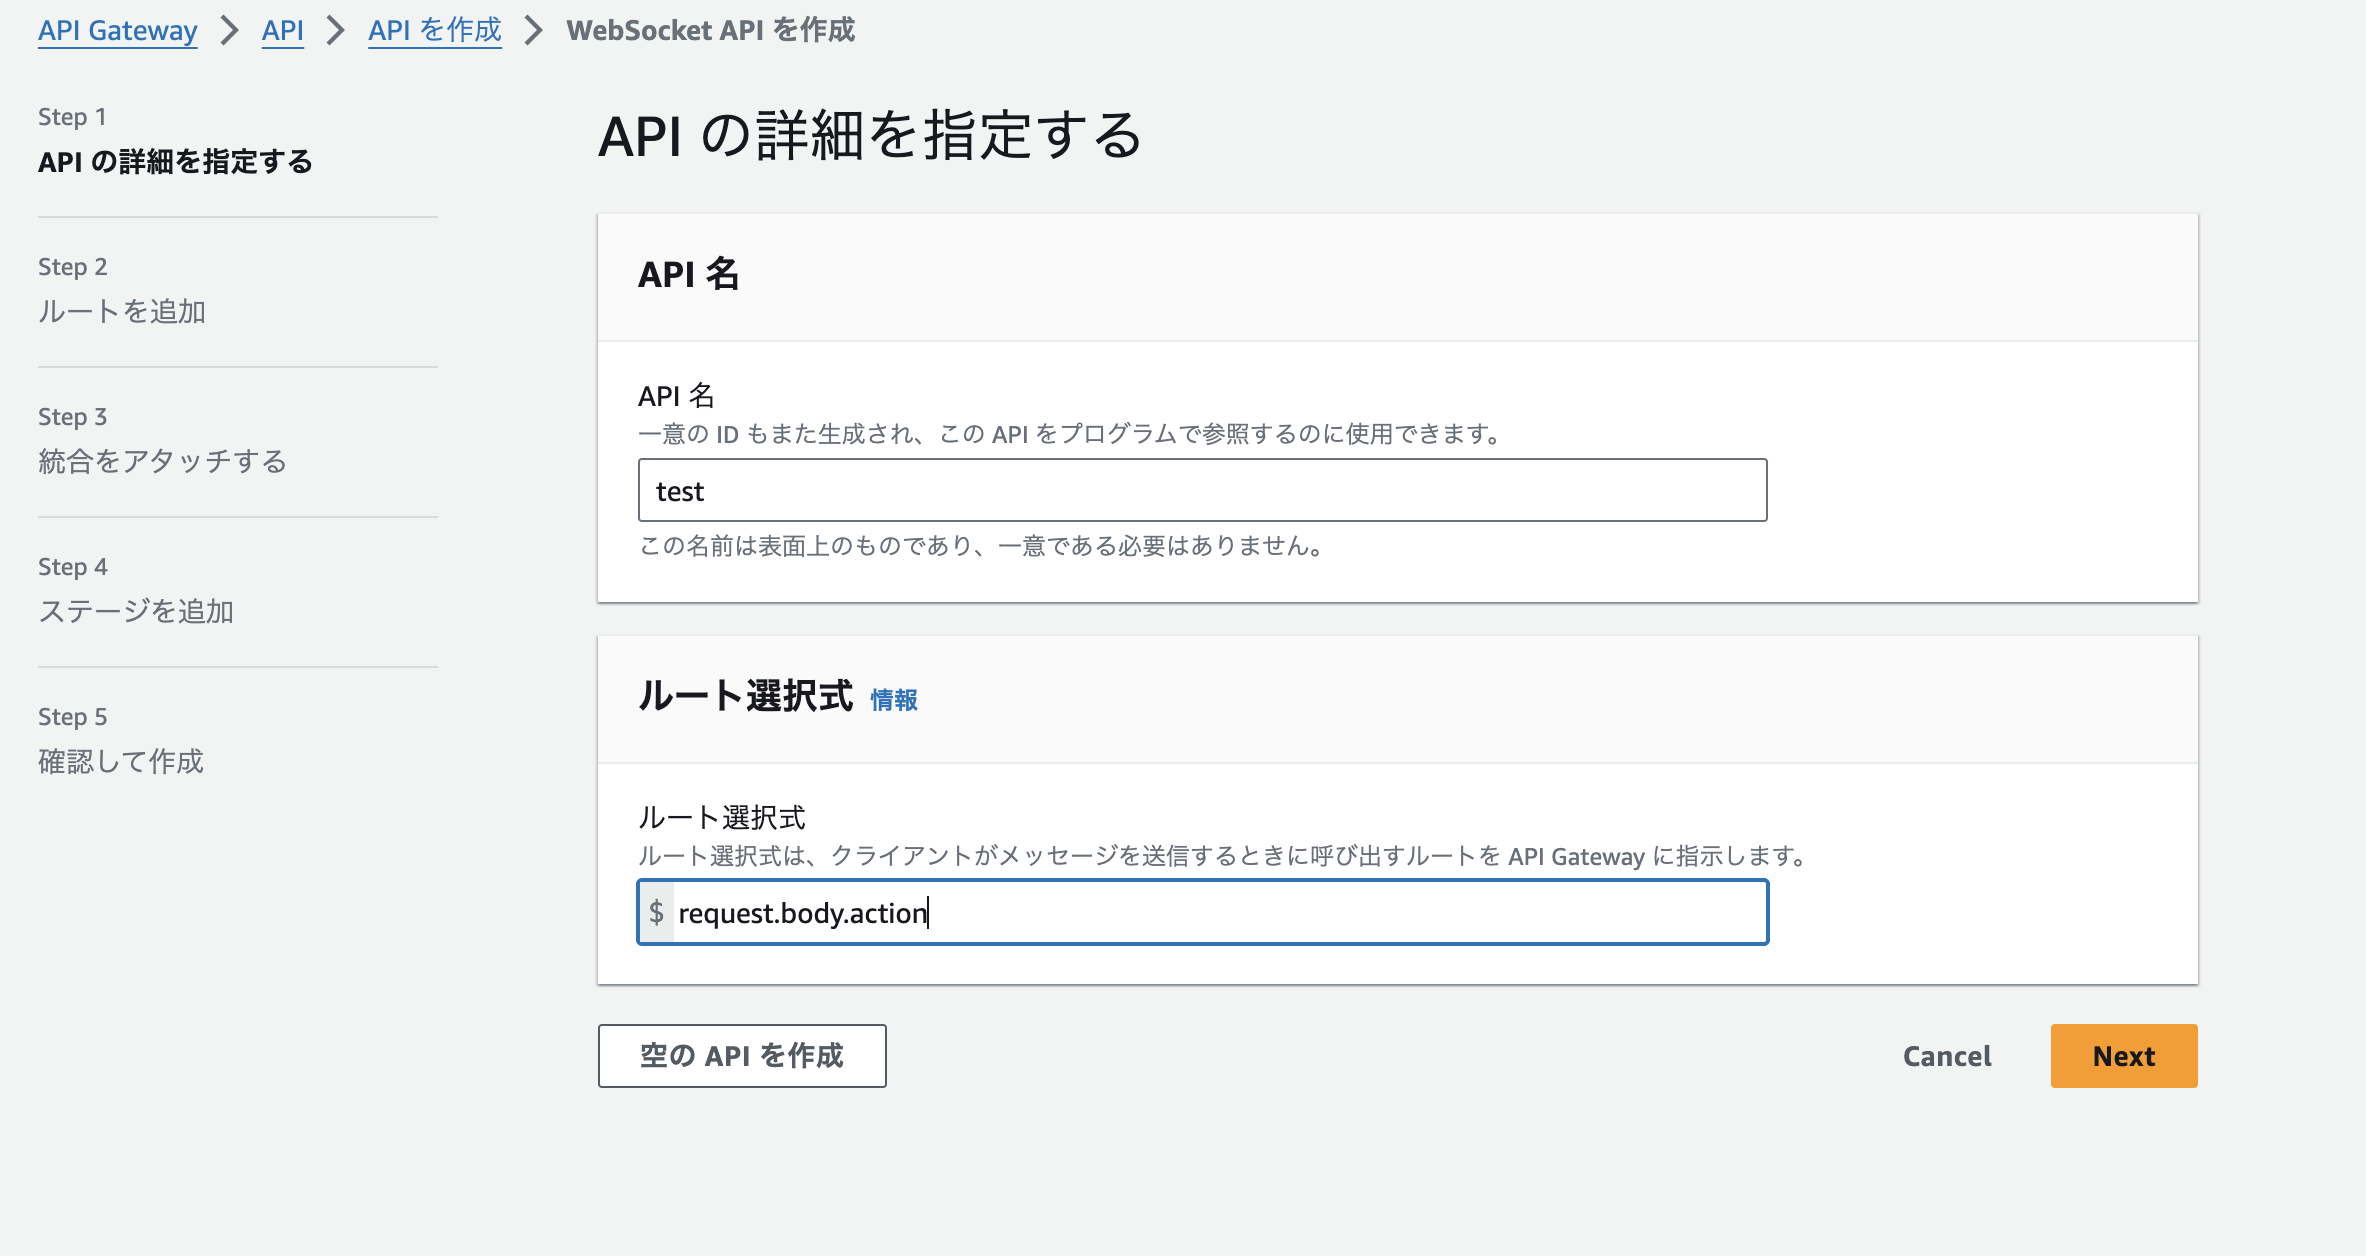
API名とルートを選択式を入力する
ルート選択式はrequest.body.actionとします。
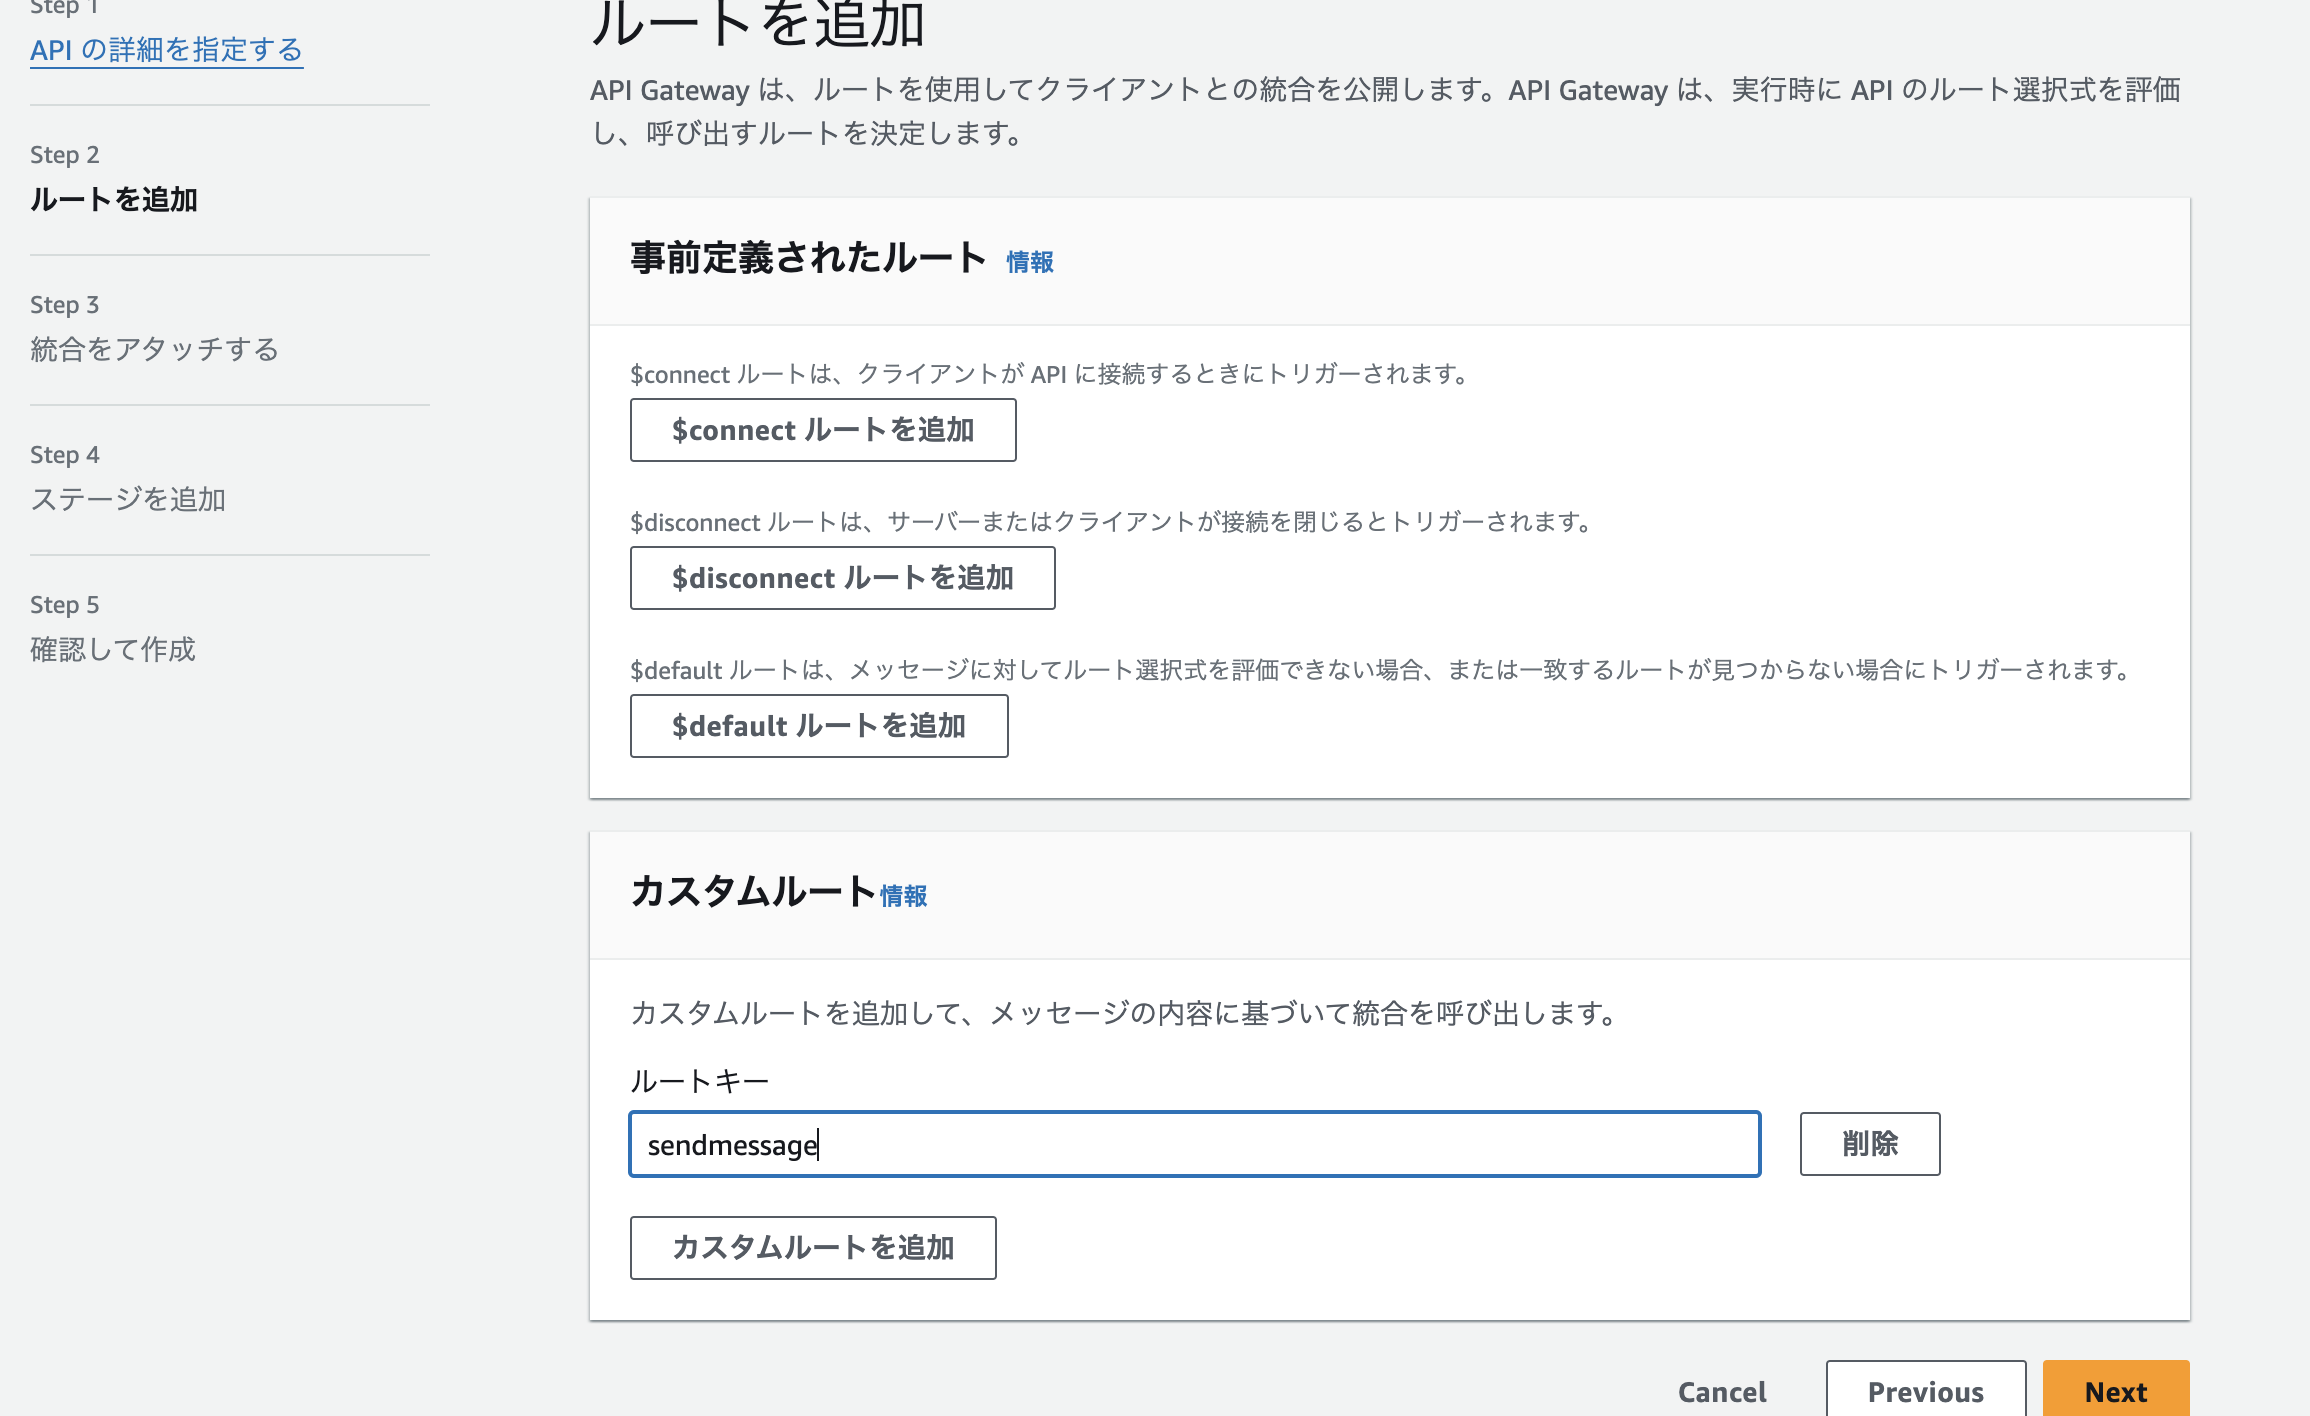
ルートーキーにsendmessageと入力します。事前定義されたルートは全部無視してokです。
統合タイプにLambdaを選らんで、8章で作ったLambdaを選択する。
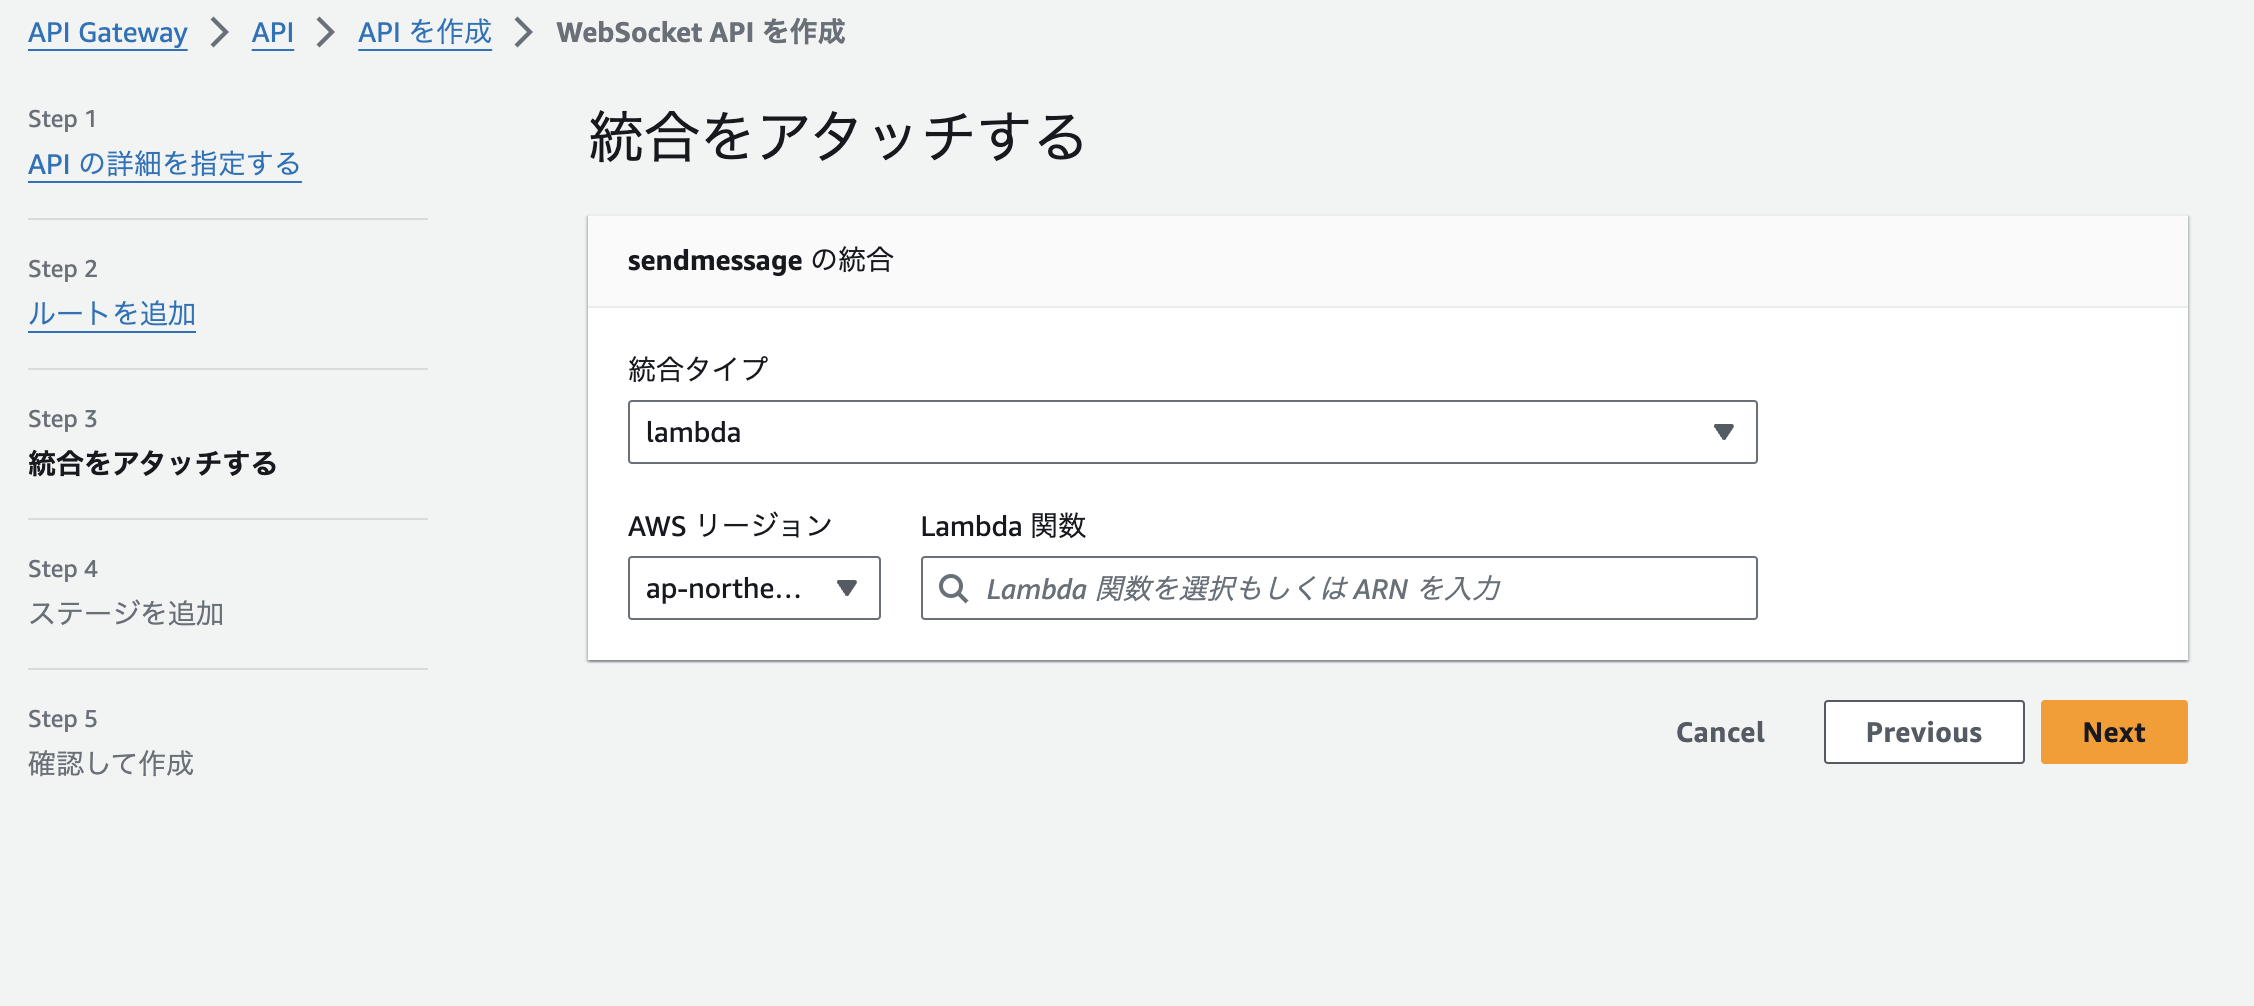
ステージを追加して、次の確認も上述の通り設定できたらok作成完了です。
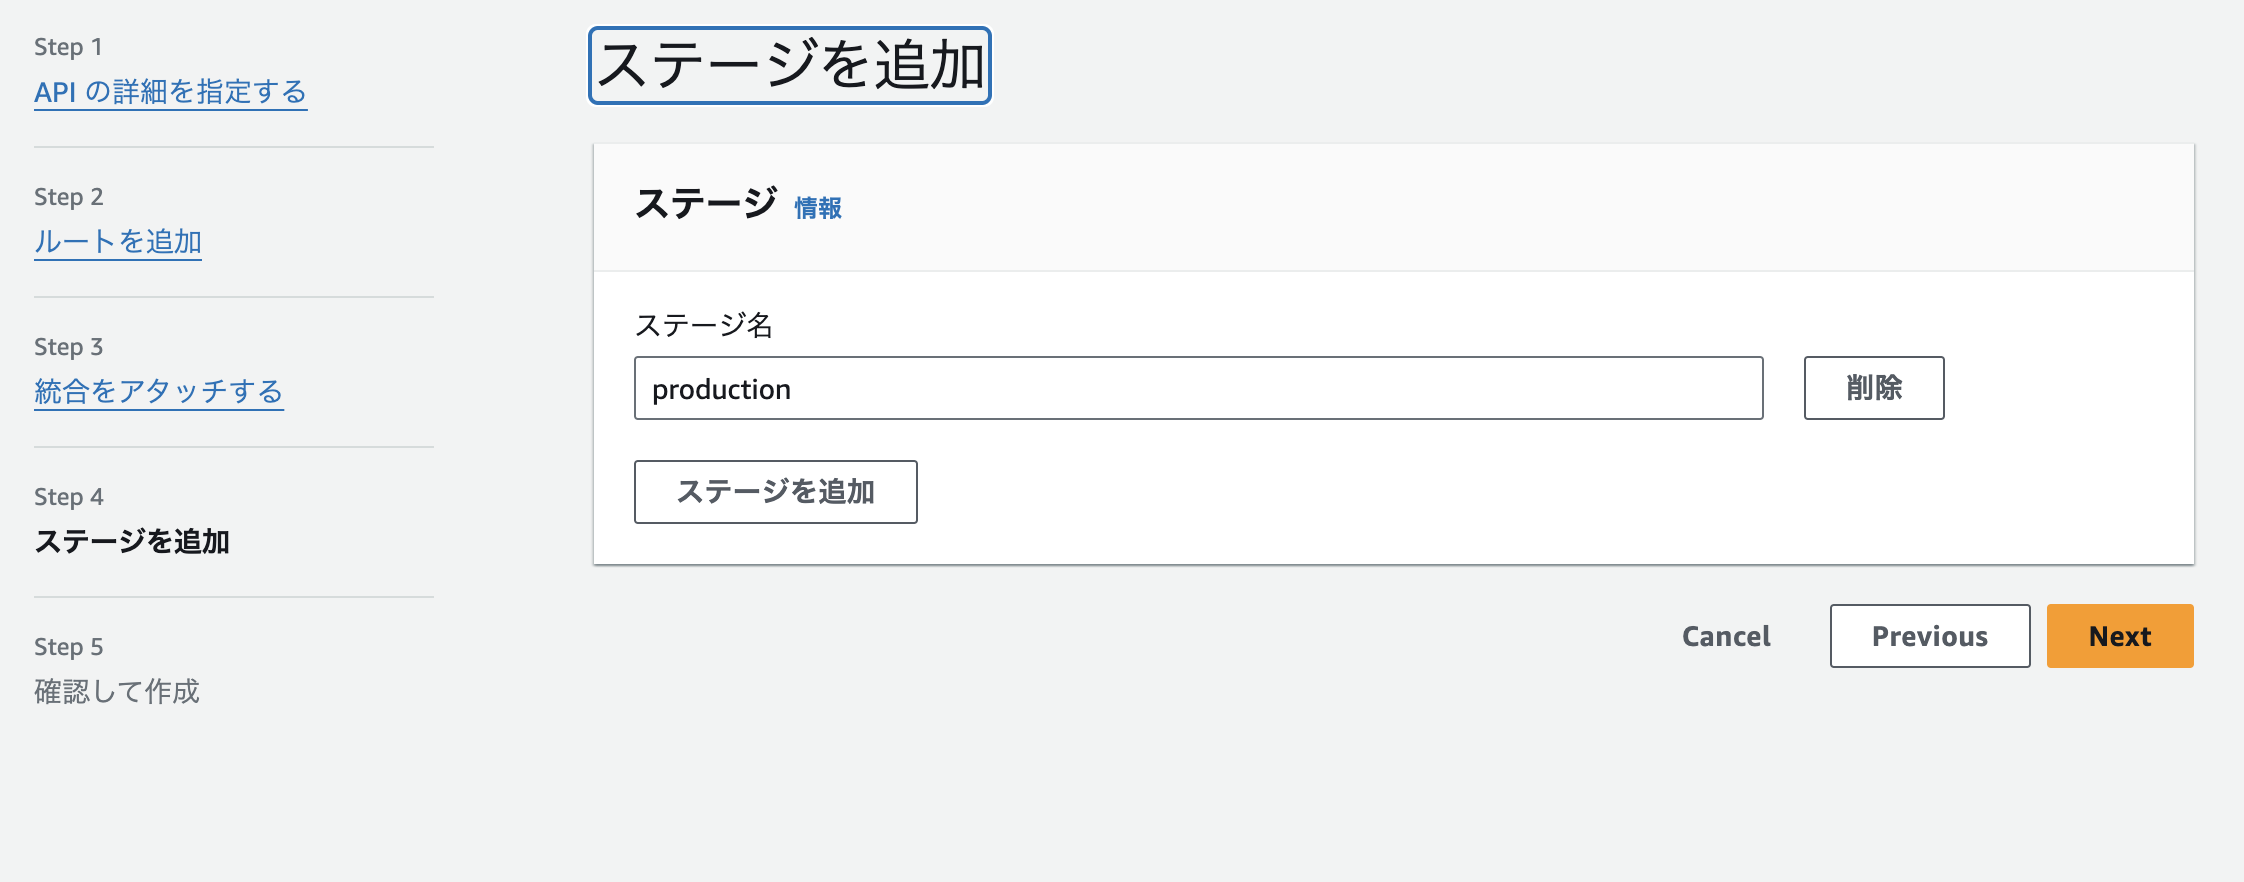
あとは、作成したAPI Gatewayをデプロイして、WebSocket URLをメモります。

8.LambdaをWebSocketに対応させる
一部、API Gatewayで前後する部分があり、すみません。
タブを複製して、対象のLambdaの作成を行ってください。
やることは、5章で作成したLambdaのコードを以下のように改変すること(コピペでok)と、IAMロールに許可ポリシーを追加することです。
import json
import boto3
import os
from openai import OpenAI


def lambda_handler(event, context):

    client = OpenAI(api_key=os.environ["OPENAI_API_KEY"])

    # 入力メッセージと、Connectionの識別のための情報を取得
    data = json.loads(event.get('body', '{}')).get('data')
    domain_name = event.get('requestContext', {}).get('domainName')
    stage = event.get('requestContext', {}).get('stage')
    connectionId = event.get('requestContext', {}).get('connectionId')
    #api gatewayのwebhookとのConnection確立
    apigw_management = boto3.client('apigatewaymanagementapi', endpoint_url=F"https://{domain_name}/{stage}")

    # OpenAI APIへのリクエスト
    response = client.chat.completions.create(
        model="gpt-4",
        messages=[{"role": "user", "content": data}],
        stream=True,
    )

    # メッセージの送信元となるクライアント側にstream的に逐次メッセージ送信
    for partial_message in response:
        content = partial_message.choices[0].delta.content
        if content:
            apigw_management.post_to_connection(
                ConnectionId=connectionId, Data=content)

    return {
        "statusCode": 200,
        "body": json.dumps({
            "message": "クライアントへのデータ送信が完了",
        }),
    }
当該LambdaのIAMロールのポリシーに以下を追加します。
これをしないと、APIGatewayとの通信ができません。
ポリシー名 : AmazonAPIGatewayInvokeFullAccess
これでWebSocketを利用してローカルからLambdaを叩いて、gpt-4からの返答をStreamレスポンスさせることができるので、wscatを使って試してみます。
$ wscat -c wssから始まるWebSocketのエンドポイントURL
Connected (press CTRL+C to quit)
> {"action":"sendmessage", "data":"日本の首相はだれ?"}
コンソールに質問に対する返答が1文字ずつ出力されれば成功です。
ちなみに、json形式でactionは、sendmessageする必要があります。これは、API Gatewayの設定でルートキーに設定したものです。API Gatewayはその値を読み取って、指定したLambdaにメッセージをルーティングします。
wscatについて
WebSocketの接続試験を簡単に行うことができます。
以下のコマンドでローカルにwscatをダウンロードし、手軽に利用できます。
$npm install -g wscat
Node.jsが入っていればnpmコマンドを使うことができます。
9.画面からgpt4を使えるようにする
画面の実装であるIndex.vueと、APIとの通信を記述しているuseAPI.tsを記載します。useAPI.tsに記載しているAPI GatewayのURL(wsEndpointの部分)は、私の場合は.envファイルに記載していますが、githubとかに上げないのであれば直接記述しても大丈夫です。
<template>
  <div>
    <v-app>
      <v-navigation-drawer permanent>
        <v-list>
          <v-list-item
            justify="center" align="center"
            title="English Sentence Correction"
          >
          </v-list-item>
        </v-list>
      </v-navigation-drawer>
      <v-main>
        <template v-if="messages.length">
          <v-container class="mt-6 pr-6">
            <v-row v-for="(msg, index) in messages" :key="index">
              <v-col cols="12">
                <v-card :class="[{'user-card': msg.type === 'user', 'api-card': msg.type === 'api'}]" class="pa-3 d-flex align-center my-card">
                  <div class="message flex-grow-1">
                    <span v-if="msg.type === 'user'" ><strong>You</strong><br>{{ msg.text }}</span>
                    <span v-if="msg.type === 'api'" ><strong>AI</strong><br>
                      <span :class="{ 'blink-response': msg.text === 'thinking...' }">{{ msg.text }}</span>
                    </span>
                  </div>
                  <v-btn size="24" icon @click="copyToClipboard(msg.text)" class="ml-3">
                    <v-icon size="18">mdi-content-copy</v-icon>
                  </v-btn>
                </v-card>
              </v-col>
            </v-row>
          </v-container>
        </template>
        <template v-else>
          <v-container class="mt-6 pr-6 fill-height">
            <v-row justify="center" align="center">
              <v-col cols="12" class="text-center">
                <p class="text-h4 pb-2">How can I help your English study?<br></p>
                <p>英語の日記を添削したい場合は、英語のみを入力してください!<br>
                それ以外の質問はご自由にどうそ!
                </p>
              </v-col>
            </v-row>
          </v-container>
        </template>
        <template v-if="showScrollButton">
          <v-container class="mt-6 pr-6 fill-height">
            <v-row justify="center" align="center">
              <v-col cols="12" class="text-center">
                <v-btn @click="scrollToBottom" class="scroll-to-bottom">
                  <v-icon>mdi-arrow-down</v-icon>
                </v-btn>
              </v-col>
            </v-row>
          </v-container>
        </template>
      </v-main>
      <v-footer color="primary" app>
        <v-textarea
          label="Your message"
          outlined
          append-inner-icon="mdi-send"
          rows="1"
          auto-grow
          clearable
          v-model="inputMessage"
          @click:append-inner="onSubmit"
          @keydown="handleKeydown">
        </v-textarea>
      </v-footer>
    </v-app>
  </div>
</template>
<script lang="ts">
import { setupWebSocket } from '~/composables/useAPI'

export default {
  data(){
    return {
      inputMessage: '',
      messages: [] as { type: string; text: string; }[],
      showScrollButton: false
    }
  },
  mounted() {
    window.addEventListener('scroll', this.handleScroll)
  },
  beforeUnmount() {
    window.removeEventListener('scroll', this.handleScroll)
  },
  methods: {
    async onSubmit() {
      // 送信ボタンがクリックされたときの処理
      const userMessage = this.inputMessage
      this.messages.push({
        type: 'user',
        text: userMessage
      });
      this.inputMessage = '';

      const tempApiMessageIndex = this.messages.length
      this.messages.push({
        type: 'api',
        text: "thinking..."
      });
      let tmpText = ""
      try {
          setupWebSocket(userMessage, (data) => {
            // サーバーからのメッセージを受け取った時の処理
            tmpText += data;
            this.messages[tempApiMessageIndex] = {
              type: 'api',
              text: tmpText
            };
          });
        this.inputMessage = ''
      } catch (error) {
        console.error("API呼び出し中にエラーが発生しました:", error);
        // エラーが発生した場合の処理_messageに文字列"エラーが発生しました"を設定
        this.messages[tempApiMessageIndex].text = "エラーが発生しました"
      }
    },
    handleKeydown(event: any) {
      //key操作時に発火
      if ((event.metaKey || event.ctrlKey) && event.key === 'Enter') {
        // ctrl+Enter時の処理
        event.preventDefault()
        this.onSubmit()
      }
    },
    copyToClipboard(msg: string) {
      if (navigator.clipboard) {
        navigator.clipboard.writeText(msg).then(() => {
        }).catch(err => {
          console.error("クリップボードへのコピーに失敗しました:", err)
        });
      }
    },
    handleScroll() {
      const scrolled = window.scrollY + window.innerHeight
      const threshold = document.body.offsetHeight - 10
      this.showScrollButton = scrolled < threshold
    },
    scrollToBottom() {
      window.scrollTo({ top: document.body.scrollHeight, behavior: 'smooth' })
    }
  }
}
</script>
<style>
.message {
  white-space: pre-wrap;
}
.my-card{
  margin-bottom: 0 !important;
}
.user-card {
  background-color: #f8f8ff;
}
.api-card {
  background-color: #ffffff;
}
/* AIからの返答待ちローディングの点滅 */
@keyframes blink {
  0%, 100% { opacity: 1; }
  50% { opacity: 0; }
}
.blink-response {
  animation: blink 2s linear infinite;
}
/* スクロールボタン */
.scroll-to-bottom {
  position: fixed;
  margin: auto;
  width: auto;
  bottom: 100px;
  z-index: 1050;
  transform: translateX(-50%); /* 要素の左端が中央に来るため要素の半分だけ左にずらす */
}
</style>
- デザインについて
- Vuetifyを用いることで綺麗にコンポーネントを簡単に配置できています。
- 配色については、全体のコンポーネントの色に対する質問者と回答者のカードの色を決めるのが難しかったです。
- 画面の機能について
- テキストを入力したら送信ボタンの押下かEnter+Commandキーで送信が可能です。単なるEnterキーの押下はフォーム内での改行と判断します。
- フォームに文字が入力されると、送信ボタンの横に入力文字を一括で削除できる削除ボタンが出現します。
- カードに記載されている内容はボタン1つでコピーをすることができます。
- カードが増えていき画面が見切れ、スクロールが可能になったことを検知すると、画面下部への自動スクロールボタンも用意しています。
- AIの回答を受け取って表示されるまでの処理の中でなんらかのエラーが出た場合、AIのカードにエラーであることを示します。
export function setupWebSocket(input: string, onMessageReceived: (data: any) => void) {
  const config = useRuntimeConfig()
  const wsEndpoint = config.public.openaiurl

  // WebSocketクライアントのインスタンスを作成
  const socket = new WebSocket(wsEndpoint);

  // WebSocketが開かれたときのイベントハンドラ
  socket.onopen = function(event) {
    // サーバーにメッセージを送信
    socket.send(JSON.stringify({
      action: 'sendmessage',
      data: input
    }));
  };

  // サーバーからメッセージを受け取ったときのイベントハンドラ
  socket.onmessage = function(event) {
    onMessageReceived(event.data);
  };

  // WebSocketが閉じられたときのイベントハンドラ
  socket.onclose = function(event) {
    console.log('WebSocket is closed now : ', event);
  };

  // エラーが発生したときのイベントハンドラ
  socket.onerror = function(error) {
    console.error('WebSocket Error : ', error);
  };
}
コールバック関数を利用して、index.vueで定義されているmessageに、APIからStreamレスポンスされた回答を追加していきます。
ここまでで、画面からのユーザの入力をWebSocketを利用してOpenAI APIに投げて、回答を1枚のカードの中にStreamレスポンスさせることができるようになりました。自作のChat-gptみたいな感じですね。
最後に、英文の添削をさせるために8章で提示したLambdaのコードの”OpenAIのAPIへのリクエスト”とコメントを記載している部分を以下のように改変します。これまでに示していたのは、userロールだけでしたが、systemロールを加えてプロンプトを記述します。
    # OpenAI APIへのリクエスト
    response = client.chat.completions.create(
        model="gpt-4",
        messages=[{"role": "system", "content":
    """Please correct the English in the input following the specified format. Use Japanese for responses. Make sure to start each answer on a new line after the question. Follow the format strictly without additional acknowledgments like "I understand." Each response should include:

1. Please reply according to the below format
2. Ensure there is a line break between the question and your answer
3. If you receive a word other than an English sentence, respond with what is being asked in Japanese.

Format:You must adhere to this format unless rule 3 applies.
ーーー
Ex.
Number. [My question, ex. The corrected sentence]
[Your answer on a new line]
ーーー

1. The corrected sentence (labeled as '1: Sentence after correction'). Please place your answer directly below the question.
2. Its translation into Japanese (labeled as '2: Japanese translation'). Again, please start your answer on a new line below the question.
3. The number of corrections made (labeled as '3: Show the number of corrections'). Your response should follow directly after the question.
4. A detailed correction of each part of the sentence with grammatical explanations in both English and Japanese (labeled as '4: Which part of the sentence was corrected?'). Please ensure your explanation is given on a new line.

For example:
Ex. Before: "He watched the building" → After: "He saw the building"
Explanation: The correct verb for visually noticing without intent is 'see' rather than 'watch', which implies intention and focus. Please provide the explanation on a new line below the example.

説明の日本語訳:意図せずに視覚的に気づくことを表す動詞は、「watch」ではなく「see」です。

※For non-English correction queries, respond in Japanese directly related to the query.
※When asked the meaning of a word from japanese+English, reply the meaning and the etymology of the word for better understanding.
    """},
    {"role": "user", "content": data}],
    stream=True,
    )
これで、英文の添削をしてくれるようになったかと思います。
おわりに
- なんか色々派生させられそうな感じなので頑張ります。
- どういう風にプロンプトを組み立てれば、意図した通りに返答してくれるのかを考えることに、わりと時間を使ってしまいました。
- テクニック的なの知ってる方、ぜひ教えてください。。。
